Food Styling for Photography: Essential Tips & Techniques

A perfectly styled burger doesn't just happen. Behind every drool-worthy food photo you've double-tapped on Instagram, there's a set of deliberate decisions — from the angle of a sauce drizzle to the exact placement of a basil leaf. The good news? You don't need a culinary degree or years of experience to style food that photographs beautifully.
Quick Summary: Food styling is the art of making food look its most appetizing for the camera. This guide covers the fundamentals (hero dish, negative space, layering), specific techniques for burgers, pasta, pizza, desserts, and drinks, plus color theory and composition rules. You'll also learn common styling mistakes and how AI tools like FoodShot can add garnishes, sauces, and plating adjustments digitally — after the shoot.
Whether you're a restaurant owner shooting menu photos, a food blogger building your feed, or a chef who wants dishes to look as stunning as they taste, this guide covers the professional food styling techniques that matter — minus the jargon.
Food Styling Fundamentals Every Photographer Should Know
Before touching a single prop or garnish, you need to understand three core concepts that professional food stylists build every shot around.
The hero dish. Every food photo has one star — the dish you want people to notice first. Everything else in the frame exists to support it. A styled scene with three equally prominent dishes creates visual confusion. Pick your hero, then build your composition outward.
Supporting elements. These are the props, scattered ingredients, and utensils that tell a story without stealing the spotlight. A linen napkin suggests comfort. A dusting of flour on the countertop implies "just baked." A fork resting on a plate whispers "dig in." The best supporting elements feel natural — like someone was just cooking or eating — rather than carefully arranged for a camera. The International Association of Culinary Professionals considers this ability to create authentic-feeling scenes the hallmark of skilled food styling.
Negative space. This is the empty area around your food — and beginners almost always underuse it. Negative space gives the viewer's eye a resting point, drawing attention back to the hero. A plate surrounded by clean, uncluttered surface looks more intentional (and more appetizing) than one crammed between six different props.
The technique that ties it all together is layering. Think of your scene as a stack: surface → linen or napkin → plate → food → garnish. Each layer adds depth. A bowl of soup on a bare table looks flat. That same bowl on a textured wood surface, with a folded cloth underneath and a sprig of thyme on top, tells a story. For more foundational techniques, check out our food photography tips guide.
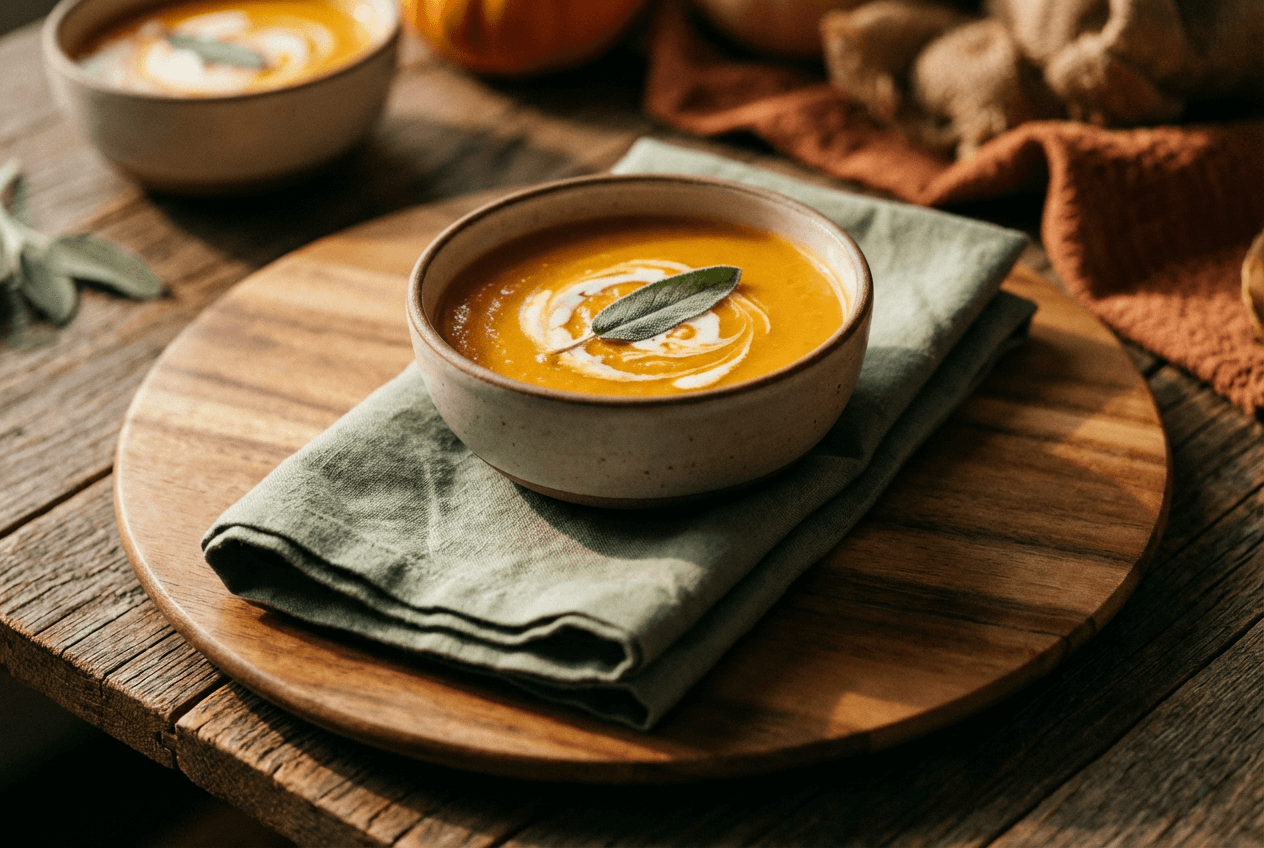 Food styling layering technique showing soup bowl on stacked layers of linen, wood board, and garnish
Styling by Food Type: Specific Techniques That Work
Generic styling advice only gets you so far. Different foods present different challenges — and professional food stylists have specific tricks for each one.
Burgers: The Architecture of a Stack
That towering, perfectly layered burger you see in ads? It's engineered, layer by layer.
Use hidden scaffolding. Professional stylists insert toothpicks vertically through the burger stack to hold every layer in place. For taller builds, thin pieces of cardboard between the patty and bun prevent the whole thing from compressing. You won't see any of this from the camera's angle.
Prevent the lean. Wedge a makeup sponge (the small triangular kind) behind the burger, just out of frame. This stops the back from sagging and keeps the front face camera-ready.
Get the cheese right. For that gooey, melting cheese effect, dip a cheese slice in hot water for 2–3 seconds before draping it over a cold patty. It softens just enough to droop naturally without melting into a puddle. Professional food stylists on commercial shoots sometimes individually position sesame seeds on buns — you don't need to go that far, but picking the best bun from the pack makes a visible difference.
Sauce placement matters. A thin, controlled drizzle from a squeeze bottle looks 10x better than a glob from a spoon. Apply sauce where it'll catch the light — usually the front and side facing the camera. Less is more with food styling.
 Gourmet burger being styled with sauce drizzle and toothpick supports for food photography
Pasta: The Twirl and the Steam
Pasta goes from photogenic to a shapeless pile in minutes. Speed and technique are everything.
The twirl. For long pasta (spaghetti, linguini, fettuccine), use a large carving fork or tongs. Grab a small portion — far less than a full serving — and twirl continuously while lifting it from the pan. Keep twirling as you lower it onto the plate. The goal is a tight, tall nest, not a flat tangle.
Undercook slightly. Pull pasta 1–2 minutes before al dente. Slightly undercooked pasta holds its shape, maintains a glossy sheen, and photographs far better than fully cooked pasta, which quickly turns dull and mushy under lights.
Layer your toppings. Reserve your best-looking mix-ins — cherry tomatoes, shrimp, fresh herbs — and place them on top after plating. The "best pieces" should be visible, not buried in the middle.
Create the steam. For that just-off-the-stove look, microwave a damp cotton ball for 10–15 seconds and hide it behind the dish, just out of frame. The rising steam sells freshness. This old food stylist trick works on almost any hot dish.
Pizza: Mastering the Cheese Pull
The cheese pull — where melted cheese stretches between a slice and the pie — is one of the most effective visual cues in food photography. Here's how professionals actually do it.
Pre-slice the crust. Before adding any toppings, cut through the raw dough where you want the slice to separate. This gives you a clean pull line instead of a ragged tear.
Build the cheese strategically. Add sauce first, then place cheese specifically across the pull line. Pre-pull the slice slightly to create the initial strands, then lay the final cheese layer on top. When it bakes, the strands are already formed and just need to be separated.
Use a heat gun. On set, cheese solidifies quickly. A quick pass with a heat gun (or a hair dryer on high) re-melts the surface just enough for that stretchy, gooey look. This tool is arguably the most important piece of equipment for any food stylist working with cheese.
Add basil last. Fresh basil placed before baking will wilt and turn dark. Add it to the finished pizza right before shooting. Bright green basil against red sauce and golden cheese is one of the strongest complementary color combinations in food photography.
Desserts: The Art of the Finishing Touch
Desserts are all about the final styling details — the garnish and finishing are what make dessert photography stand out.
Dust at the last second. Powdered sugar, cocoa powder, or cinnamon looks magical on camera — for about 90 seconds. Then it absorbs moisture and disappears. Dust through a fine-mesh sieve right before you press the shutter.
Control your drizzle. Caramel, chocolate, or fruit coulis should be drizzled with a squeeze bottle or spoon tip. Aim for thin, meandering lines that catch the light, not thick puddles. A drizzle suggests motion and indulgence; a puddle suggests a spill.
Blanch your fruit. Styling berries or cut fruit alongside a dessert? A quick 10-second blanch in boiling salted water followed by an ice-water bath locks in vivid color and prevents browning for the duration of the shoot.
Try flaky salt. A food stylist's secret weapon on sweet items. A few crystals of Maldon salt on a chocolate brownie or caramel tart adds visible texture and a sophisticated contrast that fine salt can't replicate.
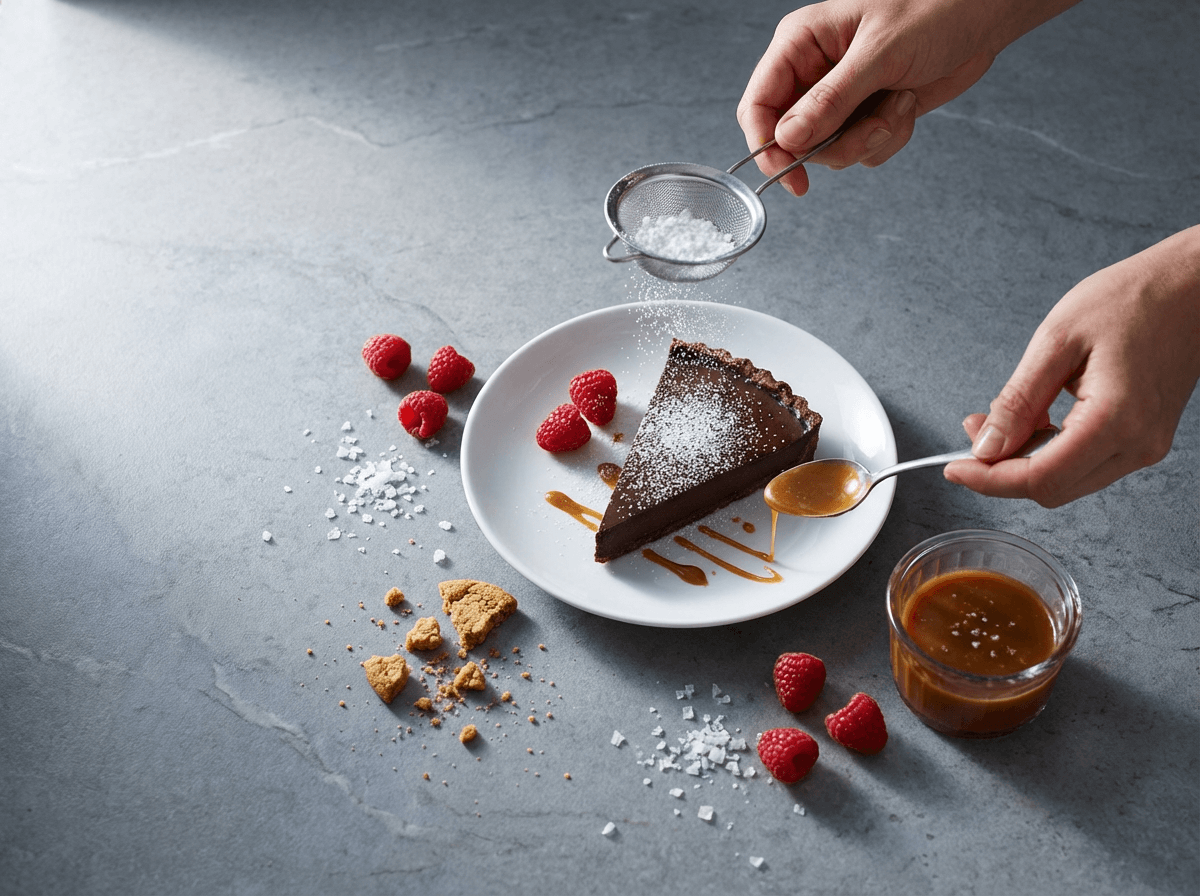 Dessert food styling in action with powdered sugar dusting, caramel drizzle, and flaky salt garnish
Drinks: Condensation, Ice, and the Perfect Garnish
Cold drinks are some of the hardest subjects to photograph because they change fast. Here's how to slow things down.
Fake the condensation. Mix equal parts vegetable glycerin and water in a small spray bottle. Spritz the outside of your glass, and the droplets will bead up and stay put for 20+ minutes — unlike real condensation, which streaks and evaporates under studio lights. This trick alone creates a dramatically different result between amateur and professional drink photos.
Use acrylic ice. Real ice melts within minutes under any lighting. Acrylic or silicone ice cubes look identical on camera and never change shape. You can find sets online for under $15.
Backlight your glass. Unlike most food, drinks benefit from light coming from directly behind or at a 45-degree angle behind the glass. This illuminates the liquid's color and creates a natural glow that side lighting can't match.
Garnish toward the camera. Place your lime wheel, mint sprig, or umbrella on the side of the glass facing the lens. It sounds obvious, but it's easy to forget when you're focused on the drink itself.
Color Theory for Food Styling
Color choices can make or break a food photo. Even a basic grasp of how different colors interact helps transform your food photography composition.
Complementary colors sit opposite each other on the color wheel and create strong visual contrast. The most powerful combination in food photography is orange and blue — think golden-fried chicken on a navy plate, or a peach smoothie bowl against a blue-gray backdrop. Red and green is another natural food pairing: tomato and basil, strawberries and mint.
Analogous colors sit next to each other on the wheel and create harmony. Warm tones together — reds, oranges, yellows — evoke comfort and coziness. Think of a butternut squash soup alongside russet-toned bread and amber honey.
Monochromatic setups use one color family for everything except the food. White plate, cream napkin, light wood surface — the food becomes the only splash of color and automatically commands attention. This is the safest approach for beginners and produces consistently clean results.
An important practical rule: warm colors are appetizing, cool colors are not. Red, orange, and yellow trigger hunger (there's a reason fast food logos use them). Blue suppresses appetite. Use cool tones sparingly — as accents, not as the dominant palette.
Plate color quick guide:
- White plates — universal, clean, work with every style of food
- Dark plates (charcoal, navy, matte black) — help bright, colorful food pop
- Earth tones (terracotta, sage) — perfect for rustic, homestyle dishes and props
- Avoid — bright blue, neon colors, or busy patterns that fight the food for attention
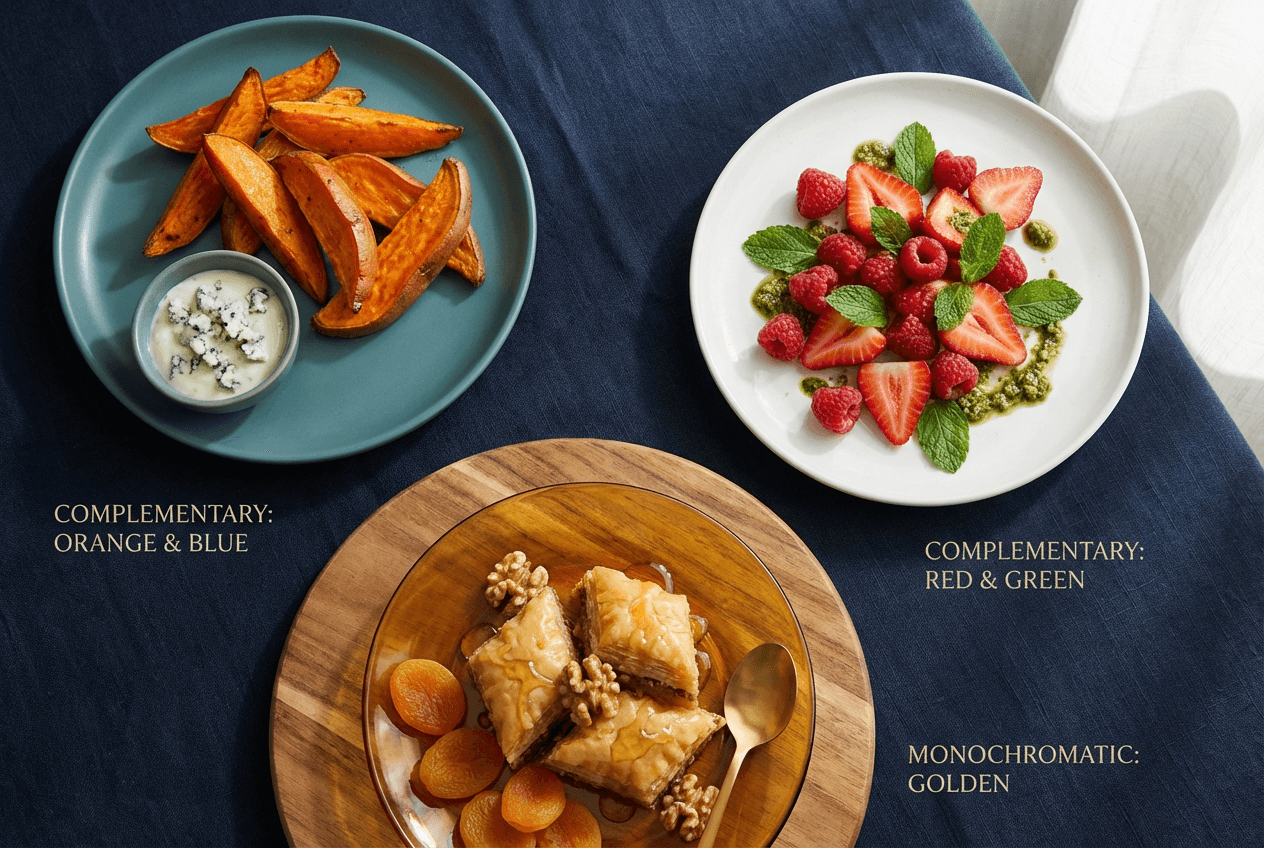 Color theory demonstration with complementary and monochromatic food and plate pairings
Composition Rules That Make Food Photos Pop
You don't need to memorize every photography rule, but these core composition principles will help transform your food shots immediately.
Rule of thirds. Imagine your frame divided into a 3×3 grid. Place your hero dish at one of the four intersection points — not dead center. Off-center placement creates visual tension that feels more dynamic and professional. Most smartphone cameras have a grid overlay you can turn on; use it.
Leading lines. Use scene elements to guide the viewer's eye toward the hero. A fork angled toward the plate. A drizzle of sauce curving inward. The fold of a napkin pointing at the dish. These "lines" don't have to be literal — they just need to create a visual path. For specific camera technique tips, our iPhone food photography guide covers the technical side.
Framing and edge breaks. Let objects break 1–3 edges of the frame. A cutting board peeking in from the left, a hand entering from the top, a second plate partially visible at the bottom — these elements make the viewer's brain complete a larger scene than what's shown. It's one of the most important composition techniques in food styling.
Use odd numbers. Three cookies look better than two. Five strawberries look better than four. Odd groupings feel organic and unplanned, even when they're completely intentional. Even numbers create a different feel — rigid and staged.
And choose your camera angle based on what you're shooting:
- Overhead (flat-lay): Best for flat foods, spreads, pizzas, arranged platters
- 45-degree angle: Most natural — mimics how you'd see food sitting at a table
- Eye-level: Best for tall, stacked food — burgers, layered cakes, drinks
Common Food Styling Mistakes (and How to Fix Them)
Even experienced shooters fall into these traps. Avoiding them puts you ahead of most food photographers.
Overcrowding the plate. The #1 food styling mistake. Use plates smaller than your dinner set — salad plates and small bowls make portions look generous. Professional food stylists use far less food than you'd expect.
Front lighting. Light from behind or beside the camera flattens everything — textures disappear, shadows vanish, and food looks two-dimensional. Move your light source to the side or behind the food. Our guide on food photography mistakes that kill online orders dives deeper into different lighting errors.
Too many props. Props should support the food, not compete with it. If you've got a napkin, fork, candle, salt shaker, plant, and scattered ingredients all in frame, the viewer doesn't know where to look. Start with the food alone, then add one prop at a time until the composition feels complete.
Busy patterns. That beautiful floral tablecloth? It's probably pulling attention from your food. Neutral textures (linen, raw wood, marble) photograph better than bold patterns. Same goes for plates — plain almost always wins.
Mixed lighting. Daylight plus an overhead kitchen light creates conflicting color temperatures. Turn off every artificial light in the room before shooting with natural light.
Not planning ahead. Food is time-sensitive. Set up your composition, test your angle, and dial in camera settings with a stand-in plate before the hero dish is ready. Professionals call this "shooting the stand-in," and it saves dozens of wasted dishes.
Over-editing. If saturation is maxed and contrast creates unnatural shadows, you've gone too far. Good editing should help enhance what's already there — not create something different from reality.
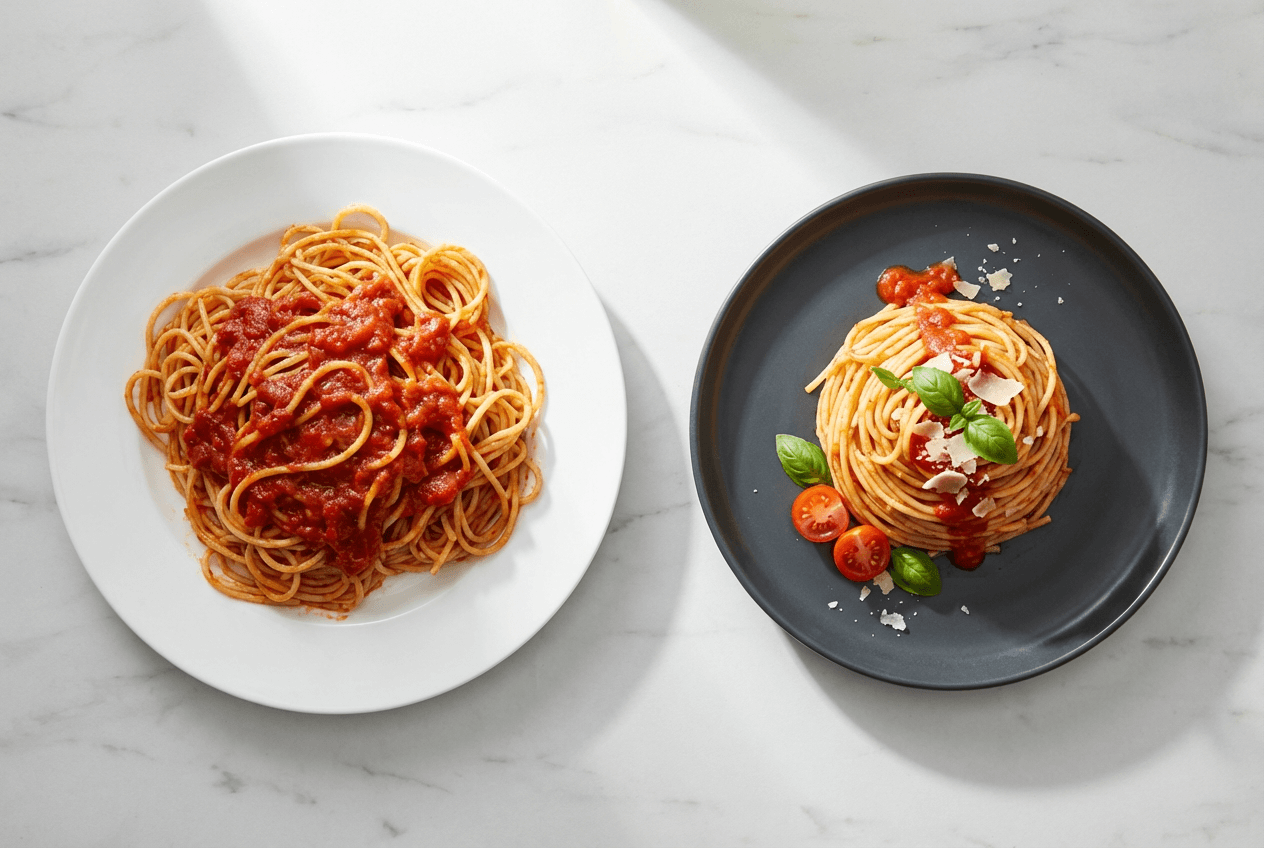 Side-by-side comparison of unstyled versus professionally styled pasta plating technique
The AI Styling Advantage: Perfect Your Plates After the Shoot
Here's the reality of traditional food styling: you get one shot at getting it right. Cheese cools, ice melts, garnishes wilt, and every minute the food sits, it looks a little worse. If you miss something — a sauce splatter on the rim, a wilted herb, a bare spot — you're reshooting from scratch.
This is where AI food photography changes the game.
With FoodShot AI, food styling doesn't end when the camera stops. You can:
- Add garnishes, sauces, and toppings digitally. Forgot the microgreens? Wish you'd added a balsamic drizzle? Add them after the fact without re-plating.
- Remove unwanted elements. Fingerprints on the rim, a stray crumb, a utensil in frame — gone in seconds.
- Swap plates and backgrounds. Shot on a white plate but it looks better on dark? Change it without re-cooking. Switch to a fine dining setting or a cozy cafe background with a click.
- Fix portions and plating. If the plate looks sparse after shooting, adjust the composition digitally.
The practical workflow: shoot your best in-camera, then use FoodShot's food photo editor to polish and experiment. At $15/month for 25 images, it's a fraction of a single reshoot — and takes about 90 seconds per photo.
This doesn't replace learning food styling fundamentals. A well-styled plate with great lighting always produces the best starting point. But knowing AI can help handle finishing touches — adding a drizzle, swapping a background, cleaning up imperfections — takes the pressure off and lets you experiment freely. For more, see our breakdown of traditional vs AI food photography and what restaurants pay for food photography.
Frequently Asked Questions
What tools does a food stylist use?
A basic food styling kit includes: tweezers (for precise garnish placement), squeeze bottles (for sauce drizzles), a spray bottle with glycerin-water mix (for condensation), toothpicks (for structural support), makeup sponges (for propping), a small brush (for oil sheen), paper towels, cotton swabs, and a heat gun for re-melting cheese. You don't need everything to start — tweezers, toothpicks, and a squeeze bottle handle most food styling situations.
Do you need to be a professional to style food for photos?
Not at all. These food styling techniques are used by professionals, but they're accessible to anyone. Start with the basics — a clean plate, good natural light, a simple garnish — and build from there. Restaurant owners, food bloggers, and home cooks can produce dramatically better food photography with just a few styling adjustments.
What's the difference between food styling and plating?
Plating is how you arrange food on the plate for serving. Food styling includes plating but goes further — it covers everything the camera sees: plate choice, surface, props, garnish placement, and even tricks like hidden supports or fake steam. Plating is for diners. Styling is for the lens. The two are different disciplines, though they share many composition principles.
How do you keep food looking fresh during a long shoot?
Work fast, and have backup. Prep multiple versions of perishable items. Keep a spray bottle handy to mist vegetables and fruits (the glycerin-water mix helps here too). For hot dishes, shoot the hero immediately and use a stand-in for composition setup. Accept that some dishes — ice cream, whipped cream, leafy greens — have a window of about 5–10 minutes before they need to be replaced.
Can AI help with food styling?
Yes — and it's becoming an important tool in food photography. AI tools like FoodShot can add garnishes, sauces, toppings, and adjust plating digitally after you've taken the photo. It's particularly useful for busy restaurants that can't spend hours on a single shot, or for correcting small imperfections after the fact. It's not a replacement for food styling fundamentals — a well-composed, well-lit photo still produces the best results — but it's an incredibly effective safety net. Try the AI food photo editor to see it in action.
