Drink Photography: Photograph Any Beverage Like a Pro
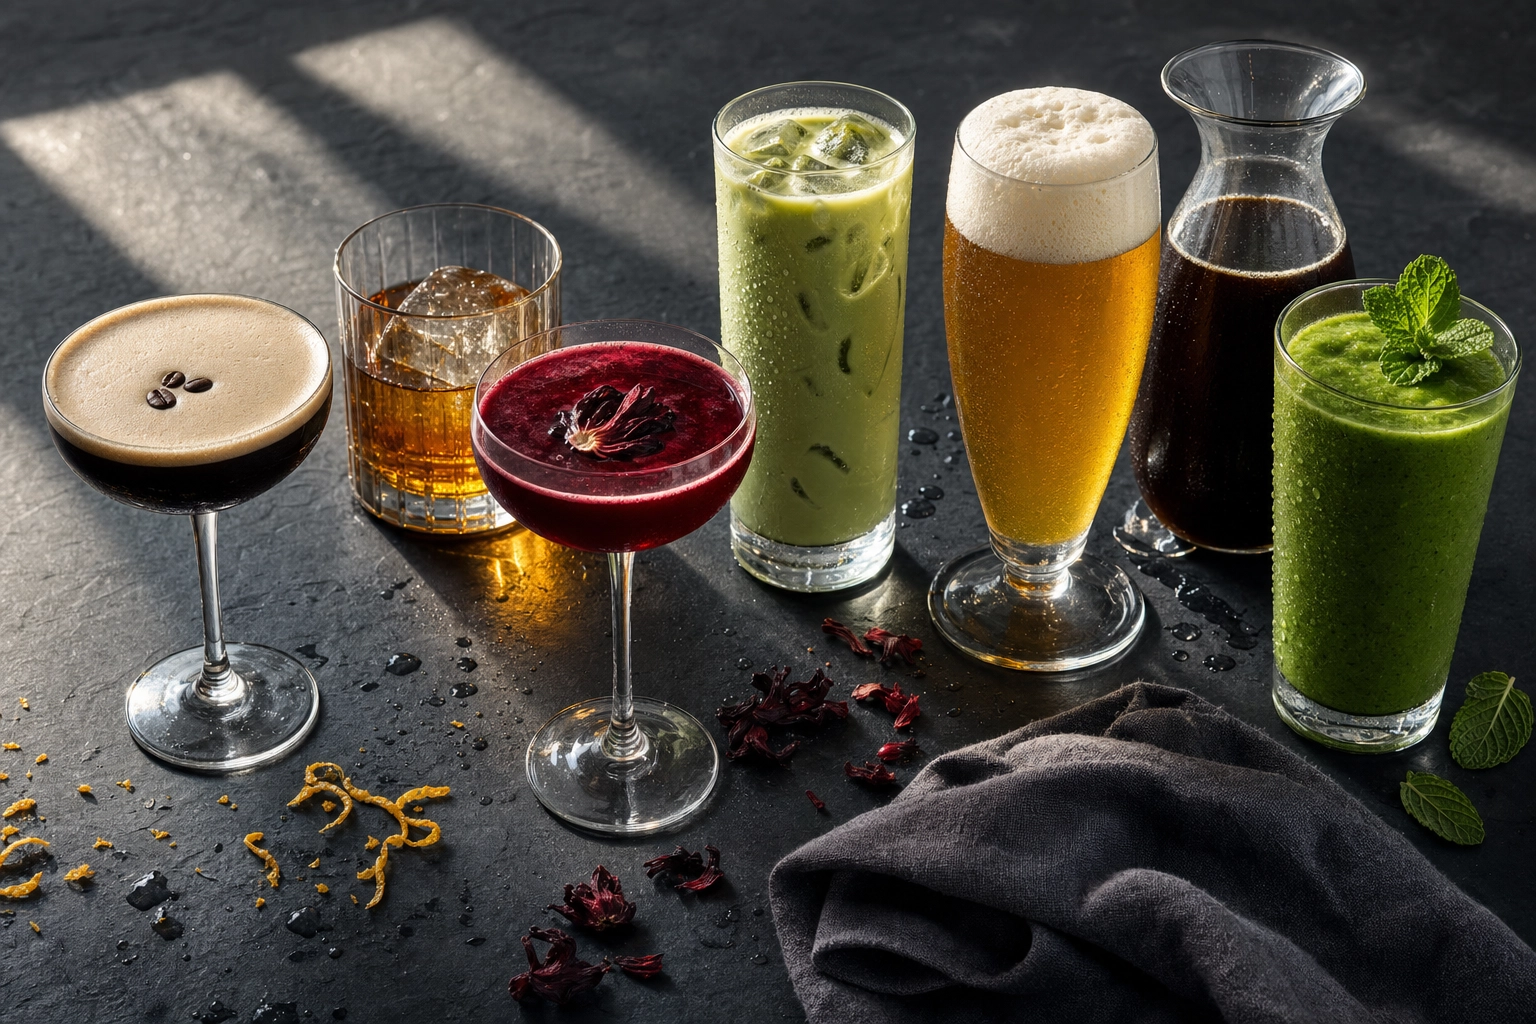
A great drink photo doesn't happen by accident. The reason your phone pictures of cocktails, lattes, and smoothies never look like the ones on Instagram isn't your camera — it's that drinks break almost every rule that works for regular food photography. They're transparent. They reflect everything. And they're on a timer.
This is the hub guide for the whole beverage photography cluster. Below, we cover the universal framework that works for any drink, a complete sub-$100 equipment kit, the decision matrix for which beverage to specialize in, plus composition, editing, and the AI shortcut that's quietly replacing entry-level shoots. When you're ready to go deep on a single category — cocktails, wine, beer, or coffee — each section links to a dedicated guide.
Quick Summary: Drink photography is harder than food photography because of three things: transparency, reflections, and motion. Master one lighting hierarchy (backlight + side light), one color rule (warm drink on cool surface, cool drink on warm surface), and one piece of glass-prep discipline, and you can photograph any beverage from a Negroni to a matcha latte with the same confidence — using gear that totals less than $100.
Why Drinks Photograph Differently Than Food
A plated burger sits still. A bowl of pasta doesn't melt. A loaf of bread doesn't reflect the photographer back at you. Drinks do all three. That's why drink photography deserves its own playbook — generic food photography advice will quietly sabotage every cocktail and coffee shot you take.
Transparency changes everything about lighting. With food, light bounces off the surface — that's why side lighting reveals texture so well. With drink photography, light passes through the liquid. A side light that makes a steak look gorgeous will turn an iced tea into a flat brown silhouette. To make a beverage glow, you usually need to light it from behind so the color radiates outward, then add a little fill so the glass doesn't disappear into shadow.
Reflections turn glass into a mirror. Every glossy surface in your room — the window, your shirt, the camera lens itself — shows up on the curve of the glass. Professional drink photographers spend more time hiding reflections than placing them. A single bright window reflected in a wine glass can ruin an otherwise perfect shot.
Motion creates a ticking clock. Once a cold drink is poured, you have about two to five minutes before the ice clouds, the foam dies, the condensation drips into puddles, or the garnish wilts. Hot drinks are kinder, but steam from a coffee or tea dissipates in seconds — and steam is often the most photogenic part of the shot. This is why every professional plans the entire image before the liquid hits the glass.
These three forces — transparency, reflection, and motion — are the reason drink photography deserves its own framework, separate from the general rules of food photography.
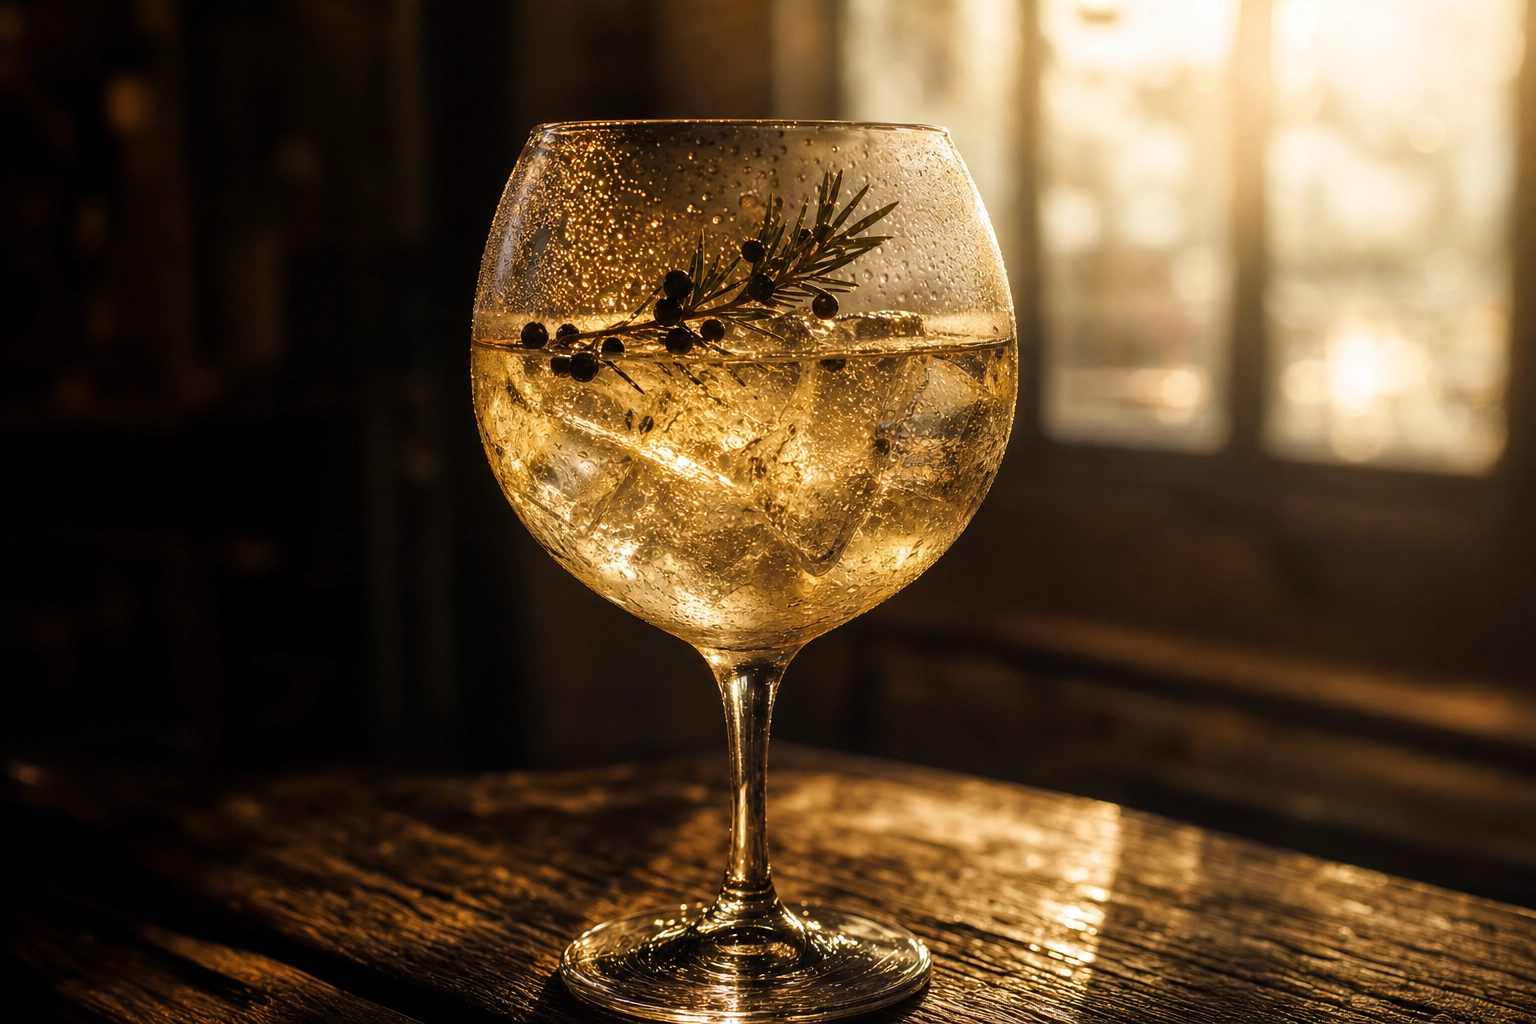 Backlit cocktail glass glowing amber as light passes through the transparent liquid — demonstrating drink photography backlight technique
The Universal Beverage Photography Framework
Strip away the niche-specific tips you'll find in 32-tip listicles and you're left with three pillars that solve roughly 90% of drink photography problems. Master these and you can switch from photographing an espresso martini to a green smoothie to a wheat beer without rebuilding your setup from scratch.
Lighting Hierarchy: Backlight, Side Light, Top Light
Light direction is the single biggest decision you'll make in beverage photography. The hierarchy for drinks goes:
- Backlight (light behind the drink, camera facing it): Best for transparent and translucent liquids — gin, cold-brew coffee, beer, sparkling wine, kombucha. The light passes through the liquid and the color glows like stained glass. Backlight is also the easiest way to minimize reflections, because the only thing reflecting off the front of the glass is whatever is behind your camera (which you can control with a black foam board or a black t-shirt).
- Side light (light 90° from the camera): Best for opaque and textured drinks — milkshakes, lattes with foam, smoothies, matcha. Side light reveals condensation droplets, foam texture, and the dimension of garnishes. It also flatters dark drinks like whiskey or stout that swallow backlight.
- Top light (light directly above): Usually wrong for drinks. It produces a hard glare on the surface of the liquid and flat shadows on the glass. The exception is flat-lay shots where the drink is one element in a wider scene.
The sweet spot for most photographers most of the time is 45° above and slightly behind the drink — a single softbox or a window with sheer curtain at that angle handles roughly 70% of beverage situations. Start there before you experiment.
A bright window with indirect daylight is genuinely all you need. Roughly 80% of professional food photographers begin with natural window light, and many never move on. If natural light isn't available, a single LED continuous light with a softbox (around $60–$90 on Amazon) replicates the same look at any hour. Photographers on r/photography consistently recommend starting with one window or one continuous light before adding anything else — the same advice you'll hear from working pros for the past decade.
Color Theory: Making Drinks Pop on Camera
Drinks are essentially colored liquid in a clear vessel — color theory matters more here than in almost any other photo genre. The rule that almost always works: contrast the drink's color temperature with the background.
- Warm drinks on cool surfaces: Whiskey, coffee, mulled wine, and orange-juice cocktails look richer on slate, dark blue marble, charcoal linen, or weathered grey wood. The cool surface makes the amber and brown tones jump forward.
- Cool drinks on warm surfaces: Gin and tonic, lemonade, mojitos, green smoothies, and pale beers look brighter on warm wood, terracotta, beige linen, or unglazed ceramic.
- Complementary pairs that always work: Amber drink + blue surface. Green drink + magenta or copper accents. Red drink + cyan or teal background.
The underlying logic comes from basic color theory and the color wheel — complementary colors (the ones directly opposite on the wheel) intensify each other visually. Drink photography is essentially a small applied subset of this rule.
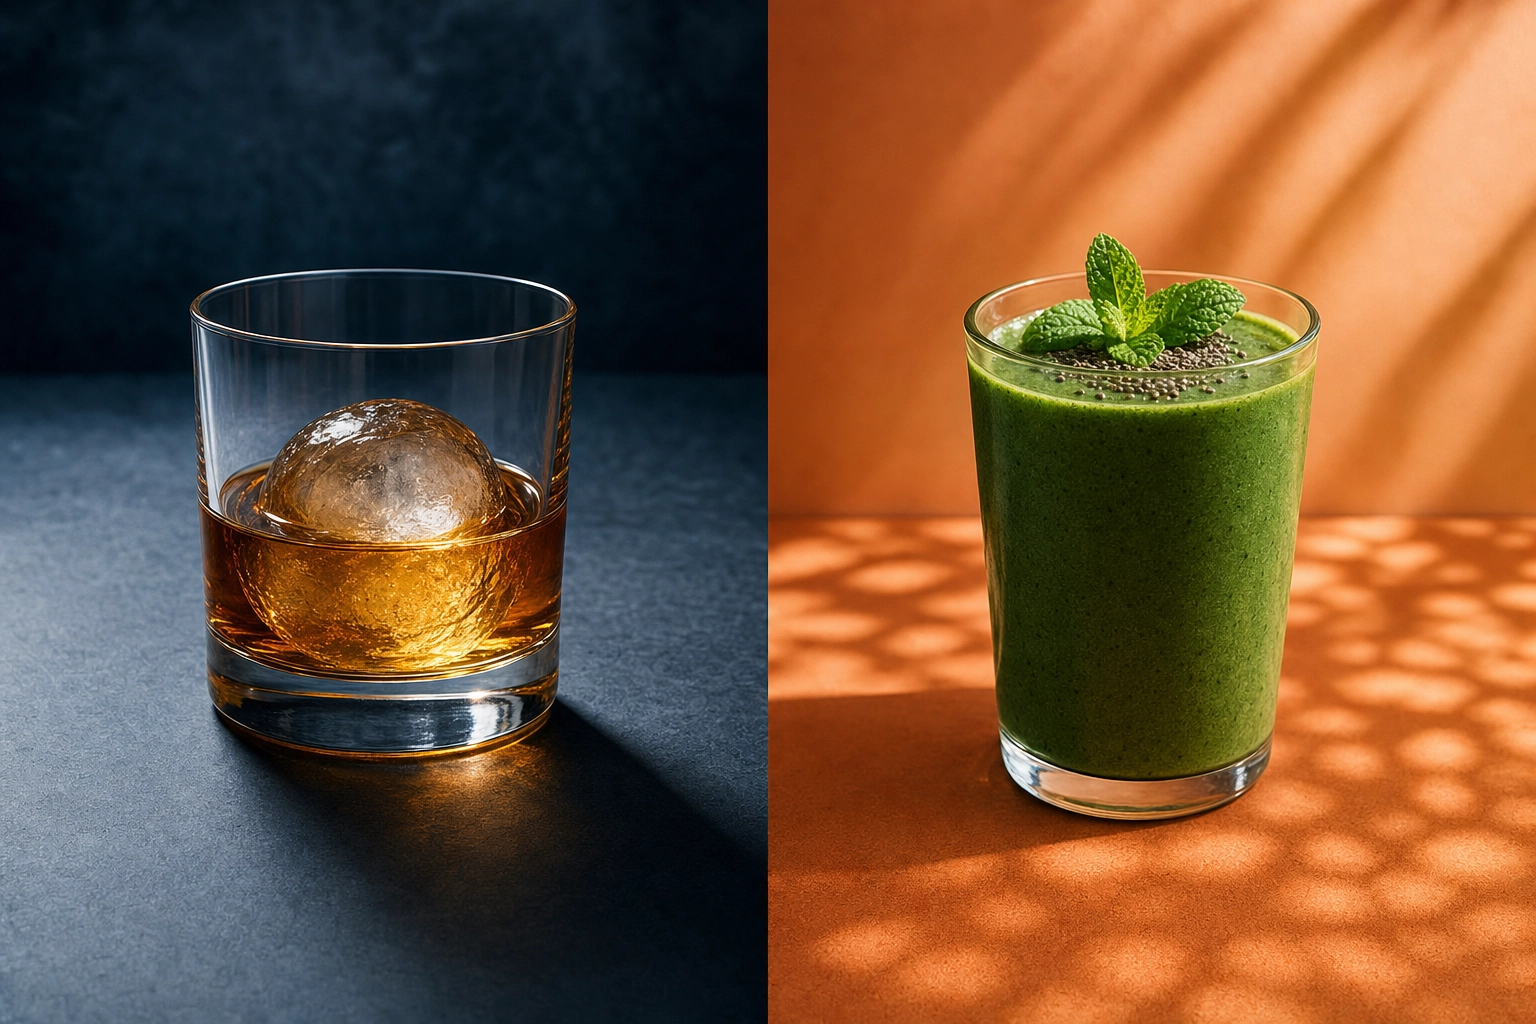 Side-by-side comparison of warm bourbon on cool slate and green smoothie on terracotta showing drink photography color theory in action
Avoid backgrounds that are louder than the drink. A patterned tablecloth, a bright-red wall, or anything with strong typography will steal attention from the glass. The drink should be the loudest thing in the frame.
Glassware Logic: Picking the Right Vessel
The glass is half the photograph. Three principles:
- Thinner glass photographs better. Thick-walled glasses produce green edges, distortion, and double reflections. Thin crystal or thin pressed glass transmits light cleanly.
- Match the glass to the drink's story. A Manhattan in a plastic tumbler looks wrong; the same drink in a vintage coupe looks like a magazine. A flat white in a thick mug feels right; the same drink in a champagne flute feels absurd.
- Buy vintage cheap. Thrift stores routinely sell beautiful coupes, rocks glasses, and decanters for $1–$3 each. A starter set of six interesting pieces costs less than a single new wine glass from a department store.
Colored glass is a trap. Tinted blues and greens fight the color of the liquid inside. Save them for drinks where the color is muted (water, vodka, gin) and you want the glass itself to be the visual subject.
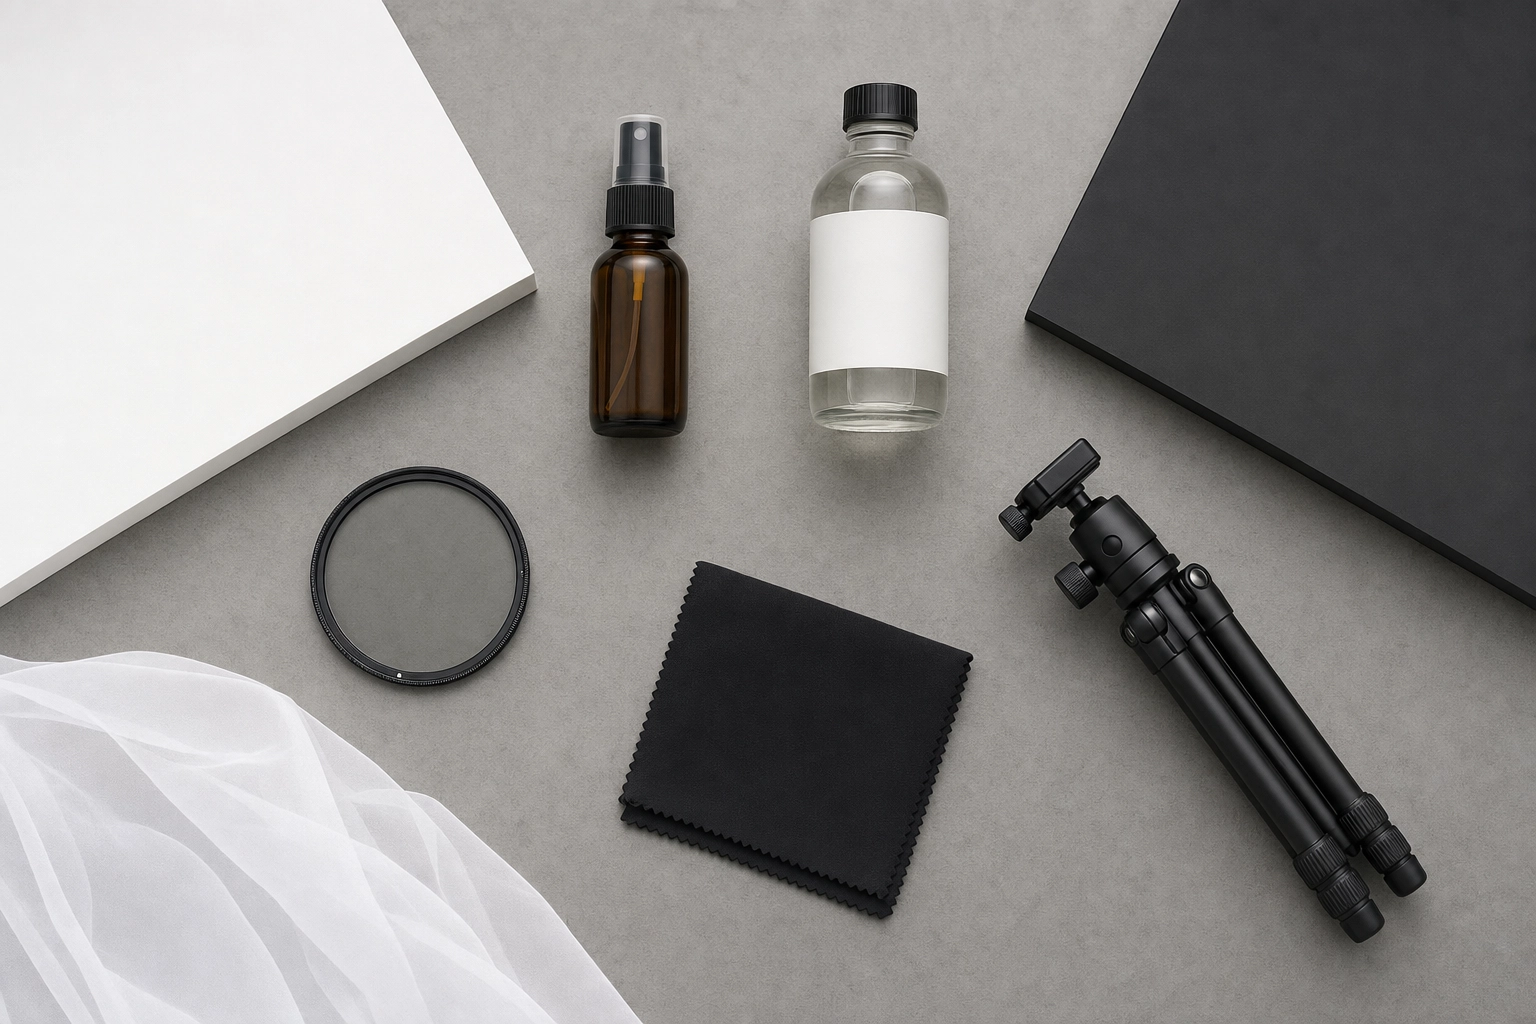 Flat-lay of complete drink photography equipment kit under 100 dollars — spray bottle, foam boards, polarizer filter, tripod, microfiber cloth on grey surface
A Complete Drink Photo Kit Under $100
You do not need a $3,000 camera and a strobe setup to make beverage photos that hold up on a menu or Instagram. Here's the full drink photography starter kit, with realistic prices for 2026:
| Item | Cost | What it does |
|---|---|---|
| Microfiber glass cloth | $5–10 | Removes fingerprints and water spots — your most-used tool |
| Spray bottle + glycerin (drugstore) | $5 | Mix 1:1 with water for condensation that lasts 30+ minutes instead of 30 seconds |
| White foam board (20x30 in) | $3–5 | Bounces light back into shadows |
| Black foam board (20x30 in) | $3–5 | Blocks unwanted reflections; deepens shadows |
| Circular polarizing filter | $25–40 | Reduces glass glare by up to 80%; mounts on phone or camera lens |
| Mini tripod (tabletop) | $20–35 | Locks composition while you adjust drink and garnishes |
| Sheer white curtain or diffusion fabric | $8–15 | Turns a harsh window into a softbox |
Total: roughly $70–95. That's it. Everything else is optional for at least the first six months of practice. A polarizer alone often does more for drink photos than a $500 lens upgrade — it cuts the reflections that would otherwise require Photoshop to remove. (Apple's own iPhone photography tips confirm what most professionals know: light and angle matter far more than camera specs.)
What to skip until later: a macro lens, expensive strobes, color gels, fancy backgrounds. The cheap kit covers 95% of what a working drink photographer does every day. The remaining 5% is technique, not gear.
The Beverage Decision Matrix: Where to Start
You're probably not trying to master every beverage at once — most photographers and operators specialize. Here's the honest breakdown of what each category demands in beverage photography, and who it's right for.
Cocktail Photography
The most technically demanding beverage. You're juggling complex glassware, melting ice, fragile garnishes, vivid colors, and the most reflective surfaces in the drink world. Cocktail shots reward planning more than any other category — most of the work happens before the bartender starts mixing. Best for bars, lounges, mixologists, and spirits brands. Expect three to six months of practice to feel confident.
Go deep in the cocktail photography deep-dive.
Wine Photography
Wine photography is mostly about three things: showing the true color of the liquid, keeping labels readable, and managing the curved surfaces of stemware. Backlight is your default; a polarizer is non-negotiable for bottle shots. Best for wine bars, restaurants, sommeliers, and small vineyards. Faster to master than cocktails — most photographers feel competent within one to three months.
Go deep in the wine photography guide.
Beer Photography
Beer revolves around the foam head. A well-poured pint stays photogenic for less than 90 seconds before the head collapses and the bubbles flatten. You'll also fight more condensation than any other drink (cans and bottles especially) and the metallic glare of packaging. Best for breweries, taprooms, and sports bars. Most people get comfortable in one to two months.
Go deep in the beer photography techniques guide.
Coffee Photography
Coffee is dark liquid in a small vessel — sounds simple, but the challenges are steam, latte art preservation, and avoiding the muddy "wet bowl" look that flat lighting creates. Warm color temperatures (around 4800K) flatter coffee in a way that cool light flattens it. Best for cafes, roasters, and coffee shops. One to two months to confident output.
Go deep in the coffee photography handbook.
Tea, Smoothies, Juices, and Other Beverages
The rest of the beverage world follows the same drink photography principles with category-specific tweaks:
- Tea: The hardest part isn't the tea — it's capturing steam. Use a dark background, side-back light, and pre-warm the cup so the steam plume lasts longer. Tea ware (clay pots, glass cups, ceramic mugs) is half the story.
- Smoothies: Vibrant colors are the selling point. Photograph immediately after blending while the color is brightest, and add textural garnishes (chia seeds, granola, fruit slices) to give your eye somewhere to land.
- Juices: Pure color saturation rules. Backlight is almost always right. Citrus juices benefit from a single piece of fruit cut and placed beside the glass to communicate freshness.
- Milkshakes: Speed photography. A whipped-cream-topped shake holds peak shape for under a minute. Style the glass empty first, then pour and shoot fast.
- Mocktails: All the visual energy of a cocktail without the alcohol cues. Lean harder on garnishes, glassware, and color contrast since you don't have spirit-bottle props to fall back on.
- Kombucha: The visible fermentation (effervescence and faint scoby strands) is the draw. Backlight + clear glass + macro detail.
The good news: master the universal framework above, and you can move between all of these with small adjustments rather than starting over.
 Three wheat beer glasses photographed at three different angles to demonstrate drink photography composition techniques
Composition Rules That Make Drink Photos Stand Out
Composition is where most amateur drink photography falls apart. The fixes are simple and free.
Rule of thirds. Place the glass at the intersection of the imaginary 1/3 lines, not dead center. Most camera apps will overlay this grid for you. Off-center compositions feel intentional; dead-center compositions feel like a snapshot.
Leading lines. Drinks come with built-in leading lines if you know how to use them. Steam rising from a latte. A line of condensation droplets running down a pint glass. The stem of an herb garnish. A spoon resting against the rim. These lines pull the viewer's eye toward the focal point of the drink (usually the foam, the garnish, or the surface of the liquid).
Rule of odds. Groups of three or five elements look more dynamic than groups of two or four. If you're shooting a flight of drinks, pour three or five — not two. If you're adding props, three small items beat four.
Negative space. Resist the urge to fill the frame. A clean expanse of surface beside a single glass communicates confidence and premium quality. Cluttered frames communicate happy hour menu.
Angle choices. Three reliable angles for drink photography:
- 45° downward (eye-level seated): natural, intimate, mimics how you'd see the drink at a table.
- Straight-on at table height (glass on the horizon line): showcases stemware silhouettes and is the most magazine-like.
- Top-down (flat lay): great for surface details like latte art, garnish patterns, and grouped shots.
Test the angle with an empty glass before you pour. Once the drink is in, you have minutes — not the time to discover the angle isn't working.
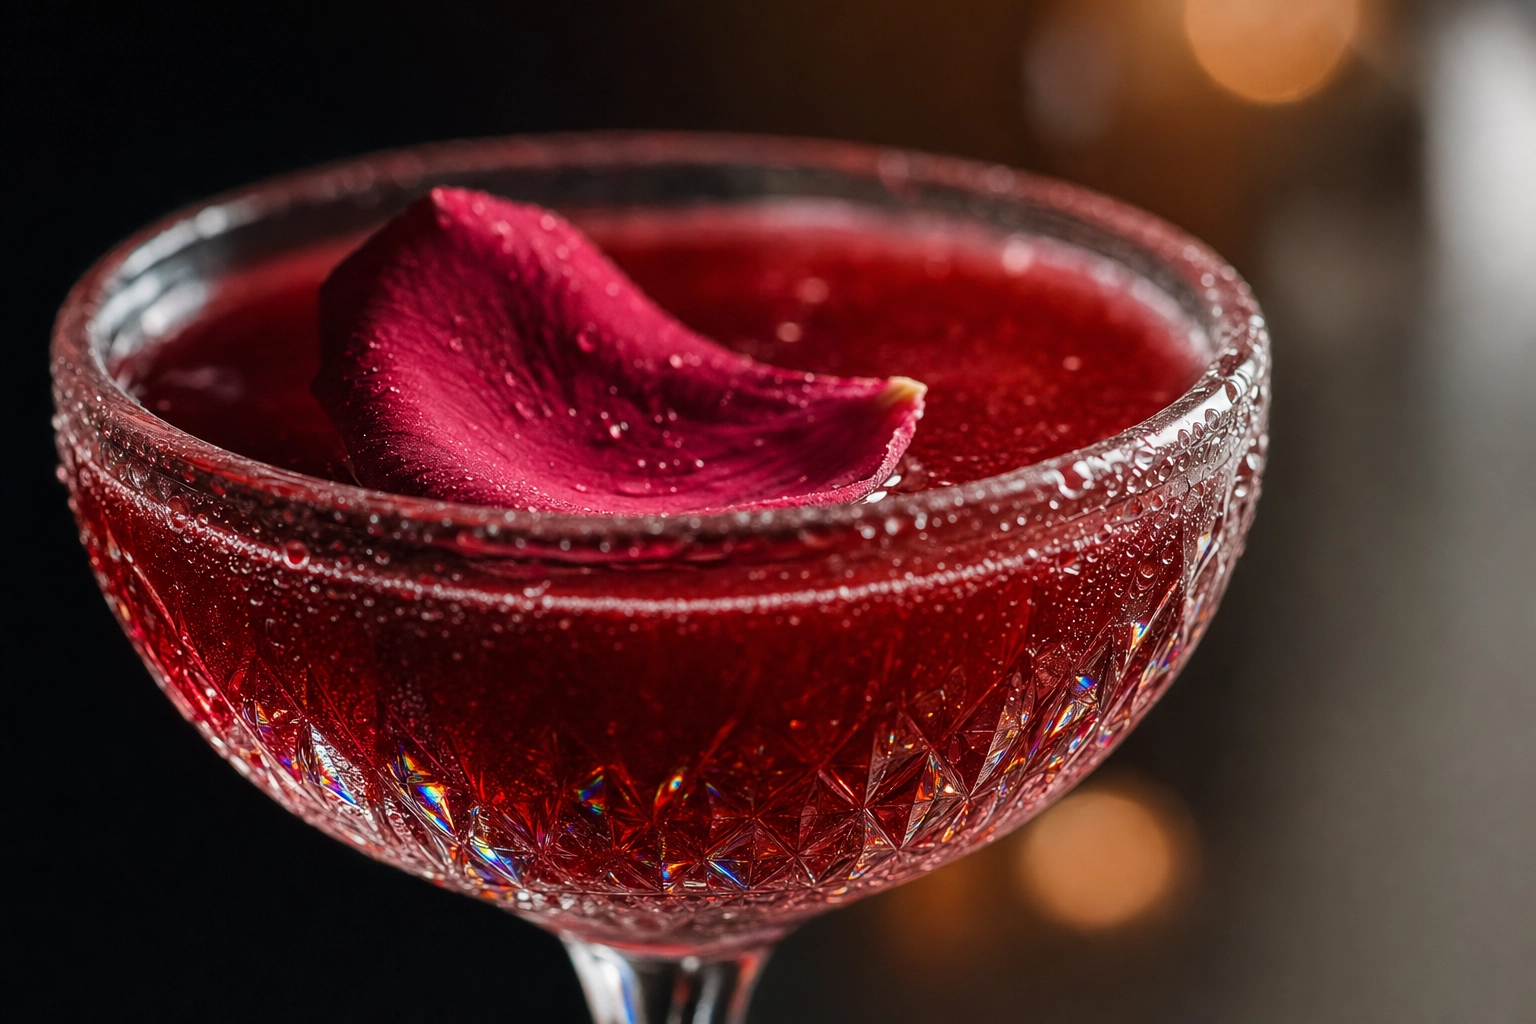 Macro close-up of pomegranate mocktail in crystal coupe glass with condensation droplets and floating rose petal — drink photography editing detail focus
The Editing Workflow: 8 Steps in Order
Most drink-photo editing problems come from doing things in the wrong order. Here's the sequence that professionals use, simplified:
- Crop and straighten first. Frame the shot before touching color. Make sure the glass rim is parallel to the frame edge — even a 1° tilt looks wrong with stemware.
- White balance. Cool drinks (gin, vodka, light beer, sparkling water) look right at 5500–5800K. Warm drinks (coffee, whiskey, mulled wine) look right at 4800–5200K. Most phone editors and Adobe Lightroom let you adjust this with a single slider.
- Exposure and contrast. Bring back blown-out highlights on the glass rim. Drinks generally benefit from slightly higher contrast than food.
- Saturation, carefully. Wine and coffee look amateurish when oversaturated — keep them subtle. Smoothies, cocktails, and juices can take a bigger push. The test: does the drink look like its real-life self at 100% screen brightness?
- Highlight recovery on glass. The bright reflections on the rim and curves often clip white — pulling them down brings back detail.
- Clarity or dehaze. A small amount adds texture to liquid and condensation. Too much creates a gritty, over-processed look that menus and delivery apps reject.
- Spot-heal the distractions. Use the healing brush to remove fingerprints, water rings, dust, and small reflections you couldn't avoid on set.
- Optional vignette. A subtle dark vignette focuses the eye on the drink. Anything heavy looks dated.
Common over-editing mistakes: HDR-style halos around the glass, neon-saturated garnishes, plastic-looking ice. If your photo looks more like a video game than a real drink, dial everything back 30%.
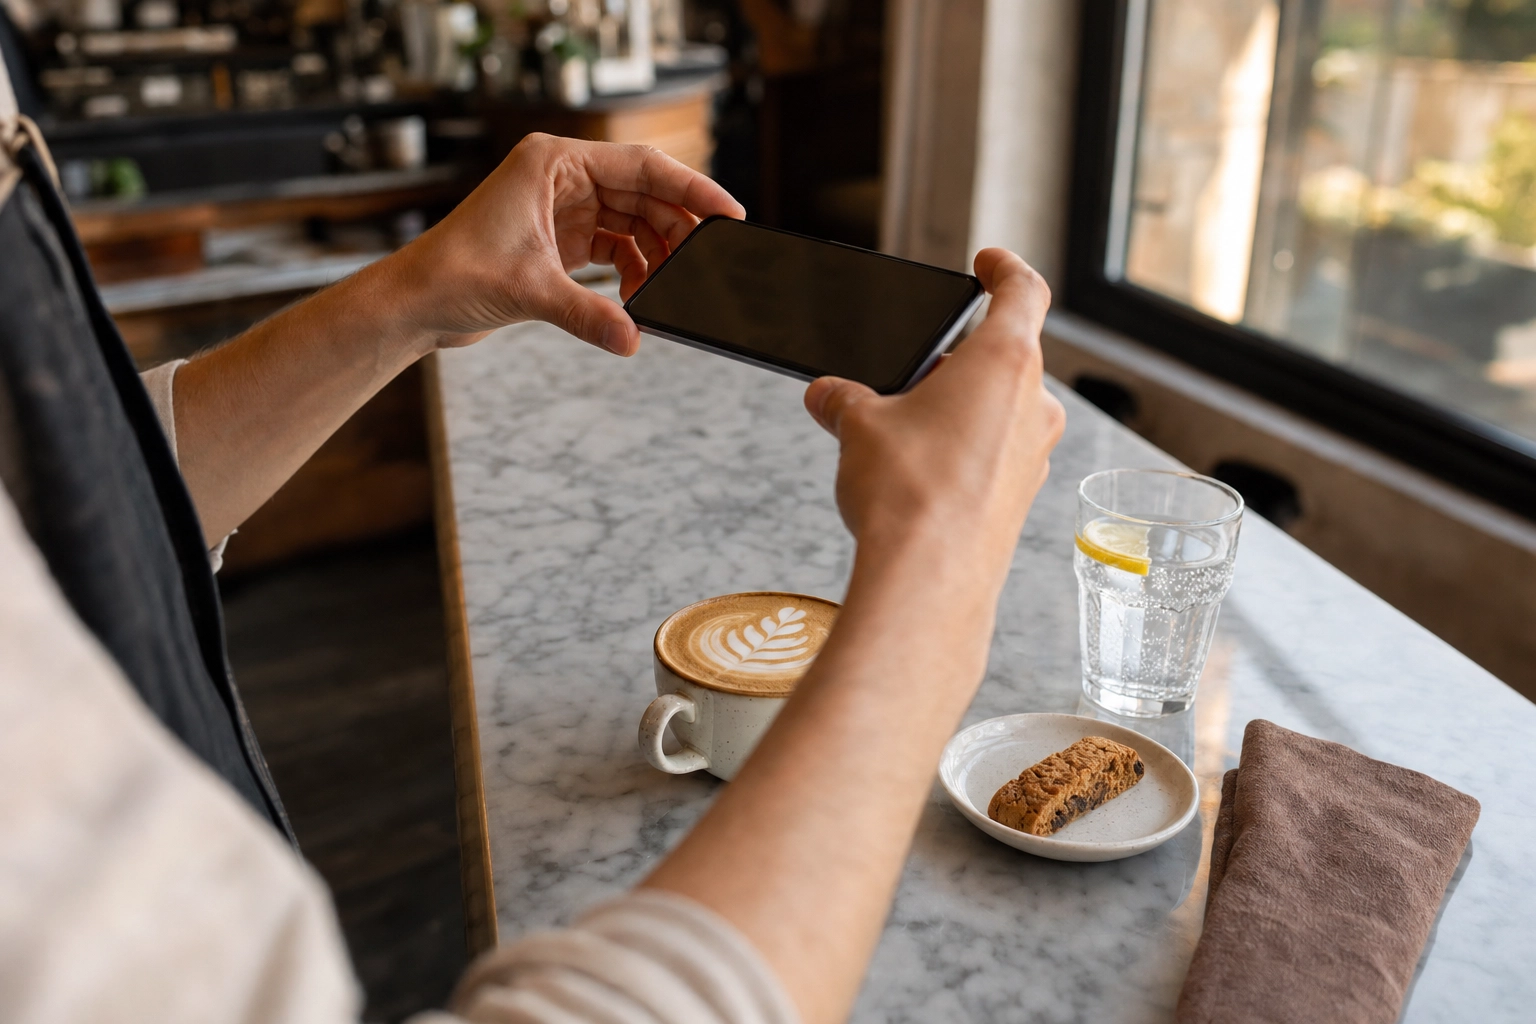 Hands holding a smartphone photographing a freshly poured cappuccino with latte art on marble counter — illustrating phone-based drink photography workflow
The AI Shortcut: When You Don't Want to Build a Studio
Here's the honest truth most drink photography guides won't tell you: most restaurant owners, cafe operators, and brand managers do not want to learn a lighting hierarchy. They want a usable menu photo this afternoon.
That's where AI beverage photography is changing the math. FoodShot AI takes a phone photo of any drink and applies one of 30+ beverage-trained styles — backlit moody cocktail, bright cafe latte, minimalist juice flatlay, dark and rustic beer, premium whiskey on slate, and many more — to produce a studio-quality image in roughly 90 seconds. The system handles the things this whole guide just spent thousands of words on: reflection cleanup, condensation rendering, glassware presentation, background swap, color grading. You can explore the full library of AI cocktail photography styles, AI wine photography, and AI beer photography for breweries.
When AI makes sense:
- High-volume menus (a cafe with 40 drinks, a brewery with 18 beers).
- Daily social media content where iteration speed beats fine-art polish.
- Delivery app listings — Uber Eats and DoorDash have both publicly shared that listings with quality photography meaningfully outperform listings without.
- Seasonal menu rotations where reshooting every quarter is impractical.
- Markets where hiring a professional drink photographer costs $500–$2,500 per session.
When traditional photography still wins:
- Brand campaigns where the photographer's eye is the product.
- Storytelling shoots that need a specific human moment or context.
- Editorial work for magazines and cookbooks.
- Award entries and competitions where provenance matters.
For most businesses doing menus, social posts, and delivery imagery, the AI route is the right answer most of the time. The workflow is: snap a clear phone photo of the actual drink in decent light, upload to FoodShot, pick a style (or build your own via the reference upload feature), and export in 4K with a commercial license. It works for cafes and coffee shops, bars and lounges, and fine dining venues running tight content calendars.
Cost comparison is brutal: $9–$15 per month gets you 25–100 generations versus $500–$2,500 for a single traditional shoot. That's not a small difference — it's a different business model. Learn more about how AI food photography handles beverages specifically, or jump straight to pricing plans.
Frequently Asked Questions
What's the single most important thing in drink photography?
Light direction. If you only learn one thing in drink photography, learn that transparent and translucent drinks (most cocktails, beer, wine, juice, tea) want backlight, and opaque drinks (milkshakes, lattes, smoothies, coffee with cream) want side light. Get that right and the rest of the photo gets dramatically easier.
Can you do drink photography with just a phone?
Yes. Modern iPhone and Android cameras have enough dynamic range and resolution to produce professional-grade results when paired with good lighting and the editing workflow above. The phone is almost never the bottleneck — lighting, glassware, and reflections are.
How do you stop reflections in glass?
Three layers of defense. First, control the room — wear dark clothes, remove white walls from the camera's reflection path, and block bright objects with black foam board. Second, use a circular polarizing filter, which cuts up to 80% of glass glare. Third, position the light so the reflection lands somewhere flattering (a controlled highlight on the curve of the glass) rather than randomly. Whatever reflections remain, clean up in editing with the spot-heal tool.
What's the best background for drink photos?
For most drinks, a single neutral surface that contrasts the drink's color temperature. Slate or dark marble for warm drinks; warm wood or terracotta for cool drinks. Avoid patterned surfaces, busy textures, and anything brighter than the drink itself. If you're building a kit, three backgrounds (a dark slate, a light wood, and a neutral linen) cover almost every scenario in drink photography.
How do you make fake condensation that lasts?
Mix equal parts glycerin (drugstore, cosmetics section, around $3) and water in a spray bottle. Mist the glass before pouring. The glycerin makes the droplets cling and prevents them from running off as quickly as plain water does. A well-prepared glass holds its condensation look for 30+ minutes, giving you plenty of time to shoot.
What aperture should I use for drink photography?
For a single drink with a soft, blurred background: f/2.8 to f/4. For a drink plus props where you want everything in focus: f/8 to f/11. If you're shooting on a phone, "Portrait mode" approximates the wide-aperture look digitally — it works well for stemware and isolated drinks, less well for complex scenes.
How long do you have to shoot before a cold drink melts?
Realistic windows: cocktails with fresh ice — 3 to 5 minutes; beer with a fresh foam head — 60 to 90 seconds; smoothies and milkshakes — 60 seconds before texture degrades; hot drinks with steam — 15 to 30 seconds for the steam plume. This is exactly why professionals plan composition, lighting, and angle with an empty glass first, then make the drink last.
Is AI a real alternative to a professional drink photographer?
For menus, delivery apps, social media, and most day-to-day commercial uses — yes. AI tools trained specifically on food and beverage imagery (like FoodShot AI's 30+ beverage styles) consistently produce results that customers can't distinguish from traditional photography, at roughly 5% of the cost. For brand campaigns, editorial work, and shoots where a specific creative vision matters, a professional photographer is still the right call. Most businesses use both: AI for volume, a photographer for hero campaigns.
The drink photography skill stack is smaller than it looks. Three lighting moves, one color rule, a $90 equipment kit, an eight-step edit, and the discipline to plan before you pour. From there, every beverage category — from a Negroni to a kombucha to a matcha latte — is a variation on the same fundamentals.
When you're ready to specialize, the deep-dives in this drink photography cluster — cocktails, wine, beer, and coffee — go far deeper than this hub allows. And when you're ready to skip the studio entirely, try FoodShot's 30+ beverage styles and watch a phone snap become menu-ready in 90 seconds.
