Wine Photography: How to Shoot Bottles, Glasses & Pours
Wine photography breaks the rules of normal product photography. A bottle is a curved mirror. A glass is a transparent reflector. Red wine reads as black on camera. White wine disappears against a bright backdrop. And every fingerprint on the stem will be the first thing your customer notices on your menu.
This guide is the cheat sheet I wish I'd had the first time I tried to shoot a wine list. You'll learn the four shots every wine program needs, how to control reflections without a studio, the gradient backdrop trick that makes any bottle look luxury, and exactly how to capture a pour without blur. We'll cover red, white, rosé, sparkling, and sake — each one needs a different approach — plus an equipment list you can build for under $200.
Quick Summary: Great wine photography is reflection control plus the right backlight. Use diffused light behind the bottle, black cards on the sides to define the edges, and a tripod. Shoot at f/8–f/11, ISO 100, and pour at 1/1000s or faster. For the fastest path to menu-ready images, AI tools like FoodShot can transform a phone snap into a studio-grade wine shot in 90 seconds — no lighting kit required.
The Four Wine Shots Every Menu, Site, and Social Feed Needs
Most wine programs need exactly four photo types — and most amateurs only shoot one. Here they are in order of how often you'll use them.
1. The bottle hero. A clean, well-lit product shot of the bottle by itself. This is what goes on your wine list, your e-commerce page, and your "by the bottle" menu inserts. Vertical orientation, sharp label, minimal distractions. The bottle is the entire story.
2. The pour shot. A stream of wine arcing from bottle to glass, frozen mid-air. Pours are the workhorses of wine social media because they suggest movement, freshness, and ceremony. Hard to shoot. Worth the effort.
3. The glass with atmosphere. A filled glass styled with a hint of context — a dimly lit bar, a hand resting nearby, a sliver of cheese plate just out of focus. This is your "by the glass" hero shot, your homepage banner, your Instagram grid filler. The wine isn't selling itself here; the mood is selling the wine.
4. The vineyard or cellar lifestyle. Place, terroir, people, barrels, vines, dust on the bottle. This is brand depth — about story, not about the liquid itself. You'll use these for "About Us" pages, longer-form content, and ads that need to sell more than just a drink.
Each shot needs a different setup. The bottle hero is technical and studio-controlled. The pour is high-speed action. The atmosphere shot is styling and storytelling. The vineyard shot is environmental portraiture. Trying to use one setup for all four is why most restaurant wine photos look identical and forgettable.
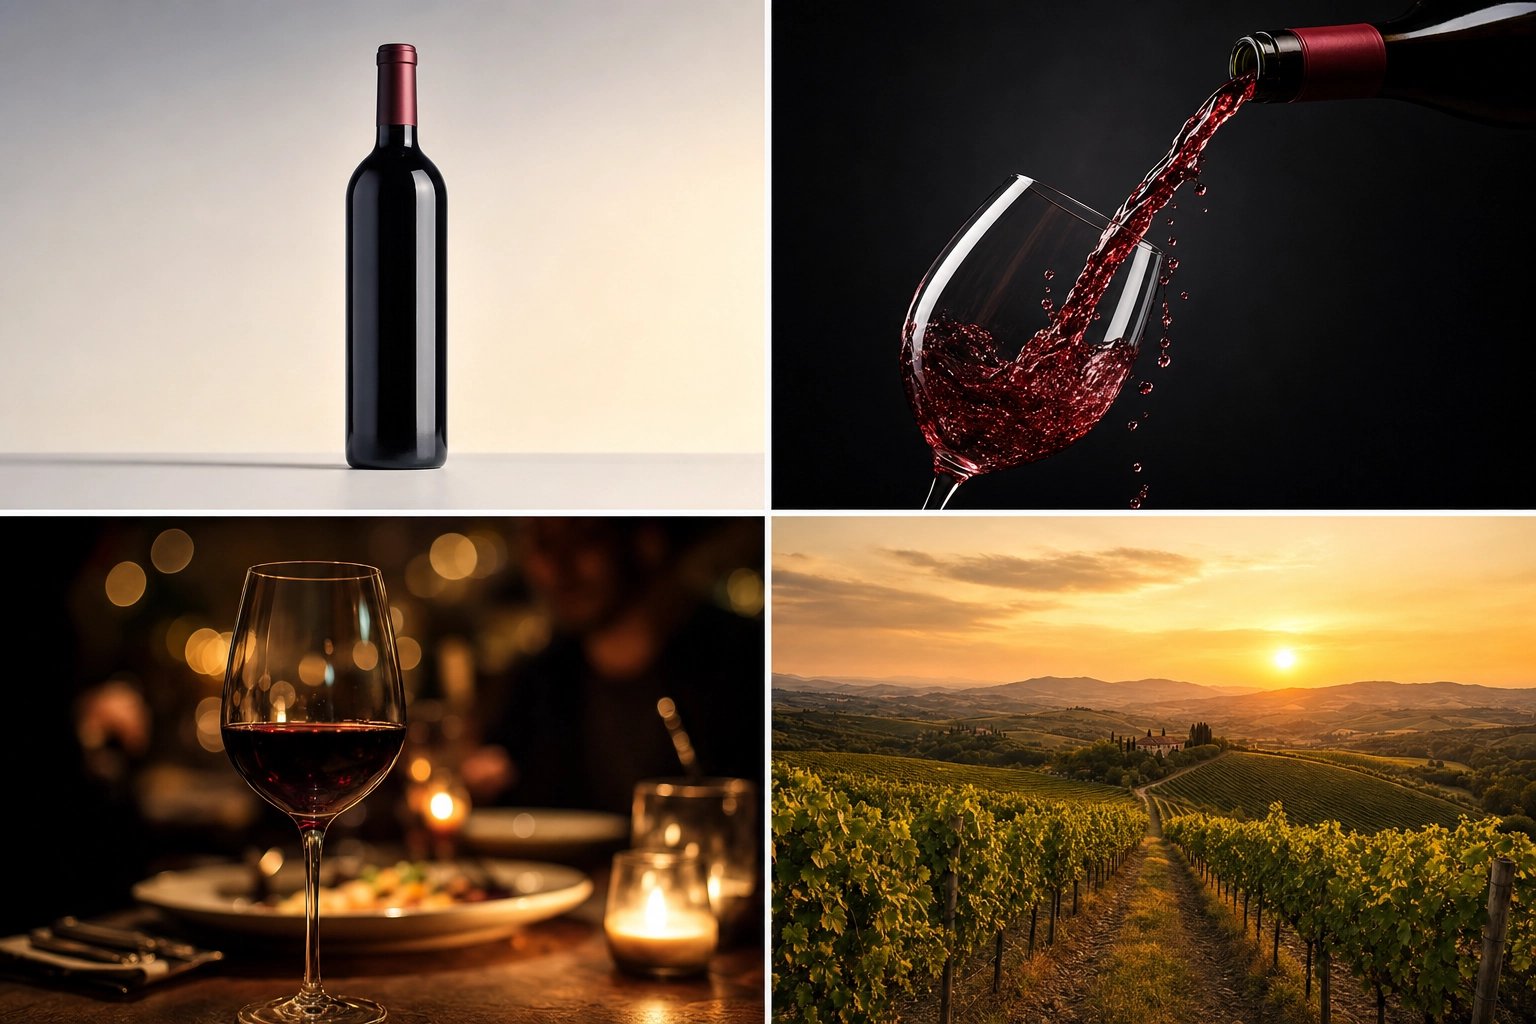 Four wine photography shot types: bottle hero, pour shot, glass with atmosphere, and vineyard lifestyle
Why Wine Bottles Are So Hard to Photograph
Wine bottles are curved mirrors. Every centimeter of glass reflects whatever happens to be around it — your ceiling lights, the window, your shirt, the camera itself. Professional photographer Jeremy Ball of Bottle Branding famously calls himself "more of a reflection manager than a photographer" when shooting wine, and he's not joking.
The two killers are:
- Hot spots from ceiling lights. Most rooms have downlights or fluorescent strips that create a vertical row of bright dots running down the side of the bottle. They show up even when you can't see them with your naked eye.
- Ambient room reflections. Anything bright in your environment — a white wall, a window, a screen — will smear color and detail across your bottle.
Rule number one before you take a single shot: turn off every overhead light in the room. Pull the blinds. Close the door. You want a darkened space where the only light hitting your bottle is the light you put there on purpose. This single step will improve 80% of amateur wine photos instantly.
Rule number two is to think about reflections backward. You're not just lighting the bottle — you're controlling what the bottle sees. If the bottle sees a black card, it reflects black (which reads as a clean dark edge). If it sees a white card, it reflects white (which reads as a soft highlight on the curve). Master this and you've mastered wine bottle photography.
How to Light Wine Glasses Without Harsh Reflections
Wine glasses have the opposite problem from bottles. They're transparent. Direct front light blasts straight through them and they vanish into the background. The trick is to light around them, not at them.
Backlight through diffusion is the foundation. Place a single light source behind the glass, then put a diffuser — a softbox, a sheet of vellum, even a cheap shower curtain — between the light and the glass. The glass picks up a glowing edge and the liquid inside lights up. For most setups, position the diffuser two to four feet behind the glass and the light one to two feet behind the diffuser.
Side-light at 45 degrees for shape. A single soft light at 45 degrees to one side of the glass adds dimension. This works particularly well for white wine and rosé, where you want to see translucent color, and for sparkling, where you need to see bubble streams.
Use black cards to define edges. Place strips of black foam core just outside the frame on each side of the glass. The glass "sees" the black strips and reflects them as clean, defined edges against your background. This is the single most important trick for making a wine glass look intentional rather than accidental.
Use white cards for selective fill. A small white card in front, angled to bounce light back onto the rim or stem, brightens the glass without adding reflections that the camera will pick up. Keep the cards small. Bigger isn't better here.
Match background to wine. Red wine on a dark background with rim light reads as moody and premium. White wine and rosé on a light or gradient background read as bright and fresh. Sparkling wine looks best with a slightly dark backdrop so the bubbles pop. Don't fight the wine's natural color — work with it.
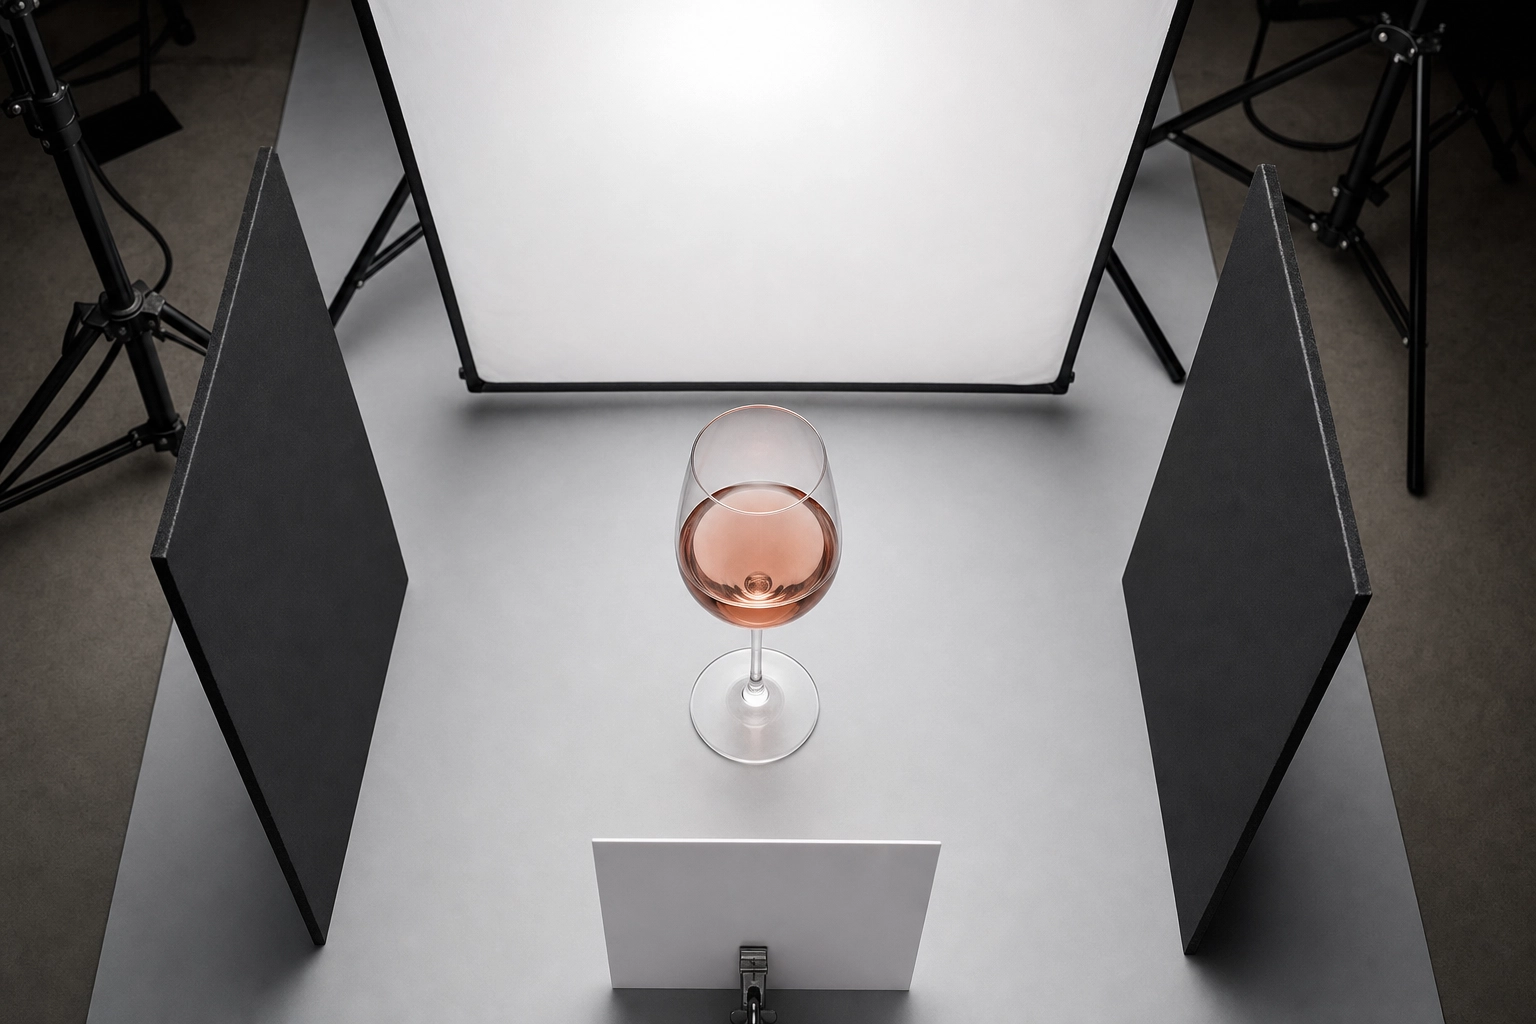 Overhead view of a wine glass lighting setup with backlight, diffuser, black flags, and white reflector cards
The Gradient Backdrop Trick for Elegant Bottle Shots
If you've ever wondered why high-end wine ads have that smooth, deep-to-light backdrop behind the bottle, this is the technique. It's called a gradient backdrop, and it's the easiest visual upgrade you can make to a bottle hero shot.
A gradient backdrop is exactly what it sounds like: a background that transitions smoothly from light to dark (or warm to cool, or one color to another) behind your subject. It does two things for a wine bottle: it creates depth, and it isolates the bottle as the obvious hero.
There are three ways to make one without buying a $200 painted canvas:
Method 1: Light fall-off. Place your bottle about three feet in front of a plain gray or black backdrop. Light only the bottle (not the backdrop) with a snoot, grid, or simply a tightly controlled spotlight. The background falls into natural darkness at the edges, creating a gradient effect for free.
Method 2: A single spot on the backdrop. Aim a small light directly at the backdrop behind the bottle — but use a grid or snoot to keep the beam tight. You'll get a bright "hot spot" that fades into darkness in every direction. Position the bottle in front of the lit area and you have an instant editorial gradient.
Method 3: Sweep paper. Use a roll of seamless paper that bends from the wall down to the floor in a smooth curve. Light the top of the sweep brightly and let the bottom fade to shadow. The viewer's eye reads it as a gradient even though the paper itself is a single color.
Match the gradient to the wine. Warm amber and gold gradients for whites and rosé. Deep burgundy or near-black gradients for reds. Cool blue or icy white for sparkling. The gradient should feel like an extension of the wine's personality, not a fight against it.
Shoot at f/8 to f/11 with the bottle three to four feet from the backdrop. The shallow depth of field keeps your background soft but readable, and the bottle stays sharp from cork to base.
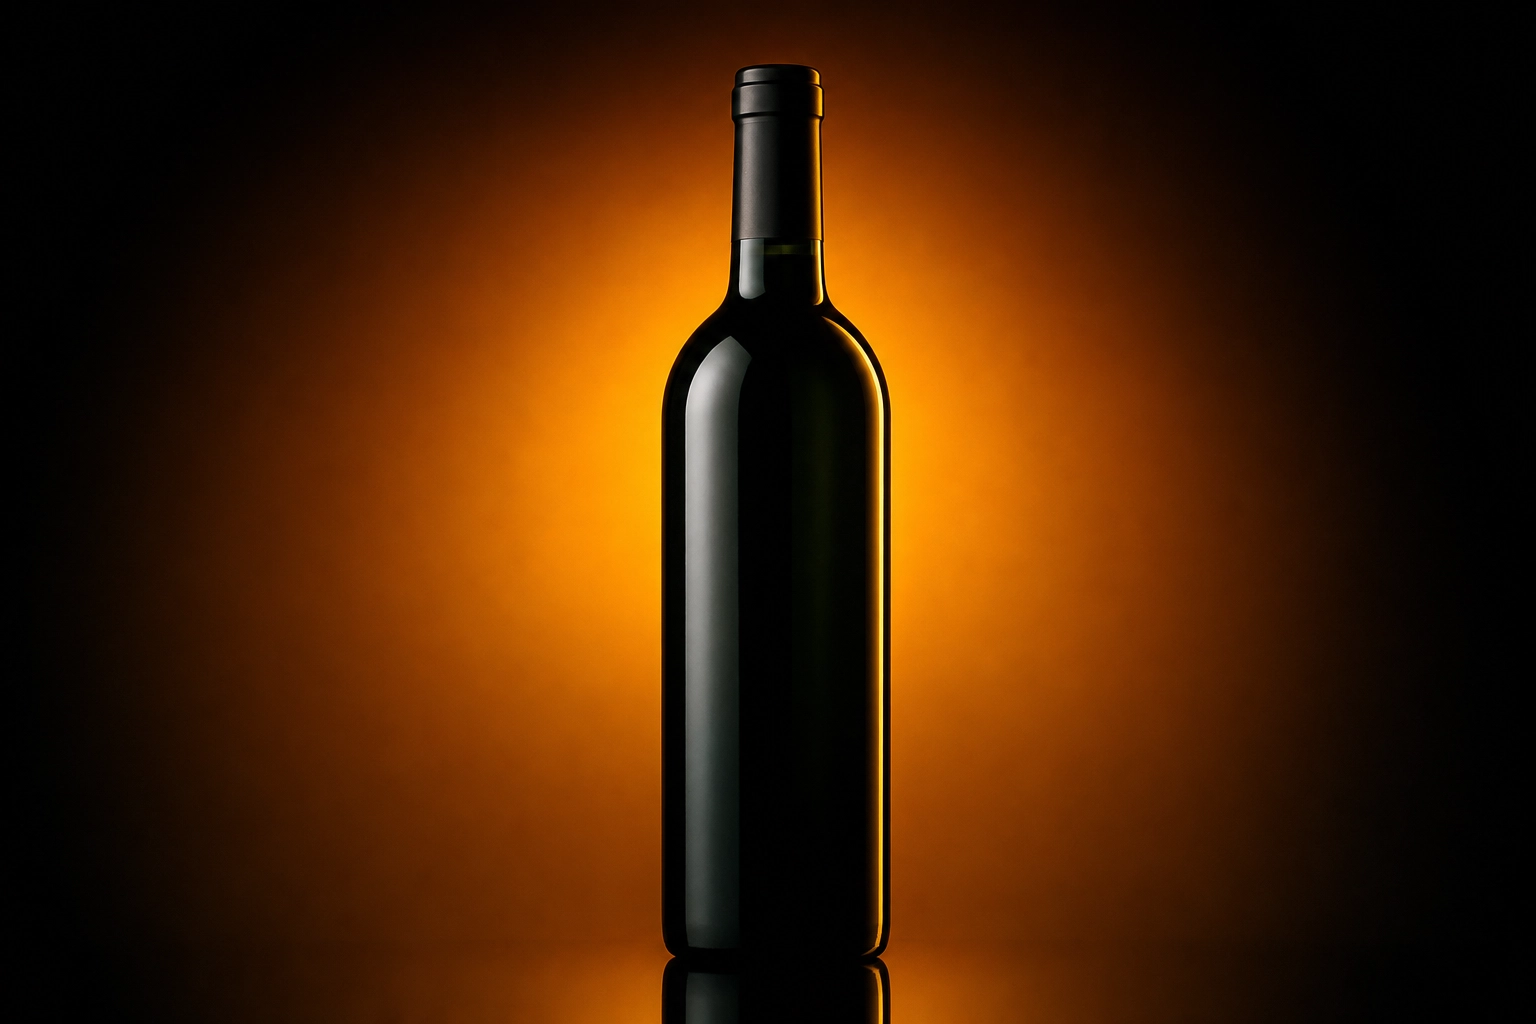 Wine bottle photographed with the gradient backdrop technique: warm halo of light fading to black
Pour Photography — Timing, Height, and Focus
Pour shots are the high-wire act of wine photography. Get them right and you have content that earns shares for years. Get them wrong and you have blurry brown smears.
Shutter speed. You need 1/500s minimum to freeze a pouring stream. For crisp, individual droplets, push to 1/1000s or 1/2000s. Slower than 1/500s and you'll get motion blur on the stream, which can be intentional but usually just looks soft.
Or use flash duration. Here's the secret most tutorials skip: if you shoot in a darkened studio with a speedlight or strobe, it's not your shutter speed that freezes the action — it's the flash duration. A speedlight at 1/8 power has a flash duration of around 1/10,000s. The shutter could be open for a full second and the burst of light freezes the splash regardless. This is why pros can shoot pours at 1/125s and still get tack-sharp results.
Aperture. Shoot at f/8 to f/11. You need enough depth of field to keep both the bottle neck and the glass rim sharp, but you don't want everything sharp or the shot loses its dimension.
Focus. Pre-focus manually on the glass rim where the stream lands. Then switch off autofocus entirely. Autofocus will hunt the moment liquid enters the frame and you'll get nothing. The rim is your anchor point.
Pour height. Pour from four to eight inches above the glass. Higher creates a longer, more dramatic stream but is harder to control. Lower is safer but the stream looks short. For sparkling wine, pour even lower — two to three inches — and tilt the glass so bubbles stay alive.
Burst mode. Set your camera to its fastest continuous burst (8–14 fps on modern cameras). Hold the shutter through the entire pour. You'll capture 20 to 40 frames. Two or three will be magical. That's the math of pour photography — most shots fail, and you only need one.
Two people are better than one. Trying to pour with one hand and shoot with the other is a recipe for blurry, off-center frames. Have a helper pour while you shoot. If you're solo, set up a small clamp or stand to hold the bottle at a consistent angle and use a remote shutter.
Focus stacking for static shots. If you want a single frame with the bottle, glass, and pour all tack-sharp from front to back, shoot three separate exposures — one focused on the bottle label, one on the glass, one on the stream — and composite them in post. This is the technique behind almost every print-ad bottle pour you've ever seen.
The pro trick: dilute the wine. Real red wine often photographs too dark, sometimes nearly opaque. Many commercial photographers shoot with a diluted mix (one part wine, two parts water with a drop of food coloring) or a custom-tinted water solution. The on-camera color is cleaner, the splash is more visible, and you don't waste a $40 bottle on test pours. Just don't tell the sommelier.
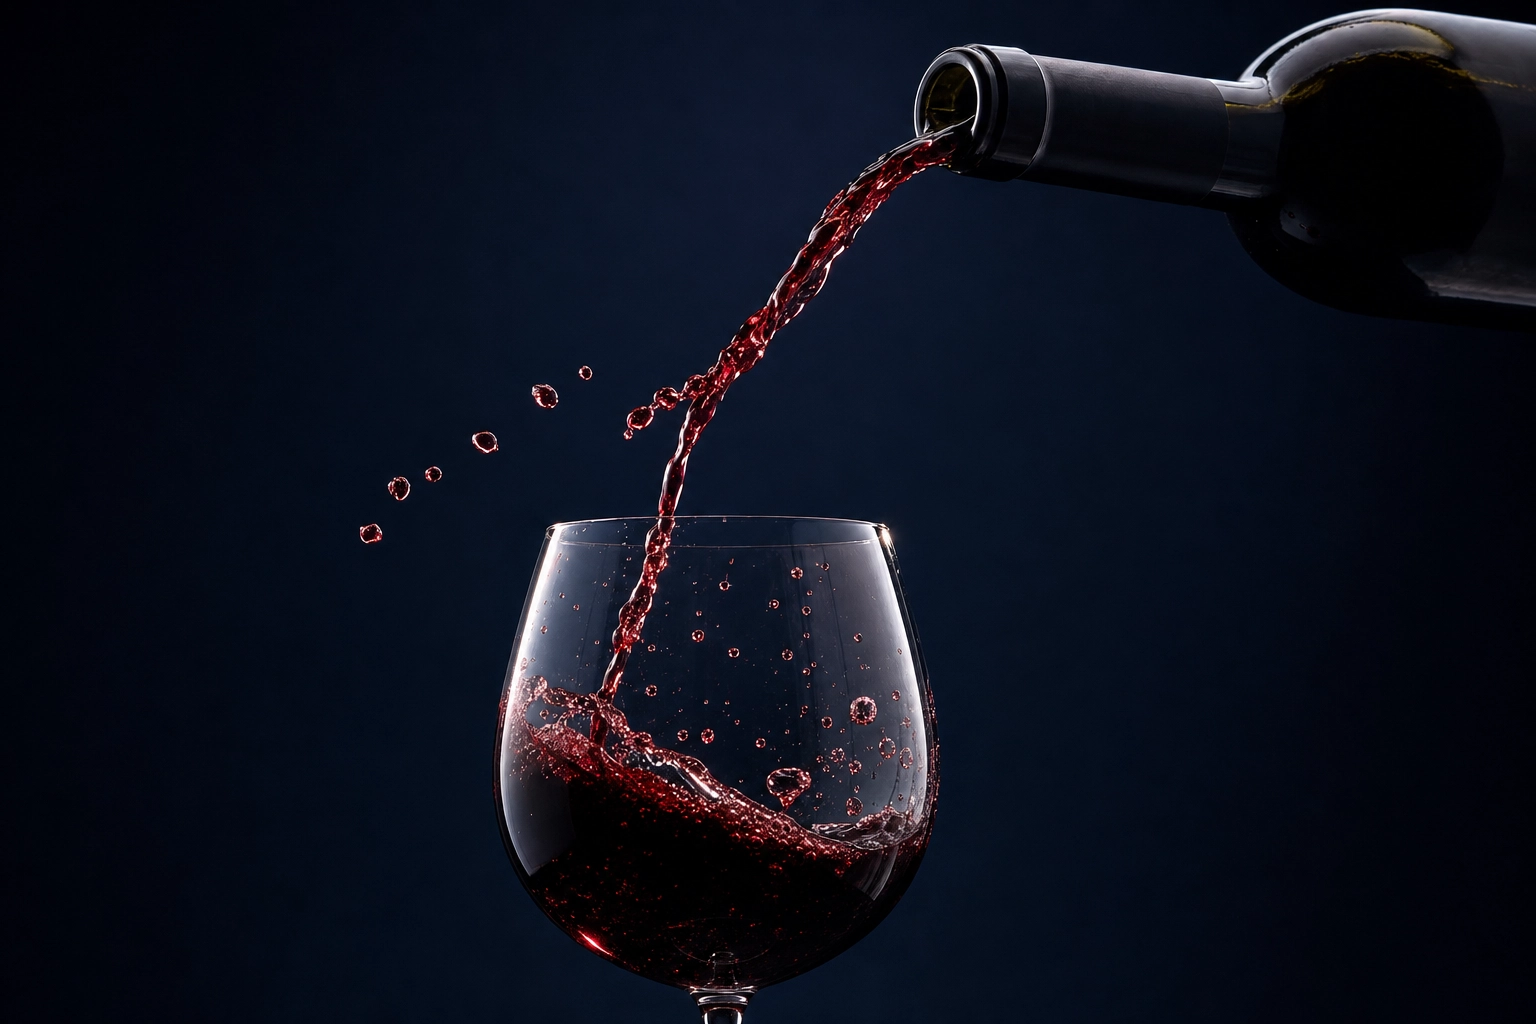 High-speed pour shot of red wine arcing from bottle into a wine glass, splash frozen mid-air
Wine-Type-Specific Photography Tips
Each style of wine has its own visual personality. Treating them all the same is the fastest way to make your wine list look generic.
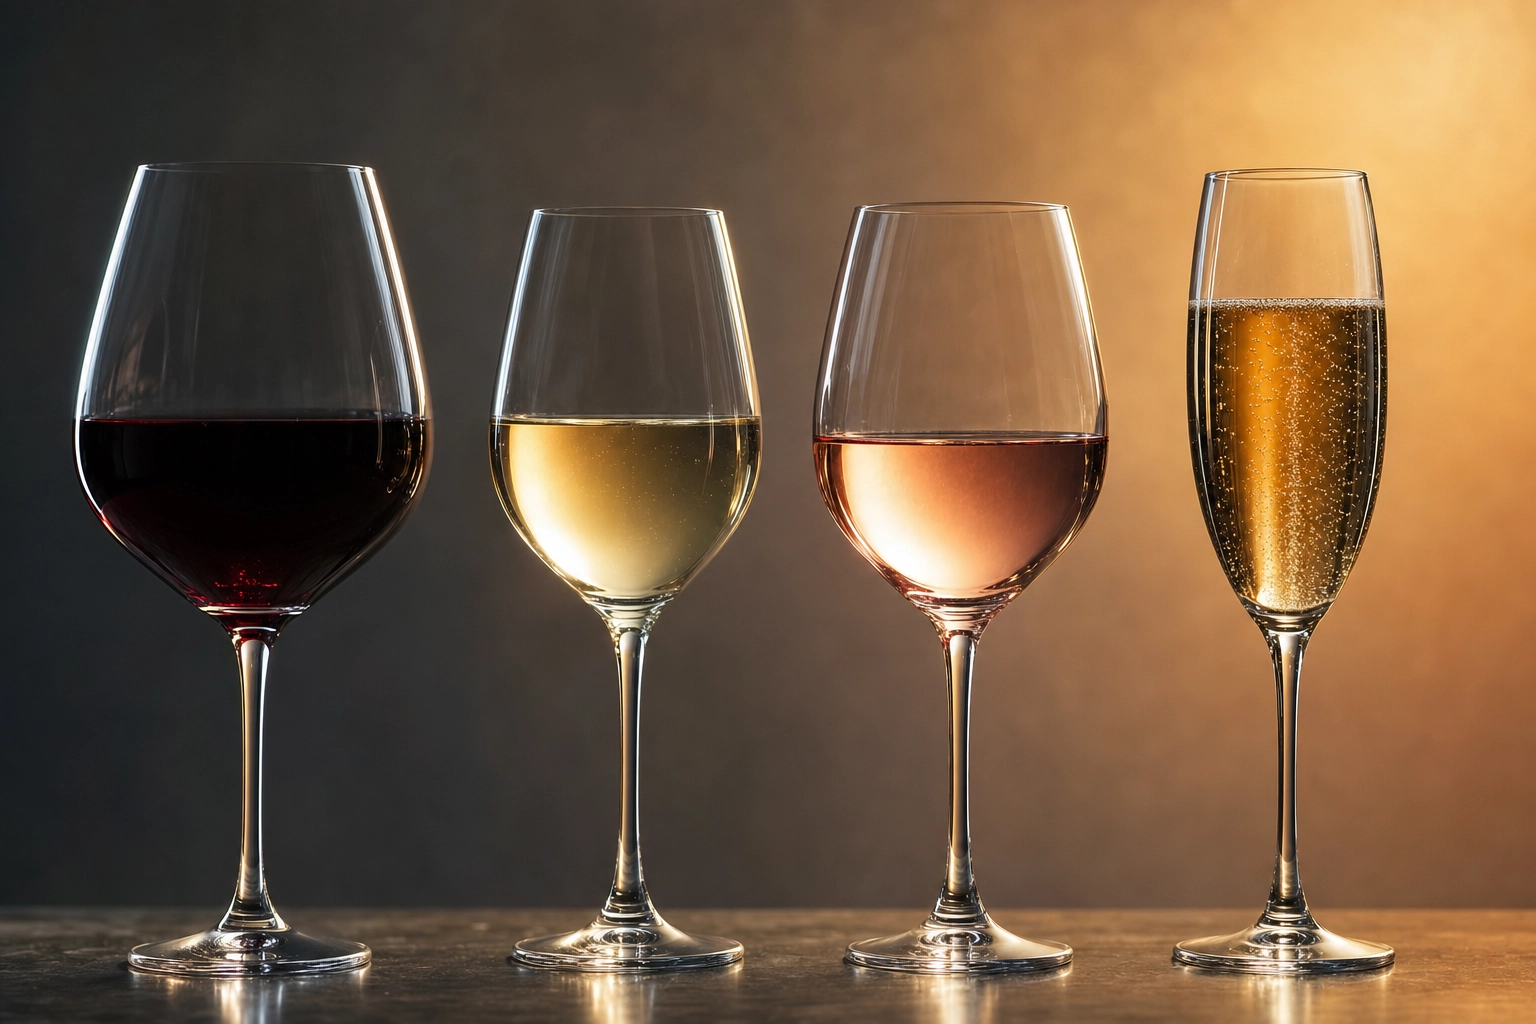 Four wine types side by side: red Bordeaux, white wine, rosé, and sparkling wine in their proper glasses
Red Wine
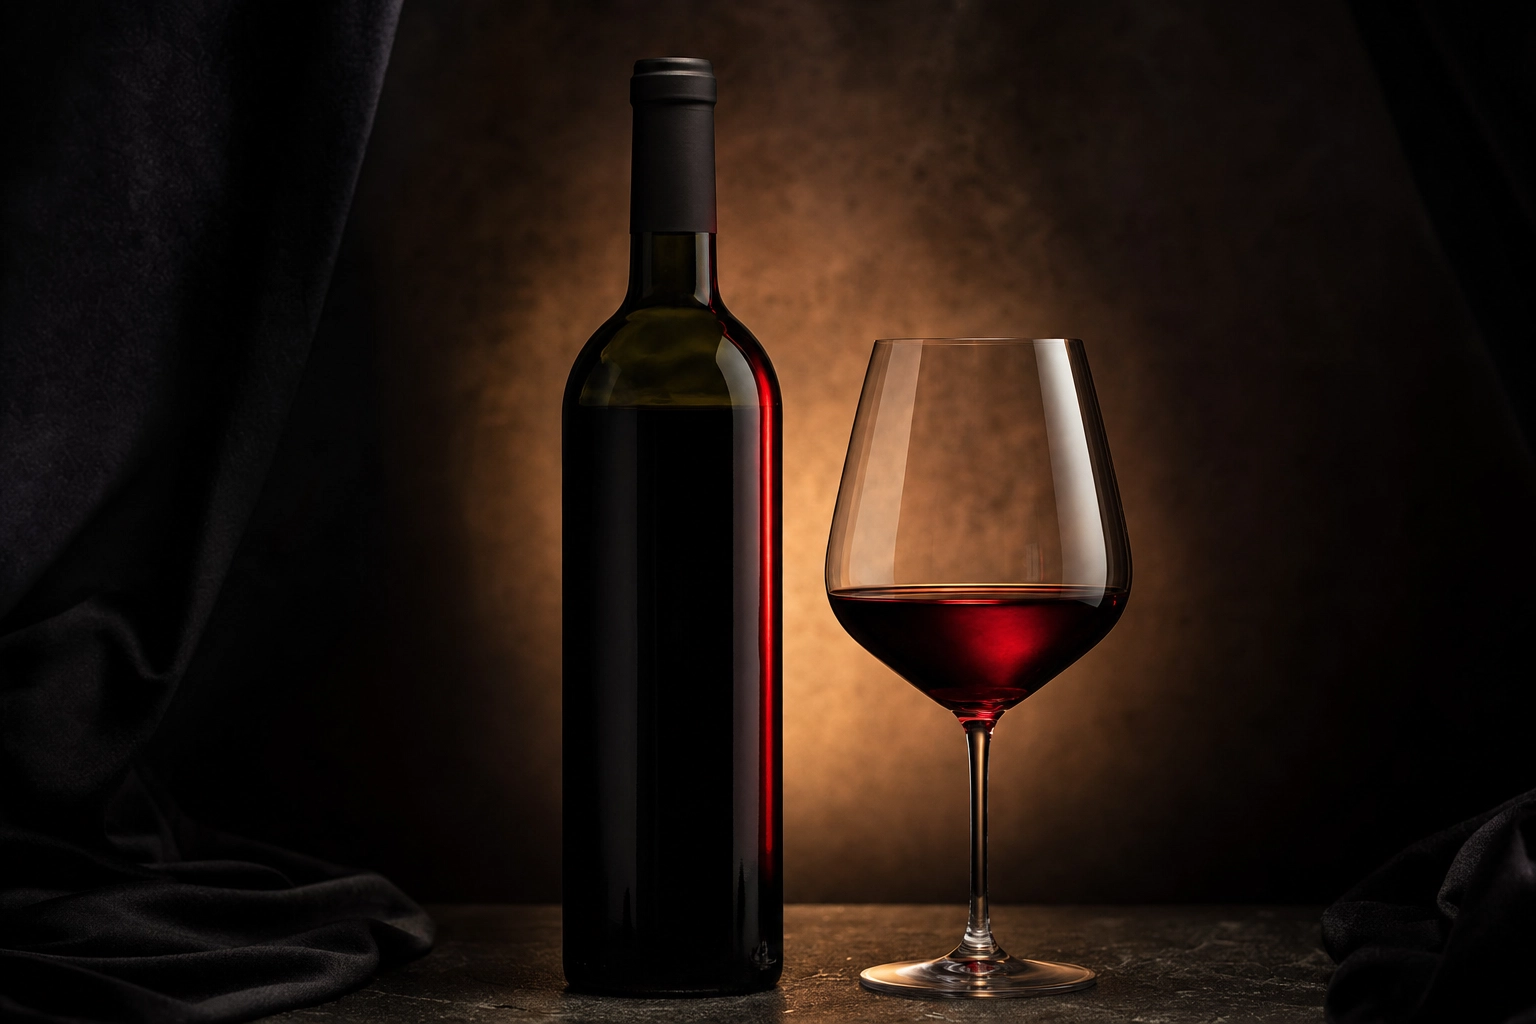
Red wine is the hardest type to photograph well. The liquid itself reads as nearly black on most cameras, and the dark glass bottle compounds the problem. The solution is rim lighting: a strong light source behind and to the side of the bottle that defines its edge against a dark background. Use black or deep burgundy backdrops. A small backlight aimed at the shoulder of the bottle creates a ruby glow through the glass that signals "this is red wine" instantly — without it, your bottle looks like motor oil.
The most common mistake with red wine photos is over-saturating in post-production. Burgundies and pinots have subtle plum and ruby tones that disappear when you crush the blacks. Keep the saturation modest and let the rim light do the work.
White Wine
White wines photograph beautifully when you let the light pass through them. Backlighting reveals the pale gold or straw color and makes the bottle glow. Lighter backdrops — cream, soft gray, light wood — read as fresh and crisp. The challenge is the label: it blocks the backlight you're trying to use, so you'll often need a second small light on the front to keep the label readable. Tilt this front light so it doesn't bounce straight into the camera.
Chardonnays, sauvignon blancs, and rieslings each have slightly different hues. A custom white balance read off a neutral card before you shoot will keep the colors accurate across your menu.
Rosé
Rosé is the easiest wine to photograph because its translucent pink is photogenic from almost any angle. Backlight is still essential — the color is the entire point — but the rest is forgiving. Lean into airy, romantic compositions: linen tablecloths, fresh flowers, summer fruit, dappled natural light. Rosé wine photography is a styling exercise more than a lighting exercise. Most rosé shots that fail do so because the styling looks heavy or wintry, not because the wine itself looks wrong.
Sparkling Wine and Champagne
Bubbles are the hero. Everything else is just supporting cast. To capture rising bubble streams, pour gently into a chilled flute or coupe, then start shooting within 30 to 60 seconds — the most active fizz lasts about two minutes per pour. A narrow-angle backlight directly behind the glass reveals the streams of bubbles climbing the inside walls. Side flags in black define the edges of the glass so it doesn't disappear into the bright backlit background.
For the iconic spray shot — the cork-pop fountain — uncork the bottle first, put your thumb over the opening, then shake. When you release your thumb, you get a long, controlled spray. Don't shake an unopened bottle. The cork becomes a projectile, and the shot lasts a quarter of a second instead of the five seconds you need.
Sake
Sake breaks most of the rules above. It's often served in opaque ceramic vessels (the tokkuri pour bottle and ochoko cups) or in wooden masu boxes that are designed to overflow into a saucer. There's nothing transparent to backlight. The hero of a sake shot is the ritual — the pour, the texture of the ceramic, the steam from warm sake, the grain of the wooden masu. Light it like you'd light a still life: soft, side-lit, with attention to texture. Warmer color tones work well; harsh white light makes sake setups look clinical.
If you're shooting clear sake (junmai daiginjo, often served chilled in glass), treat it like a delicate white wine. Backlight, pale gold tones, minimal styling.
The Complete Wine Photography Equipment List Under $200
You don't need a $5,000 strobe kit to shoot menu-ready wine photos. Here's a complete build you can put together for less than the cost of a mid-range case of wine.
Camera (free to $200):
- Your phone if it's recent. iPhones from the 13 onward and Pixels from the 6 onward shoot more than enough resolution for menus, websites, and social. $0.
- A used DSLR or mirrorless body — Canon Rebel T7, Nikon D3500, Sony A6000 — runs $150–200 second-hand on KEH or MPB. Pair with the kit 18–55mm lens it usually comes with.
Tripod ($25–$40):
- Any 60-inch tripod with a smartphone or DSLR mount. Amazon Basics or Manfrotto Compact Action are reliable. Non-negotiable — handheld bottle shots are blurry bottle shots.
Lighting ($30–$50):
- Two clip-on work lights from a hardware store. Swap the bulbs for 5500K daylight LEDs (around $5 each). Soft, color-accurate, free of the orange cast that ruins white balance.
Diffusion ($10):
- A plain white shower curtain or a yard of muslin from a fabric store. Clip it between your light and the bottle to soften everything.
Reflectors and flags ($15):
- A pack of black and white foam core boards from a craft store. Cut them into strips and squares. The black strips become your edge flags. The white pieces become your fill cards.
Styling extras ($15):
- Spray bottle for fake condensation on chilled bottles.
- Small bottle of glycerin (mix 1:1 with water) for droplets that don't run off.
- A microfiber cloth for cleaning glassware. Fingerprints and lint will show up in every shot.
Total: Around $100 if you use your phone, around $200 if you add a used camera body.
What you're not buying: a softbox, a strobe, a backdrop stand, a roll of seamless paper, a tethering cable. You don't need any of it to start. You can produce wine list photos that look professional with this kit and a darkened room. Skill with the basics beats expensive gear every time.
For a deeper dive into the broader lighting principles behind these techniques, our food photography lighting guide covers softbox alternatives, natural light tricks, and reflector setups that translate directly to wine work.
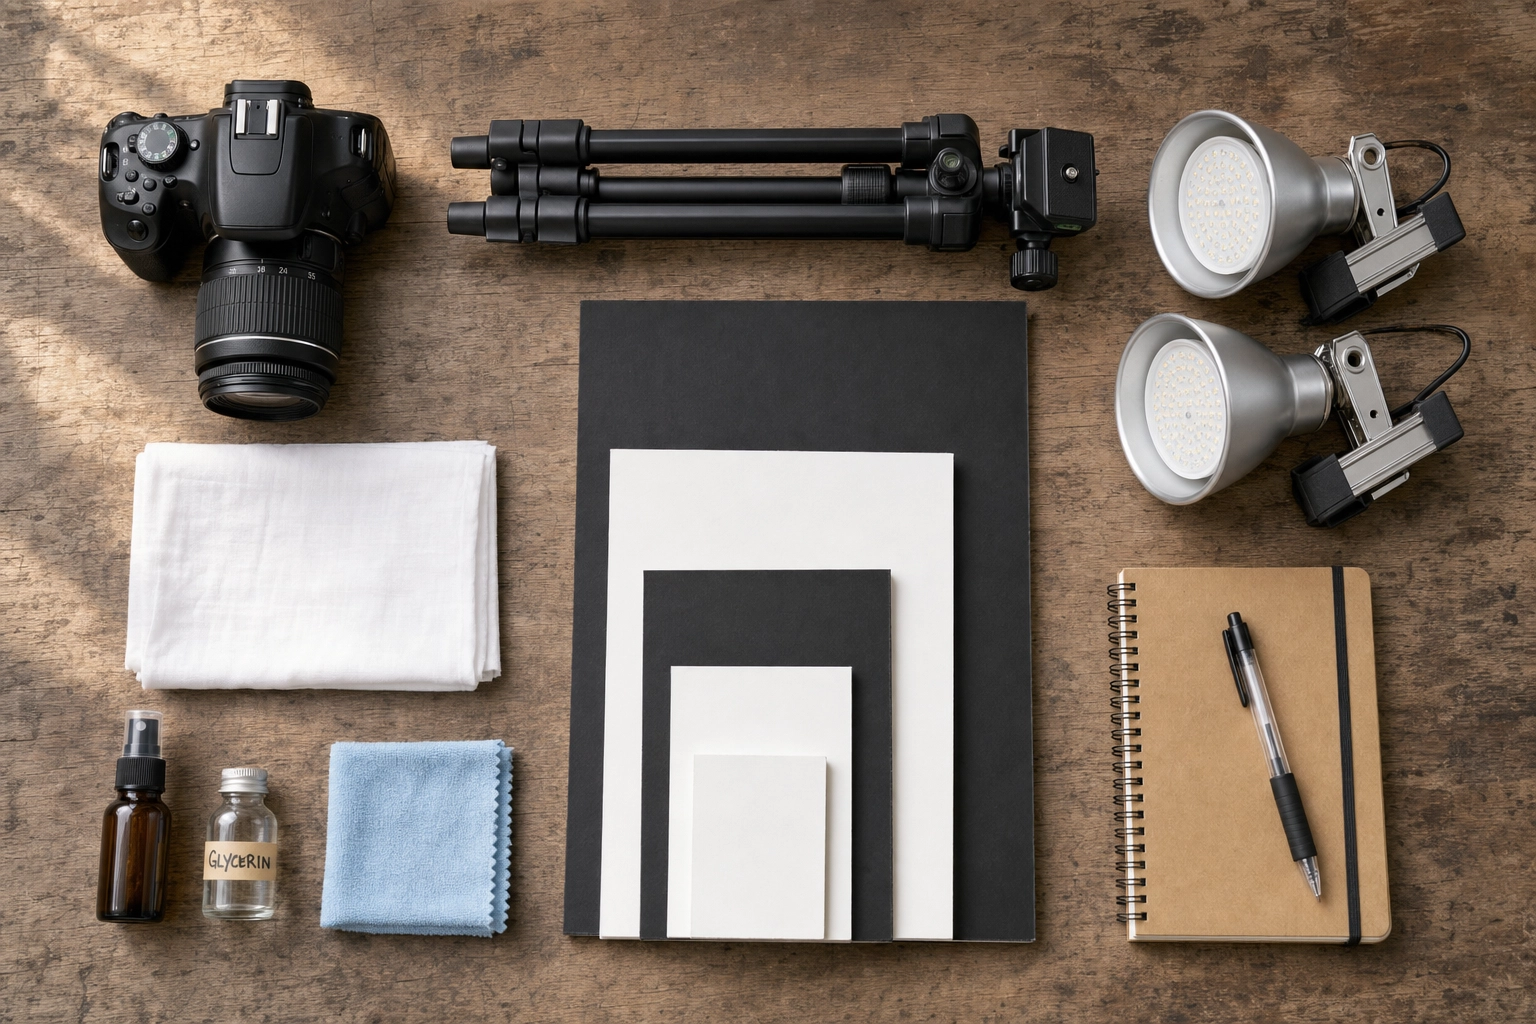 Flat lay of budget wine photography equipment under 200 dollars: camera, tripod, lights, diffusion, foam core boards
AI Enhancement: Wine-List-Ready Photos in 90 Seconds
The honest truth is that even with great equipment and good technique, professional wine photography takes time. A single bottle shoot can run two to four hours including setup, test pours, focus stacking, and editing. A vineyard or cellar shoot is a full day. If you're a sommelier, a small wine bar owner, or a restaurant operator with 80 bottles on your list and no budget for a full shoot, that math doesn't work.
This is where AI tools change the equation. FoodShot AI was built for exactly this problem. You upload a phone photo of your wine — even an imperfect one with bad lighting or a cluttered background — and the AI transforms it into a studio-quality image with proper backdrop, clean reflections, and editorial styling. The whole process takes about 90 seconds per photo.
Here's what that looks like in practice:
- A phone snap of a Burgundy bottle on your bar becomes a moody, dark-gradient hero shot ready for the wine list.
- A casual table photo of a pinot grigio with two glasses becomes a styled fine-dining lifestyle shot for your homepage.
- A handheld picture of a sparkling rosé becomes a backlit, bubble-revealing editorial frame for an Instagram carousel.
You don't need the lighting kit, the tripod, the foam core boards, the helper, or the four hours. You need an image of the right bottle and 90 seconds.
The library includes 200+ styles tuned for restaurant menus, fine dining, bars and lounges, delivery apps, and social. Builder Mode lets you combine specific elements — choose a bottle, a backdrop, a glass, and an atmosphere, and the AI builds a custom scene from your photo. My Styles lets you upload a brand reference photo (your existing wine list aesthetic, for example) so the entire output matches your visual identity. For consistency across a multi-location wine program, this is the feature that matters most.
For comparison: a single traditional wine shoot runs $500 to $2,500 depending on the photographer and location. FoodShot AI starts at $9 per month on the Starter plan when billed yearly, with commercial licensing on all paid tiers. See the full breakdown on our pricing page. For a deeper look at the styling and prop choices that translate across mediums, our food styling guide covers the principles that apply directly to wine work.
A note on what AI won't do: it won't shoot your vineyard for you, it won't create wine that doesn't exist, and it won't replace the human eye behind a real product campaign. What it will do is solve the 80% problem — the wine list photos, the social posts, the daily content that needs to look professional without the cost of a daily shoot. If you also run a bar program, the techniques here pair naturally with our cocktail photography guide, which covers the closely related world of glass-with-ice photography.
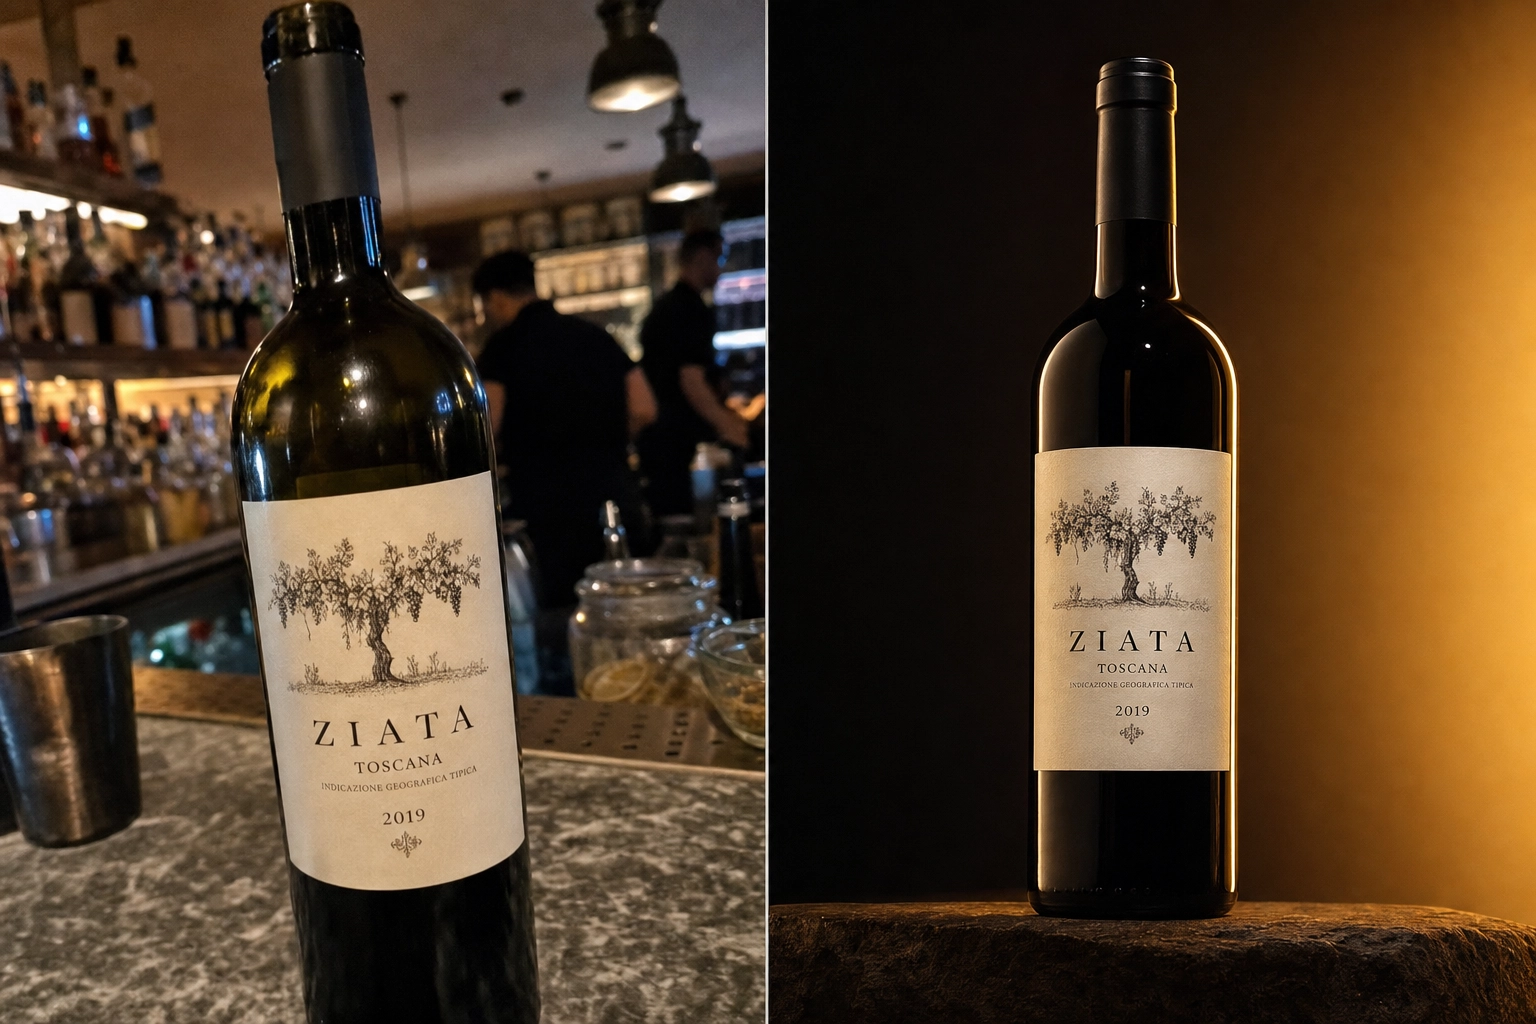 Before and after wine bottle photo comparison: messy phone snapshot transformed into polished editorial product shot
Frequently Asked Questions
How do you photograph a wine bottle without reflections?
You can't eliminate reflections entirely — wine bottles are curved glass — but you can control what they reflect. First, turn off all overhead lighting. Second, work in a darkened space so the bottle only sees the light you put there intentionally. Third, place black foam core boards just outside the camera frame on each side of the bottle. The bottle reflects the black cards as clean dark edges, which is what makes professional bottle shots look so crisp. Adjust the position of the black cards until the reflections look like intentional rim lines, not random hot spots.
What camera settings should you use for wine bottle photography?
For a static bottle shot on a tripod: aperture f/8 to f/11, ISO 100, shutter speed adjusted to match your lighting (typically 1/60s to 1/250s with continuous light, 1/125s with strobes). Manual focus on the label, since it has the highest contrast for your camera to lock onto. White balance set manually to match your light source — auto white balance will drift between frames and make your batch inconsistent. Shoot in RAW for full editing flexibility.
What's the best background for wine bottle photos?
It depends on the wine. Red wines look best on dark backgrounds — deep gray, near-black, or moody burgundy — because the contrast lets the bottle's silhouette and label pop. Whites and rosés look best on lighter or gradient backgrounds — cream, pale gray, soft amber — because they let the wine's translucent color show through. Sparkling wines work on either, but a darker backdrop with a brighter backlight produces the most dramatic bubble shots. Avoid busy patterns and any color that competes with the label.
How do you photograph a wine glass without harsh reflections?
Light the glass from behind through a diffuser, not from the front. Backlight reveals the wine's color and gives the glass a glowing edge. Then control the side reflections with black foam core flags positioned just outside the frame — the glass reflects the black as clean defined edges instead of grabbing whatever happens to be in your room. Keep your front lighting minimal or eliminate it entirely. If you need the label of the wine in the glass to be readable, add a small, targeted fill light angled away from the camera.
What shutter speed do you need for a wine pour shot?
Minimum 1/500s to freeze a basic pouring stream. For sharper droplets and crisp splashes, push to 1/1000s or 1/2000s. If you're shooting in a dark studio with flash, the flash duration freezes motion — not the shutter — so you can use slower shutter speeds (1/125s) and still get tack-sharp results because the burst of light is around 1/10,000s. Always shoot in continuous burst mode and use manual pre-focus on the glass rim.
Should you use natural light or artificial light for wine photography?
Both can produce great results — the choice depends on your control needs. Natural window light is free, soft, and flattering for white wines and rosé, but it changes throughout the day and varies with weather, so it's hard to maintain consistency across a batch. Artificial light (LED panels, strobes, or even clip-on work lights with daylight bulbs) gives you total control, repeatability, and the ability to shoot any time. For a consistent wine list with 40 bottles, artificial is more practical. For one-off lifestyle shots or social content, natural light is often more beautiful.
How do you photograph red wine when it looks black on camera?
Red wine appears black on camera because cameras struggle to capture its deep ruby color without help. The fix is rim lighting — a strong, focused light source behind and to one side of the bottle that creates a defined edge of light along the bottle's curve and ideally a small glow through the shoulder of the bottle where the glass thins. This rim light separates the bottle from the background and tells the viewer's eye "this is wine, not motor oil." Pair with a dark backdrop and modest post-production saturation. Avoid the temptation to crank up the reds in editing — it makes the wine look fake and amateur.
Can you do professional wine photography with just a smartphone?
Yes, for menu and social use. Modern smartphones — iPhone 13 and later, Pixel 6 and later, Samsung Galaxy S22 and later — shoot in high enough resolution and dynamic range to produce professional-looking wine photos when paired with proper lighting, a tripod (essential), and the reflection control techniques in this guide. For high-end print campaigns, ad billboards, or fine-dining brand work, a dedicated camera with better optics and RAW processing still wins. But for a wine list, an e-commerce site, or a daily Instagram, a tripoded phone in a darkened room with two clip lights and foam core flags will produce results that 95% of viewers can't distinguish from DSLR work.
Why does wine photography look better in restaurants than I can shoot?
Three reasons, in order of importance. First, professional wine photos are shot in controlled environments with intentional lighting — almost always backlit through diffusion with reflectors and flags. Most amateur shots are taken under the room's existing ceiling lights, which create hot spots. Second, professionals shoot dozens of frames and pick the best one — what you see is the survivor of a long selection process. Third, professionals retouch every shot: removing dust, balancing label readability, and adjusting color. The good news is all three of these gaps can be closed with the techniques in this guide, or shortcut entirely with an AI tool that handles lighting, retouching, and styling automatically.
How do you make wine bubbles show up in sparkling wine photos?
Bubbles need three things to be visible: a clean glass (any dust or fingerprint stops the bubbles from rising in a tight column), a chilled wine (warmer sparkling fizzes faster and the bubbles dissipate before you can shoot), and a backlight aligned at a narrow angle behind the glass. The light passes through the wine and catches each bubble as it rises, lighting up the entire column. Pour gently — don't shake — and start shooting within 30 to 60 seconds of pouring. The most active fizz lasts about two minutes. For champagne flutes, the tall narrow shape concentrates the bubble streams into visible vertical columns, which photographs more dramatically than coupe glasses.
Your Wine List Deserves Photos That Sell
Great wine photography is reflection management, intentional light, and patience — three skills that compound with practice. Start with one bottle, one light, and a dark room. Add a black foam core flag. Add a tripod. Add a piece of diffusion. Within a few sessions, you'll be producing images that hold their own next to anything in a glossy wine magazine.
But if you're a sommelier with 80 bottles on the list, or a wine bar owner trying to refresh your menu before Friday, or a vineyard team handling marketing alongside everything else — practice isn't always practical. FoodShot AI turns a phone photo into a wine-list-ready image in 90 seconds, with 200+ styles tuned for fine dining, bar programs, and lifestyle content. Start with three free credits, no card required, and see what your wine list could look like by tonight.
