Cake Photography: Tips for Bakeries, Weddings & Instagram
Most cake photos fail in predictable ways. Buttercream goes flat. Fondant looks like plastic. White wedding cakes blow out to featureless blobs. The birthday cake hero shot ends up looking like a snapshot from a phone roll, and the cake-cutting moment ends up blurry, badly lit, or framed with the back of a guest's head.
The good news: cake photography isn't a mystery. It's a small set of repeatable decisions about light, angle, background, and timing. Get those right and a bakery, wedding photographer, or birthday cake content creator can deliver photos that look like a magazine spread — even with a phone.
Quick Summary: The best cake photography combines a 45-degree hero angle, soft side-back light to bring out specular highlights, a background that matches the cake's voice, and an extra layer baked specifically for the cross-section slice. White cakes need +1.3 to +2 EV of exposure compensation to keep frosting detail. AI tools now polish phone-shot cake photos into menu-ready images in under 90 seconds.
This guide is built for the people who actually need these photos: bakery owners filling a website gallery, wedding cake makers building a portfolio, birthday cake content creators chasing Instagram engagement, and small food businesses that can't justify a $1,200 photo shoot every week.
The 5 cake photography shots every bakery needs
Forget shooting 40 random angles. Every cake — whether it's a $35 birthday round or a $1,500 wedding centerpiece — deserves the same five-shot treatment. These five cover roughly 90% of what bakeries, weddings, and editorial features actually use.
1. The hero portrait. Whole cake, 3/4 angle, 45 to 75 degrees off the front. Food photographers consistently call this the most powerful angle in cake photography, and they're right — it captures the top decoration and the side profile in one frame. This is your bestseller image, the one customers see first.
2. The single slice cross-section. A vertical slice on a plate, side-on at plate level. This is what customers actually buy. Show the layers, the filling, the frosting-to-cake ratio. Bake one extra layer cake specifically for this shot — slice it fresh, never the day-old leftover.
3. The cake-cutting moment. Whether it's a wedding, birthday, or product launch, this is the storytelling shot. Hands on the knife, the first incision into perfect frosting, faces in the frame. We'll cover the choreography in detail below.
4. The multi-tier wedding cake at eye-level. For tiered cakes, get the camera at the middle tier's height. Top-down crushes the architecture; ground-up distorts. Eye-level lets every tier read clearly.
5. The decorated top-down. For drip cakes, floral toppers, intricate piping, and ombré buttercream — anything where the magic is on top. A side-on shot flattens these details. Flat lay reveals them.
 Five essential cake photography shots arranged on a bakery prep table — hero, slice, tiered, top-down, cutting
A bakery that nails these five for every signature cake — every wedding cake, every birthday cake, every patisserie special — builds a portfolio that converts. A wedding photographer who delivers all five gives the cake maker images they'll repost for years.
How to light a cake without killing the texture
Lighting is the single biggest variable separating professional cake photography from amateur work. More than camera, more than lens, more than background. And almost none of it requires expensive gear.
The default rule: soft, directional light from the side or behind the cake. Position the cake near a large window, with the window roughly perpendicular to or slightly behind it. Diffuse harsh sun with a sheer curtain or a 5-in-1 reflector's white panel. Skip the on-camera flash entirely — it flattens everything it touches.
The reason behind that rule is specular highlights — the small bright spots that read as "shine" or "gloss" to the human eye. Backlight and side-back light create them. Front light kills them. Without specular highlights, glossy ganache reads as matte mud, fondant looks like drywall, and buttercream loses its sheen.
Preventing shine and hotspots on glossy frosting
Mirror glaze, dark chocolate ganache, royal icing, and Italian meringue all hit a sweet spot between "delicious shine" and "blown-out hotspot." Three controls fix this:
- Backlight 3/4 from behind at about a 60-degree angle off the cake's vertical axis. The highlight lands on the top curve, where you want it.
- A black flag in front (a piece of foam board painted matte black works) absorbs camera-side reflection and keeps the front of the cake from looking washed out.
- Tilt the cake forward by 2-3 degrees on a hidden wedge. The highlight rolls toward the top edge instead of pooling in the dead center.
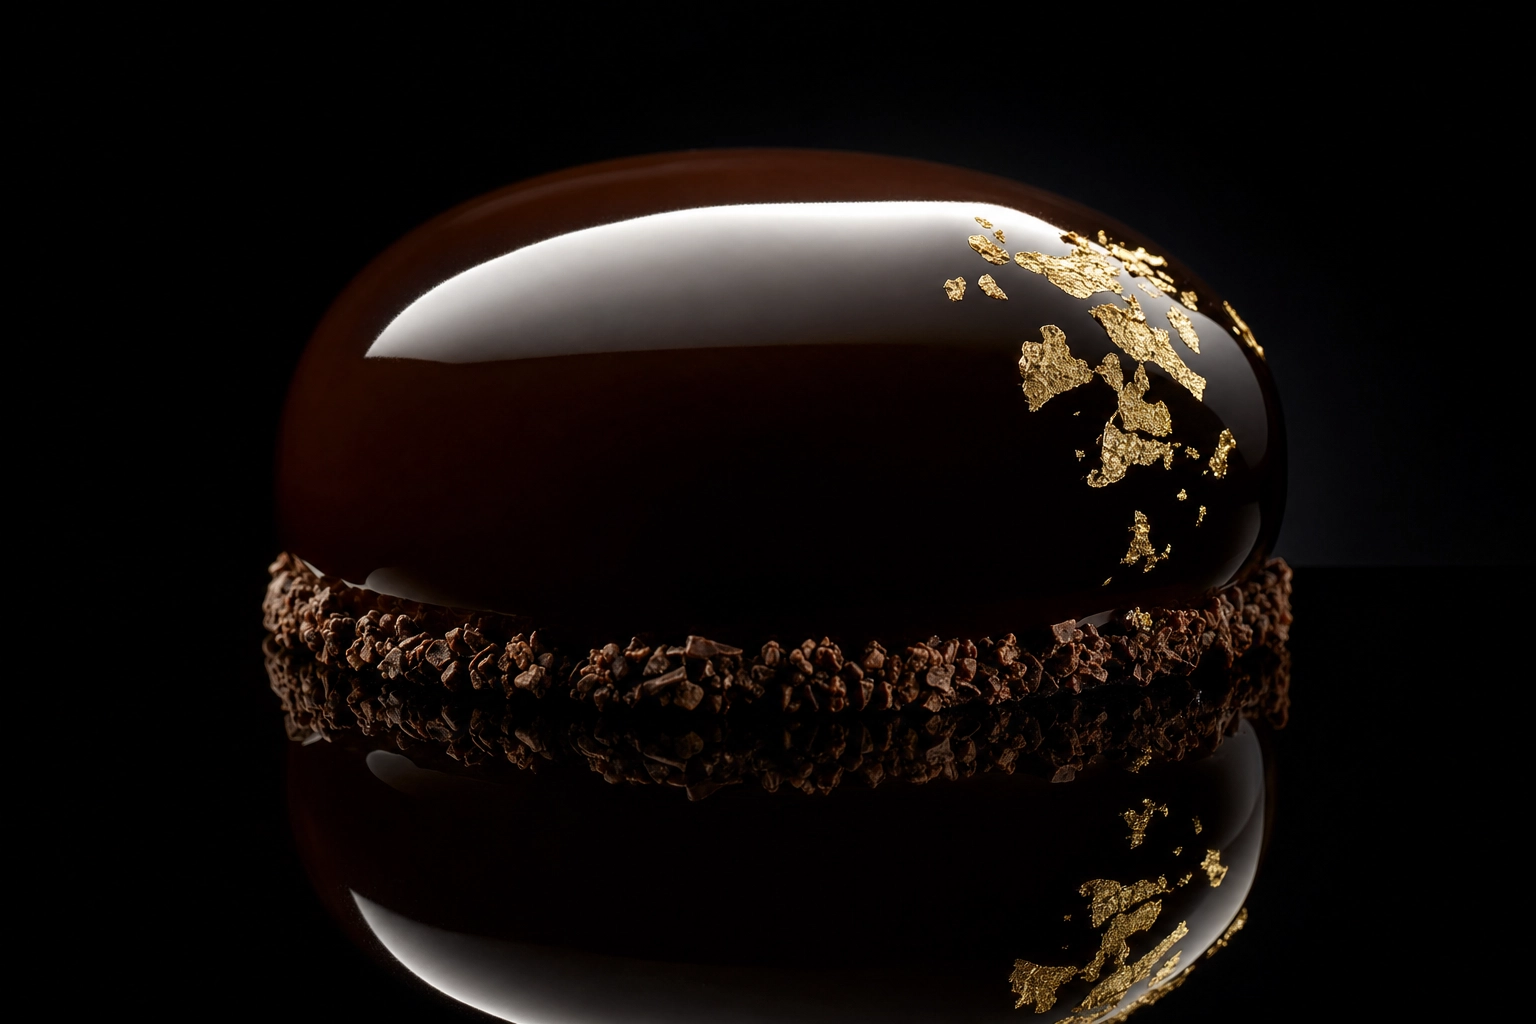 Close-up of dark chocolate mirror glaze cake with backlight specular highlight — glossy frosting photography
Capturing buttercream texture and piping detail
Buttercream piping is texture, and texture needs grazing light. Position your light source at roughly 45 degrees to the side and low — almost level with the cake's middle. The light skims across every ridge, ruffle, and rosette, casting tiny shadows that the camera reads as dimension.
Two practical notes: chill the cake for 15 minutes before shooting. Warm buttercream gets shiny and loses its crisp peaks. And for close-ups, shoot at f/4 to f/5.6 — enough depth of field to hold texture across the cake face without losing background blur.
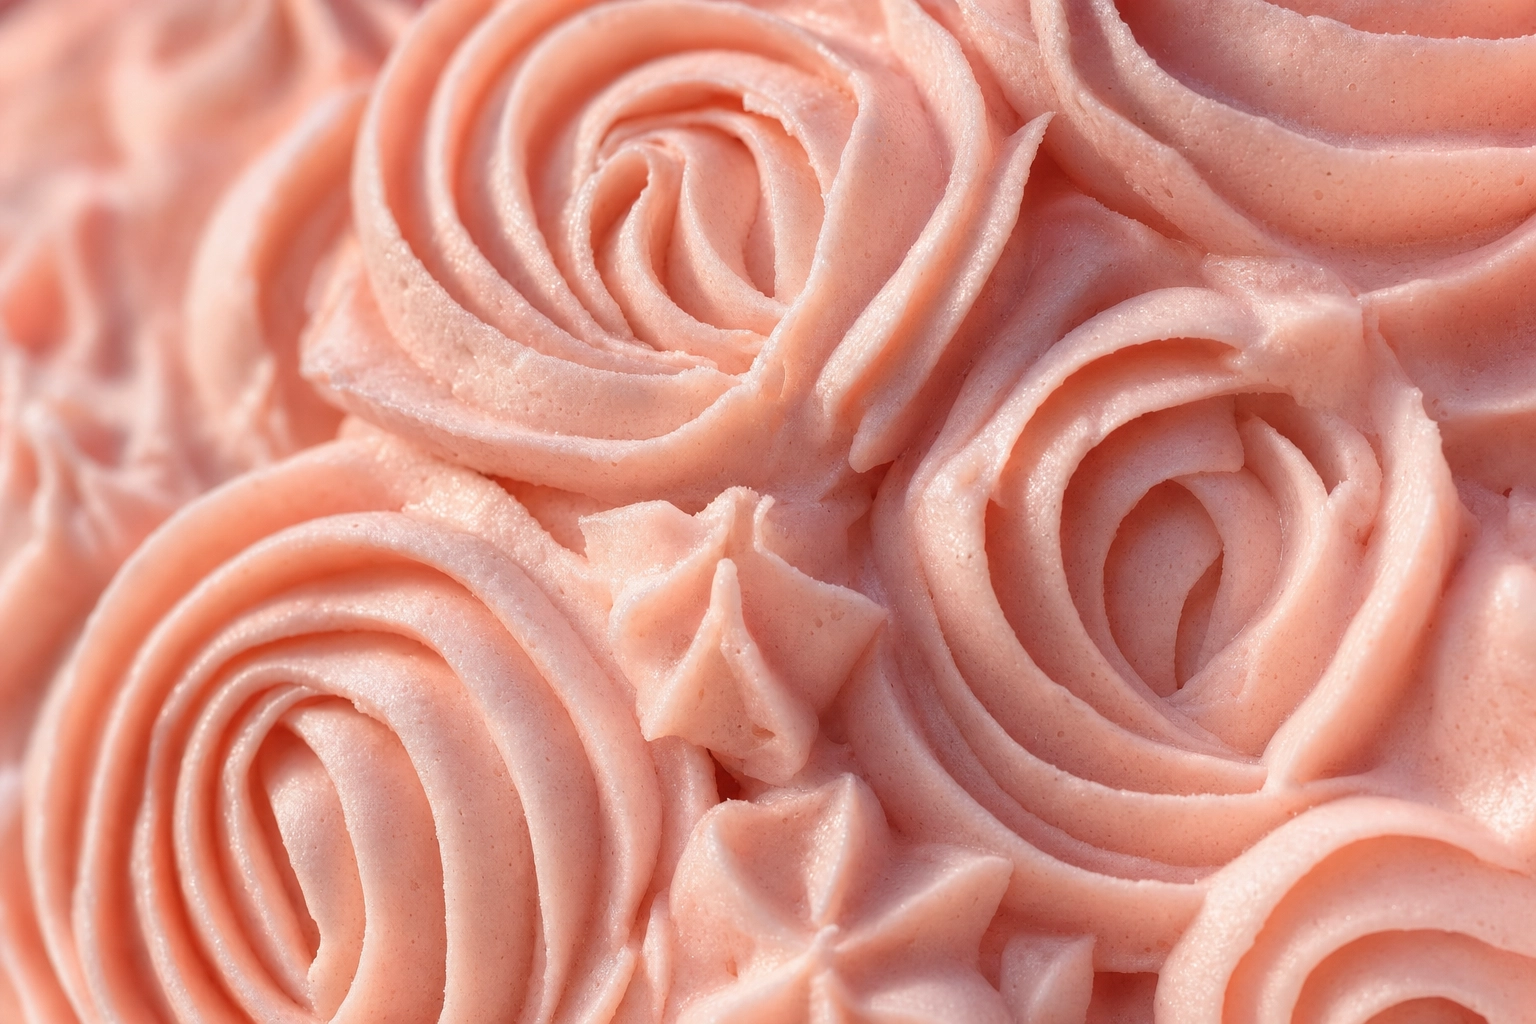 Macro close-up of pink buttercream rosettes with grazing light revealing piping texture — buttercream cake photography
Lighting fondant for that flawless magazine look
Fondant photographs well only when the light source is big and soft. A large soft light produces a large soft highlight, which the eye reads as a smooth surface. A small hard light produces a small hard highlight, which the eye reads as plastic.
In practice: bounce a window through a white sheet, or use a 24-inch or larger softbox. Position it slightly off-axis to the camera (45 degrees up and to one side). Avoid hard shadow edges along seams or panels — they advertise every minor imperfection in the fondant work.
In post-processing, ease back on clarity and contrast a touch. Pushing those sliders too far makes fondant look chalky.
 White fondant cake with large soft diffused highlight — magazine-style fondant cake photography
Choosing the right cake stand or pedestal
The cake stand sets the cake's voice before the viewer even reads the decoration. A delicate buttercream wedding cake on a chunky reclaimed wood slab reads as confused. The same cake on a slim marble pedestal reads as elegant.
A simple framework for picking the right stand:
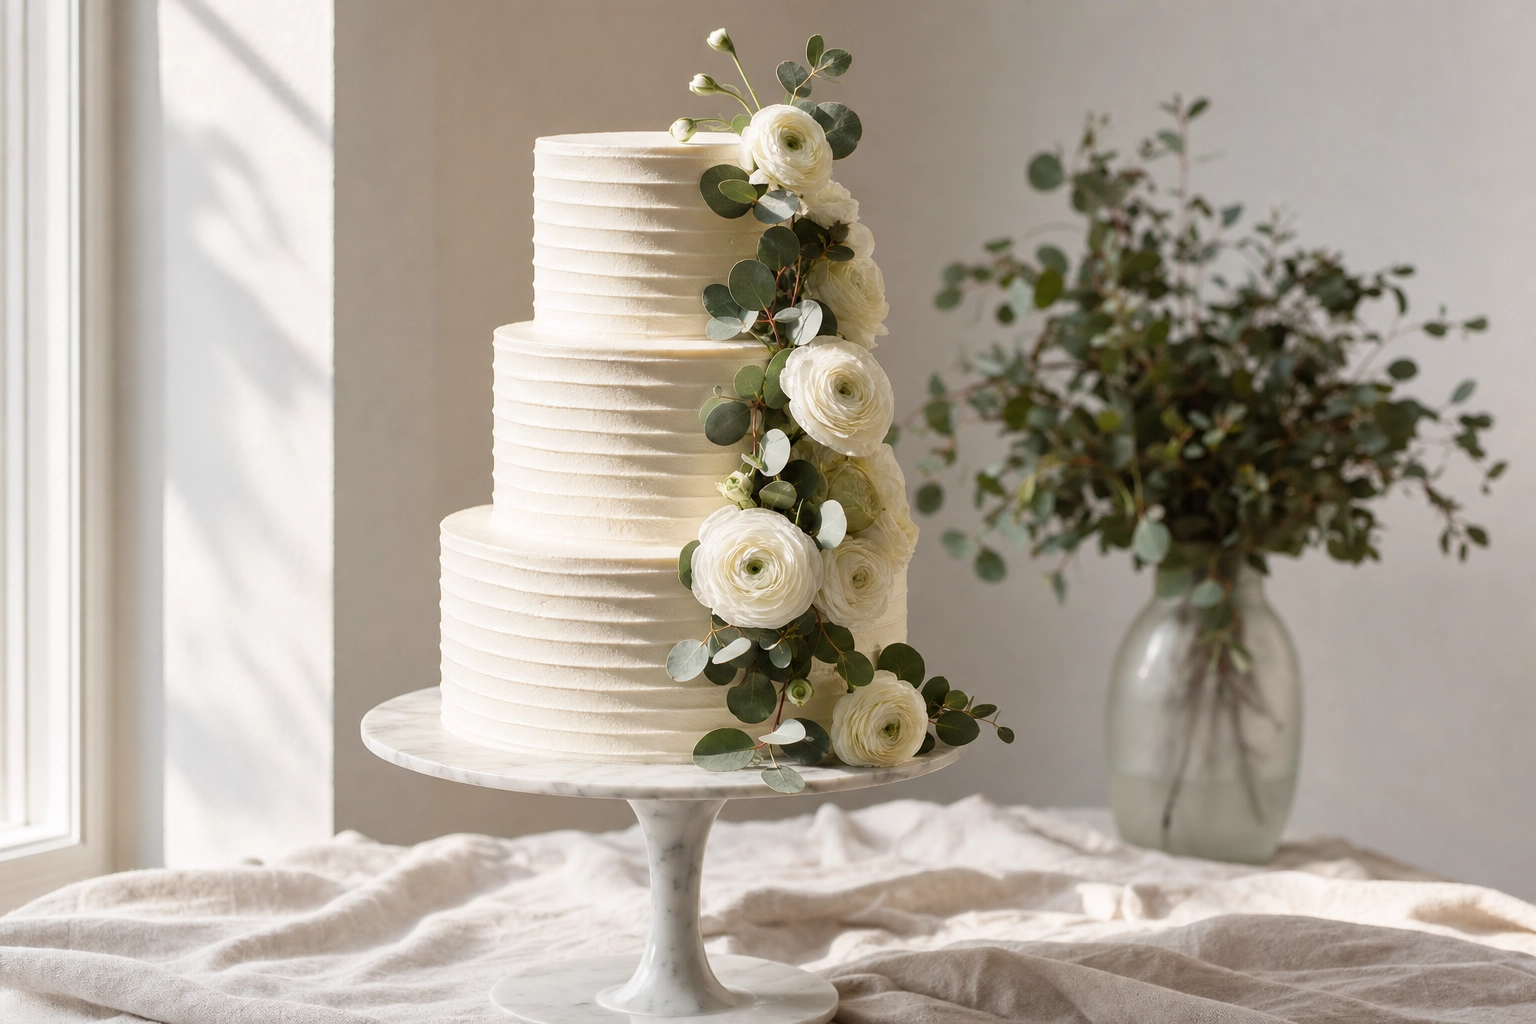
- Wedding and celebration cakes want marble, white ceramic, brass, or clear acrylic. Match pedestal height to cake height — a 14-inch tall three-tier needs at least an 8-inch pedestal to keep the proportions tall and elegant. A short stand makes a tall cake look top-heavy.
- Modern minimal cakes want low ceramic plates or sleek matte risers. The negative space around the cake is part of the design.
- Rustic and naked cakes want wood slabs, raw wooden cake boards, vintage galvanized trays, or stoneware with patina.
- Specialty patisserie wants a glass dome (for petits fours and macarons that need protection from glare), a polished mirror tray (for reflections under chandelier light), or a dark slate for chocolate work.
A useful gut check before pressing the shutter: would this stand look at home in a magazine spread? If not, swap it.
 Six different cake stands arranged on linen — marble, wood, ceramic, brass, acrylic, mirror — for cake photography
Backgrounds: matching the scene to the cake
The background should support the cake without competing for attention. Four backgrounds cover almost every use case.
Bridal and wedding is white-on-white with subtle tonal variation. An eggshell linen runner over a cream wall behind bone-china plates reads as elegant and timeless. Add a single sprig of greenery or a small floral cluster for context — never a full bouquet that fights with the cake's florals. Window light only.
Modern minimal uses a single solid surface: polished concrete, brushed plaster, a sheet of seamless paper, or a matte vinyl backdrop. Pantone-style color blocks work beautifully for modern bakery branding because they translate cleanly to e-commerce and Instagram grids.
Rustic pulls in reclaimed wood planks, hessian linen, vintage tile, and distressed metal trays. Warm white balance (closer to 4800K than 5500K) keeps the mood honest. Naked cakes, bundts, and country wedding cakes belong here.
Color-pop uses one saturated solid (cobalt, mustard, terracotta, deep emerald) behind a relatively neutral cake. Complementary color theory does the work: a yellow buttercream pops against cobalt blue; a pink rosette birthday cake against deep green leaves.
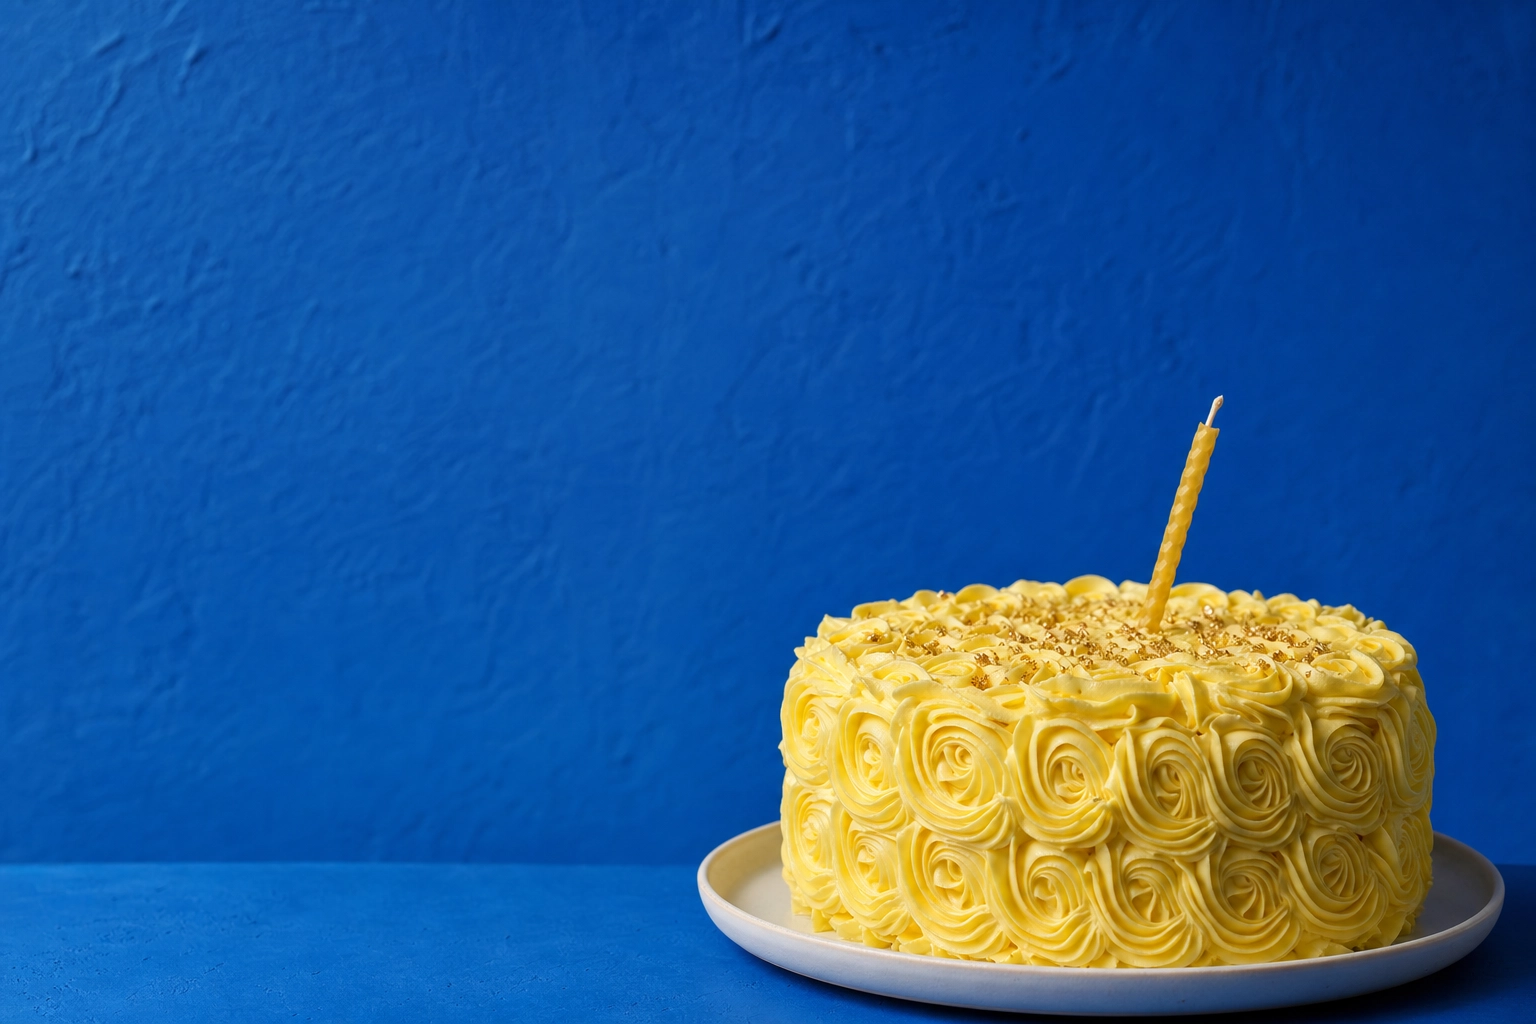 Yellow buttercream rosette birthday cake against cobalt blue background — color-pop cake photography backgrounds
A consistent background palette is also the fastest way to make a bakery's Instagram grid look professional. Pick two or three and stop improvising for every shoot.
Cake-type playbook: tips for every format
Different cakes have completely different demands. The same approach that flatters a glossy mousse dome will make a cheesecake look dull.
Layer cakes and sheet cakes
For a layer cake, the cross-section slice is the most valuable image you'll capture. Bake an extra layer cake the day of the shoot specifically so you can cut a fresh, clean slice — never the day-old leftover with crumb crumble. Chill the assembled cake for 30 minutes before slicing for a clean cut, and wipe the knife with hot water between every slice.
Sheet cakes need a top-down hero shot (the whole cake) plus a 45-degree close-up of a single square slice. Sheets are hard to make tall, so decoration carries the weight: textured frosting, fresh flowers, or a hand-piped birthday cake message.
Bundt cakes
Side-on at a slight upward angle (5-10 degrees) shows the fluted form best. A plain bundt is shy in photos — give it a powdered-sugar snowfall, a glaze drip cascading down the ridges, or a single anchor garnish (one fresh fig, a sprig of rosemary, three glossy cherries). Cluttered garnishes ruin the clean lines that make bundts beautiful.
Cheesecakes
Cheesecakes are the trickiest cake to photograph well. They're pale, flat, and visually monotone — every variable that hurts a photo. Three fixes:
- Add a colored garnish. A spoonful of macerated strawberries, a caramel drizzle, a scatter of fresh blueberries, or a basil leaf gives the eye an anchor.
- Use side-back light at roughly 45 degrees behind. The dense, tight texture of a baked New York cheesecake needs grazing light to show that it's cake, not pudding.
- Keep it cold during the shoot. Studio lights warm the surface within minutes and the top weeps. Shoot in short sets, return the cake to the fridge between takes.
Burnt Basque cheesecakes break this rule beautifully — the dark caramelized top is the hero, and it photographs like dark chocolate ganache. Lean into a black or deep-walnut background and let the burnish do the work.
Mousse cakes and entremets
Mirror glaze and glossy mousse domes demand backlight and a controlled reflection. Place the cake on dark acrylic or polished slate — the reflection underneath doubles the visual impact. Pipe and glaze fresh on shoot day; both melt or fog within 30 minutes at room temperature.
Naked and semi-naked cakes
The exposed crumb is the feature, not a flaw. Backlight it like texture: light from behind reveals the layer structure and crumb edges that make naked cakes feel handmade. A honey-toned wood background, a few wildflowers, and natural light from a single window covers most naked-cake briefs.
 Semi-naked rustic layer cake on oak board with golden backlight and wildflowers — naked cake photography
Drip cakes
Drip cakes look effortless and require the most pre-planning. The drip sets within 5-7 minutes once it touches a chilled cake, so every other element has to be ready first:
- Set up camera, tripod, lights, and background before the cake leaves the fridge.
- Take a focus-and-exposure test shot on an empty stand at final cake position.
- Heat the glaze to about 95°F (35°C) so it pours but doesn't run away.
- Pour the drip evenly around the edge, then immediately shoot.
- Capture the hero between minute 1 and minute 4 — fresh, glossy, mid-flow.
A 45-degree angle catches the drip's silhouette best. An overhead angle works for top-decorated drip cakes where the cascade is part of an arrangement.
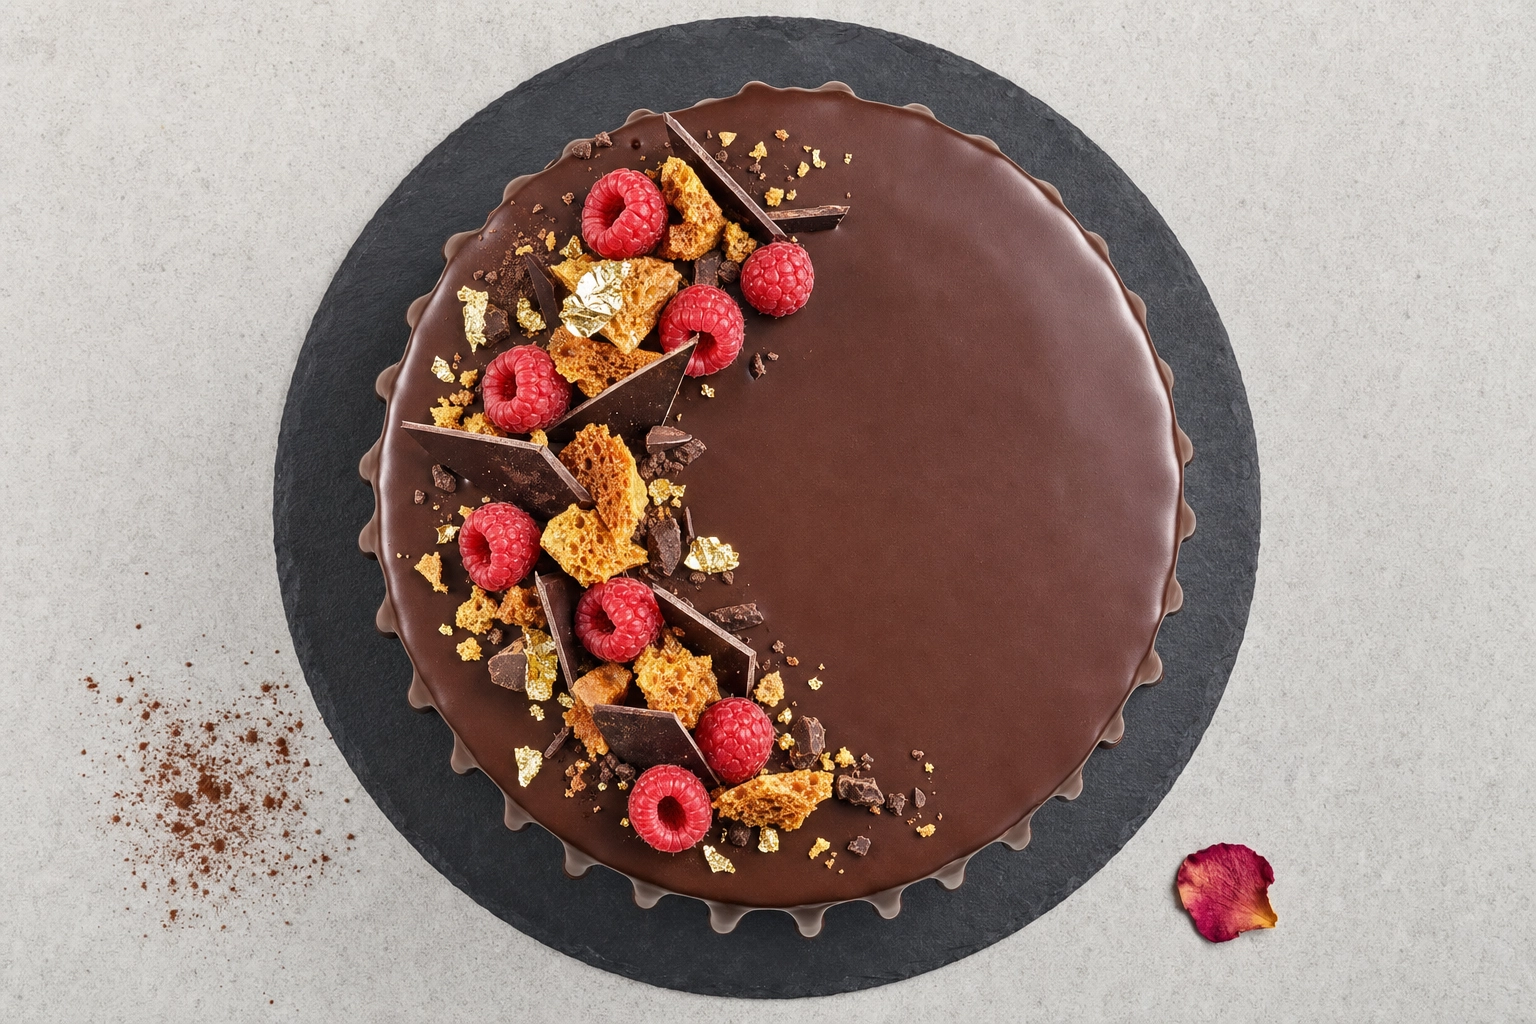 Overhead top-down view of chocolate drip cake on black slate with raspberries and gold leaf — drip cake flat-lay photography
Ice cream cakes
Ice cream cakes are the photography equivalent of working with live electricity. Schedule the shoot in a cool room (under 65°F / 18°C). Have the camera focused on an empty stand of the same height. Once the cake comes out of the freezer, the working window is about 90 seconds before melting becomes visible on camera. Backlight will create melt halos — keep lighting flat and diffused, then add interest in post.
Wedding cake photography choreography (the cake-cutting moment)
The cake-cutting shot has no retakes. The couple cuts the cake exactly once, the lighting at most venues is dim, and guests are usually crowded around the cake table at exactly the wrong angle. Choreography is everything.
Brief the couple in advance. Five minutes before the cut:
- The knife goes in the dominant hand of one partner.
- The other partner's hand cups theirs from behind — not on top, where it covers everything.
- They stand at a 3/4 angle to the camera, not flat-on. Flat-on hides the cake behind them.
- Pause for a beat with the knife touching the icing. That's the photograph.
Run a 5-shot sequence:
- Wide establishing shot — couple, cake, a slice of crowd reaction. 24-35mm focal length.
- 3/4 portrait of the couple with the knife touching the cake. 50mm or so. Faces and cake both in focus.
- Tight detail on hands, blade, frosting. 85mm or macro. This is the texture shot.
- Feeding shot — couple offering each other the first bite. Captured before any face-smashing tradition wrecks the frame.
- Aftermath — partial cake with the cut slice on a plate, knife resting beside. The quiet final beat.
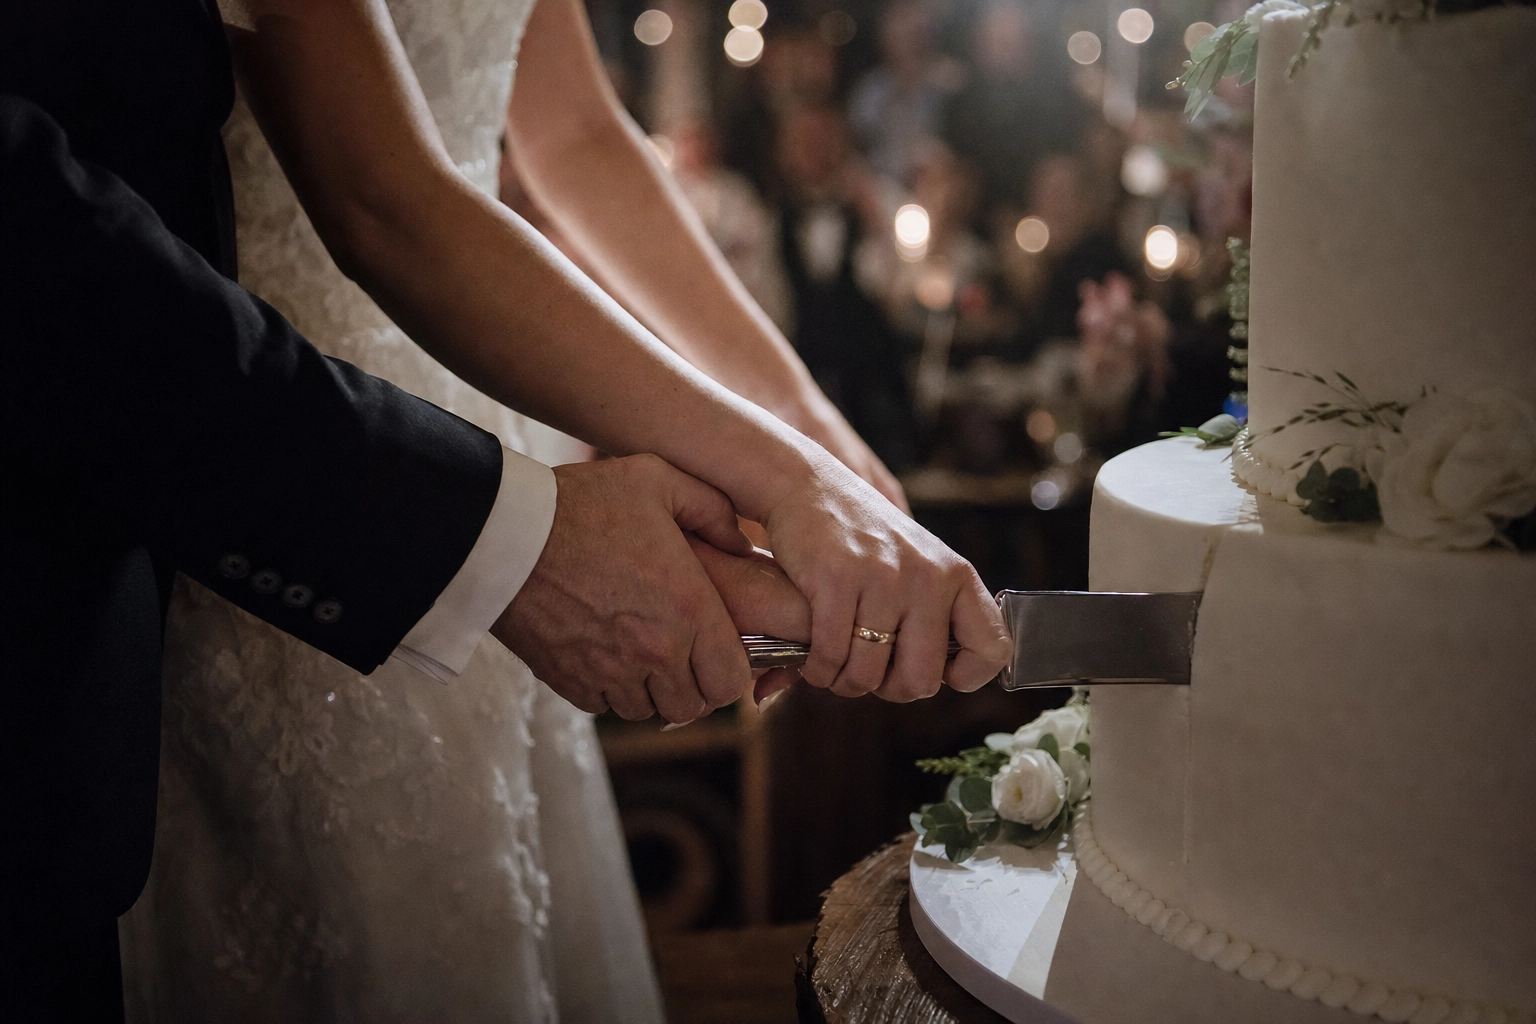 Couple's hands on knife mid-cut into white wedding cake with blurred reception background — cake cutting moment
Settings for dim venues: shutter 1/200, aperture f/4-5.6, ISO 1600-3200. Bounce flash off a ceiling or wall — never direct on-camera flash. Direct flash flattens skin tones and creates a harsh white circle on every glossy surface in the room, including the cake. The technical issue here is well documented in exposure compensation guides on Fstoppers — camera meters pull bright scenes toward middle gray, which is exactly the wrong instinct for a brightly lit cake on a dark dance floor.
The active window from first cut to first bite is roughly 30 seconds. Pre-position yourself before the couple approaches the cake. Once they start, work the sequence — you can't choreograph it backward.
Wedding vs editorial vs e-commerce: three different jobs
Same cake, three completely different briefs. Mixing them up is the most common professional mistake.
Wedding cake photography is storytelling first, product second. The cake exists inside a day. Wide shots show the venue, the table styling, the floral arrangements behind it. Mixed angles, mixed focal lengths. Available light, supplemented with small bounced flash. The cake might only get 12-20 minutes of dedicated camera time during a 10-hour wedding day, so prioritize the moments that can't be recreated. Wedding cake decisions — fondant vs. buttercream, tiers vs. single layer, traditional vs. modern — are well covered in Brides magazine's guide to wedding cake frosting if you need context on what the couple chose.
Editorial cake photography is concept-driven, magazine-style. One hero shot per recipe. Stylized props, deliberate color palette, controlled light. A pastry magazine spread might involve a food stylist, a prop stylist, and a half day on a single image. Angles are usually 45 degrees or directly overhead. Backgrounds are intentional — sometimes painterly, sometimes minimalist.
E-commerce and menu cake photography is the opposite extreme. Catalog consistency matters more than artistry. Same angle, same exposure, same background across every cake in a 50-item catalog. Customers scrolling a menu app should feel they're comparing apples to apples. Neutral background, single hero angle, clean lighting, color-accurate exposure. This is where modern AI food photo editor tools have replaced expensive catalog shoots almost entirely — they apply one consistent style to a whole catalog automatically.
Knowing which job you're doing before the shoot saves hours of editing later.
Where AI enhancement fits in modern cake photography
A traditional half-day food photography session in the US runs $700 to $1,400, plus prop styling and post-production. A full editorial day costs $1,500 to $3,500. For a small bakery generating new content weekly — a fresh birthday cake design every Friday, a new seasonal flavor every month — that math doesn't work.
AI food photography tools have changed the economics. The workflow:
- Bake and decorate as normal.
- Photograph the finished cake with a phone in decent natural light (window, no flash, 45-degree angle).
- Upload to the AI food photography platform.
- Apply a style preset (Delivery, Menu, Fine Dining) or build a custom background.
- Export a 4K studio-quality image in roughly 90 seconds.
Cost per image at FoodShot AI's Starter tier works out to about $0.36 for 25 polished images a month at $9/month annual — versus $35-$70 per image on a traditional commercial shoot.
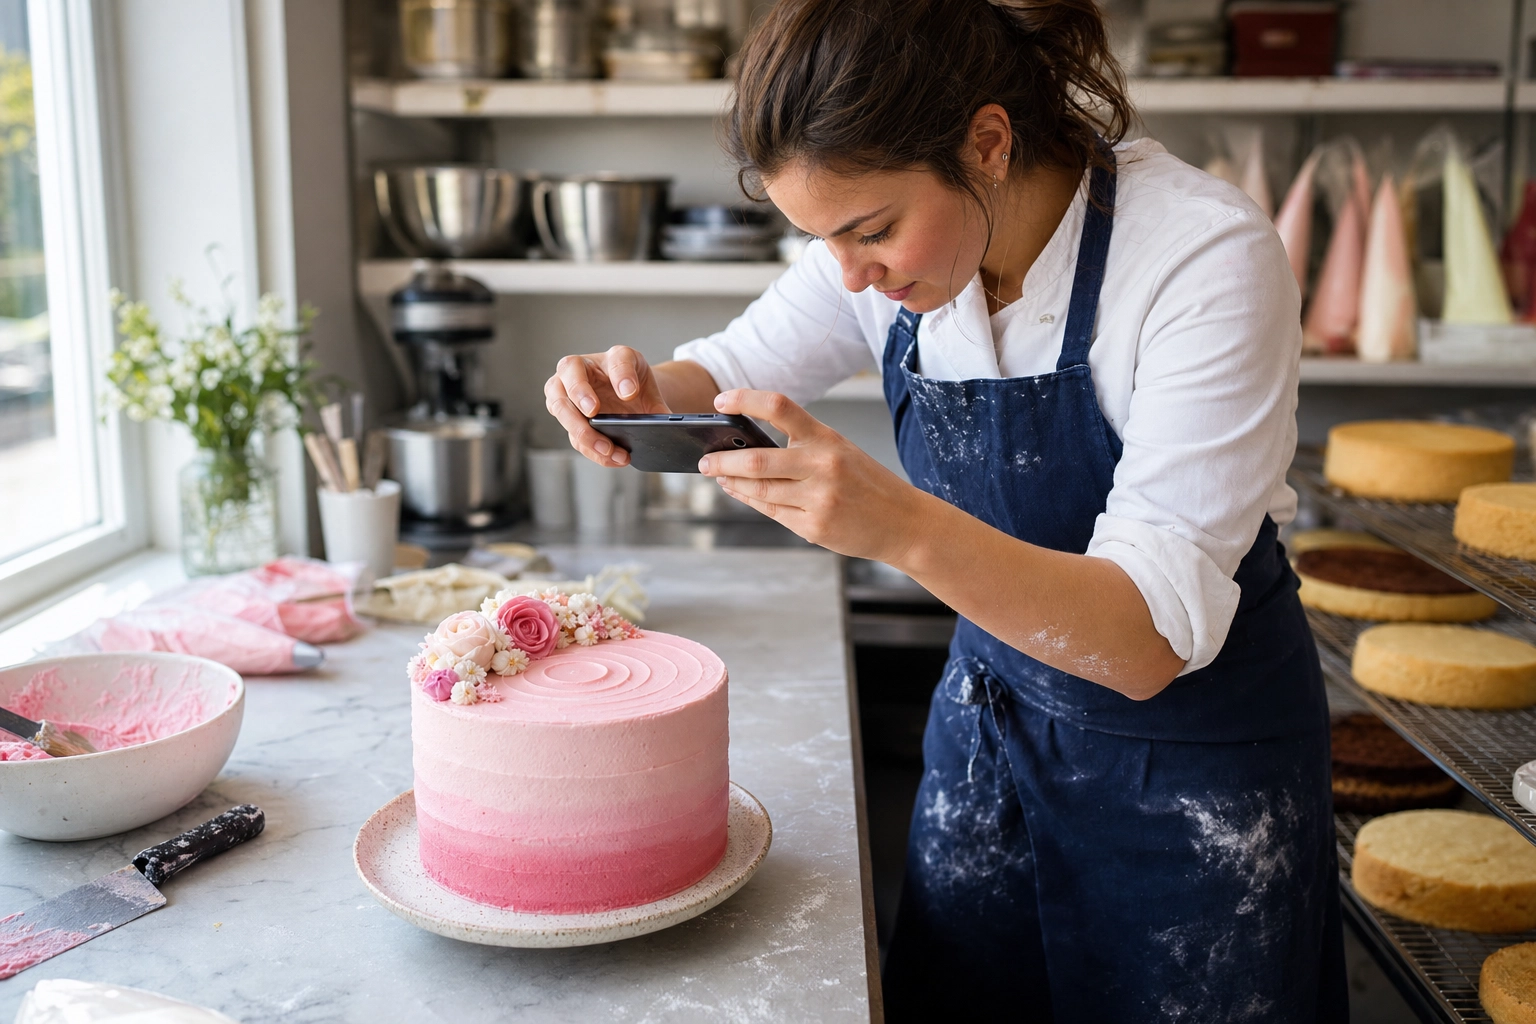 Pastry chef photographing pink ombre buttercream cake with smartphone in sunlit bakery — phone cake photography workflow
What AI does well: background replacement, lighting enhancement, plate and surface swaps, catalog consistency, seasonal variations of the same cake, social-media-ready cropping, Pinterest-style aesthetic matching.
What AI doesn't do: invent decoration that isn't on the cake. A drip cake without drips on the original photo won't come out with drips. AI enhances what's already there — it doesn't fabricate. Start with a well-exposed, in-focus phone shot of the actual cake.
When to still hire a human photographer: the wedding day itself (people, moments, emotion can't be reshot), a magazine cover or brand campaign with a custom concept, a hero shot for a flagship product launch.
For everything else — weekly menu updates, delivery app catalog refreshes, seasonal cake collections, hotel and resort dessert menus, birthday cake Instagram content — AI is faster, cheaper, and increasingly indistinguishable from a traditional shoot. The same approach scales to other formats too, like cupcake photography, cookie photography, broader dessert photography, and proper food styling for any pastry catalog.
Frequently Asked Questions
How do you photograph drip cakes without the drips drying mid-shoot?
Set up your entire scene first — camera on tripod, lights positioned, background ready, focus tested on an empty stand. Heat the glaze to about 95°F (35°C). Then pour the drip onto a chilled cake and shoot within 5-7 minutes, before it sets. The first 60-90 seconds after pouring give you the glossiest, most dynamic drip. If the glaze is too thick, thin it with a few drops of warm cream; if it runs too fast, refrigerate it for 60 seconds before pouring.
How do you photograph a white wedding cake without losing frosting detail?
White cakes fool camera meters into underexposing — the meter pulls bright scenes toward middle gray. Meter the brightest area of the frosting and add +1.3 to +2 stops of exposure compensation. Watch the histogram: highlights should approach but not touch the right wall. Enable highlight alert (zebras) on a mirrorless body. Soft side or back-side light only — direct on-camera flash will blow out the frosting and erase texture you can't recover.
What's the best angle for cheesecake photography?
Straight-on at plate level, or a low 25-30 degree angle. Cheesecakes are flat and dense, so overhead shots make them look like discs. The slight low angle shows the height and the crust edge. Always add a colored garnish — berries, caramel, herbs — to break up the monochrome pale surface.
Should cakes be photographed cold or at room temperature?
Most cakes photograph best when chilled. Cold buttercream holds crisp piping lines. Cheesecakes and mousses must stay cold. Fondant is unaffected by temperature in the short term. Buttercream and ganache get glossy and start to sweat once they warm past 70°F — chill the cake 15-30 minutes before shooting and shoot in short sets.
What lens is best for cake photography?
A 50mm f/1.8 is the most versatile single lens — sharp, fast, and forgiving on a tight budget. For close-ups of drips, mirror glaze, and buttercream texture, a 100mm macro is the gold standard. Phone wide-angle lenses work well at arm's length but distort at very close range; back up and crop in instead of pushing the lens into the cake.
How much does professional cake photography cost?
A professional food photographer charges $700 to $1,400 for a half-day session in most US markets, and $1,500 to $3,500 for a full editorial day. Wedding cake photography is usually built into the wedding photographer's $4,000-$8,000 day rate, or runs $300 to $500 for a standalone short session. AI cake photography tools deliver comparable image quality for $9 to $15 per month and produce 25 to 100 finished images in the same window.
Wedding-cake-worthy in 90 seconds
Cake photography rewards preparation. Decide which of the five essential shots you need, set up light that creates specular highlights instead of flat front-fill, pick a stand and background that matches the cake's voice, and learn the few rules specific to your cake type (chilled drips, +2 EV for white wedding cakes, fresh-piped mousse, cold cheesecakes).
For bakery photography and small food businesses that need new images every week — for menus, delivery apps, Instagram, birthday cake commissions, and seasonal campaigns — AI handles the heavy lifting. Snap a clean phone photo of the finished cake, upload to FoodShot AI's cake photography tools, pick a style, and have a magazine-quality image in the time it takes to brew a coffee.
The wedding day still belongs to the human photographer. Everything else now belongs to whoever ships fastest. See pricing or try a free generation and find out what your next bakery photo could look like.
