Sushi Photography: Capture Rolls, Sashimi & Sets Beautifully
Sushi might be the most photogenic food on the planet — and the most unforgiving to shoot. A single piece of nigiri carries glossy fish, individually defined rice grains, a brushstroke of nikiri glaze, and knife-work that took a chef years to master. Get the light wrong and all of that collapses into a flat, brownish blob that looks nothing like what's sitting on your counter. Welcome to the high-wire act of sushi photography.
This guide breaks it down step by step — nigiri, maki rolls, sashimi, omakase boards and chirashi bowls — so every shot looks fresh, precise and menu-ready. You'll get a repeatable five-shot list, the lighting rules that keep raw fish looking alive, plate and garnish choices that flatter every cut, and a faster AI route for when you don't have a studio day to spare.
Quick Summary: Great sushi photography comes down to three things: shoot fast (fish loses its sheen within minutes of cutting), light it cool and soft from the side (to keep fish fresh and rice grain visible), and use a dark background (to make color pop). Shoot nigiri at 45°, roll cross-sections and chirashi bowls top-down, and sashimi in a fan.
Why sushi is the hardest food to photograph
Most food forgives a sloppy photo. A burger still reads as a burger under bad light. Sushi doesn't get that grace. Here's what makes it so demanding:
- Rice grain has to stay visible. Properly seasoned shari is a mound of individual, glistening grains. Flatten the light and it turns into a white lump — and at delivery-app thumbnail size, that lump is all anyone sees.
- Fish loses its glisten fast. The wet sheen on a fresh slice of salmon or tuna peaks the moment it's cut and dulls within minutes as the surface dries. Red fish like maguro also turns brown and muddy under a direct on-camera flash.
- Nori softens on the clock. A hand roll's nori is crisp and crackling for maybe 90 seconds after assembly before kitchen humidity turns it chewy. Shooting temaki or futomaki means racing a timer.
- Precision has to read. A chef's clean, even slices and a tidy rice mound are the whole point. Messy plating or a smudge of soy on the plate rim undoes the craft instantly.
- Glare is everywhere. Soy sauce, eel sauce, nikiri glaze and shiny lacquer plates all throw harsh hotspots that blow out detail.
There's also a subtler trap: register. Light a premium omakase course like a fast-casual menu and it reads as gas-station sushi. The fish can be flawless, but the wrong lighting tells the wrong story about price and quality — and for a sushi restaurant, that gap shows up directly in orders.
The 5 essential sushi photography shots
You don't need fifty setups. You need five reliable shots that cover almost any Japanese menu — and a clear angle for each one.
1. The nigiri pair at 45°
Shoot nigiri in pairs (it's how it's served, and two pieces fill the frame better than one) from a 45° angle — roughly the eye line of someone leaning in for a bite. That angle shows the slice of fish draping over the rice mound, gives you real depth, and lets the topping — the neta — actually read.
Pro food photographer Jim Sullivan put the metering rule perfectly in Popular Photography: "meter for the fish, but you want to make sure you capture the texture of the rice." Leave a little negative space — a sliver of bare plate or counter — so the eye lands on the nigiri instead of fighting clutter.
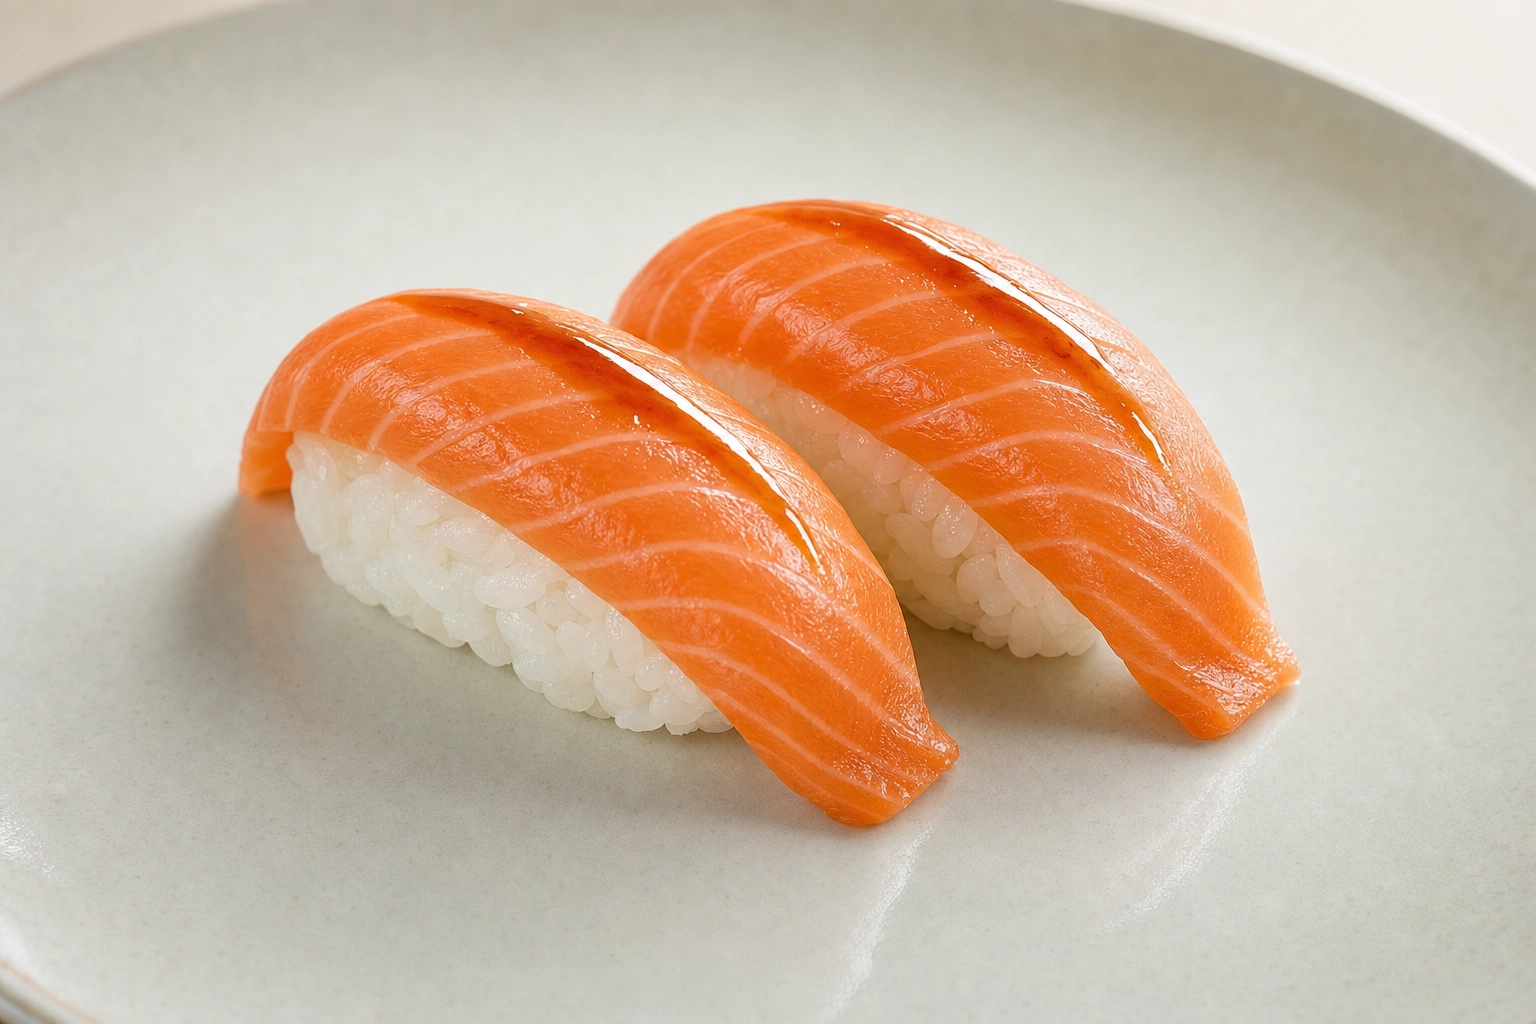 Salmon nigiri pair shot at a 45-degree angle showing fish drape and visible rice grains with negative space
2. The roll cross-section, top-down
A cut roll is all about the reveal: the spiral of rice, nori and filling. Stand the cut pieces upright on their ends and shoot straight down. Top-down turns those circular cross-sections into a clean, graphic pattern — symmetrical, colorful and instantly readable even on a phone screen. It's the single most thumbnail-friendly sushi shot you can take, which is exactly why it dominates delivery menus.
 Top-down view of an uramaki sushi roll cut into pieces showing colorful rice, nori and filling cross-sections
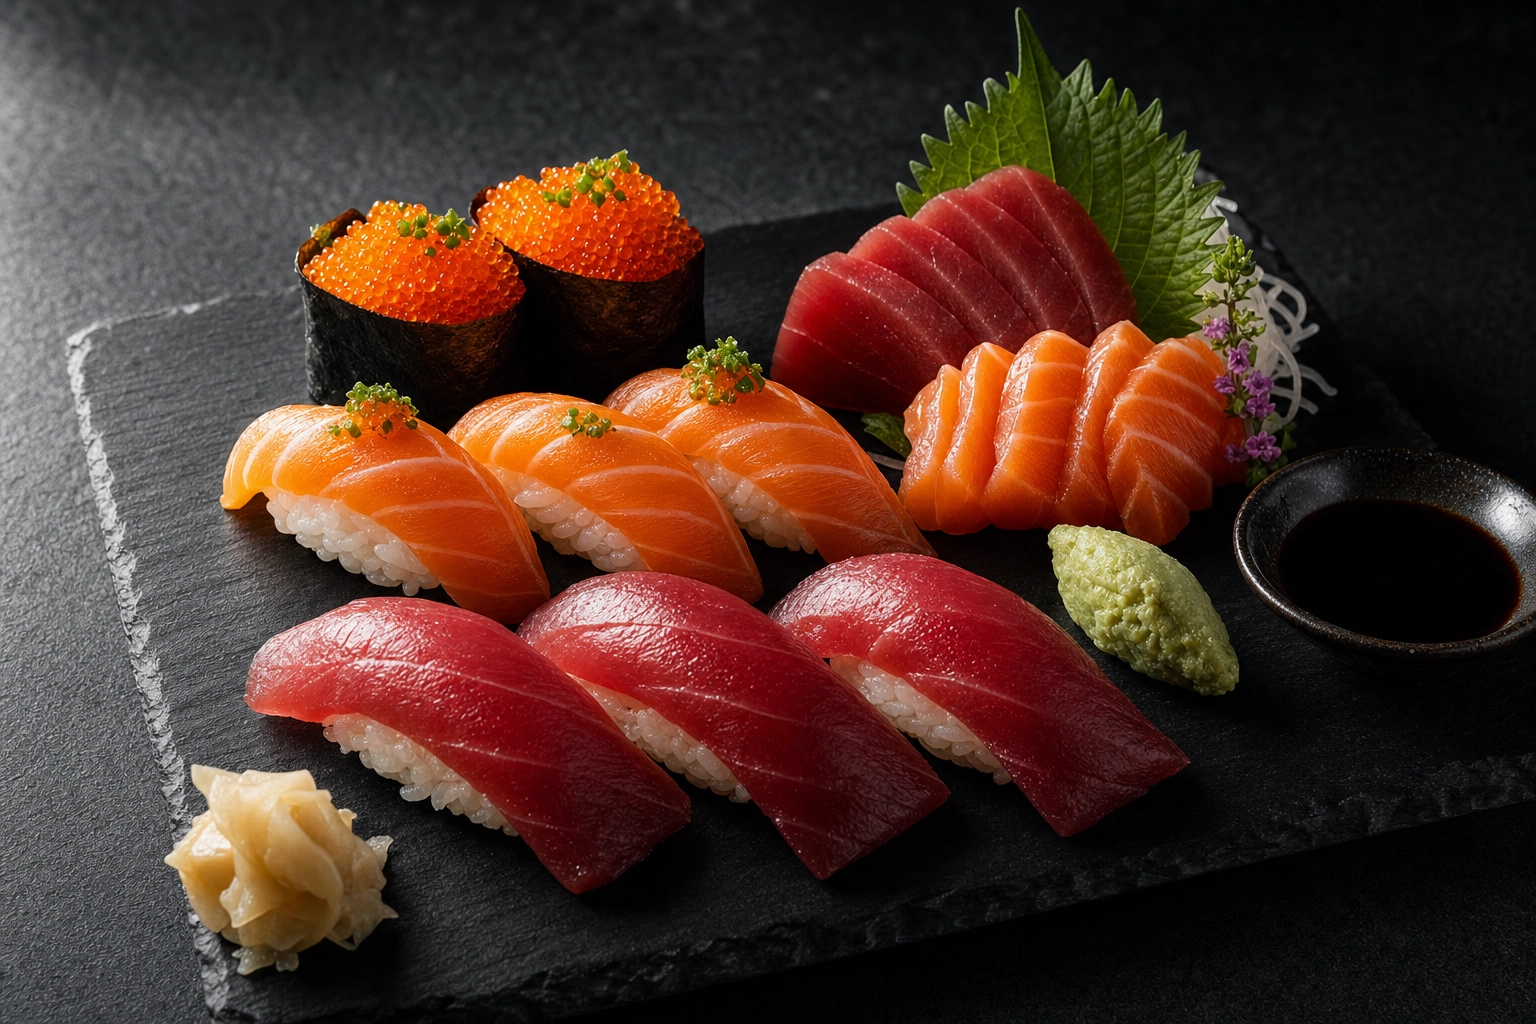
3. The sashimi fan
Sashimi is pure fish, so the photo lives and dies on color and knife-work. Fan the slices in an overlapping row or arc so each cut edge catches the light and you can see the gradient — the pale belly fading to deep red on tuna, the orange striping of salmon. Keep the white balance cool here (more on that below) and drop it on a dark surface so the color jumps.
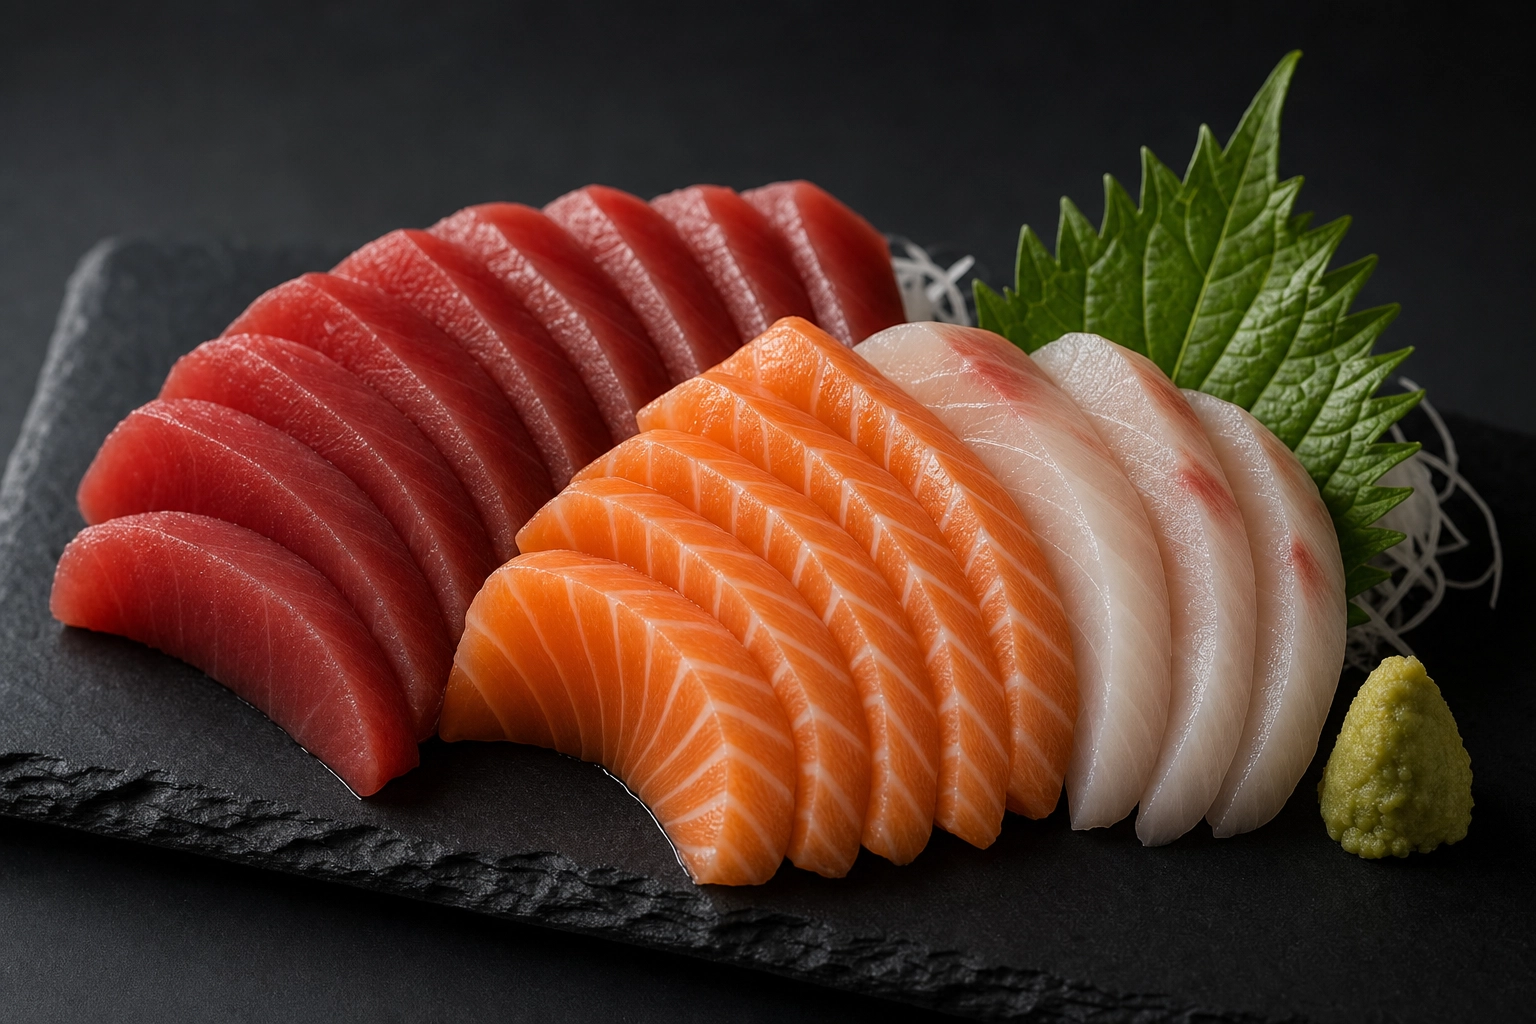 Fan of tuna, salmon and white fish sashimi slices on dark slate with shiso leaf and wasabi, cool lighting
4. The omakase course progression
For omakase and fine dining, one hero shot isn't the story — the sequence is. Photograph each course in the same style and lighting so they read as a set: a grid or carousel that walks a diner through the meal. Consistency is everything; a single warm frame in a cool set breaks the spell. This is gold for social carousels and tasting-menu pages.
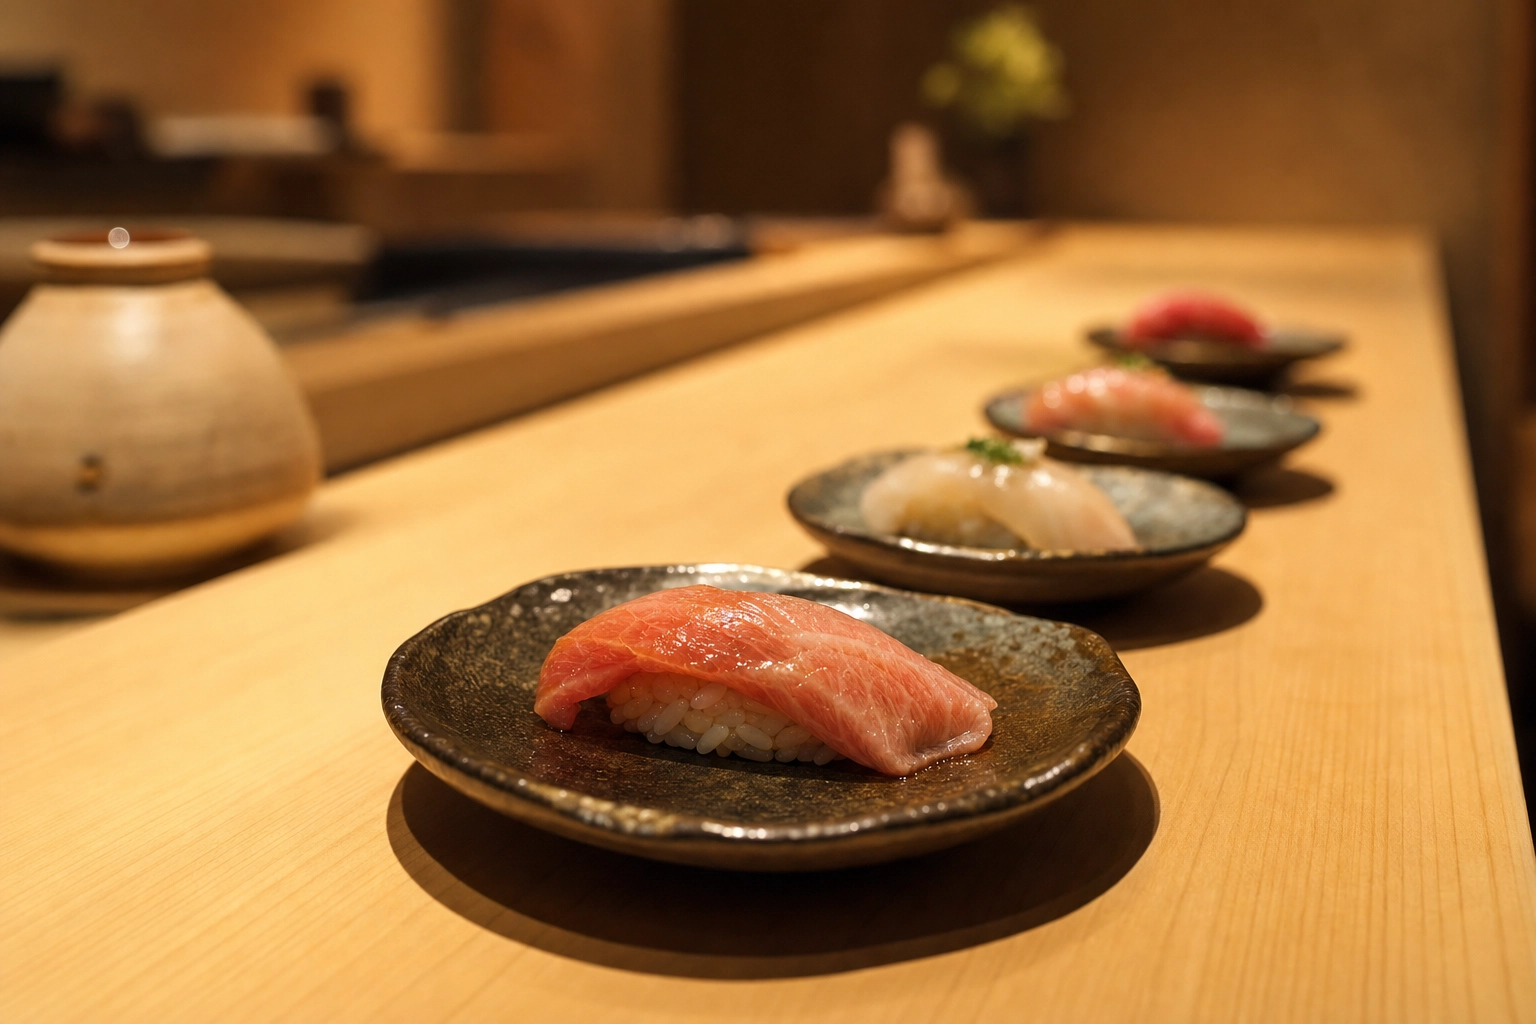 Omakase nigiri courses lined along a hinoki cedar counter under warm tungsten light, receding into soft focus
5. The chef's hands in action
Nothing signals craft like the itamae's hands — pressing a nigiri, brushing on nikiri, or drawing a yanagiba knife through a loin of tuna. A human element adds authenticity and movement that plated shots can't. Bump your shutter speed up to freeze the motion, or let the blade blur slightly for energy.
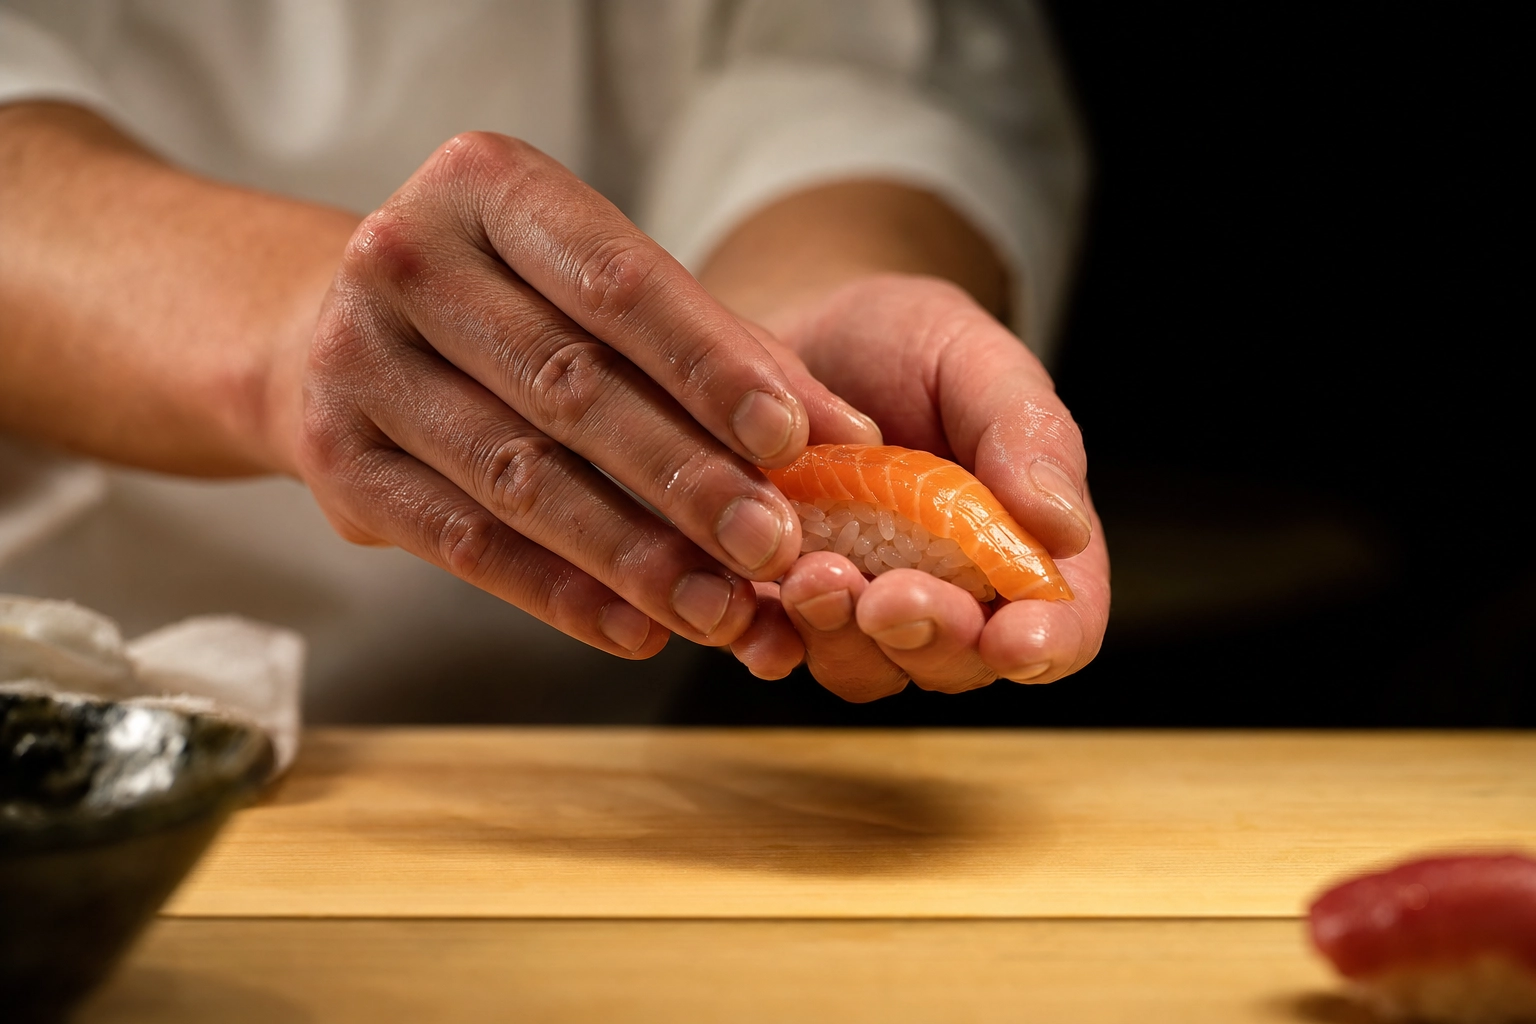 Sushi chef's hands pressing a slice of salmon onto vinegared rice to shape nigiri on a cedar counter
Lighting sushi: cool, soft and directional
If you only fix one thing, fix the light. Lighting does more for a sushi photo than any plate, prop or camera body. Three principles carry almost every shot.
 Sushi photography lighting setup with diffused window light, a white reflector, and a phone on a small tripod
Keep white balance cool to keep fish looking fresh
Raw fish reads as "fresh" when it's clean and slightly cool. Warm, yellow light — like most restaurant tungsten — makes salmon and tuna look oily, aged, almost cooked. Nudge your white balance toward neutral or very slightly cool and the fish snaps back to life while the rice stays white instead of going cream.
One caveat: don't overcorrect. Push too far into blue and you'll suppress appetite — our brains read blue food as spoiled. You're aiming for "just-cut and clean," not "refrigerator shelf."
Use soft, directional light for rice grain and sheen
The easiest light source is free: soft, natural light from a large window. Hard light blows out the wet highlights on fish; flat front light erases the texture of the rice. The fix is soft, directional side light. Diffuse that bright window with a sheer curtain (or use a softbox), place the dish so the light rakes across it from the side or back-side, and pop a white reflector on the opposite side to lift the shadows. That raking angle is what separates each rice grain and lays a controlled glint across the fish.
Culinary schools teach the same fundamentals — the Institute of Culinary Education warns against backlighting that leaves your subject dark and hazy, recommending light that approaches from the side. And whatever you do, kill the on-camera flash: it flattens the dish, browns the tuna and throws ugly hotspots across every glossy surface.
Go dark for color pop
A dark background is sushi's best friend. Set ruby tuna, orange salmon and bright tobiko against dark slate or walnut and the colors leap off the surface through sheer contrast — it's the fastest way to make your sushi images look expensive. Dark backgrounds also read as premium and strip out distractions, so the fish is the only thing your eye can land on. To tame glare on soy and glaze, keep your light diffused, lower its angle, and reach for matte plates over shiny ones. For a deeper dive into modifiers, angles and reflectors, see our full food photography lighting guide.
Sushi photography tips for every type
Every sushi style has a flattering angle and a styling note. Here's the cheat sheet.
Nigiri, maki rolls and sashimi
- Nigiri — 45° angle, shot in pairs, with negative space. Brush on a touch of nikiri right before shooting for a fresh glaze.
- Maki rolls — show the cross-section. Hosomaki (thin, single-filling), futomaki (fat, multi-filling) and uramaki (inside-out, rice on the outside, like a California roll) all photograph best when you reveal the spiral of filling, either top-down or straight-on at eye level.
- Sashimi — fan the slices, cool white balance, dark backdrop. Because there's no rice to anchor it, lean on a small garnish — a shiso leaf, a wasabi quenelle — for scale and color.
Hand rolls, dragon rolls and chirashi bowls
- Temaki (hand rolls) — shoot immediately. The cone of nori is crisp for seconds, not minutes. Stand it upright in a temaki stand or have someone hold it so the cross-section of rice and filling shows at the top.
- Dragon roll and specialty rolls — these are built to impress, with overlapping avocado "scales," eel, sauce drizzle and a scatter of tobiko. Shoot top-down or at 45°, and watch the sauce: too much glaze becomes a glare slick, so wipe the plate and apply sauce sparingly just before the shot.
- Chirashi and donburi bowls — scattered sashimi over seasoned rice is a top-down story. Shoot straight overhead to capture the full arrangement of fish, roe and garnish, and fill the frame with the bowl.
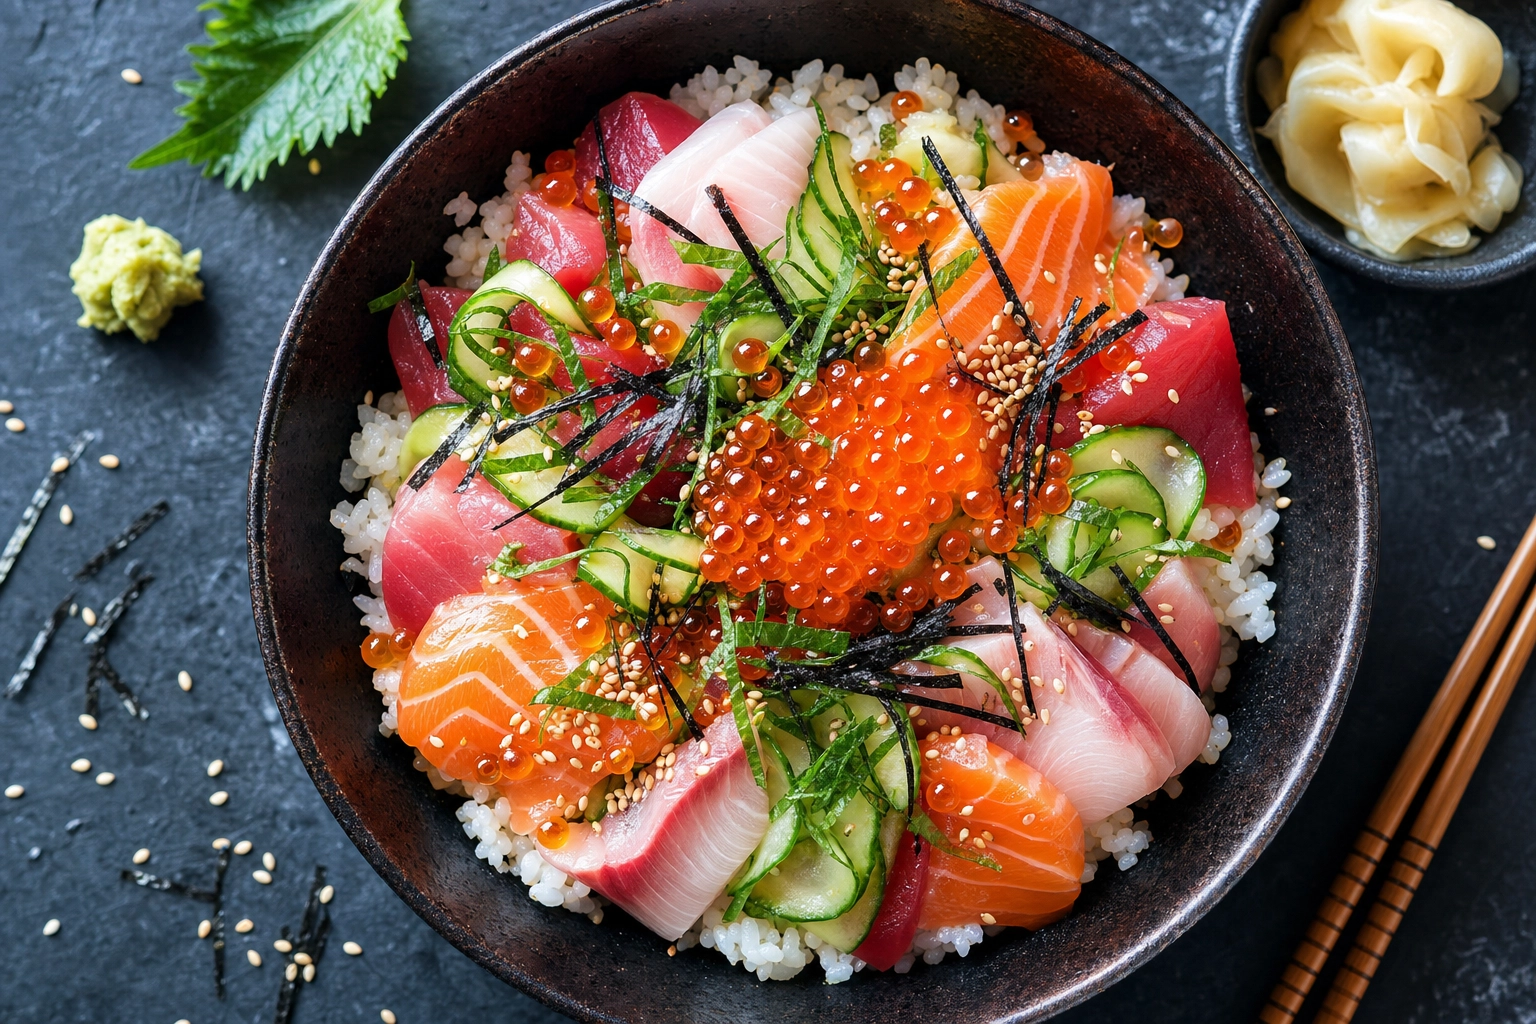 Overhead chirashi donburi bowl with scattered tuna, salmon, yellowtail and ikura roe over seasoned sushi rice
For more on plating and props across Japanese cuisine, our Asian food photography guide and seafood photography breakdown go deeper on handling raw fish.
Plates, boards and backgrounds that flatter sushi
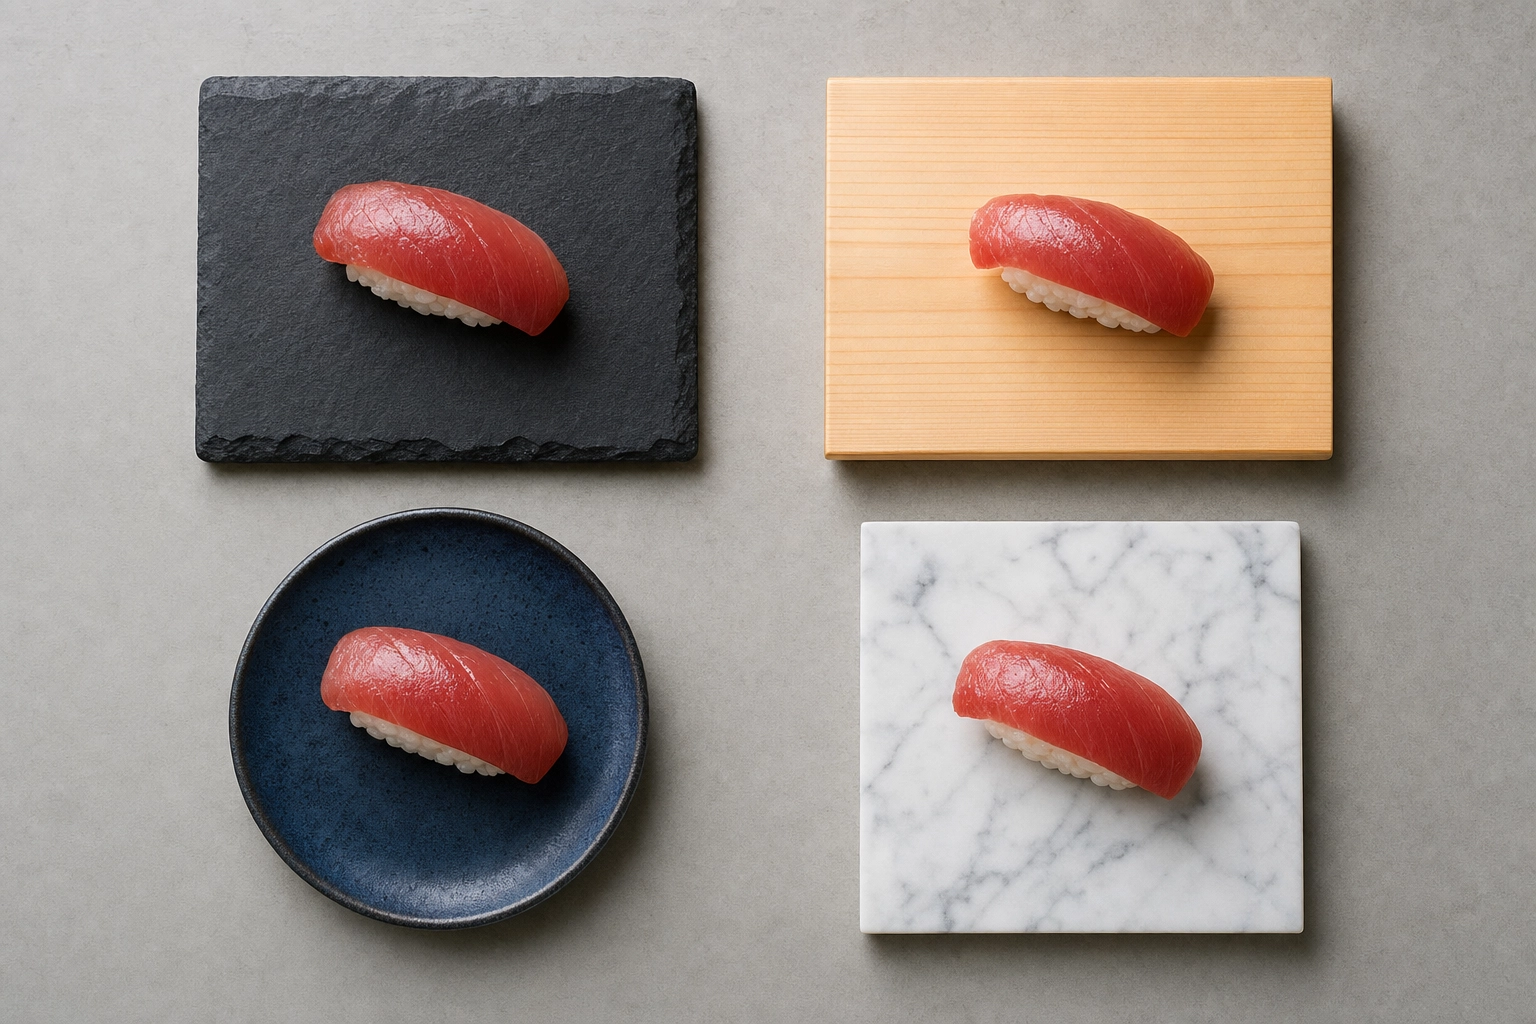 Overhead comparison of tuna nigiri on slate, cedar wood, matte ceramic, and marble sushi serving surfaces
Your surface sets the entire register of the shot. Match it to your brand:
- Dark slate — maximum drama and contrast. Makes color pop and reads as high-end omakase. The default for premium counters.
- Hinoki cedar and blonde wood — warm, authentic, unmistakably Japanese. Cedar omakase boards and bamboo mats signal a traditional sushi-ya.
- Matte ceramic — clean and neutral in white, charcoal or indigo. Versatile and glare-free, great for everyday menu shots.
- White Carrara marble — bright, modern, editorial. The look for a contemporary bistro or a lifestyle social feed.
Two rules apply across all of them. First, avoid shiny or reflective props — glossy lacquer and polished steel catch the light at odd angles and create glare you'll fight in every frame. Second, keep it minimal. Negative space is a feature in Japanese presentation, not a bug; a single piece of fish on a large, quiet plate looks more expensive than a crowded one.
Styling the details: ginger, wasabi, tobiko and micro greens
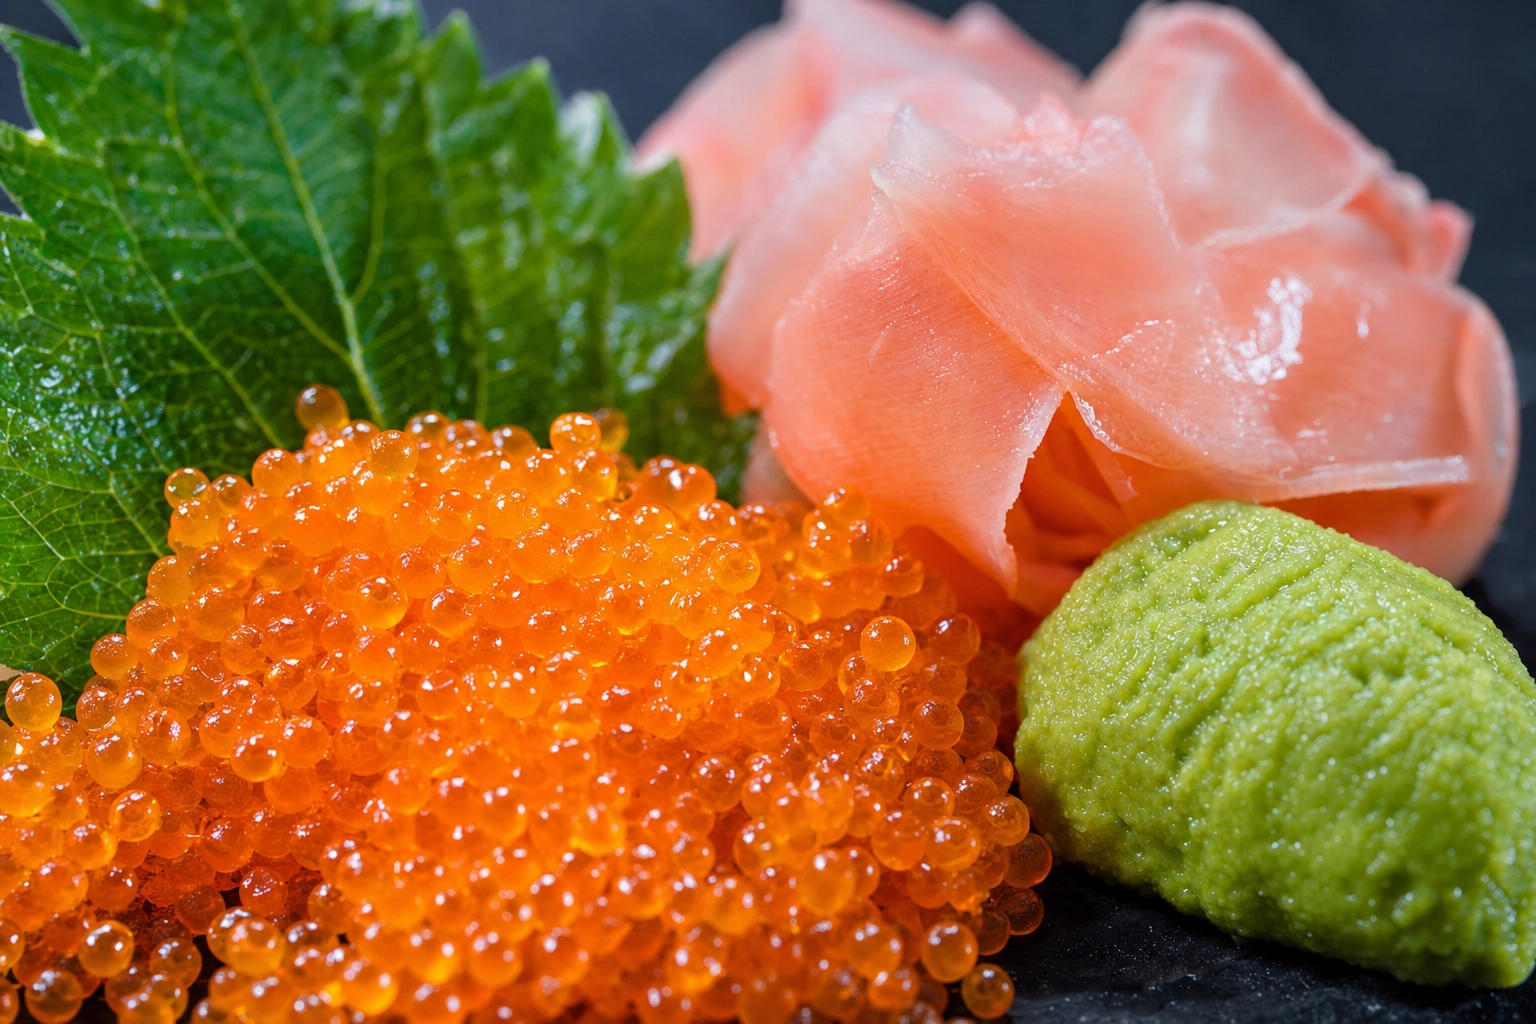 Macro close-up of sushi garnishes: glossy orange tobiko, pink pickled ginger, green wasabi, and shiso leaf
Garnishes are where a good sushi photo becomes a great one — they add color, height and a sense of place. Use them with restraint:
- Pickled ginger (gari) — soft pink ribbons. Fold a small mound to one side as an accent; never let it crowd the fish.
- Wasabi — a sharp green quenelle or neat mound adds a punch of contrasting color. Keep the edges crisp; a melting smear looks careless.
- Tobiko and ikura — flying-fish roe and salmon roe are tiny, glossy beads that catch light beautifully. A scatter of orange tobiko or a glistening nest of ikura adds texture and sparkle.
- Shiso and micro greens — a fresh shiso leaf or a few micro greens bring living green and a little height. Keep them crisp and unwilted; tired garnish photographs as tired food.
The hard part is knowing when to stop. An over-garnished plate looks busy and cluttered, and it buries the fish you're trying to sell. When in doubt, remove one element. Our food styling guide covers the broader principles of balance, height and color theory.
Action shots that sell the craft
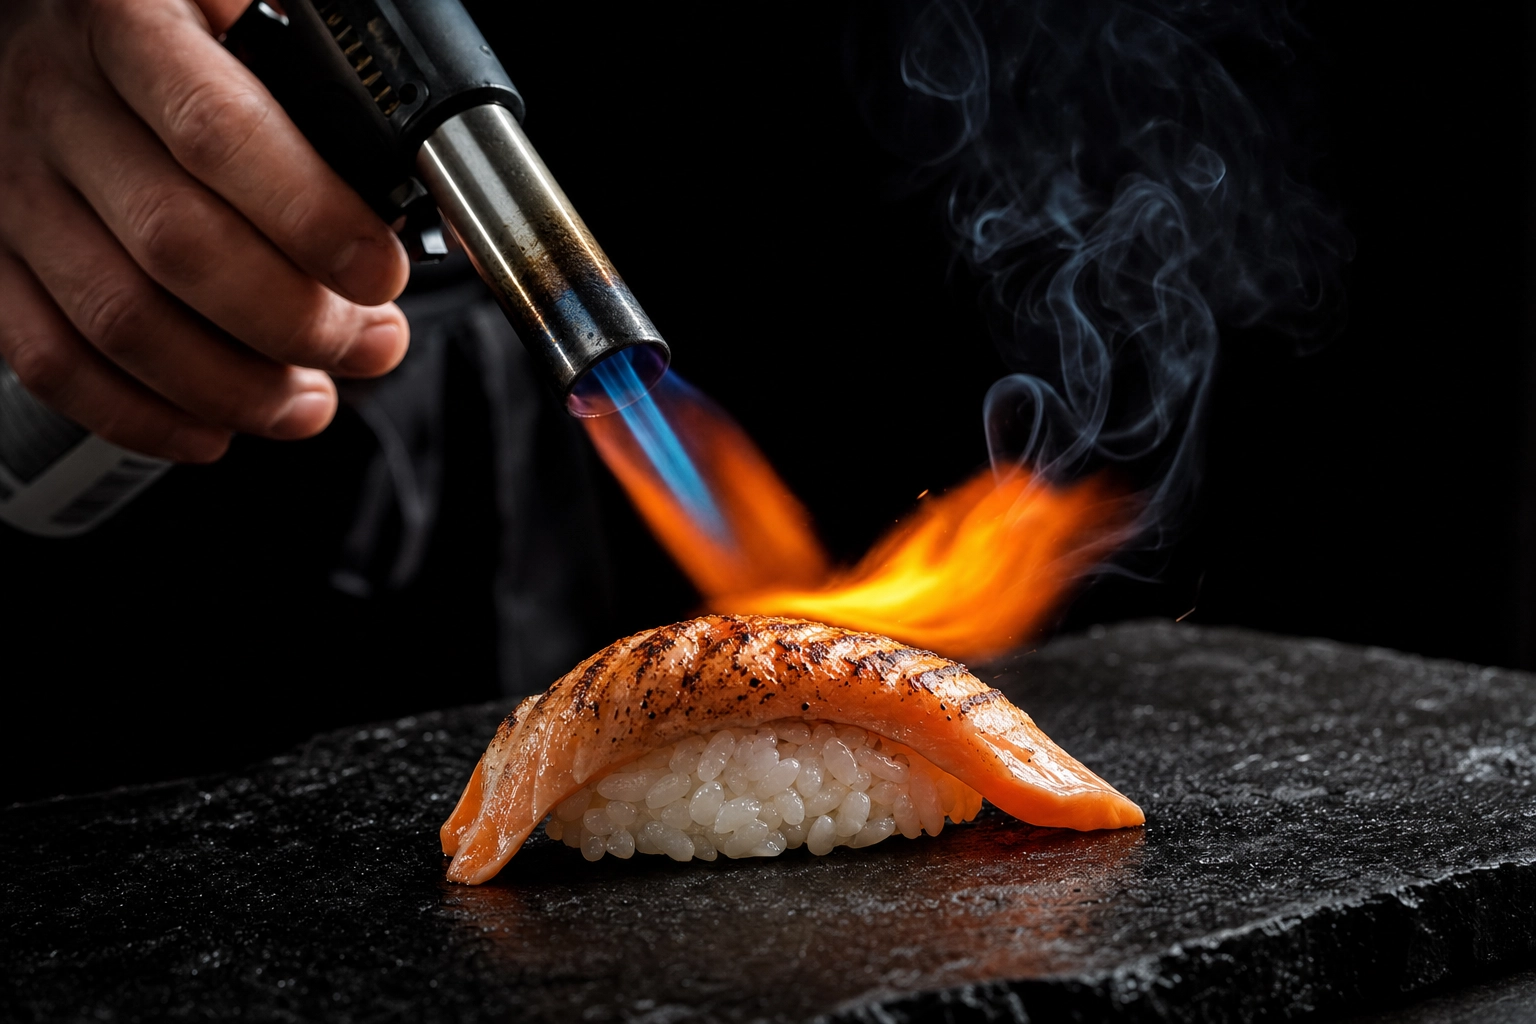 Chef torch-searing aburi salmon nigiri, flame caramelizing the fish against a dark dramatic background
Plated shots show the product; action shots show the experience. Three are worth building into any sushi shoot:
- The soy or sauce pour — a thin stream of soy, or a brush of glossy eel sauce over unagi, adds motion and gloss. Freeze the stream with a fast shutter (1/500s or quicker) or catch it mid-drizzle.
- The chef cutting — an itamae drawing a long yanagiba blade through a tuna loin is pure craft. Frame tight on the hands and the knife.
- The aburi torch sear — torch-seared (aburi) nigiri is made for the camera. The flame caramelizes the fish surface into a glistening, blistered finish. Shoot it in a slightly darker setting so the flame reads bright and dramatic against the shadows, then catch the rising sheen the instant the torch lifts.
These shots take timing and a few attempts. Burst mode is your friend.
The AI shortcut: studio sushi photos in 90 seconds
Here's the honest tradeoff. A professional sushi shoot delivers gorgeous results — and it costs accordingly. Industry pricing runs roughly $25–$300 per dish, with photographer day rates of $700–$1,400 for their time alone, plus $500–$1,200 a day for a food stylist and another $150–$400 in props. For a restaurant menu with thirty rolls, that math gets painful fast. And sushi doesn't wait: the fish you styled an hour ago has already lost its sheen.
That's the gap FoodShot AI closes. Snap a clean, well-lit phone photo of your dish, upload it, and the AI transforms it into studio-quality, menu-ready sushi photography in about 90 seconds — at roughly 95% less than a traditional shoot. It's built specifically for the challenges above: holding rice-grain definition, preserving fish glisten, and keeping nori reading crisp.
Here's the workflow:
- Shoot clean. Get the sharpest, best-lit phone photo you can — soft side light, neat plating, no flash. The better your input, the better the output.
- Upload and pick a style. Choose from 200+ styles tuned for sushi — bright counter daylight, intimate omakase tungsten, dramatic dark-slate top-down. Or use Builder Mode to set the surface (slate, hinoki cedar, donburi bowl), vessel and props one decision at a time.
- Generate variations. Get multiple looks from a single upload and pick the best for each platform.
- Stay consistent with My Styles. Upload three or four reference photos and FoodShot learns your sushi-ya's signature look, so your nigiri set, maki assortment and omakase board all read as one brand.
- Export in 4K. Print-ready for menus, billboards and packaging — with a commercial license on paid plans.
One important note: FoodShot enhances real photos — it needs an actual shot of your dish to work, and it isn't a fake-food generator. That's a feature, not a limit: your customers get the sushi you actually serve, just photographed like it's on a Ginza counter. Dedicated AI sushi photography styles handle every cut, from chirashi bowls to dragon rolls.
You can start free with 3 credits (no credit card), and paid plans begin at $15/month with the commercial license and 4K output included. See pricing for the full breakdown.
Frequently Asked Questions
How do I keep raw fish looking fresh in photos?
Speed and light. Shoot within a few minutes of cutting, before the surface dries and dulls. Use a neutral-to-slightly-cool white balance so the fish looks clean rather than oily and yellow, light it with soft, directional side light to bring up a natural sheen, and never use on-camera flash — it browns red fish like tuna and flattens the whole dish. A light brush of nikiri or a fine water mist just before shooting can restore a fresh glisten.
What's the best way to photograph a sushi roll cross-section?
Cut the roll cleanly with a wet, sharp knife, then stand the pieces upright on their cut ends. Shoot either straight down (top-down) for a graphic, symmetrical pattern or straight-on at eye level to show the height of the spiral. Soft side light defines the layers of rice, nori and filling. Wipe any stray grains or sauce off the plate first — at thumbnail size, every smudge shows.
Why do dark backgrounds work so well for sushi?
Contrast. The vivid colors of sushi — orange salmon, ruby tuna, bright tobiko, green wasabi — pop hardest against a dark slate or walnut background, and that contrast is what makes them read at a glance on a crowded menu or feed. Dark backgrounds also strip out visual clutter and signal a premium, omakase-style register, so the fish becomes the only thing your eye can land on.
Do I need a professional camera, or will a phone work?
A modern smartphone is more than enough for sushi photography. Clean composition and good light matter far more than the camera body — a well-lit phone shot beats a poorly lit DSLR frame every time. Nail the fundamentals (cool, soft, directional light, a dark surface, neat plating), then let a tool like FoodShot AI finish the studio look. Your finished images still show the real food you serve — just save your budget for fresh fish, not gear.
Ready to make every roll look counter-worthy? Turn a phone snap into omakase-quality sushi photography in 90 seconds — start free, no credit card required.
