Food Photography Lighting: Master Light for Better Photos
Food photography lighting is the difference between a photo that makes someone order immediately and one they scroll right past. You can nail composition, styling, and plating — but if your food photography lighting is wrong, the dish looks flat, lifeless, or just unappetizing. In this blog post, you'll learn exactly how to fix that.
Quick Summary: Side light and back light are the two essential directions for food photography lighting. Natural window light is your best free source, but a $50 LED panel can replicate it anytime. The key rules: never use your phone's flash, always turn off overhead kitchen lights, and diffuse everything. For imperfect conditions, AI tools like FoodShot can really help by correcting food photography lighting after the fact.
Why Food Photography Lighting Is the Most Important Variable
A beautifully plated dish looks completely different depending on how it's lit. Side light reveals the crispy texture of fried chicken skin. Backlight makes a glass of iced tea glow like amber. Flat overhead light makes that same chicken and tea look like cafeteria food.
Light does three critical things when you shoot food:
- Creates depth — Dark and light areas give food a three-dimensional quality that makes it look real on screen
- Reveals texture — The way light rakes across a surface shows crust, crumble, glaze, and grill marks in images
- Sets the mood — Bright and airy or dark and moody, your food photography lighting setup defines whether a photo feels like Sunday brunch or an intimate dinner
According to the Institute of Culinary Education: "Light tells the story of the food. It shows color, texture, and freshness. Without good light, you lose all of that."
You don't need expensive equipment. Understanding the direction and quality of light matters far more than what's producing it. For more fundamentals, check out our complete food photography tips blog post. The r/foodphotography community on Reddit is also a great place to learn from others and see real examples.
Natural Light: The Gold Standard for Food Photography Lighting
Natural window light is the most flattering, accessible source for food photography — and it's completely free. Most professionals really love using natural light whenever possible because nothing quite matches the quality of diffused daylight.
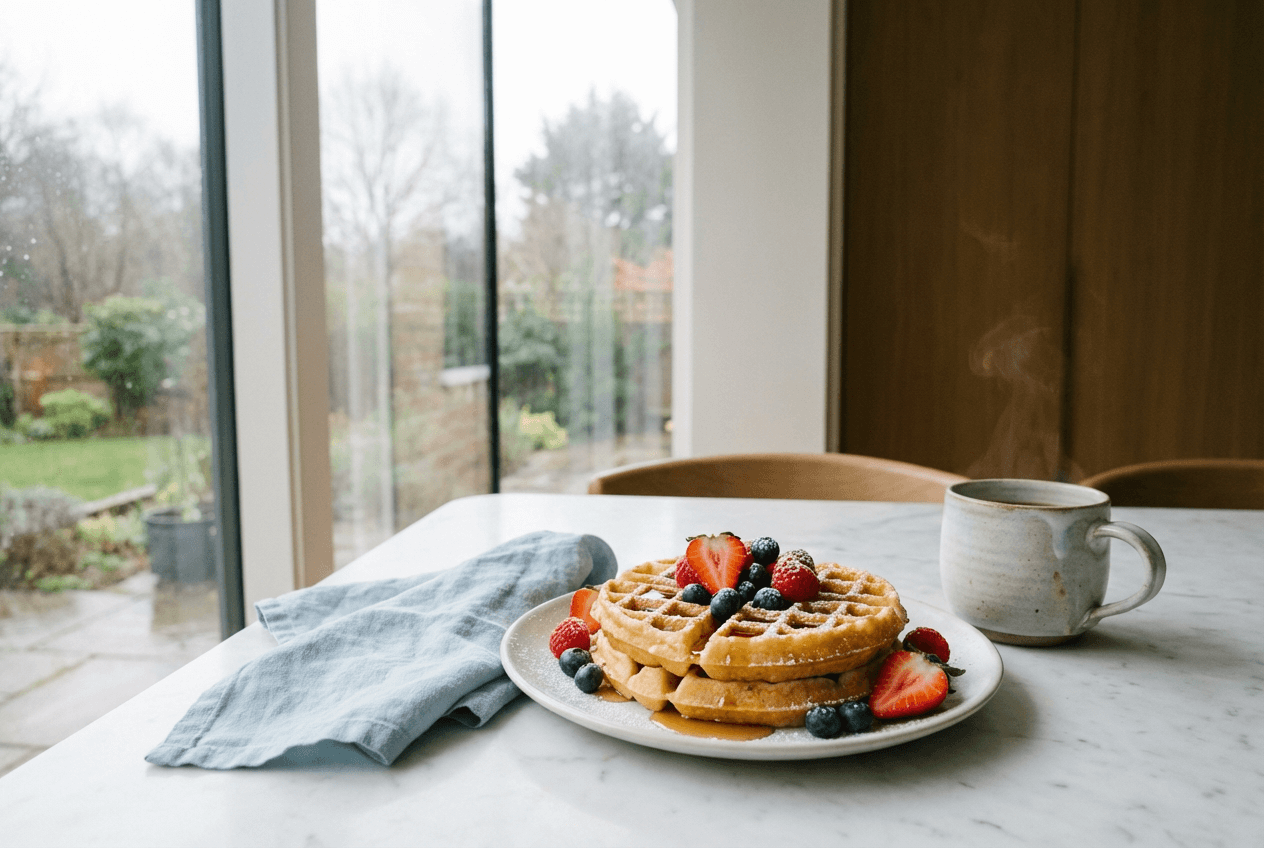 Natural window light illuminating a breakfast plate showing soft diffused shadows ideal for food photography
How to set it up: Position your dish 2–3 feet from a large window with indirect sunlight. Direct sun blasting through creates harsh contrasts and hot spots. Overcast days are actually ideal because cloud cover acts as a giant natural softbox, scattering light evenly across your entire set.
Best times of day for natural light food photography:
- Morning (7–10 AM): Soft, warm light. Perfect for breakfast and brunch images.
- Midday (11 AM–1 PM): Brighter and more neutral. Works well if diffused through a curtain or white sheet over the window.
- Late afternoon (3–5 PM): Warm golden tones that complement baked goods and comfort food photography.
- Overcast anytime: The most consistent, even light. No harsh highlights, no deep dark areas — ideal food photography lighting conditions.
What to avoid: Direct midday sun pouring through a window without any diffusion. It creates hard-edged contrasts that cut across your food and blown-out highlights that lose all detail.
iPhone tip: These same natural light principles apply when shooting food with your phone's camera. See our blog post on iPhone food photography for phone-specific settings and exposure tricks.
The Clock Method: How Light Direction Changes Everything
Think of your food as the center of a clock face. Your camera sits at 6 o'clock. Now the question becomes: where does the light source come from?
This single decision — light direction — has more impact on your final image than almost any other food photography variable. Here's what each position creates.
Side Light (3 and 9 O'Clock)
Side lighting is the most versatile and commonly used direction in food photography. The light source hits the food from the left or right, creating natural-looking contrasts that reveal texture and depth.
Why it works: Darker areas falling to one side give food a three-dimensional quality. You see the crispy crust of artisan bread, the ridges on grilled vegetables, the layers in a slice of cake. Left-side light (9 o'clock) tends to feel most natural to viewers since we read left to right — making it the most popular food photography lighting position.
Best for: Baked goods, grilled meats, plated entrées, fried foods — anything with surface texture you want to emphasize.
How to set it up: Place the light source (window or LED panel) directly to the side. Position a white foam core board on the opposite side to gently fill the darker areas without eliminating them.
Back Light (12 O'Clock)
Backlighting places the light source behind the food, facing toward your camera. It's the go-to food photography lighting position for anything liquid or steamy.
Why it works: Light passing through translucent foods — drinks, thin soups, sauces — creates a gorgeous natural glow. It draws bright outlines around food edges (called rim light) and catches steam rising from hot dishes dramatically against a dark background.
Best for: Beverages, cocktails, soups, any dish where you want steam visible, glazed foods, and translucent ingredients.
How to set it up: Position the light source directly behind the food. Place a white bounce card between the camera and the subject (below the frame) to redirect light back onto the front of the dish. Without this, you'll end up with a silhouette.
Side-Backlight (10–11 or 1–2 O'Clock)
This is the food photography lighting direction many professionals choose as their default setup. It combines the texture-revealing power of side light with the rim glow of backlight.
Why it works: You get strong three-dimensional definition, beautiful edge highlights, and the ability to capture steam, gloss, and color transparency all at once. The fluffy texture of a cake, the marbling of salmon, the billowing steam from ramen — this angle renders all of these beautifully.
Best for: Nearly everything. It's the most dynamic, versatile position and a reliable default when you're unsure. If you're just starting to learn food photography lighting, start here.
Front Light (6 O'Clock) — Avoid This
Front lighting aligns the light source with your camera, casting illumination flat onto the front of the food. It eliminates nearly all contrast.
Why it fails: Food looks flat, two-dimensional, and lifeless. This is exactly what happens when using your phone's flash — it blasts directly from the camera position, washing everything out. It's really the single most common food photography lighting mistake.
The rule: If your light source is directly behind you (at 6 o'clock), move it. Side or back positions create dramatically better results.
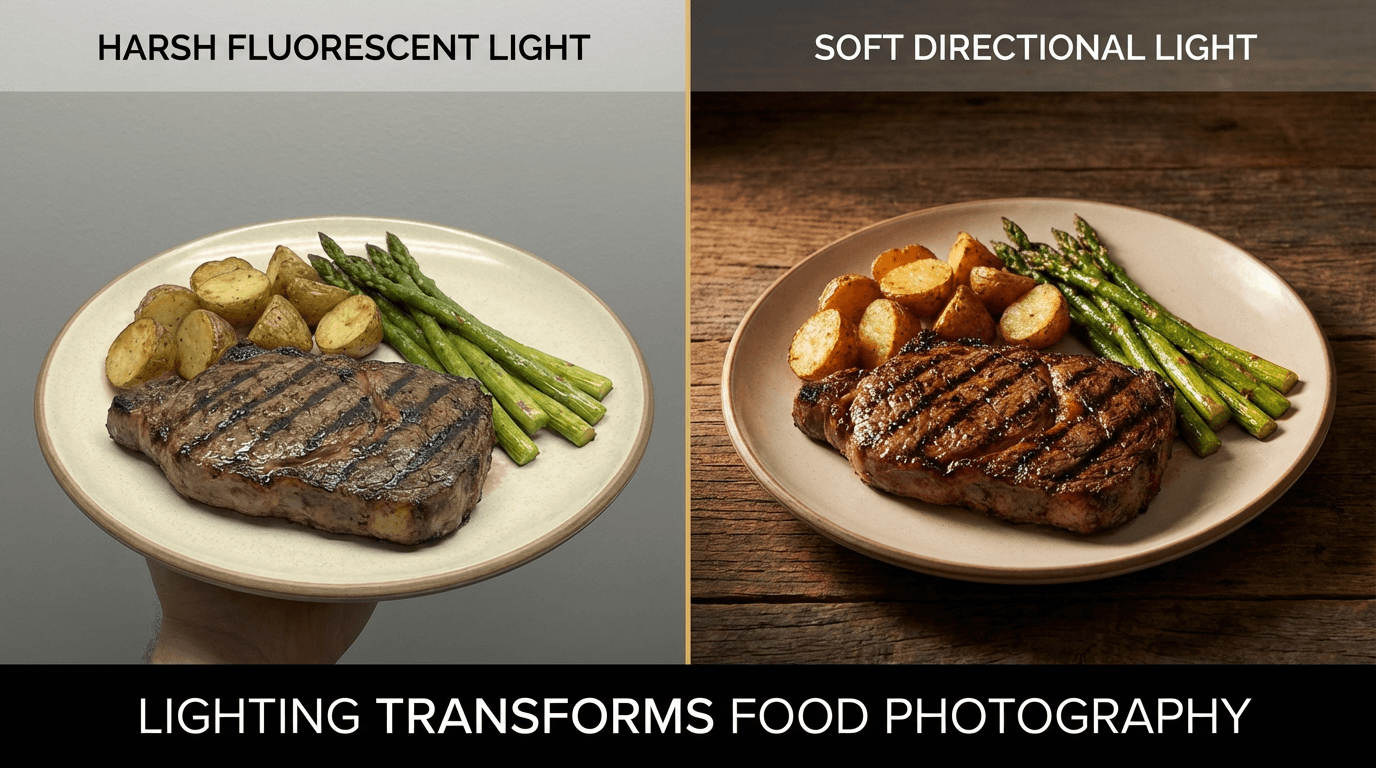 Side-by-side comparison of food under harsh overhead light versus soft side light showing dramatic quality difference
Artificial Lighting Setups That Mimic Natural Light
Not everyone has reliable natural light for food photography. Maybe you're shooting at night, in a windowless kitchen, or in a restaurant with zero daylight. Artificial lighting setups let you recreate that soft, directional quality whenever you need it.
Continuous LED Panels
LED panels are the best starting point for photographers new to artificial food photography lighting. Unlike studio flash, continuous LEDs give you what-you-see-is-what-you-get — the light stays on, so you can see exactly where darker areas fall before pressing the shutter on your camera.
What to look for:
- Daylight-balanced (5000–5500K) for neutral, natural-looking color temperature
- Adjustable brightness so you can dial the intensity to match your set
- CRI 95+ (Color Rendering Index) for accurate color reproduction — critical when shooting food
Budget-friendly LED panels in the $50–$150 range really work well. A single panel paired with a diffuser can replace a window as your primary food photography light source.
Softboxes and Diffusion Panels
A softbox takes any artificial light source — LED, strobe, even a bare bulb — and turns it into a large, soft, even source. It's a box lined with reflective material and covered with a translucent front panel.
Why size matters: The larger the softbox relative to your subject, the softer the light. A 24×36-inch softbox positioned 2–3 feet from your set produces light remarkably similar to a large window on an overcast day — which is exactly the look most food photography aims for.
Pair a softbox with a continuous LED for a complete artificial food photography lighting setup. For equipment recommendations, see our food photography equipment guide blog post next.
Studio Strobes (Flash Units)
Strobes emit brief, intense bursts of light. They're excellent for freezing motion — shooting pouring honey, sprinkling powdered sugar, or capturing steam rising off a fresh plate.
The trade-off: you can't preview the light before it fires (without modeling lights), and there's a steeper learning curve. For most restaurant owners and bloggers, continuous LED panels are the more practical choice for everyday food photography lighting.
Diffusers and Reflectors: Shaping Your Light
Your light source is only half the equation. How you modify that light determines whether your food images look amateur or professional.
Diffusers (Soften Harsh Light)
A diffuser is any semi-transparent material placed between the light source and your food. It scatters the light, creating more even, flattering food photography lighting.
Professional options: Collapsible diffusion panels (a 5-in-1 reflector kit usually includes one), softbox front panels, and dedicated scrim frames.
DIY options that work great:
- White bed sheet or sheer curtain hung over a window
- Parchment paper or wax paper taped to a simple frame
- White shower curtain liner stretched on a PVC pipe frame
- Frosted acrylic sheet from a hardware store ($5–$10)
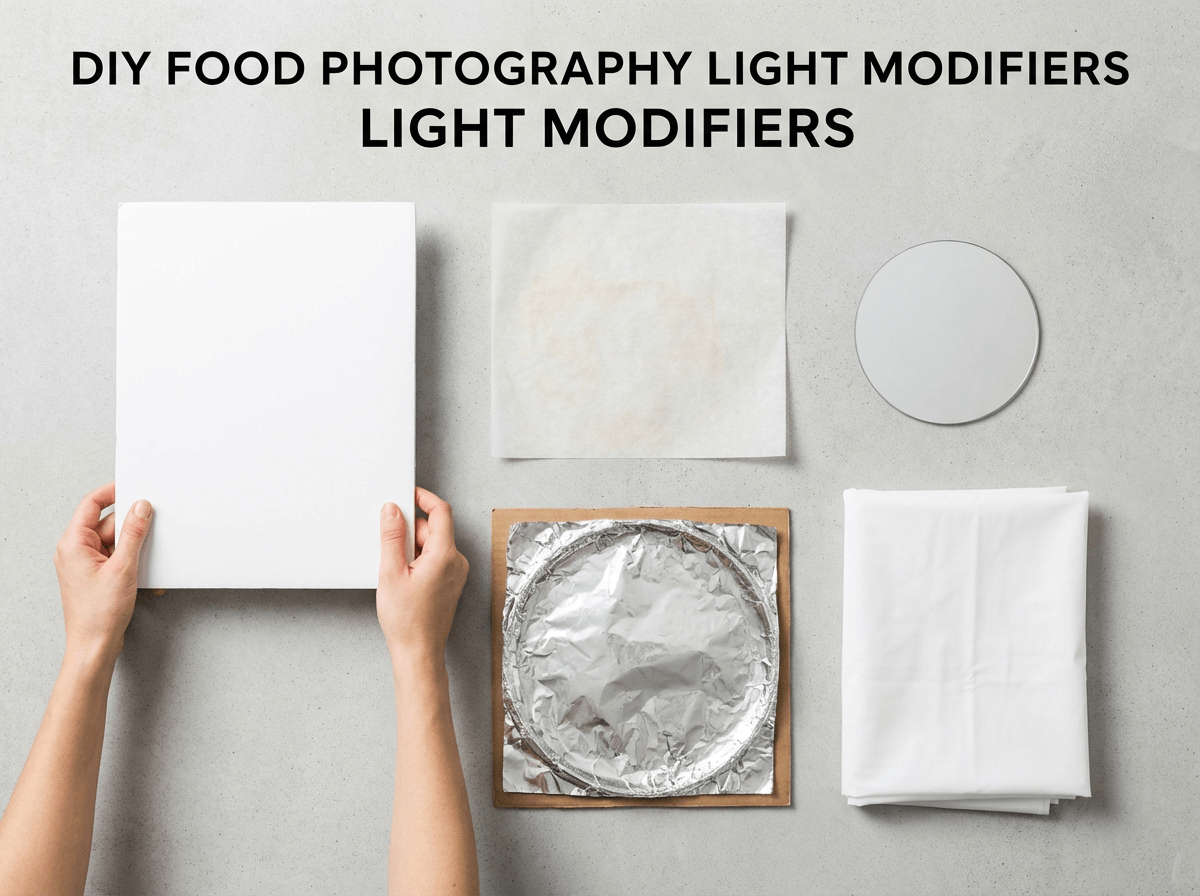 DIY food photography light modifiers including foam core reflector, parchment paper diffuser, and aluminum foil bounce
Reflectors (Fill the Darker Areas)
A reflector bounces light back toward the darker side of your food, reducing contrast without using a second light source. It's the simplest, cheapest way to control your food photography lighting.
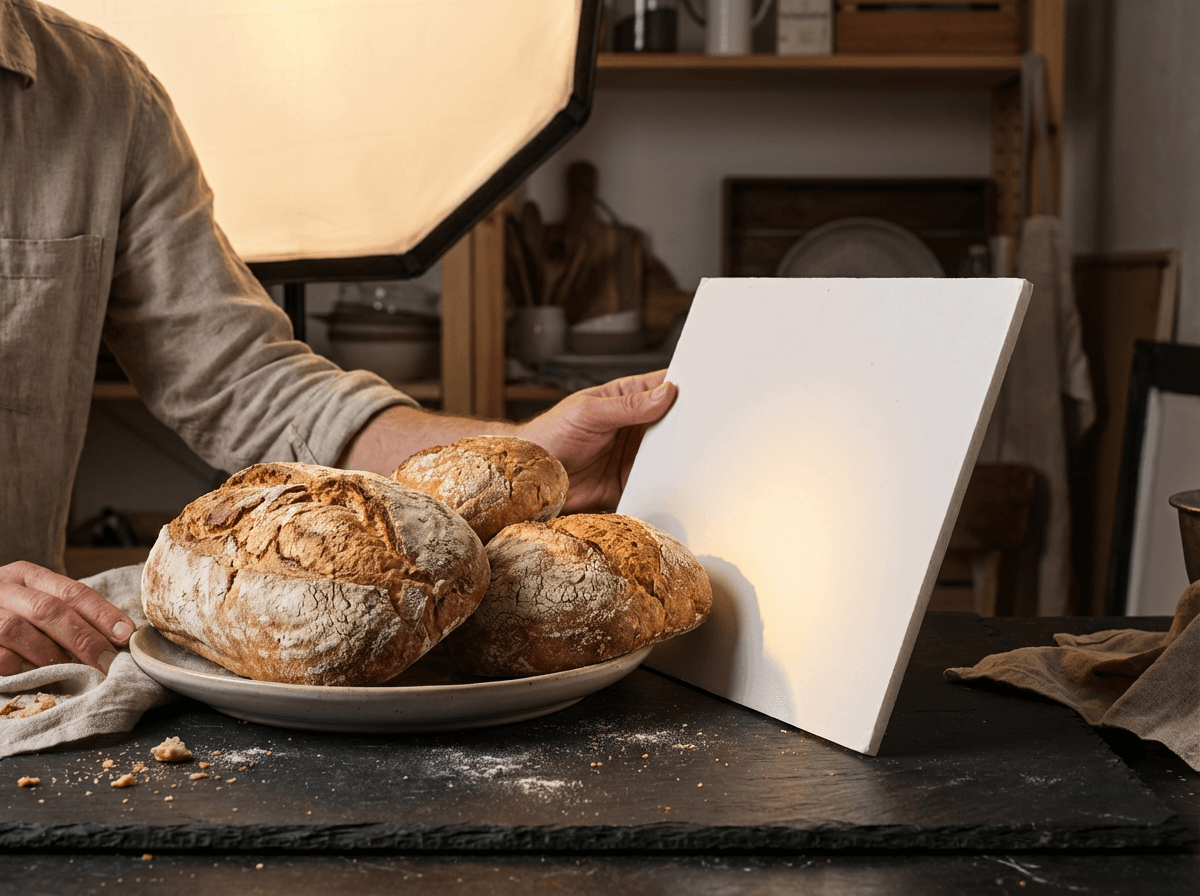 Food photographer using white foam core reflector to bounce light onto artisan bread for better shadow fill
Types of reflectors:
- White: Gentle, neutral fill. The most commonly used in professional food photography lighting setups.
- Silver: More intense bounce with added sparkle. Creates bright, high-energy images.
- Gold: Adds warm tones. Ideal for comfort food photography. People really love gold reflectors for bakery shots.
- Black (flag/negative fill): Absorbs light to deepen dark areas. Used for creating moody food photography.
The industry's worst-kept secret: A white foam core board from the dollar store works as well as any professional reflector. Position it on the opposite side of your light source, 12–18 inches from the subject, and it fills dark areas beautifully.
Food Photography Lighting by Food Type: A Quick Reference
Different foods photograph best under different lighting setups. Here's a reference for matching your food photography lighting to the dish in front of you.
Drinks and Beverages
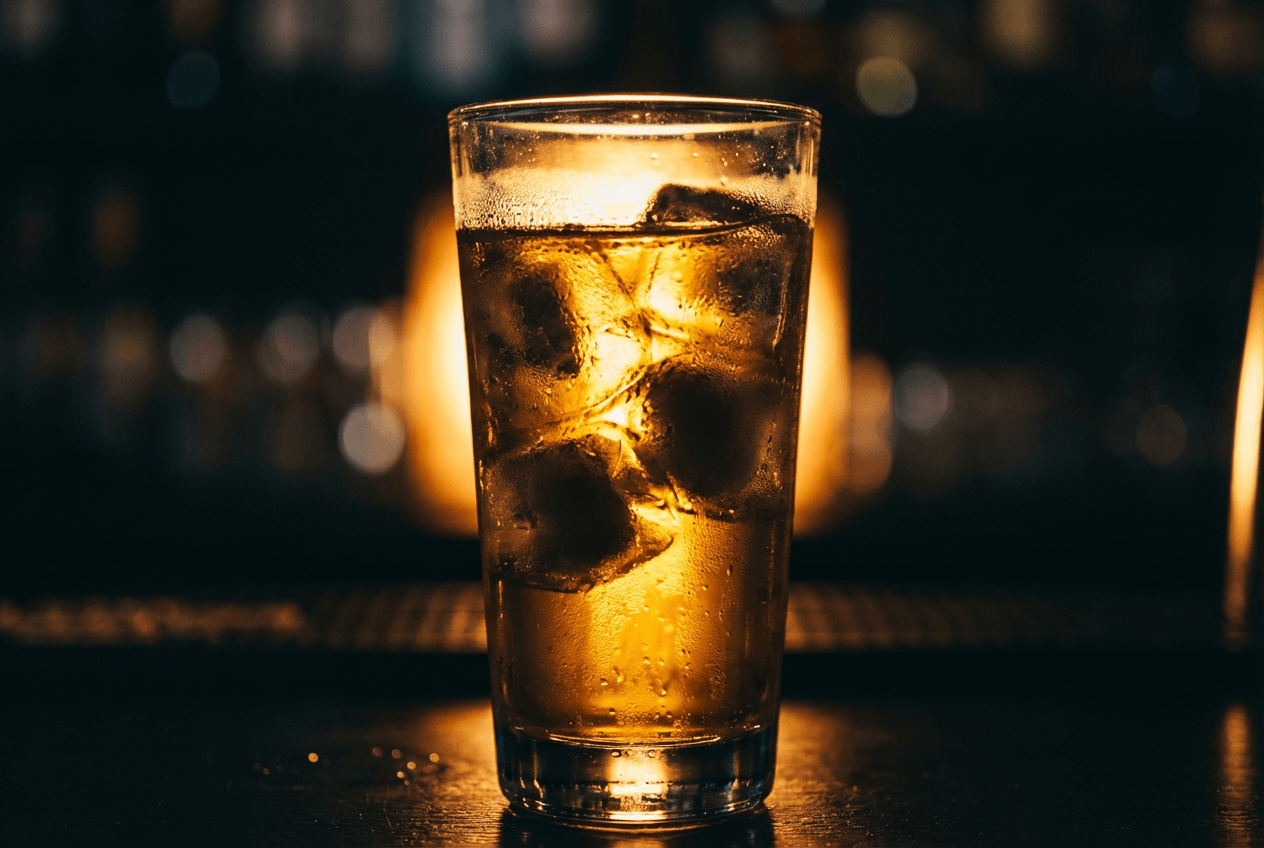 Backlit cocktail photography showing amber light glowing through glass demonstrating backlight technique for beverages
Use backlight. Light passing through liquids creates that gorgeous glow — amber beer, ruby wine, golden cocktails all come alive when you position the light source behind the glass. Add side light for extra dimension and a reflector in front. Photographers love this combination of backlight + side light + reflector for beverage food photography.
Soups and Hot Dishes
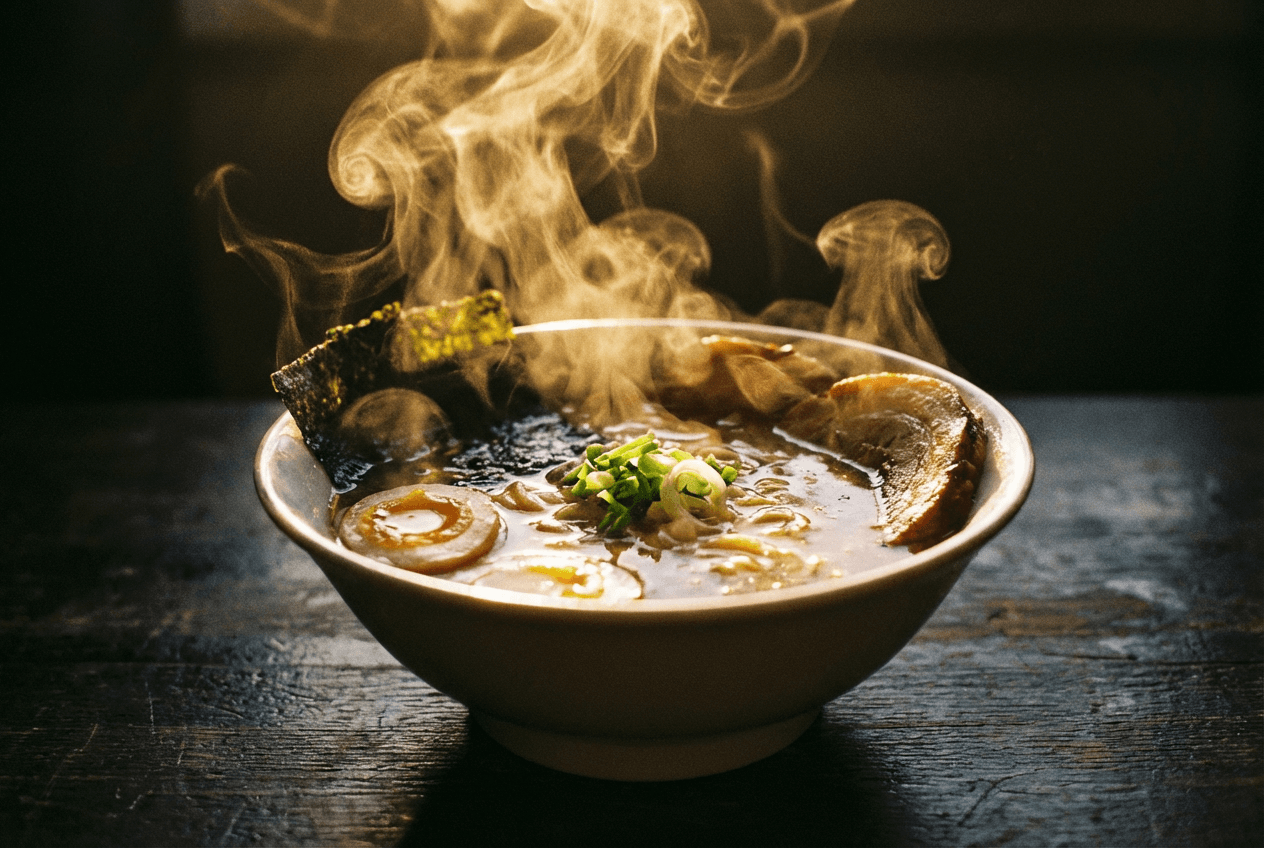 Side-backlight catching steam rising from ramen bowl showing ideal lighting for hot soup food photography
Use backlight or side-backlight. The primary goal is capturing steam, and backlighting makes those wisps visible and dramatic against a darker background. Shoot quickly — steam dissipates within 30–60 seconds of plating. For an extra burst of visible steam, hold a soaked microfiber cloth wrung out from hot water just behind the bowl, out of the camera frame.
Baked Goods and Pastries
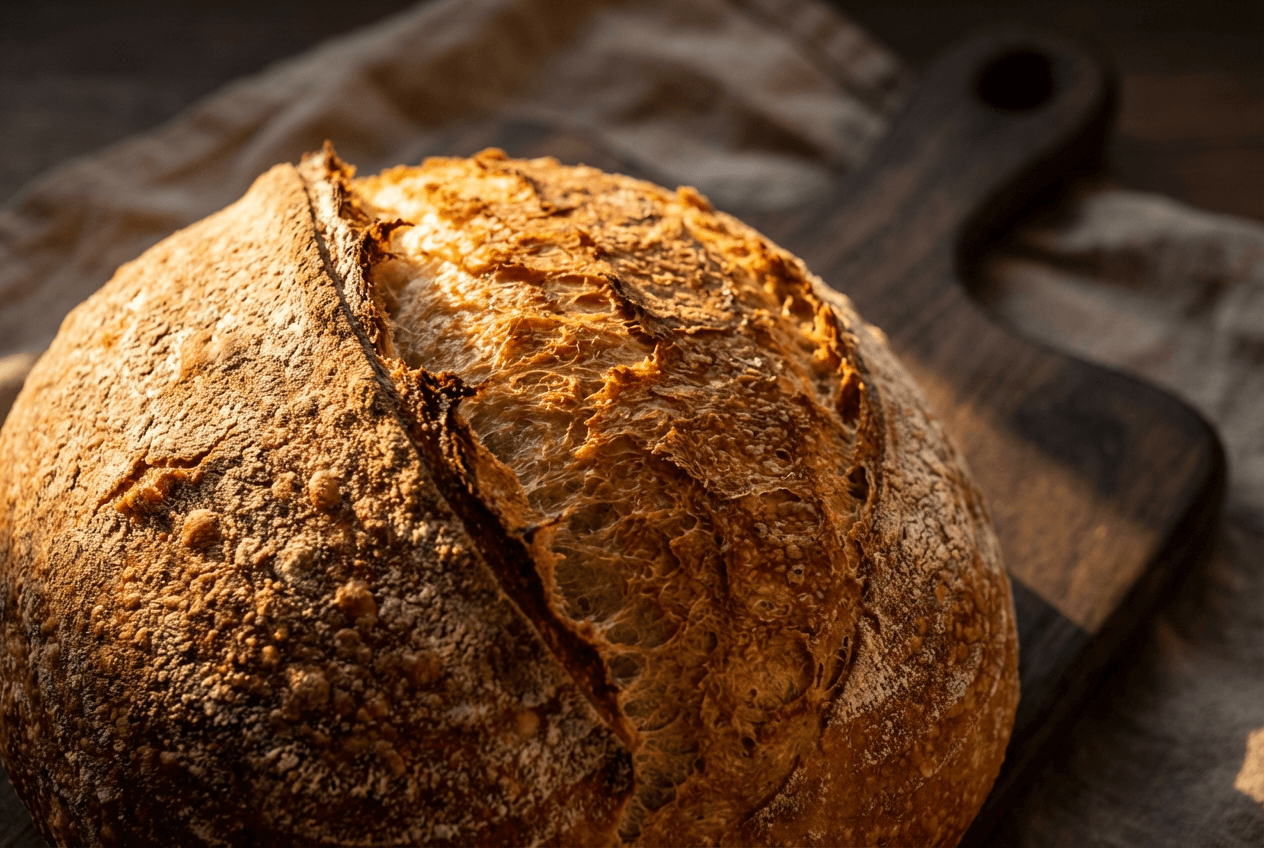 Dramatic side light revealing texture on artisan sourdough bread crust for baked goods food photography
Use side light. The defining features of baked goods — crusty bread surfaces, layered croissant cross-sections, cake crumb structure — all need strong directional side lighting to stand out. A slightly warm color temperature (3500–4000K) complements the golden hues naturally. This food photography lighting approach works for virtually all pastry types.
Fresh Produce and Salads
Use soft, diffused light. Vibrant colors wash out under harsh, undiffused light. Soft diffusion preserves the rich greens, reds, and oranges of fresh produce in food photography. A touch of backlight adds beautiful translucency to lettuce leaves and herbs. Keep your white balance neutral to cool (5000–5500K) to create images that emphasize freshness.
Fried and Crispy Foods
Use strong side light at a low angle. You want dramatic contrasts that accentuate the crunch and texture of every ridge and crevice on fried surfaces. Don't over-diffuse here — crispy food photography actually benefits from some contrast to make the texture pop in your images.
5 Food Photography Lighting Mistakes That Ruin Photos
Avoid these common food photography lighting mistakes and your photos will improve overnight. Using the right approach next time will make a visible difference.
1. Using your phone's flash. The built-in flash creates direct front light — the worst possible food photography lighting. It washes out colors, creates harsh reflections on sauces, and eliminates all detail. Turn it off permanently. If you need more brightness, increase your camera's exposure or add a nearby artificial light source.
2. Leaving overhead kitchen lights on. Restaurant and kitchen ceiling fixtures cast flat, top-down light with a yellowish color cast (typically around 2700K on the Kelvin scale). They destroy texture and make food look lifeless. Turn them off and use a single directional light source instead.
3. Mixing multiple light sources. A window at 5500K, an overhead incandescent at 2700K, and a fluorescent tube at 4000K all hitting your food at once creates inconsistent color casts that no white balance setting can fix. Stick to one dominant light source and turn off everything else on set.
4. Skipping diffusion. Bare, undiffused light — whether from the sun or an LED panel — creates harsh, hard-edged contrasts that cut across food unnaturally. Always put a diffuser between the light source and your subject: a softbox, diffusion panel, or even a simple white sheet.
5. Wrong white balance. If your photos have a yellow, blue, or green tint, your white balance doesn't match your light source. Set it manually on your camera (5500K for daylight, 3200K for tungsten) or use a gray card. This is one of the most common food delivery photography mistakes that costs restaurants online orders.
Practical Food Photography Lighting for Restaurants
Most restaurant owners aren't building a studio. Here's what actually works in a busy restaurant environment for better food photography lighting with minimal time and equipment.
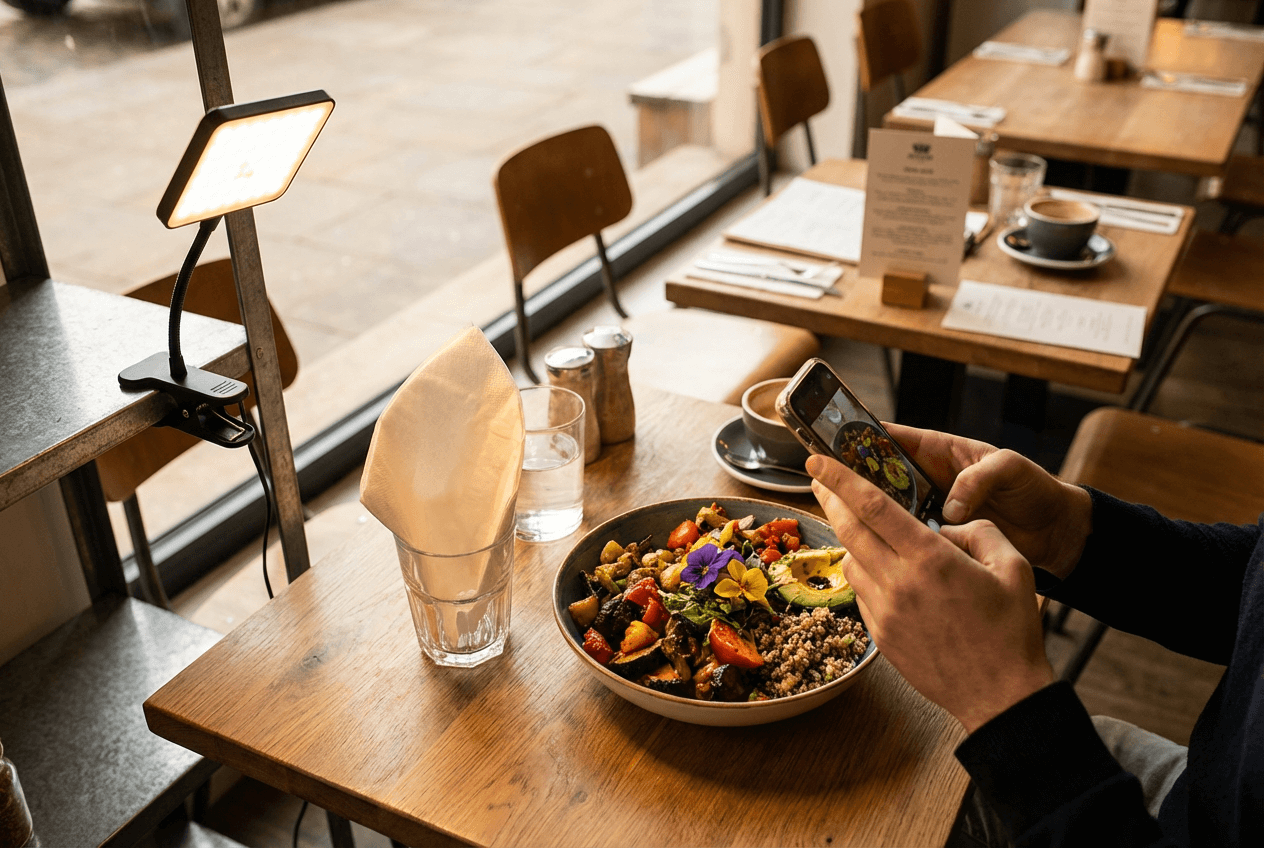 Restaurant owner photographing food with smartphone near window using portable LED panel and napkin as reflector
Create a photo station near a window. Designate a small table near your largest window as your dedicated food photography spot. A 2×2 foot area is all you need. Keep a neutral background surface there (wooden cutting board, marble slab, or clean white plate) and photograph during daylight hours.
Keep a portable LED panel on hand. A compact, battery-powered LED panel ($30–$60) clipped to a shelf or propped on a small stand gives you consistent artificial light anytime. Position it to the side for instant flattering food photography lighting — the most versatile direction for most food.
Use what you already have as reflectors. A white napkin, printer paper, or a white menu card propped against a water glass works as a quick bounce tool. Hold it opposite your light source to fill darker areas.
Turn off overhead fixtures. Even if the scene looks dim to your eyes, your camera will compensate. One controlled light source always beats five uncontrolled ones for food photography lighting.
Batch your shoots. Photograph all your menu items during a 1–2 hour window when natural light is best — typically mid-morning. This saves time and ensures consistent results across your entire menu. If you're optimizing for delivery platforms like Uber Eats and DoorDash, consistent food photography lighting is especially critical.
Clean your lens first. Kitchen environments create grease and steam buildup on phone cameras. Wipe your lens with a clean cloth before every session. According to Food52's photography experts, this single step helps improve image quality more than most people realize. For post-shoot editing help, see our blog tutorial on how to edit food photos.
When Food Photography Lighting Goes Wrong: How AI Fixes It
You've learned the techniques. You understand side light, diffusion, and reflectors. But reality is this: restaurants are busy, conditions are imperfect, and you don't always have time to set up ideal food photography lighting.
That's where AI post-processing becomes genuinely useful. Rather than reshooting, you can fix food photography lighting issues after the photo is already taken.
FoodShot AI lets you transform the lighting of an existing food photo. Shot under harsh fluorescent kitchen fixtures? The AI shifts the look to soft, natural window light. Taken in a dim corner booth with a yellowish color cast? It brightens, rebalances exposure, and adjusts the mood while maintaining realistic depth.
Here's what specifically helps with food photography lighting challenges:
- Lighting style changes correct color casts, rebalance contrasts, and adjust the overall mood without reshooting
- 30+ style presets (Restaurant, Fine Dining, Instagram, Delivery, and more) each apply optimized food photography lighting characteristics suited to that context
- Reference photo cloning lets you upload any photo whose lighting you love — from Pinterest, a magazine, or any inspiration — and FoodShot matches that style to your dish
- Background replacement swaps out the scene entirely, which also changes the ambient lighting context of the food photography
The practical workflow for restaurant teams: snap a quick photo of each dish as it's plated — even under imperfect conditions — and let the AI handle the transformation afterward. At $15/month for 25 images, it's a fraction of what traditional food photography costs. If you're looking to explore the next step beyond manual food photography lighting, see how AI food photography works, or explore FoodShot's full studio capabilities to start right away.
This doesn't replace food photography lighting knowledge — a well-lit original gives any AI better raw material. But imperfect lighting is no longer a dealbreaker for creating professional-quality food images for your restaurant, cafe, fine dining establishment, or food delivery business. To learn more about this approach, explore how traditional and AI food photography compare.
Frequently Asked Questions
What is the best lighting for food photography?
Side light or side-backlight from a single, diffused source is the most versatile food photography lighting setup. Position the light at the 9–11 o'clock position (relative to your camera at 6 o'clock) and use a white reflector on the opposite side to fill darker areas. Natural window light on an overcast day is the easiest and most flattering option.
Is natural or artificial light better for food photography?
Both produce excellent results when used correctly. Natural light is more forgiving and requires zero equipment — soft window light is the easiest to work with. Artificial light (a continuous LED panel with a softbox) gives you complete control regardless of time, weather, or location. Many professionals really prefer artificial food photography lighting for its consistency and repeatability.
How do you avoid harsh shadows in food photos?
Place a diffuser between the light source and the food. This can be a professional diffusion panel, a softbox, or a DIY solution like a white bed sheet or parchment paper. Then position a white reflector on the opposite side to gently fill the remaining darker areas. Using this combination of diffusion plus reflection is the foundation of professional food photography lighting.
What color temperature is best for food photography?
Daylight-balanced light at 5000–5500K is the most versatile and neutral starting point for food photography lighting. For warm comfort foods and baked goods, slightly warmer tones (3500–4000K) enhance golden hues. For fresh produce, seafood, and salads, neutral to slightly cool light (5500–6000K) emphasizes freshness. The critical rule: use only one color temperature at a time — never mix warm and cool light sources on the same set.
How do you photograph food in a dark restaurant?
Three strategies: (1) Request a window-adjacent table and shoot during daylight hours, (2) bring a small portable LED panel for controlled directional food photography lighting, or (3) capture the best photo you can and use an AI food photo editor like FoodShot to correct the lighting afterward. Always turn off your phone's flash — it makes food look worse. A tripod or propping your phone against something stable helps reduce blur in low-light food photography conditions.
