Bread Photography: Capture Loaves, Crusts & Crumbs Like a Pro
Bread is the hardest thing in food photography. A burger has color contrast built in. A salad has chaos and motion. But a loaf is brown, more brown, and a small amount of off-white — and somehow you need to make it look so good people open Uber Eats at 11 PM.
The good news: bread photography is mostly lighting and angles, not gear. The bad news: a lot of bread photography ideas on the internet were written by people who own one camera and never touched a sourdough.
This guide is built for bakeries, sourdough bakers, food bloggers, and anyone shooting bread to sell — not just to admire. Every section comes from how working food photographers actually shoot loaves, with the specific angles, light setups, and styling ideas they use on real jobs. Use it as a definitive reference for everything from a single hero loaf shot to a full rustic bakery menu rollout.
Quick Summary: Great bread photography comes down to four shots (hero loaf, crust close-up, crumb cross-section, lifestyle scene), one lighting principle (side light at 9–11 o'clock), and a handful of styling moves (linen, rustic wood, a dusting of flour). You can do it all with a phone if your window light is good — and related AI tools can rescue the shots that aren't.
The Four Bread Shots Every Bakery Needs
Before we talk lighting or props, decide what you're actually shooting. Most bakery photo problems start with not knowing what role each image plays. Every loaf you photograph for commercial use should generate four related images, each doing a different job.
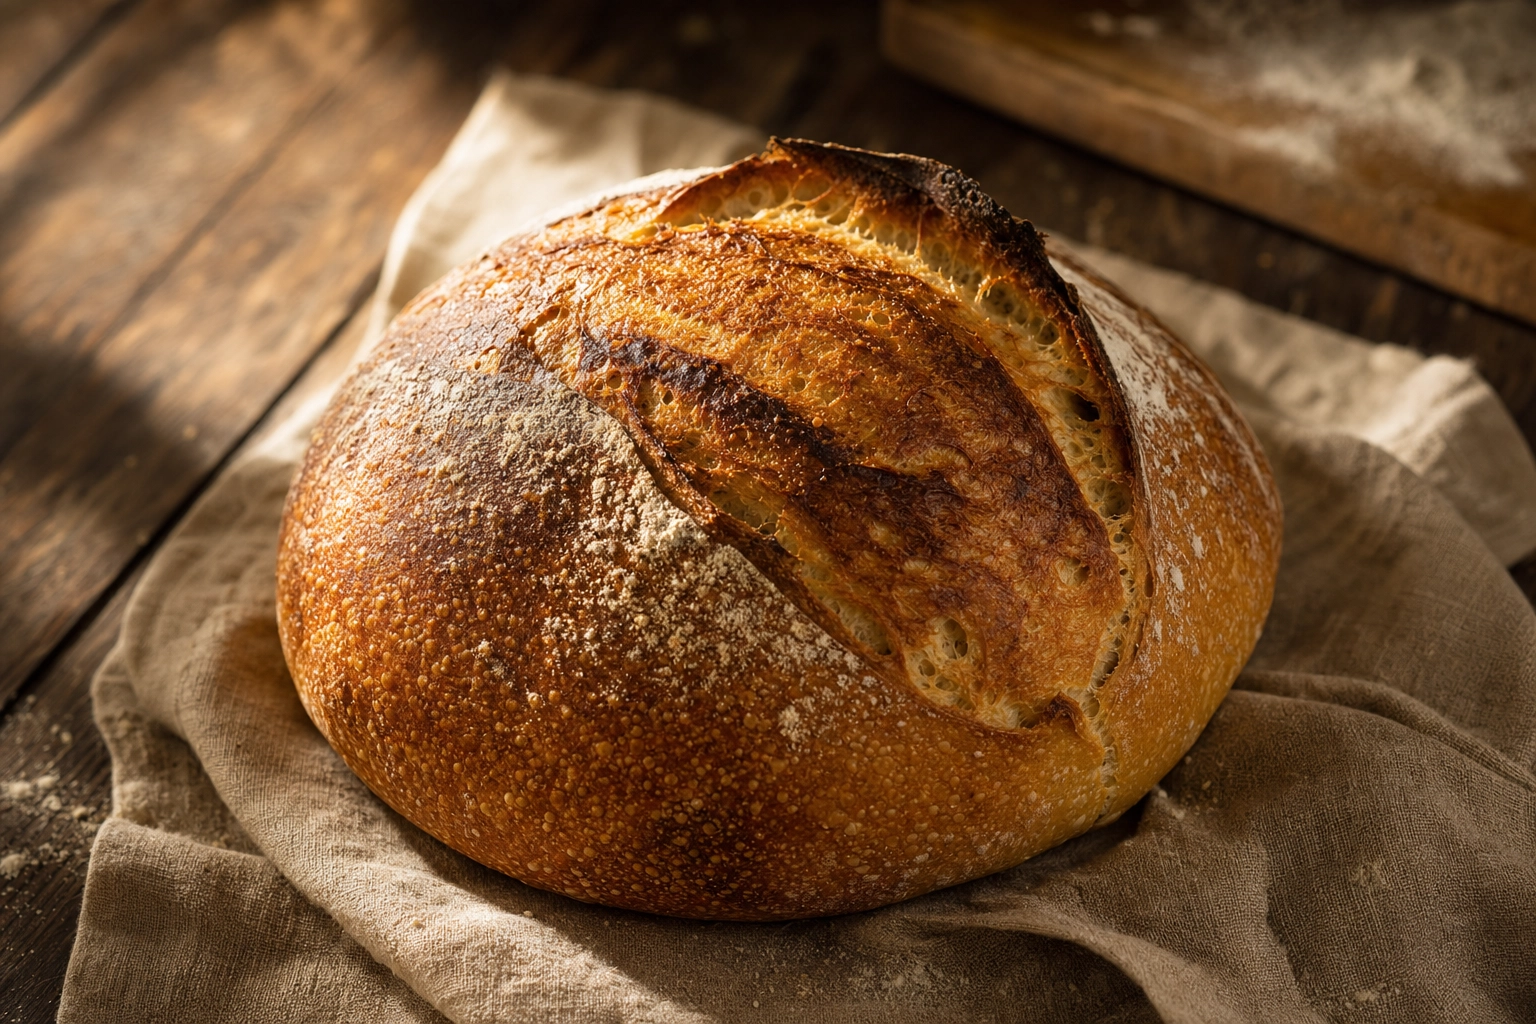
1. The Hero Loaf Shot
This is the wide, beauty-shot of the whole loaf, uncut. It's what goes on the menu cover, the homepage, the Instagram grid square.
- Angle: 15 to 25 degrees off horizontal — not flat-lay overhead, not eye-level. This angle reveals the dome of the whole bake while still showing the crust topology.
- Framing: Loaf takes up 60–70% of the frame. Leave breathing room on at least two sides.
- Light direction: Side or side-back (10 o'clock or 11 o'clock from the camera's view).
- Why it works: Shows scoring, ear curl, color gradient from blistered top to floured base — all the things that signal "real artisan bread" instead of "supermarket loaf."
2. The Crust Close-Up
This is the macro shot that makes people want to crack the bread open. It's the detail shot social algorithms love because of its tactile, almost edible feel.
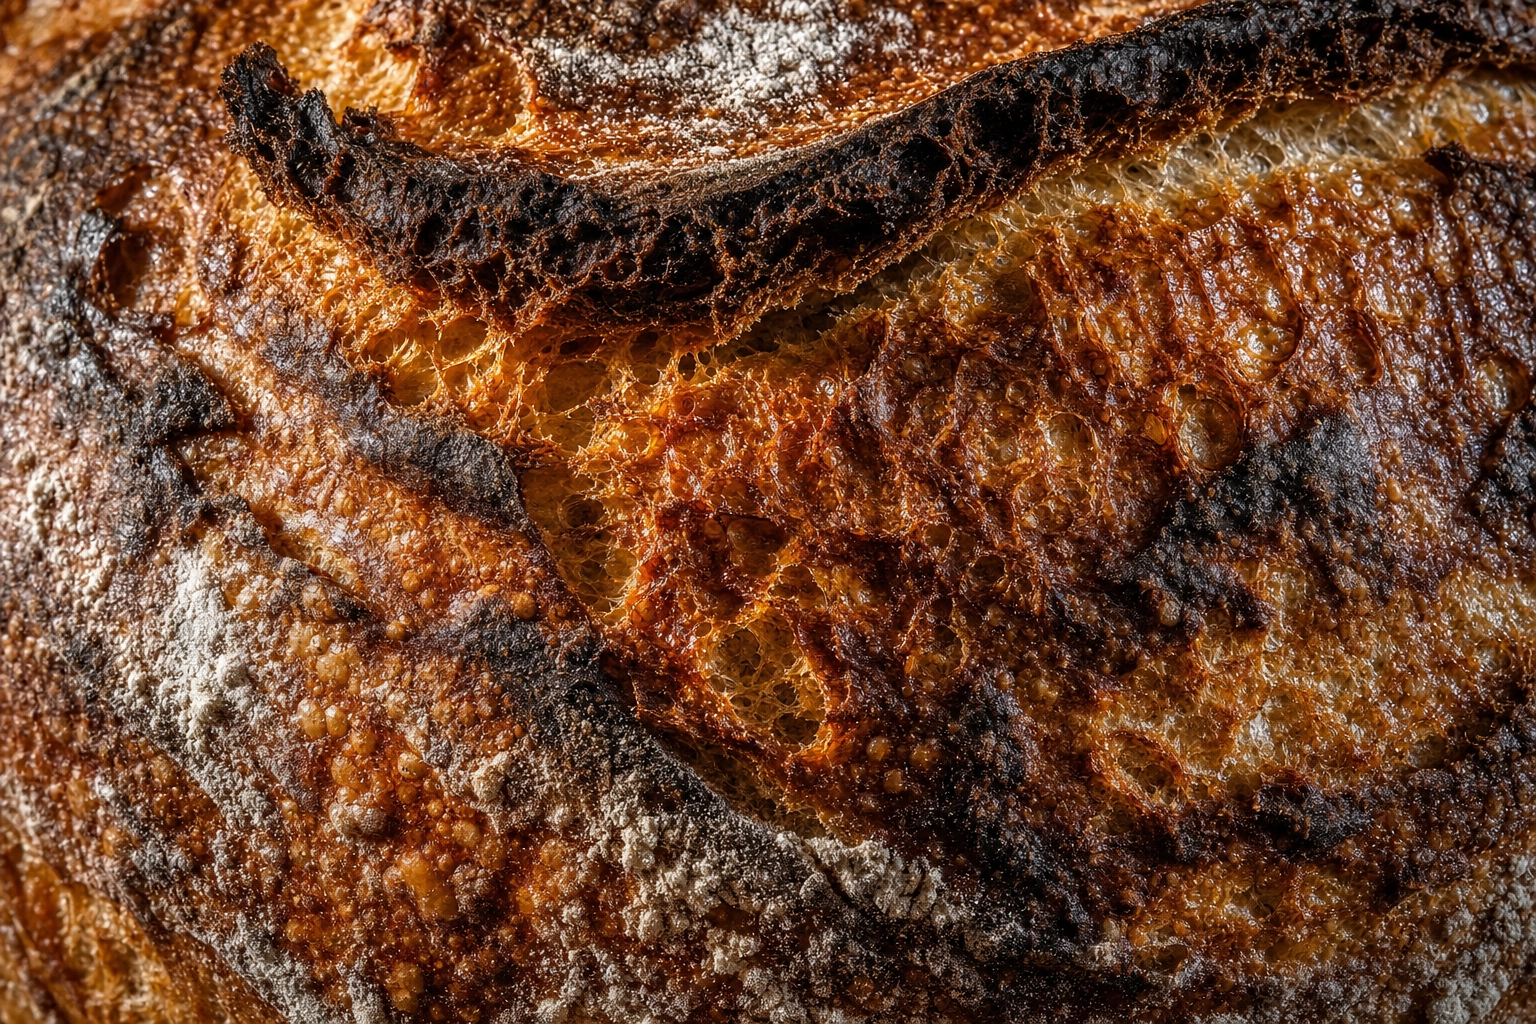 Macro close-up of sourdough crust showing blisters, char marks, scoring ear curl, and flour bloom in raking side light
- Angle: 80–90 degrees to the surface — nearly straight-on to the crust.
- Framing: Crop tight. Fill the frame with crust. Don't show the whole loaf.
- Light direction: Hard, raking side light at 15–30 degrees from horizontal. This is the only shot where you want hard light.
- Focus on: Blistered patches, char marks, flour bloom, the lip of a scoring ear, individual seeds, the matte vs. shiny color shift.
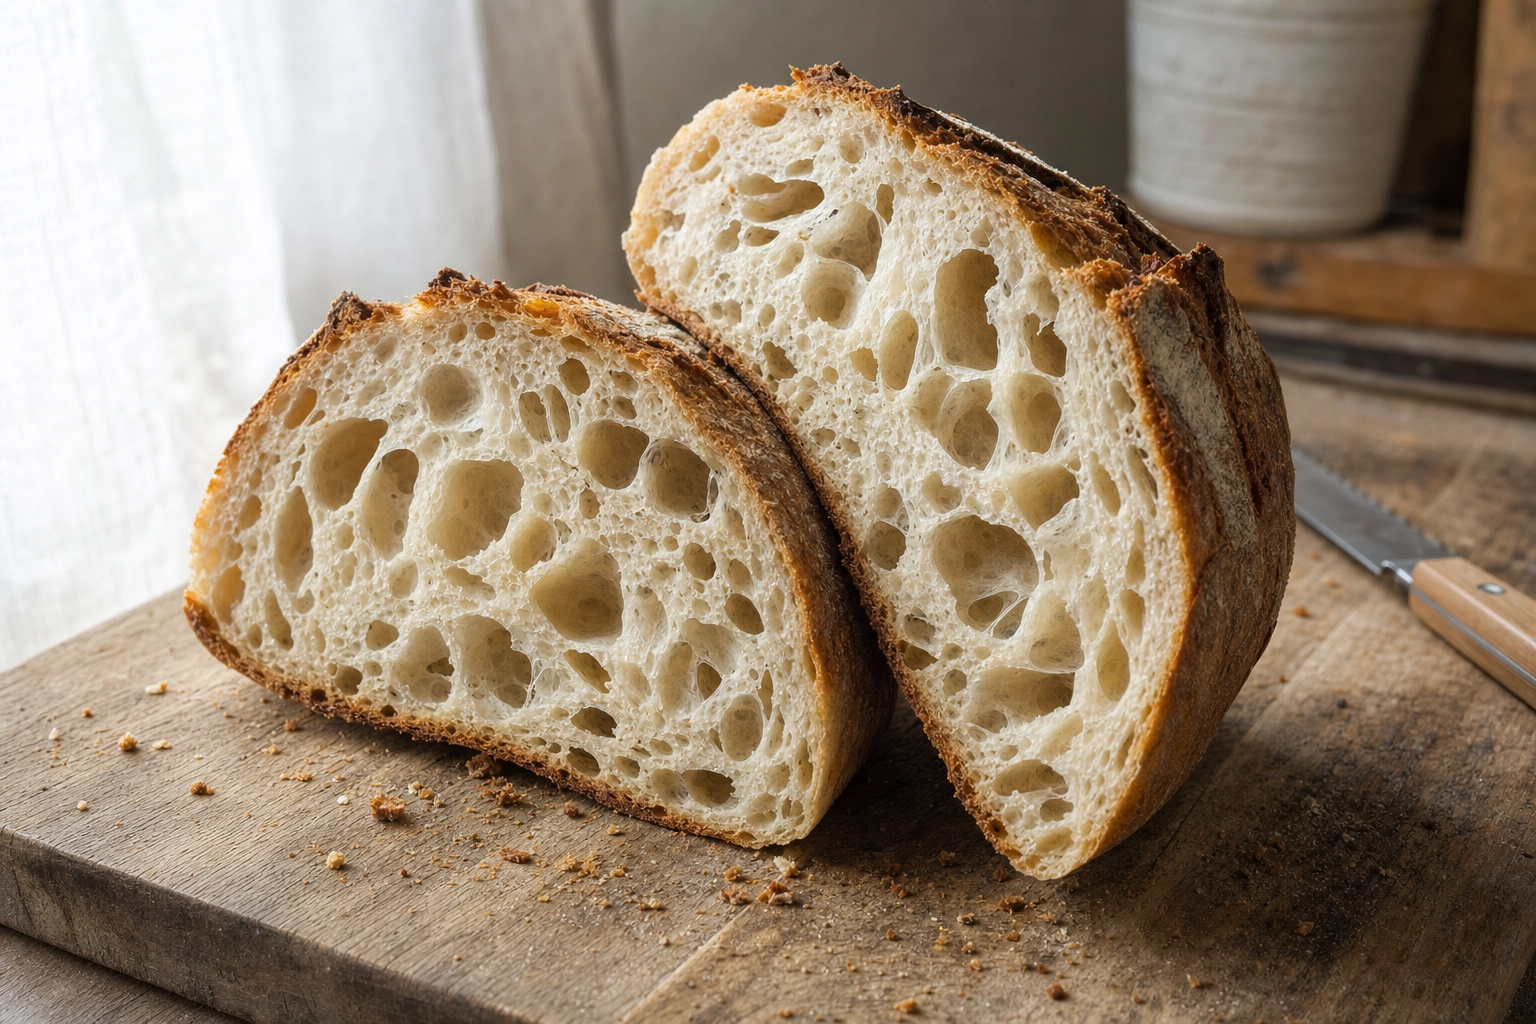
3. The Crumb Cross-Section
The crumb shot — the cross-section of a sliced or torn loaf — is the closest thing bakers have to a money shot. Open crumb sells artisan bread. Tight, even crumb sells sandwich loaves. Either way, the cut face is the hero.
- Angle: Cut face tilted 20–30 degrees off vertical, leaning toward the camera and toward the light.
- Framing: Show the cut face plus a bit of crust for context. Don't crop so tight you lose the curve of the loaf.
- Light direction: Soft side light. Same 9–11 o'clock direction as the hero shot, but diffused (sheer curtain or a 5-in-1 diffuser).
- Cutting tip: Let the loaf cool 30–60 minutes before slicing. A warm crumb compresses under the knife and looks gummy.
4. The Lifestyle Scene
The scene shot puts the bread in a rustic moment. Hands tearing a piece off, a knife mid-cut, butter melting into a slice, a coffee cup just out of focus. It's the shot that says "this bread is for eating" instead of "this bread is for displaying."
- Angle: 25–45 degrees. Closer to the food than a true overhead, but not flat-on either.
- Framing: Bread is anchor, props are story. Linen, a wood handle, a hint of butter or jam.
- Light direction: Soft side light. Avoid hard shadows that distract from the human moment.
- Why it matters: Lifestyle shots get the most social shares because they invite the viewer in.
If you only have time for two shots per loaf, do the hero and the crumb. Those two cover 80% of menu, social, and delivery-app use cases.
Lighting Bread Textures: Side Light Is King
If you remember one thing from this guide, make it this: side light at 9 to 11 o'clock is the gold standard for bread photography. Frontal light flattens texture. Backlight creates a silhouette. Side light rakes across the crust and crumb at an angle that turns every bump, blister, and air pocket into a micro-shadow your camera can read.
 Sourdough cross-section showing open crumb structure with soft diffused side window light demonstrating bread photography lighting
Hard Light for Crust
The crust is the only part of bread that benefits from unmodified hard light. You want every blister to throw a tiny shadow. You want the ear of the score to cast a defined lip. You want the matte char patches to read as nearly-black while the polished caramel ridges shine.
How to get it:
- A south- or west-facing window in late morning, blinds open, no diffuser
- A strip softbox or bare LED panel placed 18–24 inches from the loaf, at 15–30 degrees above horizontal
- Outdoors in open shade with one direction of sky light hitting the loaf
Position the loaf so the light grazes across the crust, not into it. The shadow side should be visibly darker — that contrast is what makes the rustic texture pop.
Soft Light for Crumb
The crumb is the opposite. Hard light on a sliced loaf turns the air pockets into harsh black holes that look like burn marks. You want shadows in the holes, but soft, graded ones.
How to get it:
- The same window, but with a sheer white curtain over it
- A softbox with double diffusion at 24–36 inches
- A bedsheet or shower curtain hung between the loaf and the window
The cut face of the loaf should face into the light. The shadows in the open crumb should look like they have depth, not like they're punched-out holes.
Color Temperature: Don't Fix the Warmth
A common mistake: setting white balance to "auto" and letting the camera neutralize bread color. Bread should look warm. Set white balance manually to around 5200–5500K (or use your camera's "daylight" preset). If the photo still looks too neutral in editing, pull the white balance slider 200–400 K warmer.
What Kills Bread Photos
- On-camera flash. Always. It crushes shadows and creates a glossy spot on the crust that reads as plastic.
- Overhead kitchen LEDs. They cast downward, yellow, and almost shadowless. Turn them off and use a window.
- Direct frontal light. No texture, no story, no dimension.
- Mixed light sources. If the room has a window and overhead bulbs on, kill the bulbs. Two color temperatures in one frame will fight each other.
For a deeper look at the lighting setups professional food photographers use on related editorial shoots, see our food photography lighting guide.
Backgrounds That Make Bread Look Better
Bread is brown. The background is what gives it a personality. The wrong surface makes a beautiful loaf look like a sad supermarket prop. The right one tells a story before anyone reads a single word.
 Comparison of bread photography backgrounds — marble, oak wood, and linen — shown flat-lay with bread samples
Linen
Natural flax linen — beige, oatmeal, or warm white — is the default rustic background for a reason. Its slubby texture echoes the bran and seed texture of artisan breads. It absorbs light gently, never reflecting hot spots. Wrinkles aren't flaws — they're invitations to drape and tear.
Use linen as a tablecloth, a draped backdrop, or a small napkin under the loaf. Pro tip: lightly mist linen with water and let it dry — the wrinkles become more graphic.
Wood Boards
Wood is the most versatile bread background. The variety matters:
- Dark walnut or stained oak: High contrast for white breads, milk bread, brioche
- Light oak or maple: Balanced, warm, works with almost everything
- Weathered farmhouse pine: Rustic, French country, sourdough country loaf energy
- Endgrain butcher block: Clean, professional, modern bakery aesthetic
A 12×16-inch rustic wooden board is enough for one or two loaves. For larger scenes, find a vintage wooden table or buy reclaimed boards from a hardware store.
Marble
Marble — real or printed vinyl — is the cool, modern, slightly Instagram-tropey background that still works incredibly well. The cool gray neutralizes the warmth of the bread, creating clean contrast. Light bounces off marble subtly, lifting shadows.
Best for: sourdough, sliced loaves where you want crumb to read clean, breakfast scenes with butter and jam.
Vintage and Patterned Tile
Tile gives bread cultural context. Hand-painted Italian tile under focaccia signals "Roman bakery." Terracotta or zellige under pita and naan signals Mediterranean. White subway tile in a cluster signals "clean bakery storefront." Tile works best for top-down (flat-lay) shots where the pattern becomes the framing device.
Slate, Concrete, and Parchment
For drama, slate and dark concrete. For budget and rustic bakery realism, crumpled parchment paper straight from the oven. Both work — slate for hero shots of dark breads, parchment for honest "I just baked this" moments.
The rule across every surface: the background should never compete with the bread. If a viewer's eye lands on the wood grain before the loaf, you've gone too busy. For more ideas on pairing surfaces with subjects, see our related food styling guide.
Styling Tools and Props That Sell the Story
Styling bread is less is more. One or two well-chosen props beat a cluttered table every time. These are the tools that earn their place.
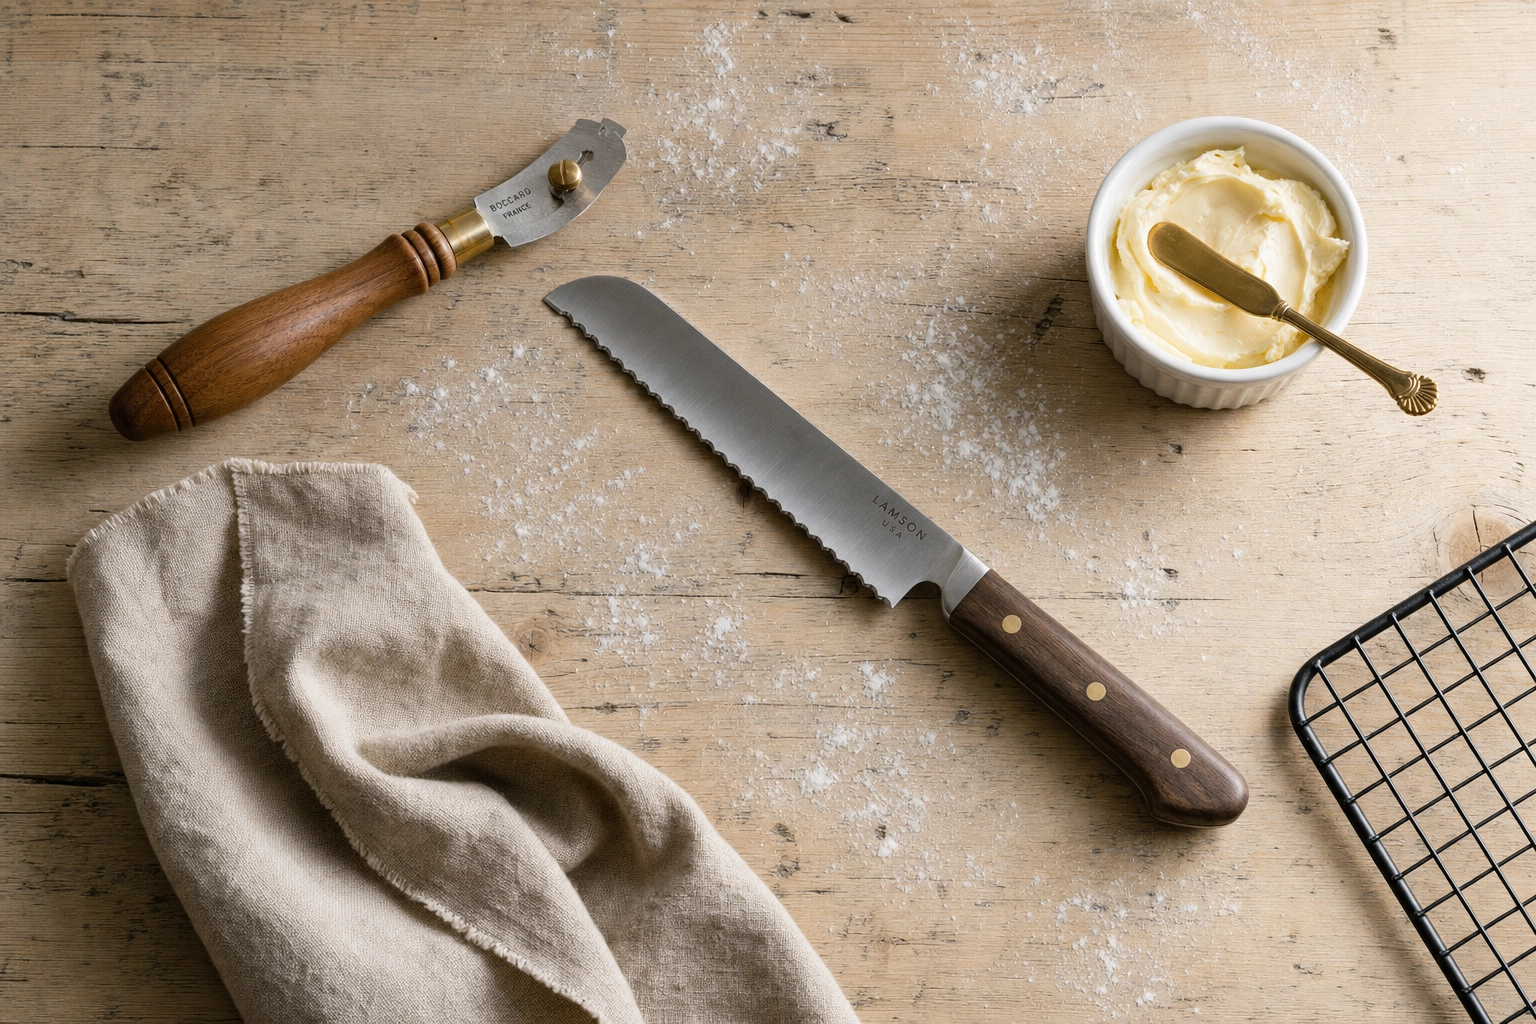 Bread photography styling tools flat-lay — bread lame, serrated knife, butter, cooling rack, and linen on wood
The Bread Lame
A bread lame (the curved blade bakers use to score dough) is the single best prop for an artisan bread shot. Place it just outside the focus plane, blade angled away from the loaf, wood handle visible. It implies the entire process — fermentation, shaping, scoring — without saying anything. Wooden handles look craft and rustic. Brass or copper lames look upscale.
Flour Dust
Flour dust is the most overused and most under-controlled prop in bread photography. The mistake everyone makes: dumping a fistful and creating a snowstorm. The fix:
- Use a small fine-mesh sieve
- Pinch a small amount, hold 12 inches above the surface
- Tap gently, twice
- Stop
You want sparse, photographic dust — a few clusters on the surface, a light veil on the crust. Not a wedding cake of flour.
A Butter Knife (or a Real Bread Knife)
A knife resting next to or on the loaf signals "this is being eaten." Wood-handled bread knives look rustic and home-baked. Brass, brushed steel, or vintage silver looks upscale. Avoid plastic, neon, or anything that screams "kitchen drawer." Position the blade slightly angled toward the camera so the edge catches a highlight.
A Cooling Rack
A wire cooling rack or rustic black sheet pan under fresh loaves is the visual shorthand for "out of the oven five minutes ago." Pair it with a linen napkin underneath for layered texture, and you've got a hero shot for any bakery's "fresh bread daily" post.
Supporting Props (Use One, Maybe Two)
- A small ramekin of soft butter with a butter knife
- A jar of jam, lid off, spoon resting on top
- An espresso cup or French press
- Raw wheat stalks in a small vase or laid flat
- A flour-dusted linen apron edge entering the frame
- A small jar of sourdough starter with a wooden spoon
Pick one. Maybe two. Never three. The bread is the subject — everything else is a supporting actor.
Bread-Type Playbook: 10 Loaves and How to Shoot Each
Different breads have different selling points. A baguette's story is length. Focaccia's story is the top. A dinner roll's story is the cluster. Here's how to shoot each — with specific angle, light, and styling ideas for every loaf.
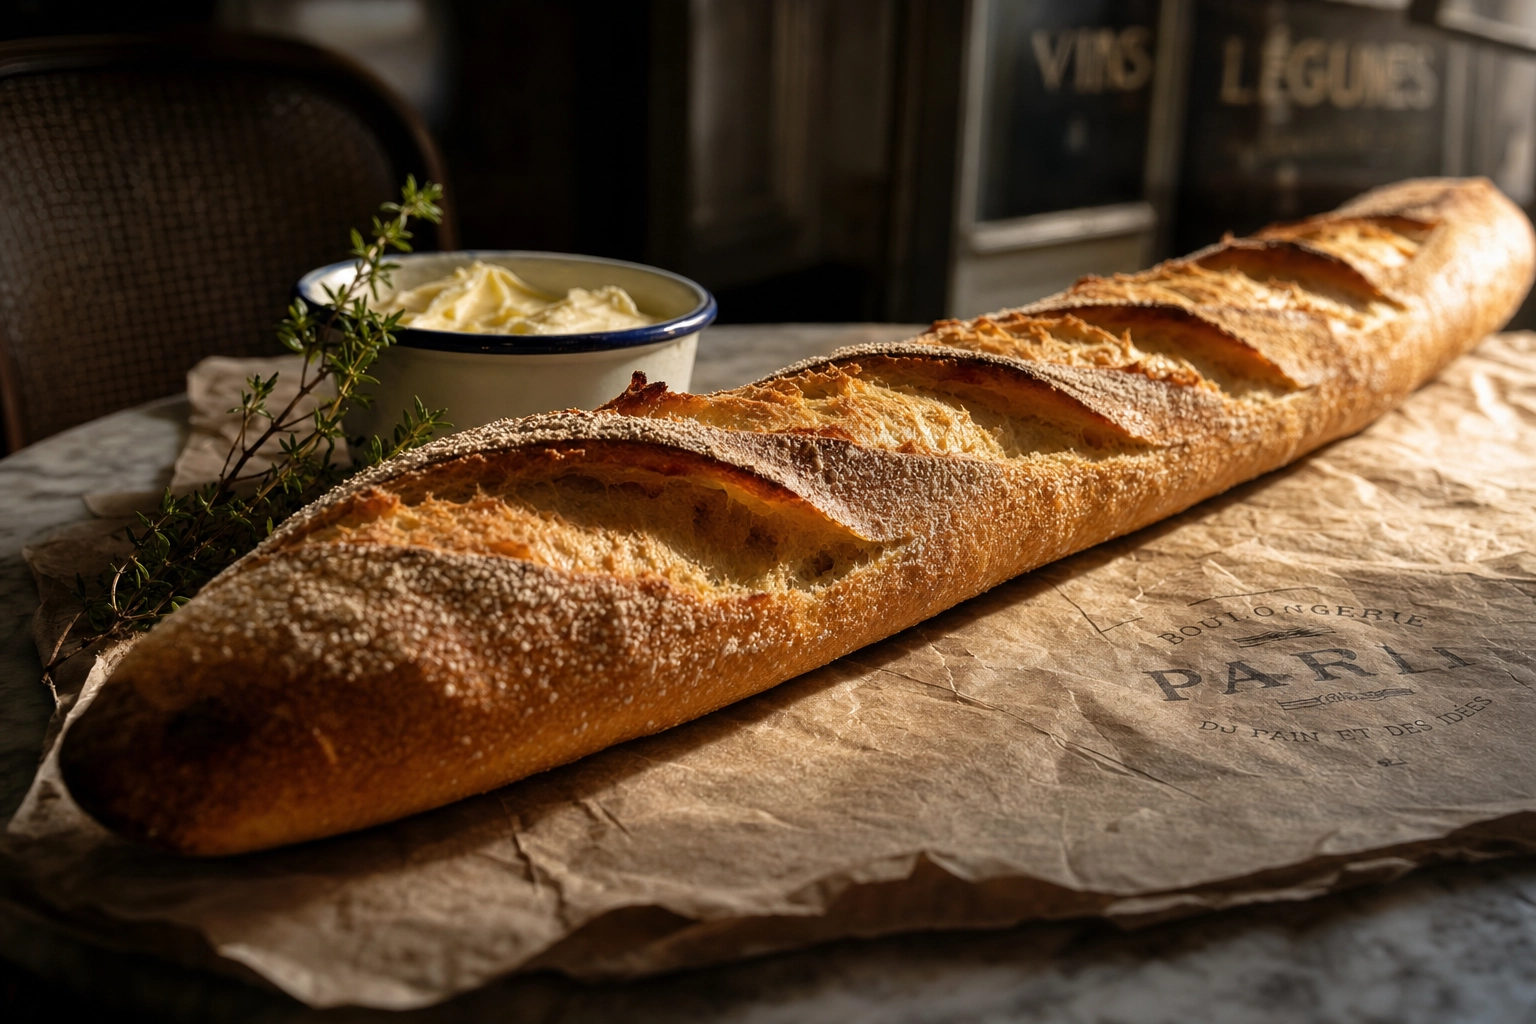 Long golden baguette photographed from low side angle on French butcher paper and marble — bread photography composition
1. Sourdough Boule
The classic round artisan loaf. Lead with the hero shot — 25 degrees off horizontal, side-back light at 11 o'clock, showing the scoring ear and crust blisters. Cut and shoot the crumb cross-section second. Backgrounds: linen on rustic wood. Avoid marble — it competes with the rustic country feel.
2. Baguette
Length is the story. Shoot down the length of the whole baguette at low angle (camera at 3 or 9 o'clock to the bread), letting the loaf curve out of the frame on one or both sides. Or place diagonally across an overhead frame and let it cross corner-to-corner. Side light brings out the score cuts and crackled crust.
3. Dinner Rolls
Cluster shot. Six to nine rolls in a cast-iron skillet or stoneware pan, shot at 30 to 45 degrees. The pull-apart connection between rolls is the magic — that soft, golden seam where two crusts meet. Tear one open and place beside the pan for a secondary shot showing the soft interior.
4. Focaccia
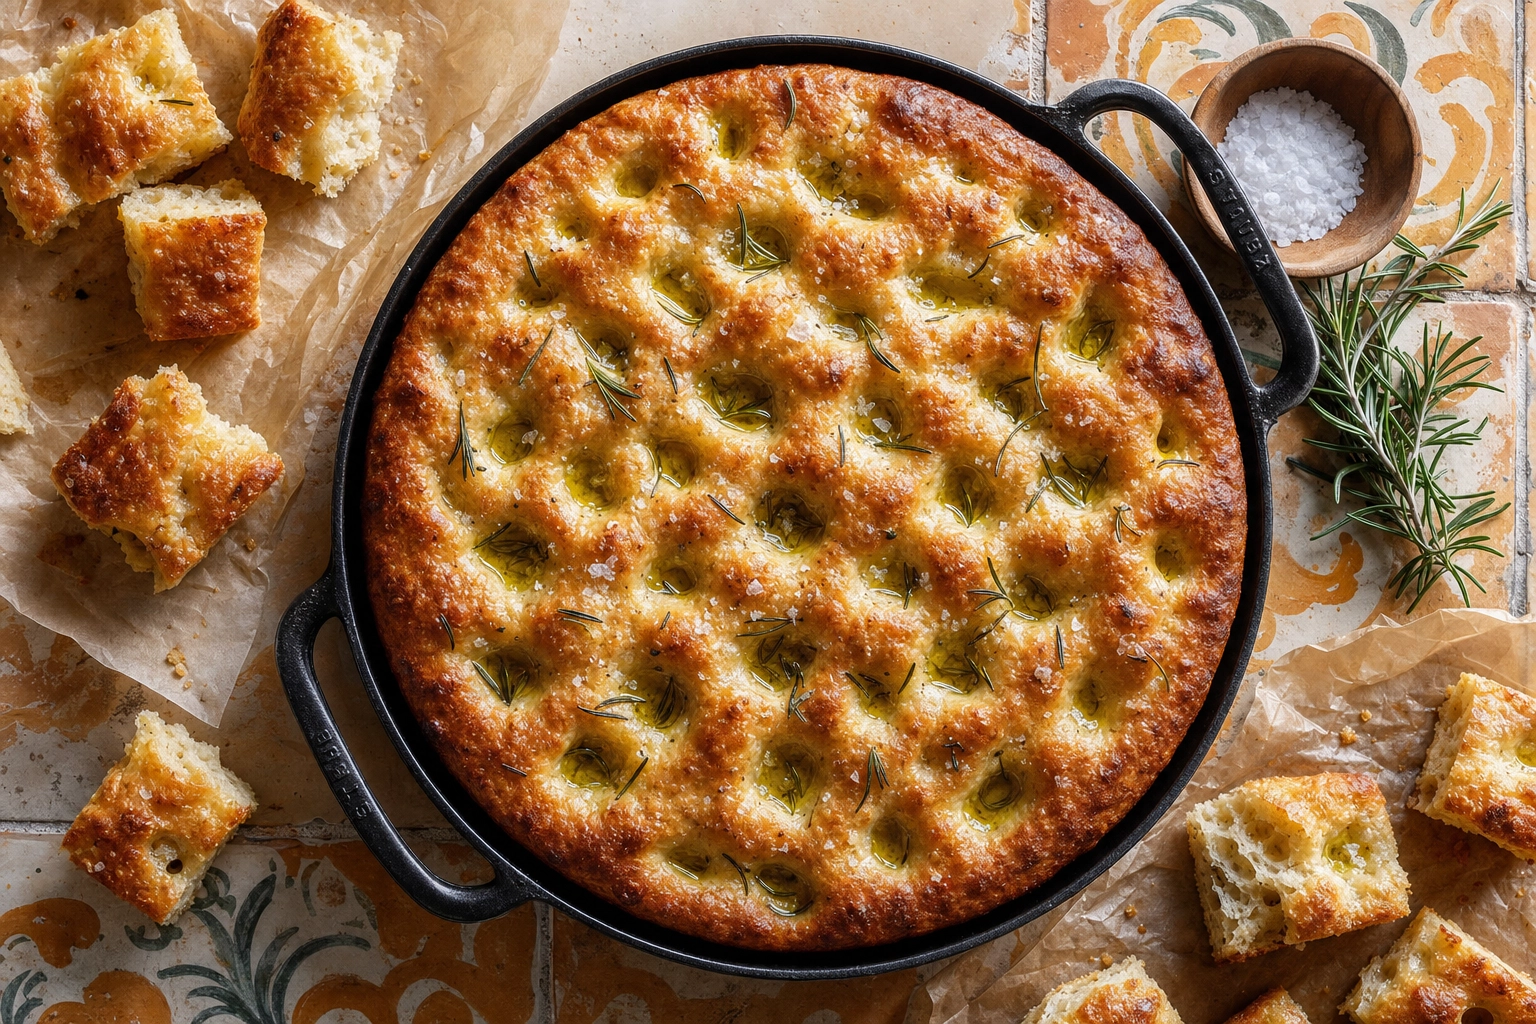 Top-down focaccia photography in cast iron pan on Italian terracotta tile showing dimples, olive oil pools, and rosemary
Focaccia is the rare top-down bread. The dimpled, oil-pooled, herbed surface is the entire show. Shoot directly overhead from a phone or camera on a horizontal arm, with the whole pan filling the frame. Light from one side to throw small shadows into each dimple. Cut into squares laid on parchment for the secondary shot.
5. Ciabatta
Ciabatta lives or dies on open crumb. Tear (don't slice) the loaf in half. Stand the two halves with cut faces toward the camera, slightly tilted. Hard side light to maximize the depth of the air pockets. Show one whole loaf to the side for context.
6. Brioche
Brioche is soft, golden, and glossy — the opposite of artisan crust. Avoid hard shadows. Soft side light, slightly diffused. Show the pull-apart tear with hands actually pulling — motion implied by the tension between the two halves. Pastel or pale wood backgrounds let the warm gold of the brioche pop.
7. Bagels
Stack three to five bagels slightly fanned, or shoot one whole bagel sliced with cream cheese mid-spread. Side light to bring out poppy, sesame, and everything-seed topping detail. Cross-section reveals the dense, chewy interior — important for selling a New York-style bagel against a fluffy supermarket competitor.
8. Milk Bread and Shokupan
The story here is the cottony pull. Tear a slice in half slowly to show the elastic interior threads. A light golden top crust against an ivory crumb — pastel backgrounds (powder blue, soft pink, light wood) keep the palette gentle. Avoid dramatic side light; it makes shokupan look harsh. Use soft top-light with a small side fill.
9. Rye and Dark Breads
Dark breads need contrast support. A dark background swallows them. Use light wood, a beige linen, or a marble slab. Side-back light maximizes crust contrast. A light dusting of flour helps the loaf separate from a darker surface. Sliced rye should be shot in a small stack so the dense crumb pattern reads.
10. Flatbreads (Pita, Naan, Lavash)
Top-down is the default. Show char marks, blisters, and the irregular hand-shaped edge. Stack two or three in a wooden bowl, on parchment, or laid flat on terracotta tile. If the bread just came off heat, capture steam — a moment of moving wisp against a darker background sells "fresh and hot" instantly.
For more bread-specific styling ideas and related AI presets tuned to each loaf type, see our AI bread photography presets.
Phone or Camera? A Practical Workflow for Bakeries
The honest answer: it depends less on the camera than people think. A good phone in good window light beats a $3,000 camera in bad light, every time. NYC food photographer Francesco Sapienza ran a side-by-side test with an iPhone 13 Pro and a Sony A7R III, and the iPhone shot was nearly indistinguishable — because the lighting was the same.
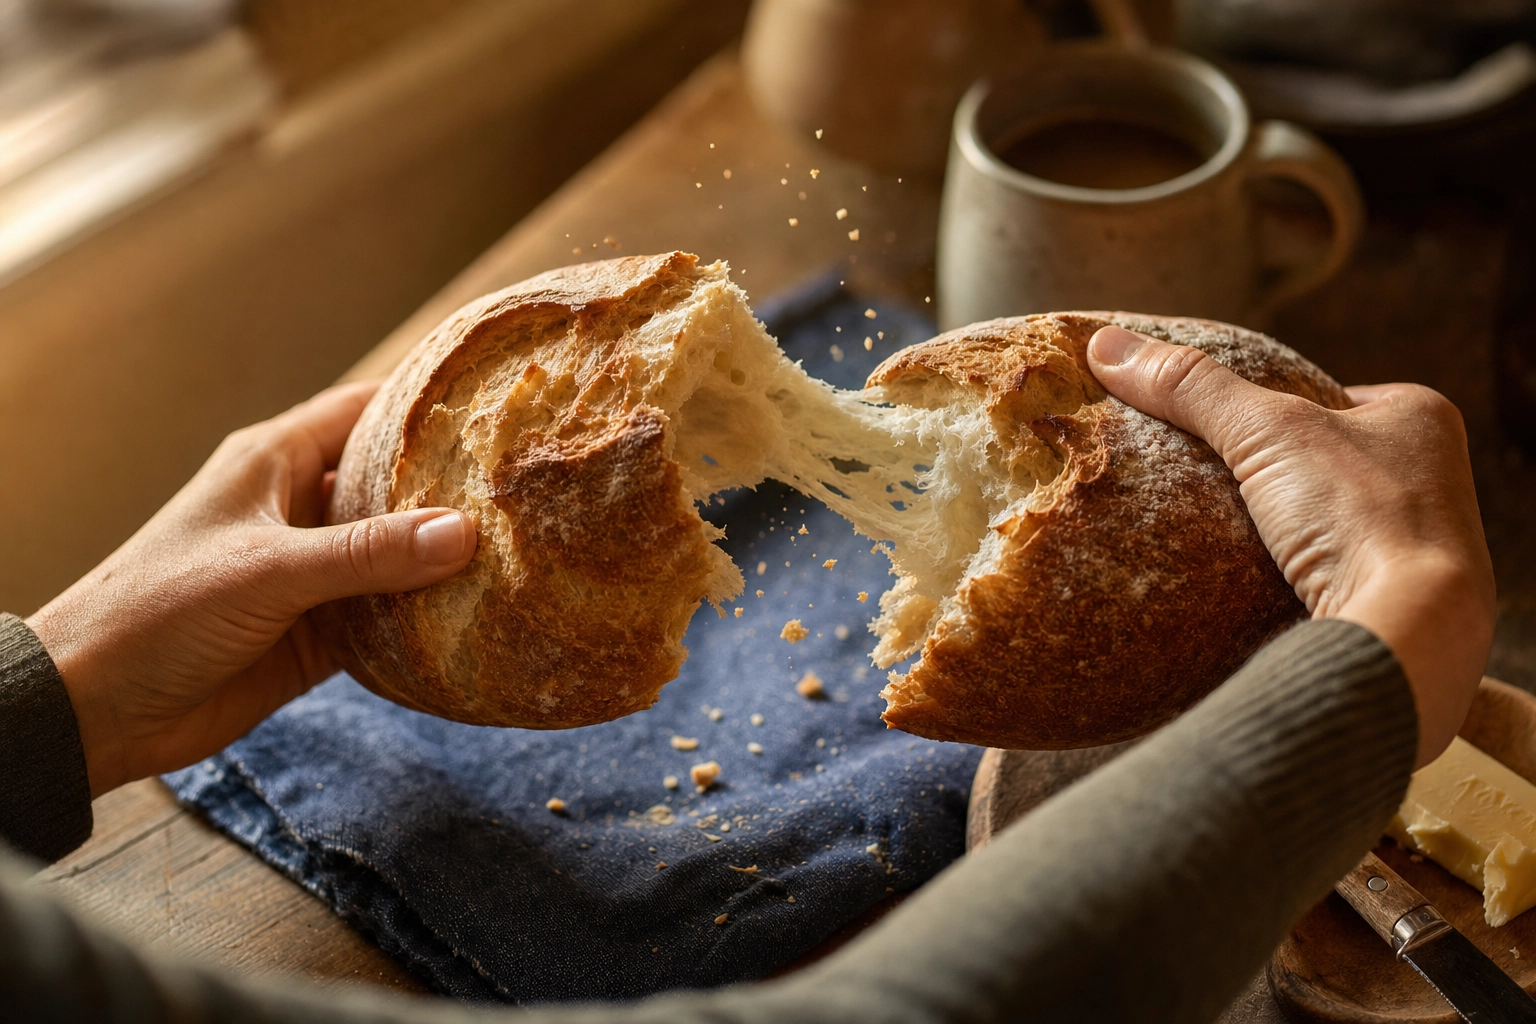 Hands tearing rustic country bread loaf in warm morning light — lifestyle bread photography scene
That said, each tool has clear strengths.
Phone Setup (iPhone, Pixel, Galaxy)
For 90% of bakery social and menu use, a phone is enough. Here's the workflow:
- Turn off flash. Always.
- Use the main 1x lens. Avoid ultrawide — it distorts close subjects.
- Tap to focus on the brightest crust point.
- Long-press to lock focus and exposure so it doesn't drift as you move.
- Slide the exposure down 0.3 to 0.7 stops — phones tend to overexpose bread photos.
- Shoot in ProRAW (iPhone 12 Pro+), RAW (Pixel 6+), or Expert RAW (Samsung Galaxy S22+). This gives you editing latitude later.
- Use a $20 phone tripod for sharp shots in low light.
- Edit in Lightroom Mobile or Snapseed — warm WB, lift shadows slightly, drop highlights by 10–15, add 5–10 contrast.
Camera Setup (DSLR or Mirrorless)
For commercial work — packaging, print menus, billboards — a dedicated camera still wins on dynamic range, depth control, and 4K+ output.
- Lens: 50mm or 85mm prime. The 85mm compresses backgrounds beautifully for hero shots.
- Aperture: f/4 to f/5.6 for crumb shots (you need front-to-back sharpness), f/2.8 for hero shots with intentional background blur.
- ISO: 100 (use a tripod and let the shutter do the work).
- Shutter: Whatever the light gives you — typically 1/30 to 1/125 on a tripod.
- White balance: Manual at 5200K, or shoot RAW and set in post.
- Tripod: Non-negotiable. Window light is dim enough that handheld means blur.
Editing Basics for Both
Whatever you shoot with, the same five edits make almost every bread photo look 30% better:
- Warm white balance by 200–400K
- Lift shadows by 15–25
- Drop highlights by 10–15 (saves the bright crust ridges)
- Add 5–10 contrast
- Bump clarity or texture by 10 (not more — past 15 it looks crunchy)
For a full breakdown of cameras, lenses, and related budget gear ideas, see our food photography equipment guide.
When AI Enhancement Saves the Shot
Here's the reality every bakery owner runs into: you have a display case full of beautiful bread, your phone, ninety seconds before the morning rush, and zero photographers on staff. The lighting in your shop is fluorescent. The background is busy. The croissants are selling, but the photo on your DoorDash listing looks like it was shot in 2007.
Professional bakery shoots run $500 to $2,500 per session. For a shop that rotates 20 to 50 items, sometimes weekly with seasonal swaps, traditional photography math doesn't work. (We broke down what food photography actually costs across every tier.)
This is where AI enhancement earns its keep.
FoodShot AI's bakery presets are tuned specifically for bread, pastry, and viennoiserie. The model knows that crust should look amber and warm, not oversaturated. It knows that powdered sugar needs soft diffusion, not digital sharpening. It knows that a sourdough ear should be a defined ridge, not a smudge. Upload a phone photo, pick a bakery style, and the AI:
- Enhances visible crust texture (blisters, ear curl, flour bloom)
- Deepens crumb shadow without flattening the structure
- Corrects display-case yellow casts to natural warm tones
- Replaces busy backgrounds with marble, rustic wood, linen, or solid color
- Outputs in 4K, ready for print menus or billboards
The workflow is unreasonably fast: phone photo → upload → pick "Artisan Bread" or "Bakery Daylight" → about 90 seconds → download. For bakeries running 200+ images a year, the math is simple — Starter at $15/month gives you 25 credits, Business at $45 gives you 100. Compare that to even one $500 photographer session.
Three FoodShot features matter most for bakeries:
- Bakery presets — 100+ styles tuned for bread textures, from dark moody artisan to bright bakery daylight
- My Styles — Upload a reference photo of your best bread shot and every subsequent loaf matches that exact lighting, surface, and mood. Your menu starts looking like one cohesive shoot instead of fifteen different phones.
- Builder Mode — Combine your loaf photo with a wooden board, linen drape, marble slab, or flour-dusted surface. Control angle, light direction, and props without touching a camera.
All paid plans include a commercial license, so the images are cleared for menu use, delivery app uploads, social media, and print marketing. For more on how bakeries specifically use FoodShot, see our AI food photography for bakeries hub — and the full feature breakdown lives at the AI food photo editor page.
Frequently Asked Questions
How do you make bread crust look golden in photos?
Three things, in this order. First, white balance — set it to 5200–5500K manually, not auto. Auto WB will try to "fix" the warmth out of your bread photo and leave the crust looking pale. Second, light angle — a side or side-back light at 15–30 degrees from horizontal makes the amber ridges catch and the matte patches recede, giving the crust dimension. Third, editing — push the white balance 200–400K warmer in post and lift the orange/yellow tones in HSL by 5–10. If you're shooting with FoodShot AI, the bakery presets handle all three automatically.
How do you photograph bread slices without crumbs everywhere?
Cooling and technique. Let the whole loaf rest 30–60 minutes after baking before you slice — a warm crumb is still setting and will compress under the knife. Use a long serrated bread knife with a gentle sawing motion, not downward pressure. Some bakers swear by flipping crusty loaves upside down and slicing through the soft bottom first. Wipe the blade between slices on a damp towel. If a few crumbs land, leave them — small crumbs on a rustic cutting board read as authentic, not messy. Big shards are the problem, and cooling fixes that.
What's the best background for dark vs white bread?
Reverse contrast. Dark breads (rye, pumpernickel, multigrain) get lost on dark backgrounds — use light oak, beige linen, warm marble, or weathered light wood. A light flour dusting on the crust helps the loaf separate from the surface. White breads (brioche, milk bread, shokupan, country loaves) benefit from darker, richer surfaces — dark walnut, slate, navy linen, dark marble. The goal is always to make the bread the brightest, most saturated thing in the frame.
What time of day is best for bread photography?
Mid-morning (9–11 AM) or late afternoon (3–5 PM). At those hours the sun is angled rather than overhead, which gives you natural side light through a window. Avoid noon direct sun — the light comes straight down, kills texture, and creates a harsh, contrasty look that flatters almost no food. Cloudy days are actually excellent for bread; the diffused overcast light works like a giant softbox. North-facing windows in the Northern Hemisphere give the most consistent indirect light all day.
Do you need a DSLR camera to photograph bread for a bakery?
No. Modern phones (iPhone 12 Pro and up, Pixel 6 and up, Galaxy S22 and up) produce bread photos that are completely menu-ready, delivery-app-ready, and Instagram-ready. The phone limitation is professional commercial work — billboards, packaging, full-page magazine ads — where you need maximum resolution and shallow depth of field control. For 90% of bakery use cases (menu, social, delivery apps, posters), a phone plus good window light is enough. If you can't shoot in good light, AI enhancement closes the quality gap.
How many photos do I need per loaf for a bakery menu?
The professional standard is three to four images per product: a hero shot (whole loaf, beauty angle), a crust or surface detail close-up, a crumb cross-section if it's a cuttable loaf, and a lifestyle or scene shot. For a bakery selling on Uber Eats or DoorDash, the hero alone is enough for the listing — but having all four gives you content for social media, menu inserts, and seasonal promotional posters. If you bake 20 different items, that's 60–80 photos, which is exactly why bakeries lean on AI enhancement for everyday content and reserve professional shoots for hero brand images.
Bakery-Ready Photos in 90 Seconds
The fundamentals of bread photography don't change: side light, four key shots, simple rustic backgrounds, sparing props. Master those and a phone is all you need to make any loaf look like it belongs on a menu.
For the days when the light is wrong, the display case is yellow, or you have 30 loaves to photograph by tomorrow, FoodShot AI handles the rest. Upload a phone snap, pick a bakery style, and get a 4K, commercially-licensed bread image in about 90 seconds — at roughly 95% less than a professional bakery shoot.
Start with 3 free credits and try the Artisan Bread preset on your next loaf.
