Indian Food Photography: Shoot Curry & Biryani
Your butter chicken tastes incredible and your biryani has regulars coming back every week — so why does the photo on your menu look like a bowl of brown sludge? You're not bad at photography. Indian food photography is just genuinely hard. The rich, layered gravies that make the cuisine so addictive — deep reds, earthy browns, golden yellows — are exactly what cameras struggle with. A burger photographs itself; a korma fights back.
This guide is for Indian restaurant owners, cloud kitchens, and caterers who want their curries, biryani, and tandoori to look as good on screen as they taste on the plate. We'll cover why Indian dishes photograph flat, the four shots every menu needs, the lighting that rescues a monochrome gravy, and color grading that makes spices pop without looking fake — plus a 90-second shortcut for the nights you don't have time for any of it.
Quick Summary: Indian food photographs flat because dark curries absorb light while pale rice and naan reflect it — one flat light can't handle both. Fix it with side or back lighting plus a reflector, a warm white balance, contrast garnishes, and restrained color grading. Master four shots — the overhead thali, the curry-bowl hero, the biryani layer shot, and the tandoori char close-up — and your whole menu is covered. Short on time? AI tools like FoodShot turn a phone snap into a menu-ready Indian dish photo in about 90 seconds.
Why Indian Food Photography Is So Hard (and Worth It)
Browse any stock library and you'll find gorgeous shots of pizza and pancakes. Indian food? Mostly muddy, orange-lit plates. Four things make this cuisine uniquely tricky to shoot:
- Curries photograph flat. A masala or dal is one color repeated across the bowl. Where a salad has built-in contrast, a chicken curry is brown-on-brown — cameras read it as a textureless blob.
- The meat hides in the gravy. Chicken in a red makhani, mutton in a brown korma — the protein is the same color as the sauce, so customers can't tell whether they're getting meat or plain gravy.
- Every hero has a supporting cast. Traditional Indian dishes were built for sharing: a dum biryani arrives with raita, salan, and a boiled egg; a curry comes with rice and roti. That's harder to compose than one clean burger.
- It's not one cuisine — it's a dozen. A creamy North Indian makhani, a fiery Chettinad curry, a crisp South Indian dosa — each has its own colors and traditional plating, so no single formula flatters them all.
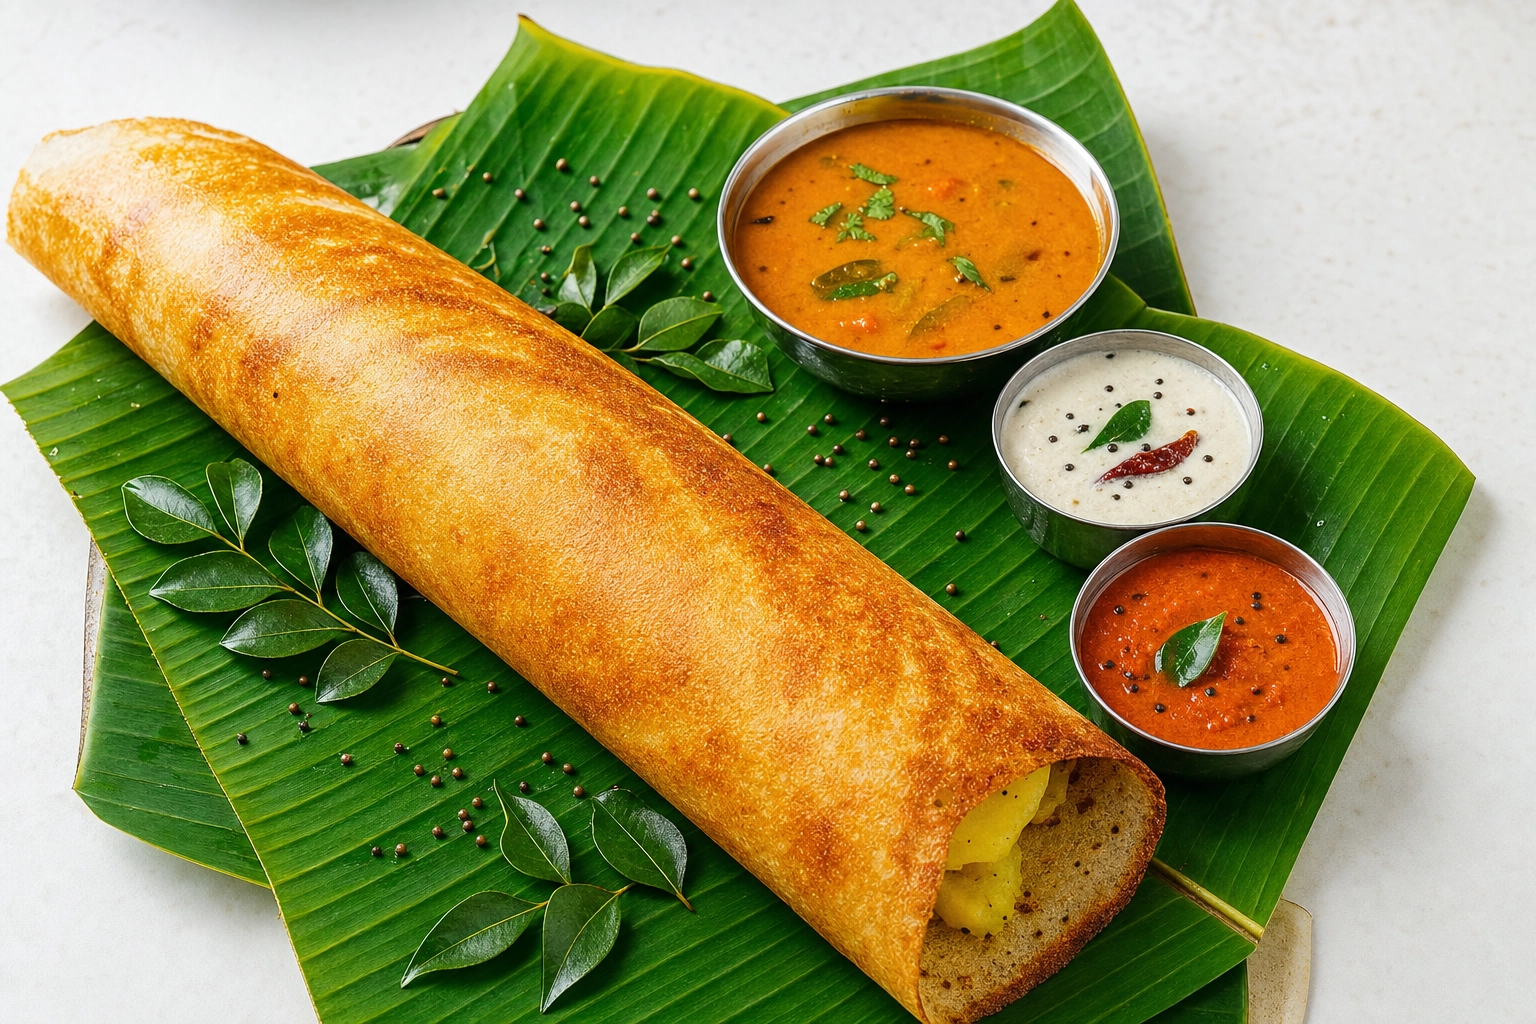 Crispy golden masala dosa on a banana leaf with sambar and coconut chutney, a traditional South Indian dish
The technical heart of it is what photographers call the "white dress, black suit" problem. Pale foods — rice, naan, raita — reflect light and need very little. Dark curries absorb light and need a lot. Light both with one flat source and you'll blow out the rice or lose the curry in shadow.
Is it worth solving? Absolutely. Menu items with photos earn far more orders — DoorDash reports up to 44% more monthly sales for items with images, Grubhub up to 70% more orders on listings with photos versus text alone, and Deliveroo a roughly 24% lift from professional food photos. For an Indian restaurant on a crowded food delivery app, the gap between a brown blob and a steaming, garnished dish is real revenue. (Our restaurant food photography guide covers that math.)
The 4 Shots Every Indian Menu Needs
Almost every dish on an Indian menu fits one of four shot types. Learn these four and you can shoot your whole menu consistently — the foundation of good food photography. Indian dishes just ask you to apply it deliberately.
1. The Overhead Thali or Spread
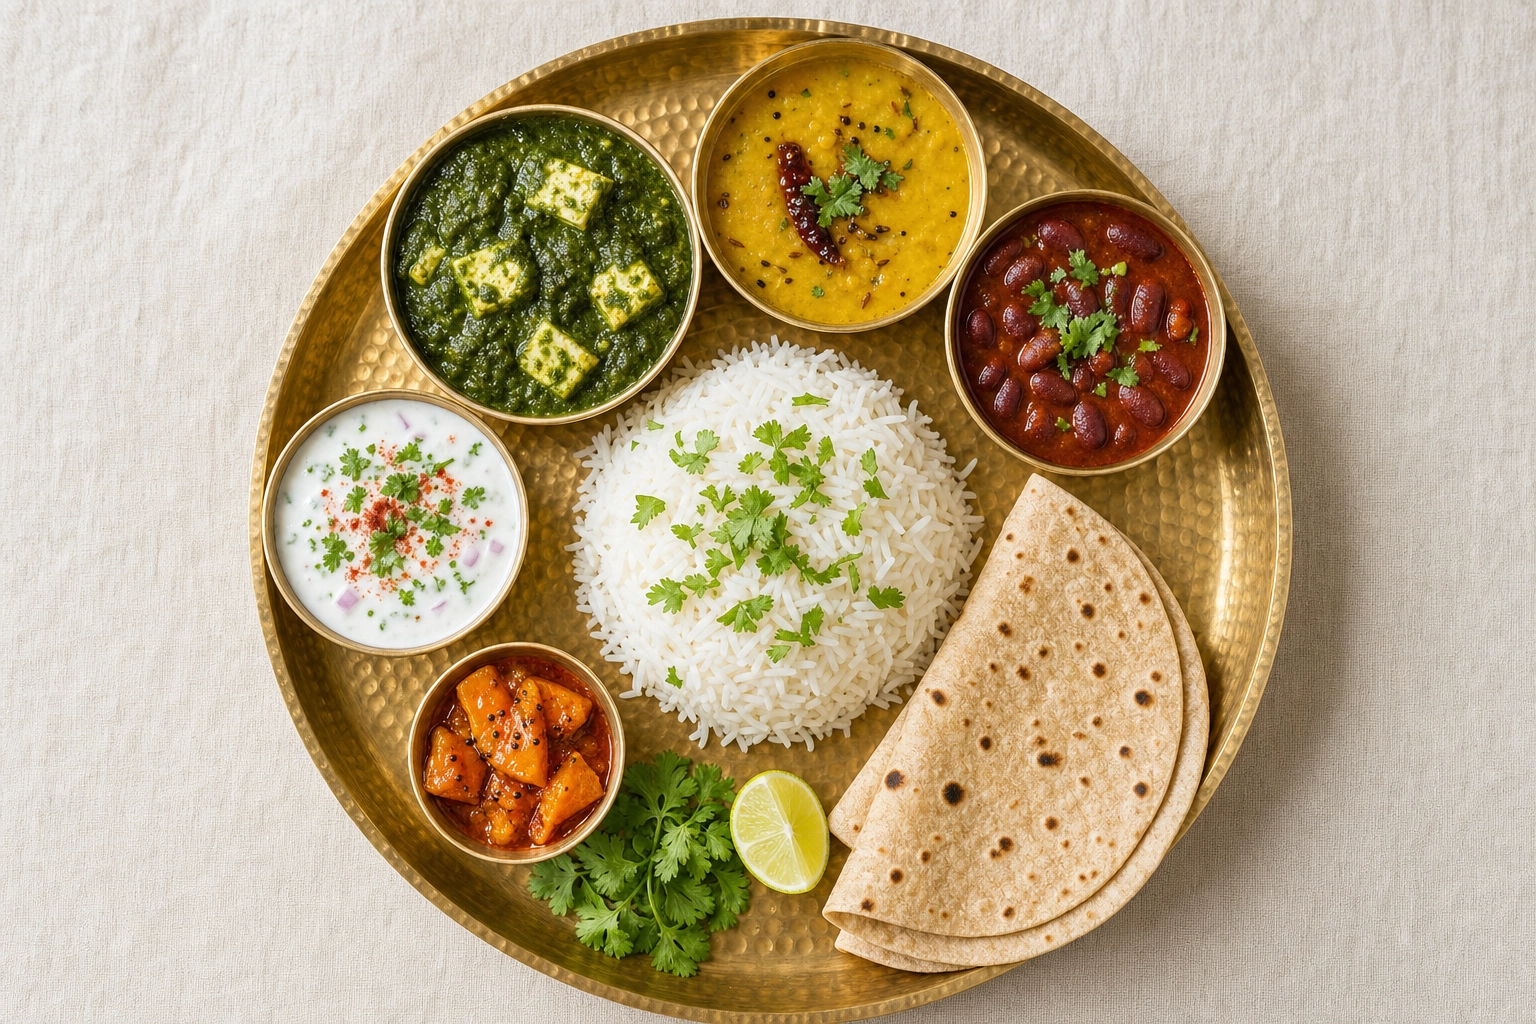 Overhead flat-lay of a traditional Indian thali on a brass platter with rice, dal, palak paneer, rajma and raita
Shoot straight down — a true 90-degree flat-lay — for a thali, family meal, or table full of dishes. It's the only angle that captures the full range of colors and tells the "feast" story. The trick is hierarchy: place your hero (the biryani, the butter chicken) front and center and slightly larger, and push pickles and minor chutneys to the edges. Set it on a traditional brass thali or banana leaf for an authentic base, and leave breathing room so it reads as abundant, not cluttered.
2. The Curry Bowl Hero
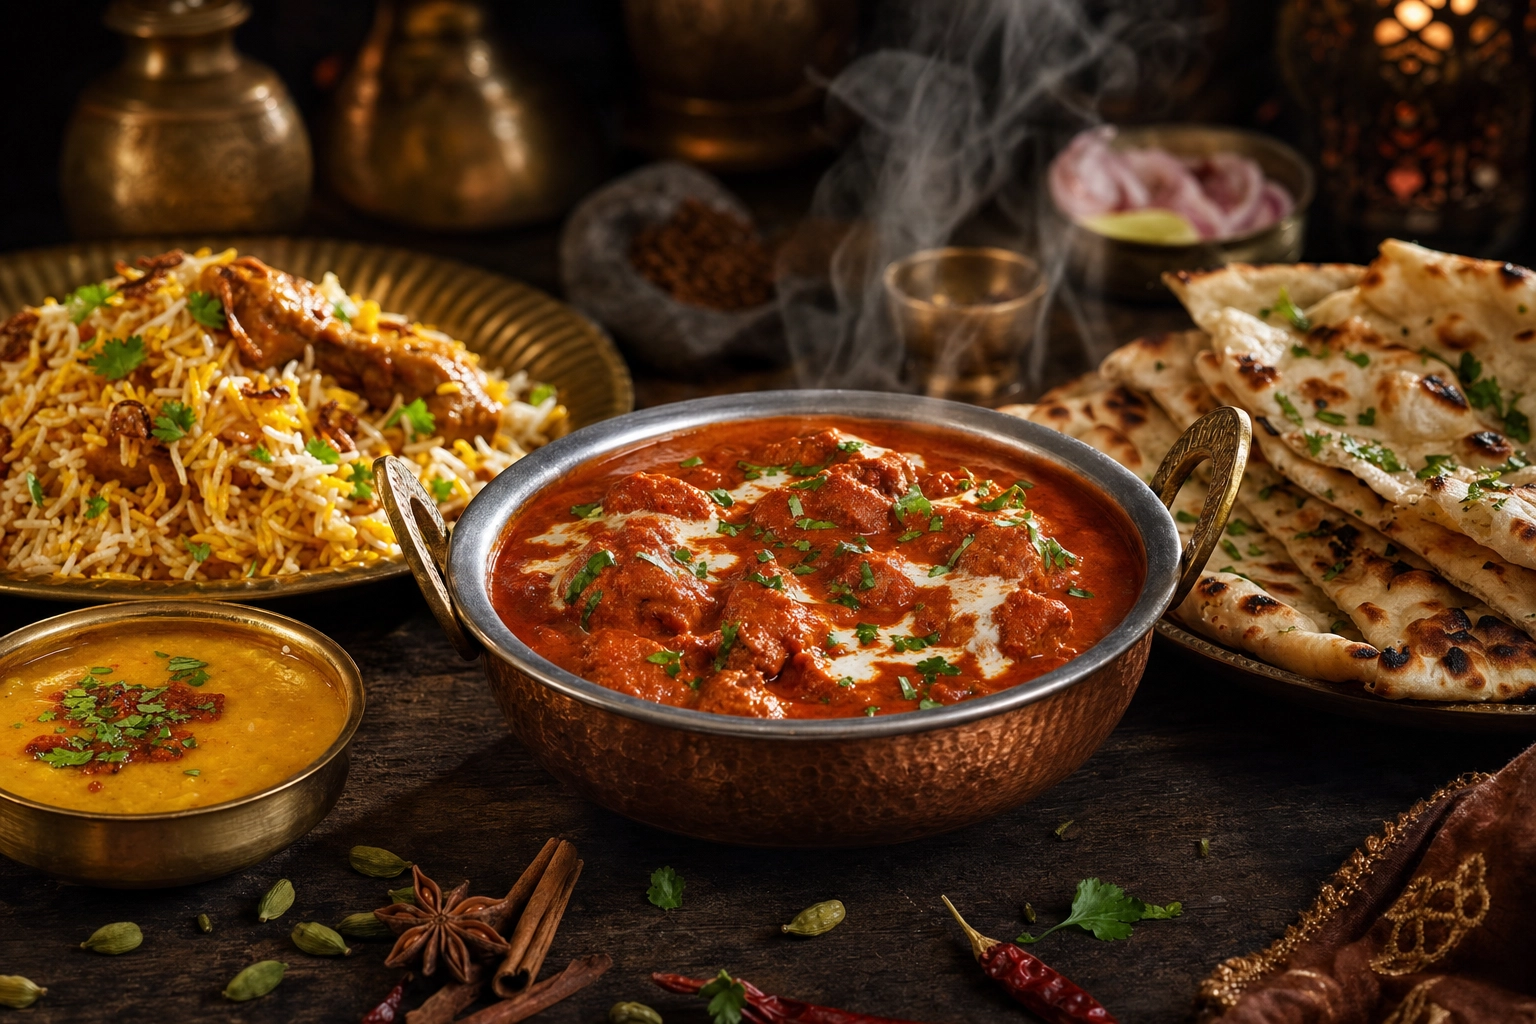
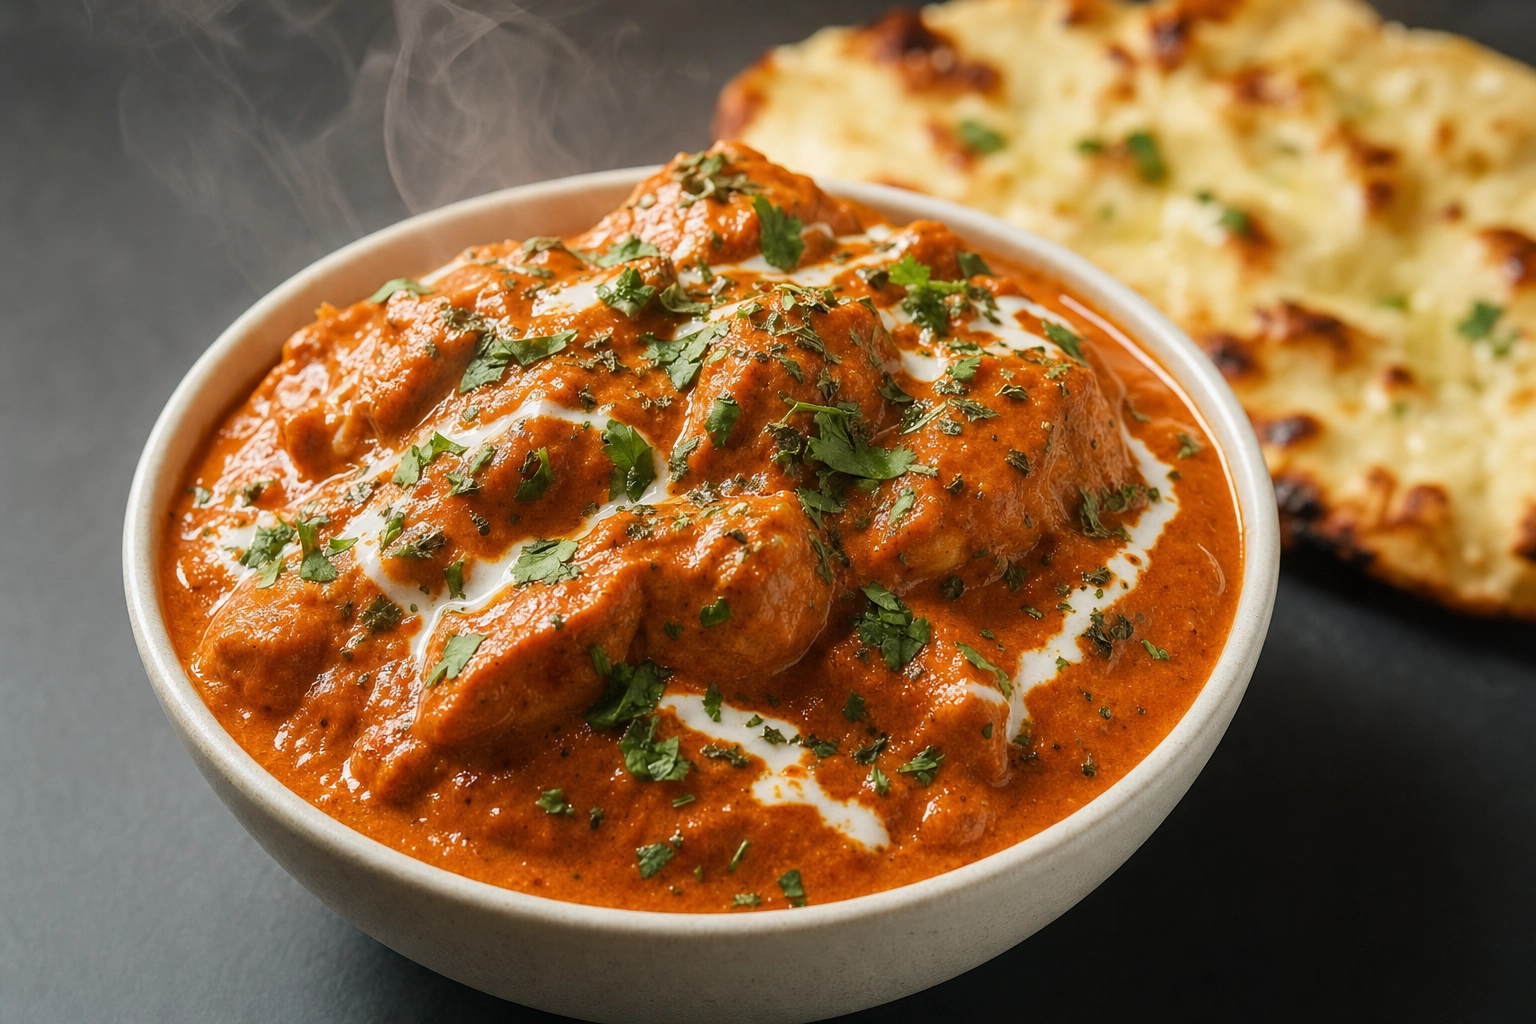 Bowl of creamy butter chicken garnished with a cream swirl and coriander, shot at a 45-degree angle with side light
For single curries — butter chicken, dal makhani, paneer tikka masala — shoot at about 45 degrees. This three-quarter angle shows the surface and a little depth, making a gravy look rich rather than flat. Two things make it work: cheat the elevation by mounding the chicken or paneer above the rim so it doesn't sink and disappear, and garnish for contrast — a swirl of cream and crushed kasuri methi on butter chicken, coriander and a red chili on a yellow dal, a drizzle of oil for sheen. It's the most reliable way to make butter chicken images look like a national chain's menu.
3. The Biryani Layer Shot
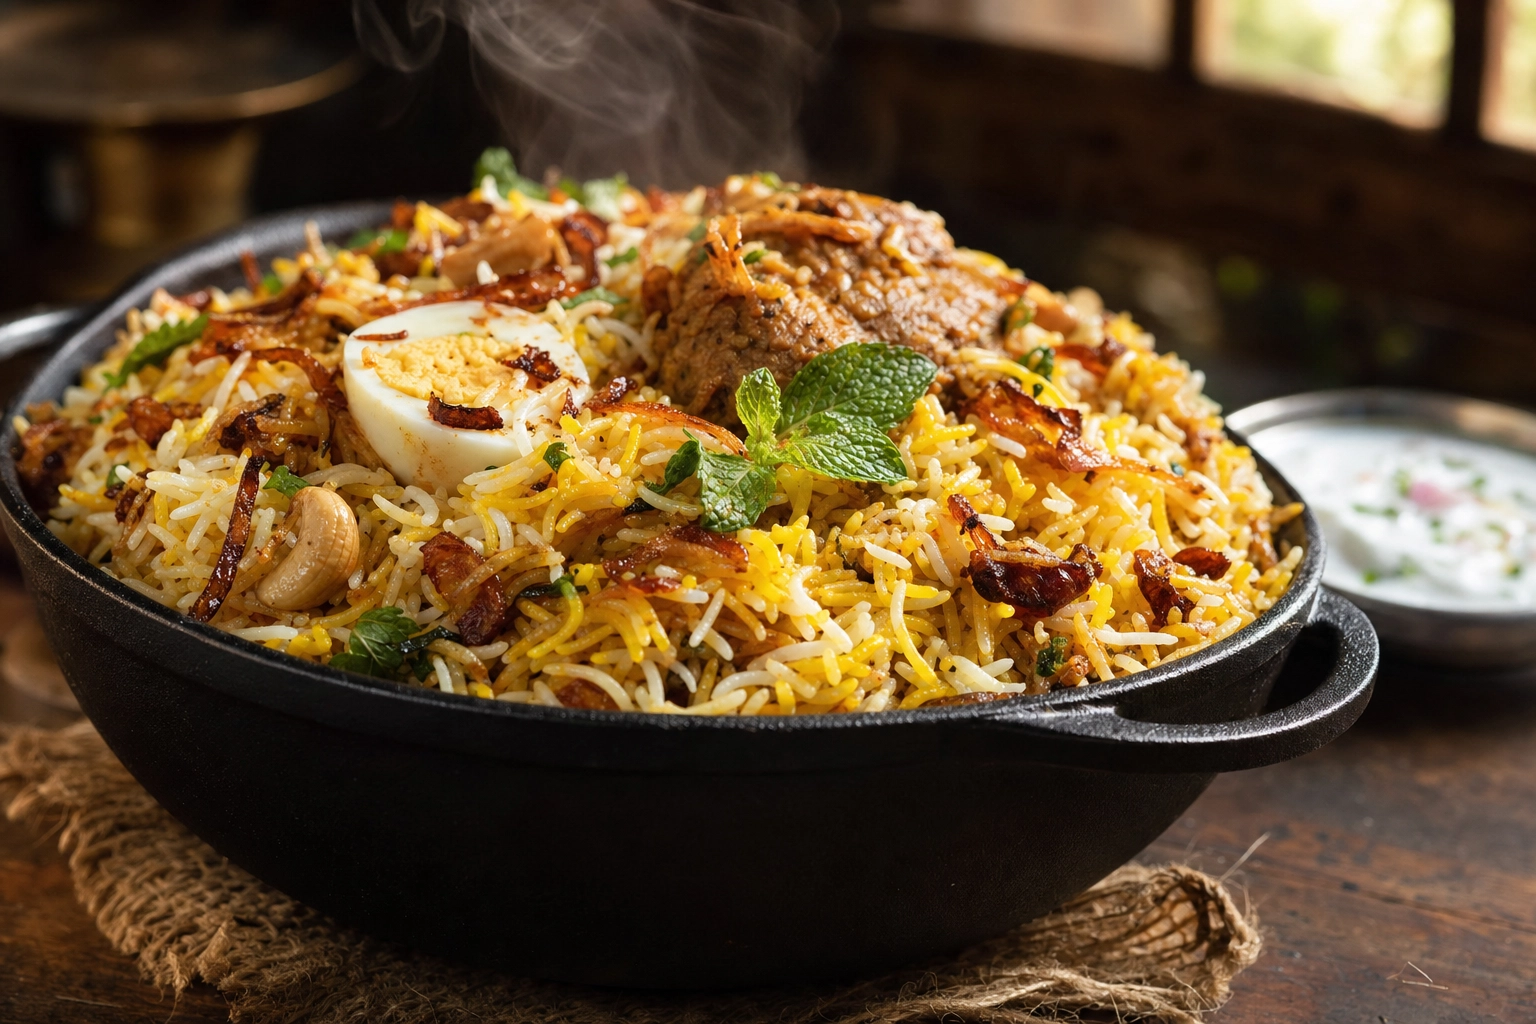 Low side-angle shot of chicken biryani in a handi showing layered rice, golden fried onions and a boiled egg
Biryani is about the layers, so don't flatten it from overhead. Drop to a low side angle — almost table level — to show the depth of the rice and the long, separated grains. Style it so the components read: golden birista (crispy fried onions), a halved boiled egg, a piece of meat peeking through, a scatter of mint and fried cashews, with raita and salan alongside. Biryani images are some of the most-searched food terms there are, so a great one earns its place on your menu and your feed.
4. The Tandoori Char Close-Up
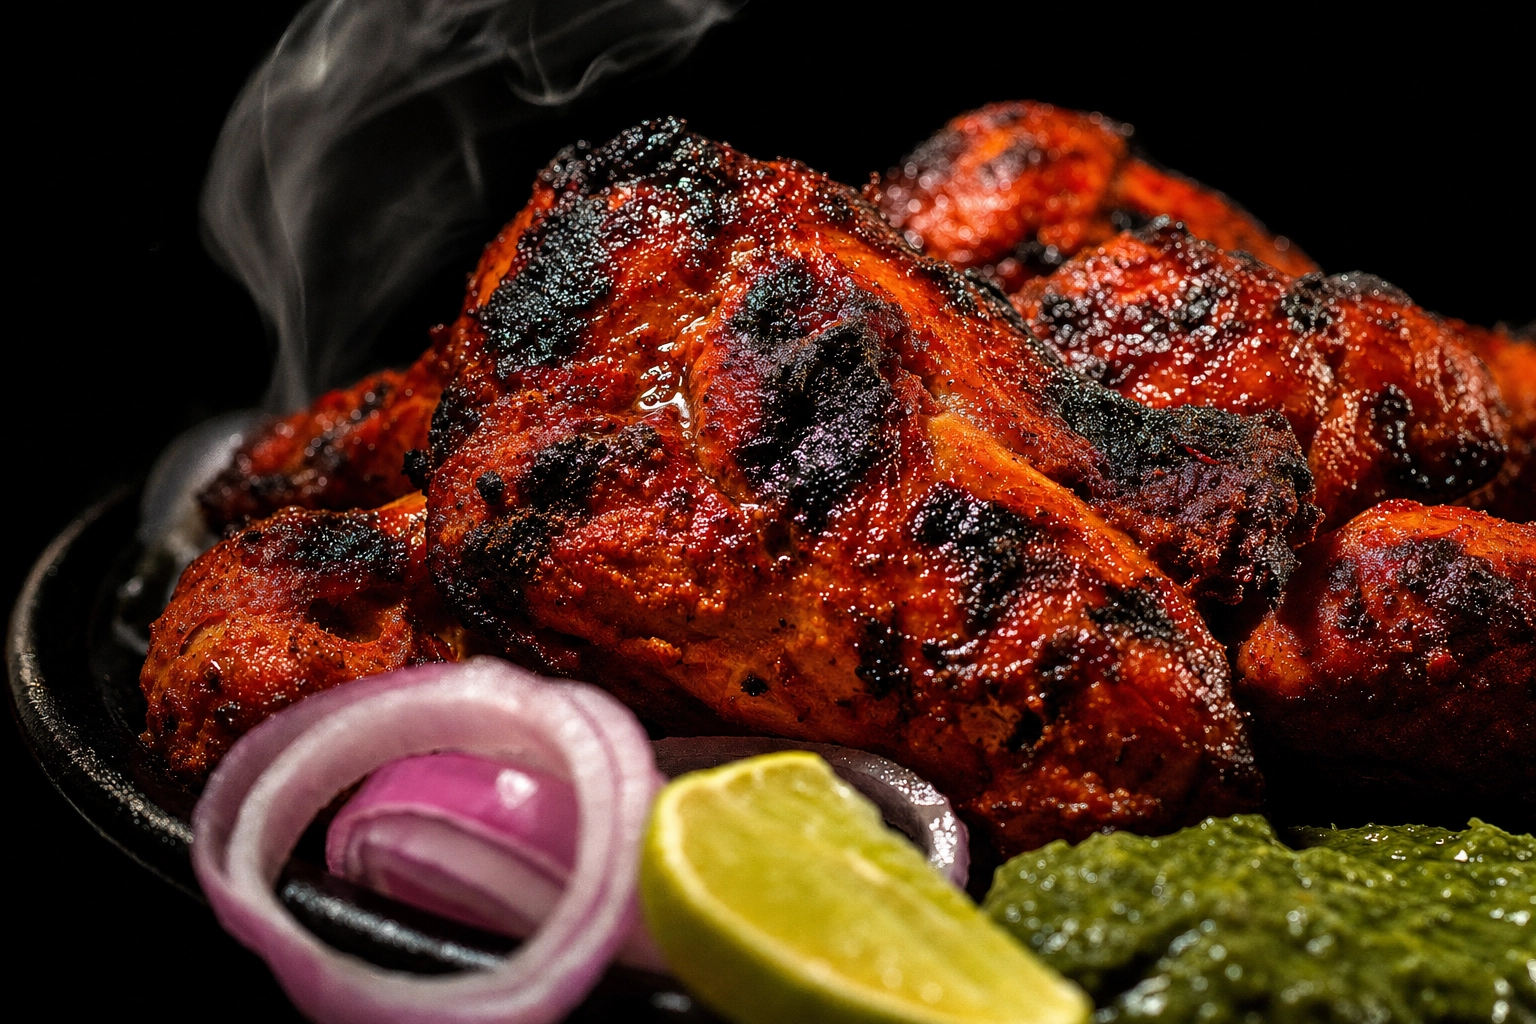 Macro close-up of charred tandoori chicken with oil sheen, char marks, onion rings, lime and green chutney
Tandoori chicken, paneer tikka, seekh kebab — these are about texture, and texture loves a close-up. Get in tight and use hard, directional light to rake across the surface and reveal every char mark and blister. Brush the meat with a little oil so it glistens, and style with lime wedges, raw onion rings, green chutney, and a wisp of smoke. For more on shooting marinated and grilled birds — tandoori and butter chicken included — see our chicken photography styles page.
Lighting That Rescues Flat, Monochrome Gravies
If you fix only one thing, fix your light. Good food photography, Indian food especially, lives or dies on it.
 Food photography lighting setup with a curry bowl by a window, soft side light and a white reflector filling shadows
Use side or back light — never front light. Picture your dish at the center of a clock, camera at 6 o'clock. Light from 3 or 9 o'clock (side light) rakes across the food and reveals texture — rice grains, tandoori char, glossy gravy. Light from 12 o'clock (back light) makes steam glow and rims a glass of mango lassi. Light from behind the camera — your phone's flash — flattens everything and kills depth.
 Backlit glass of mango lassi glowing amber with pistachio and mint, demonstrating the backlight technique
Give dark curries more light. When the gravy is deep and dark, add light, then bounce a white reflector (even foam board or a folded napkin) into the shadow side to lift detail. Pale dishes like raita or plain rice need the opposite — ease off so they don't blow out.
Set a warm white balance. Indian spices live in the warm range — turmeric yellow, chili red, garam-masala brown — so a white balance around 5,500–6,000K keeps them appetizing. Watch auto white balance when there's lots of white rice in frame; it neutralizes the white and drains warmth from the food.
Kill the overhead tube light. Those greenish ceiling lights make Indian dishes look sickly. Shoot near a window or use one daylight-balanced LED panel with a diffuser. For the full clock method and modifiers, see our guide to food photography lighting.
Styling Tricks That Make Curry Look Crave-Worthy
Food styling is where flat Indian dishes come alive — it's just the plating care you'd give a guest, dialed up for the camera. In food photography, Indian dishes reward this deliberate styling more than most.
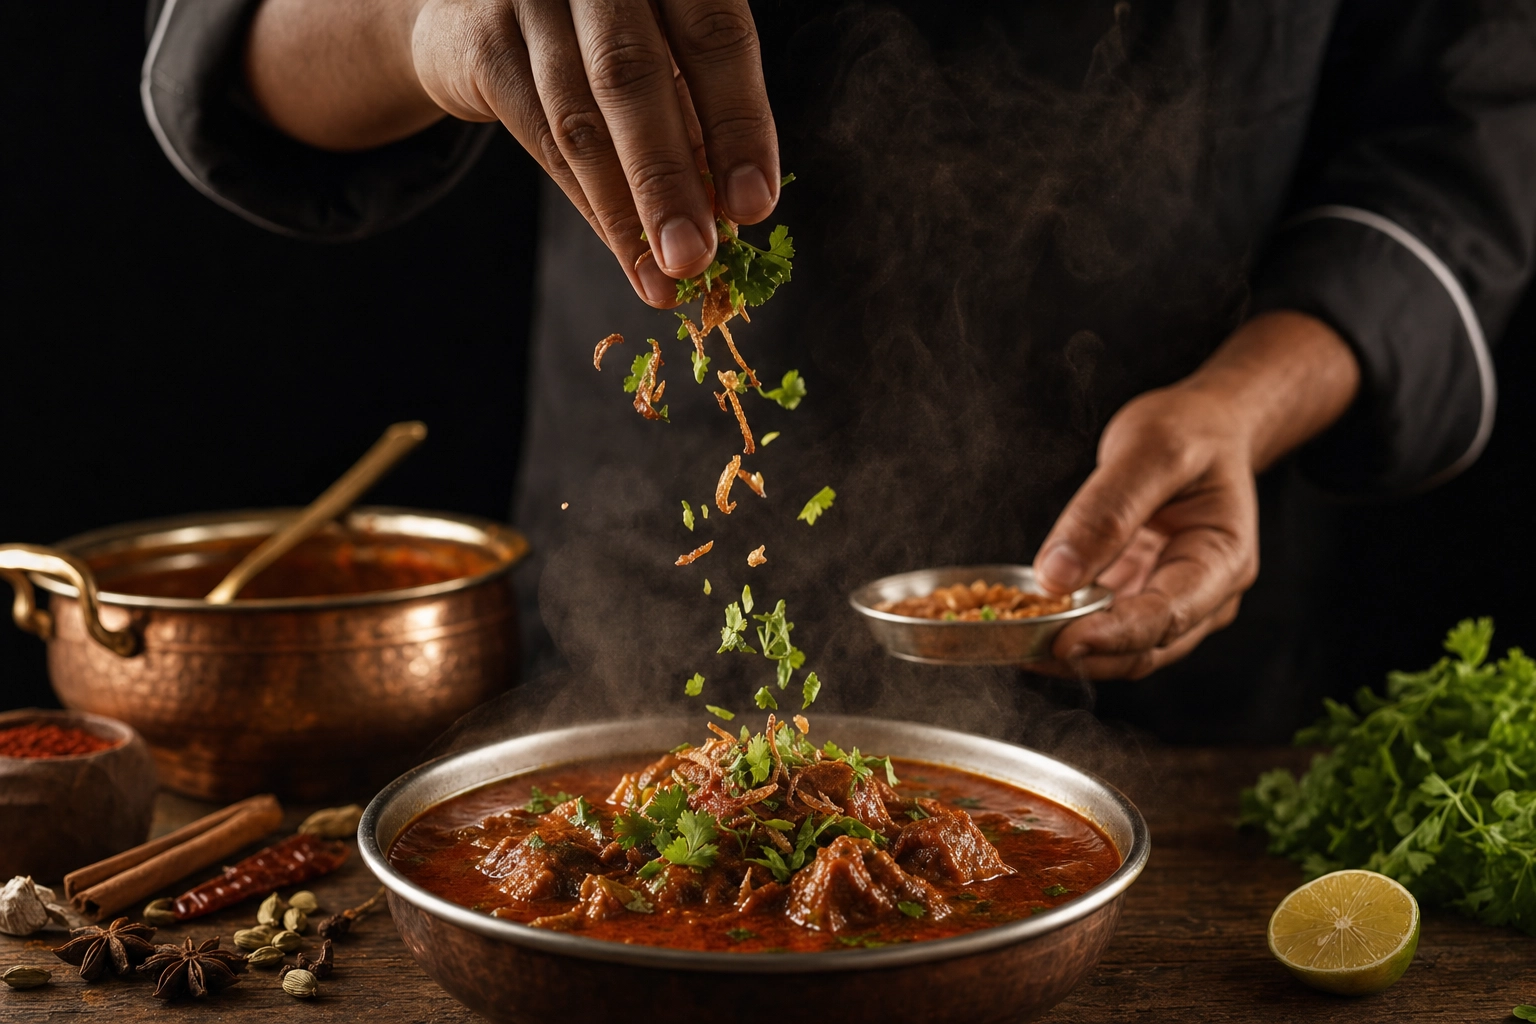 A chef's hands sprinkling coriander and crispy fried onions over a steaming bowl of rich red Indian curry
- Garnish for contrast. The highest-impact habit. A plain dal is a flat sheet of yellow; one green coriander sprig and one red chili give the photo three colors and a focal point. Birista on biryani, a cream swirl on makhani, a dusting of chaat masala — each breaks the monochrome that makes curry images look dull.
- Chase the oil sheen. A little glisten reads as fresh and rich. Brush oil or ghee on tandoori meats before shooting, and let the natural oil patches on a resting curry catch the light.
- Capture steam for freshness. Shoot the moment the dish hits the table, light it from behind or the side, and put a dark background behind the steam so it shows.
- Separate the meat from the gravy. Lift a few pieces of meat so they sit proud of the surface and angle them toward the light; a torn piece of naan alongside adds context.
- Choose props that look lived-in. Brass and copper katoris, a seasoned kadai, a banana leaf, hand-loomed linen. Slightly tarnished metal photographs better than shiny new. Match scale to the dish — tiny bowls for chutneys, a big plate for biryani.
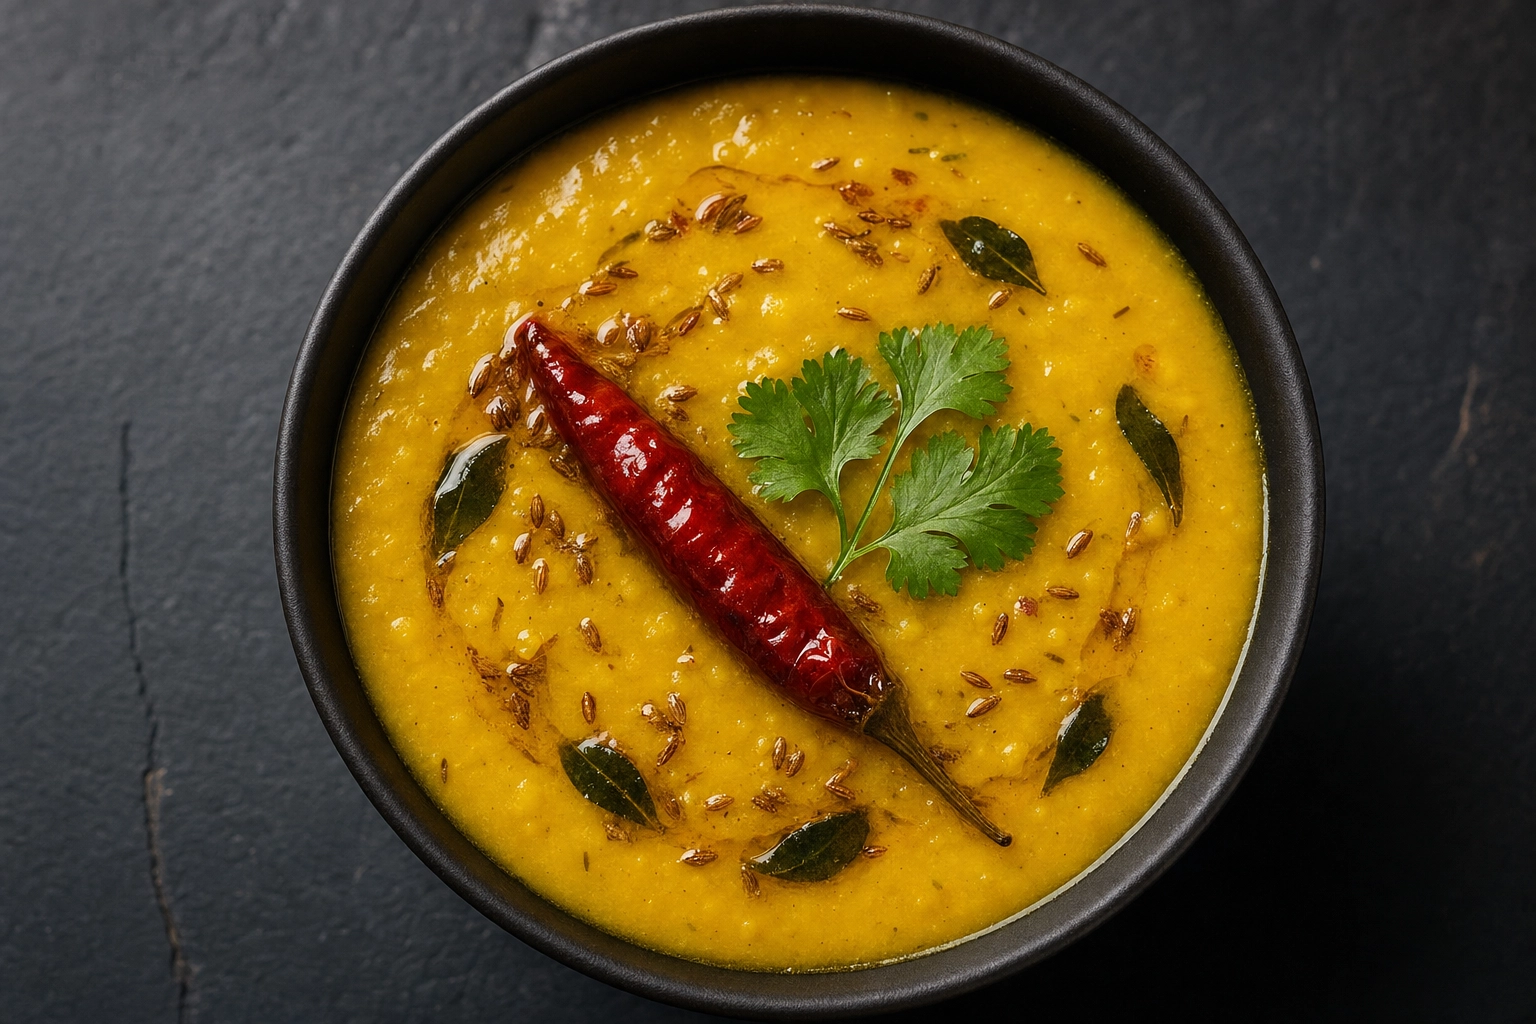 Close-up of yellow tadka dal garnished with a red chili and green coriander showing high color contrast
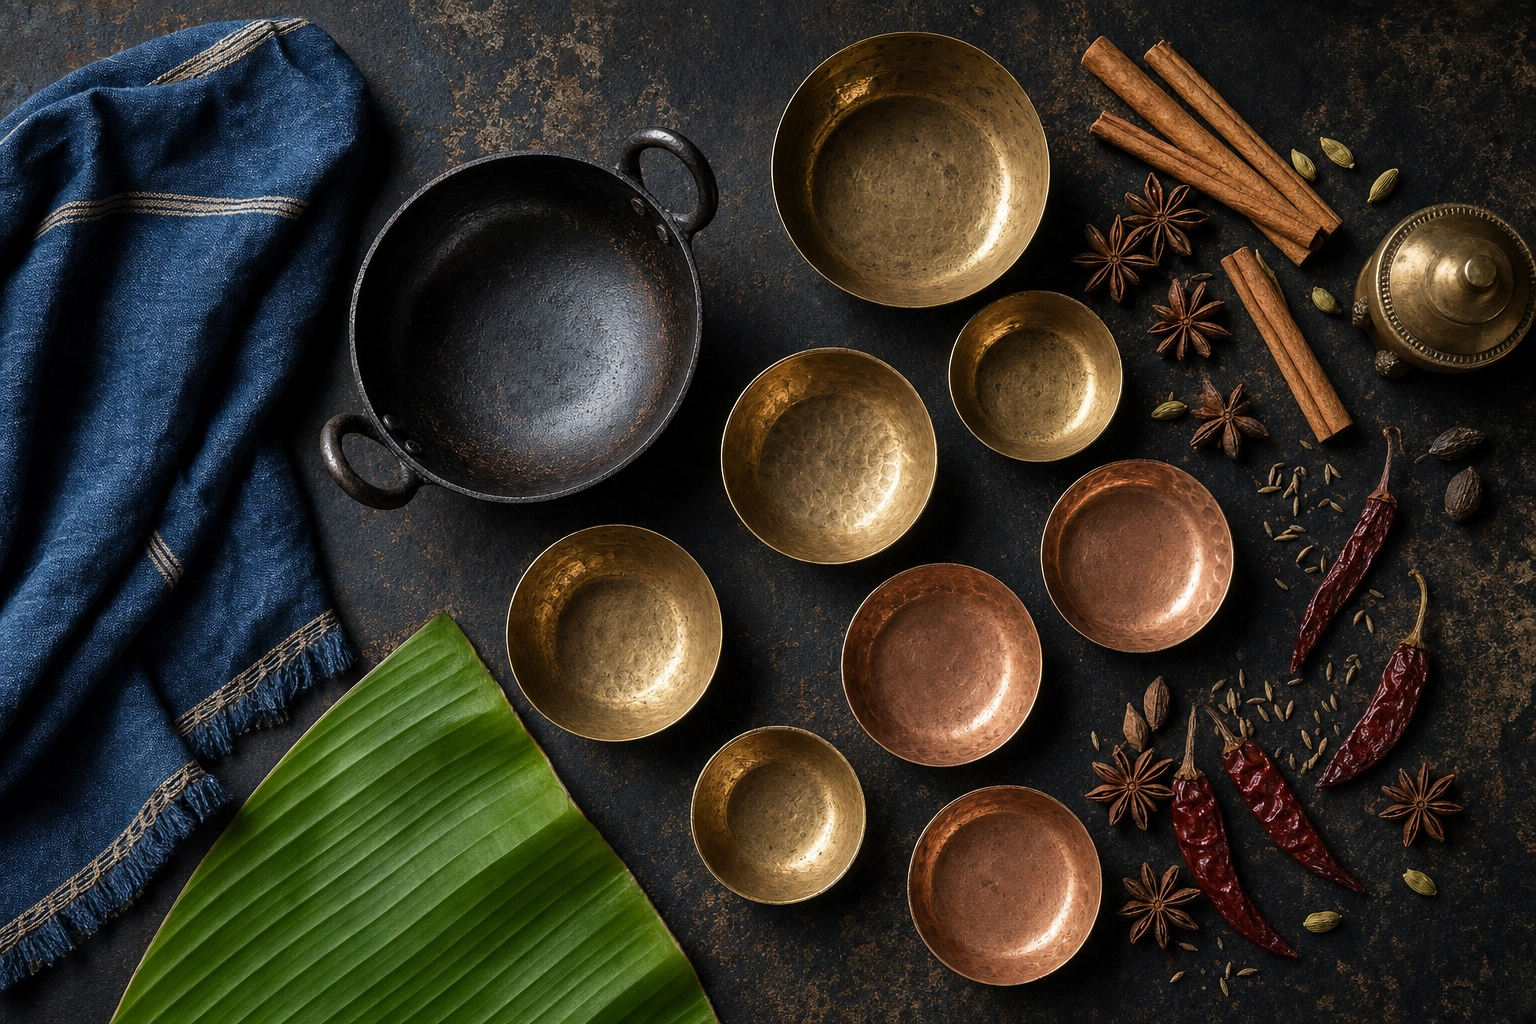 Overhead flat-lay of brass and copper katori bowls, a kadai, banana leaf and whole spices used as Indian food props
Color Grading: Make the Spices Pop Without Going Radioactive
Editing is the final 10% that makes spices sing — or look fake. Aim for rich and appetizing, not neon.
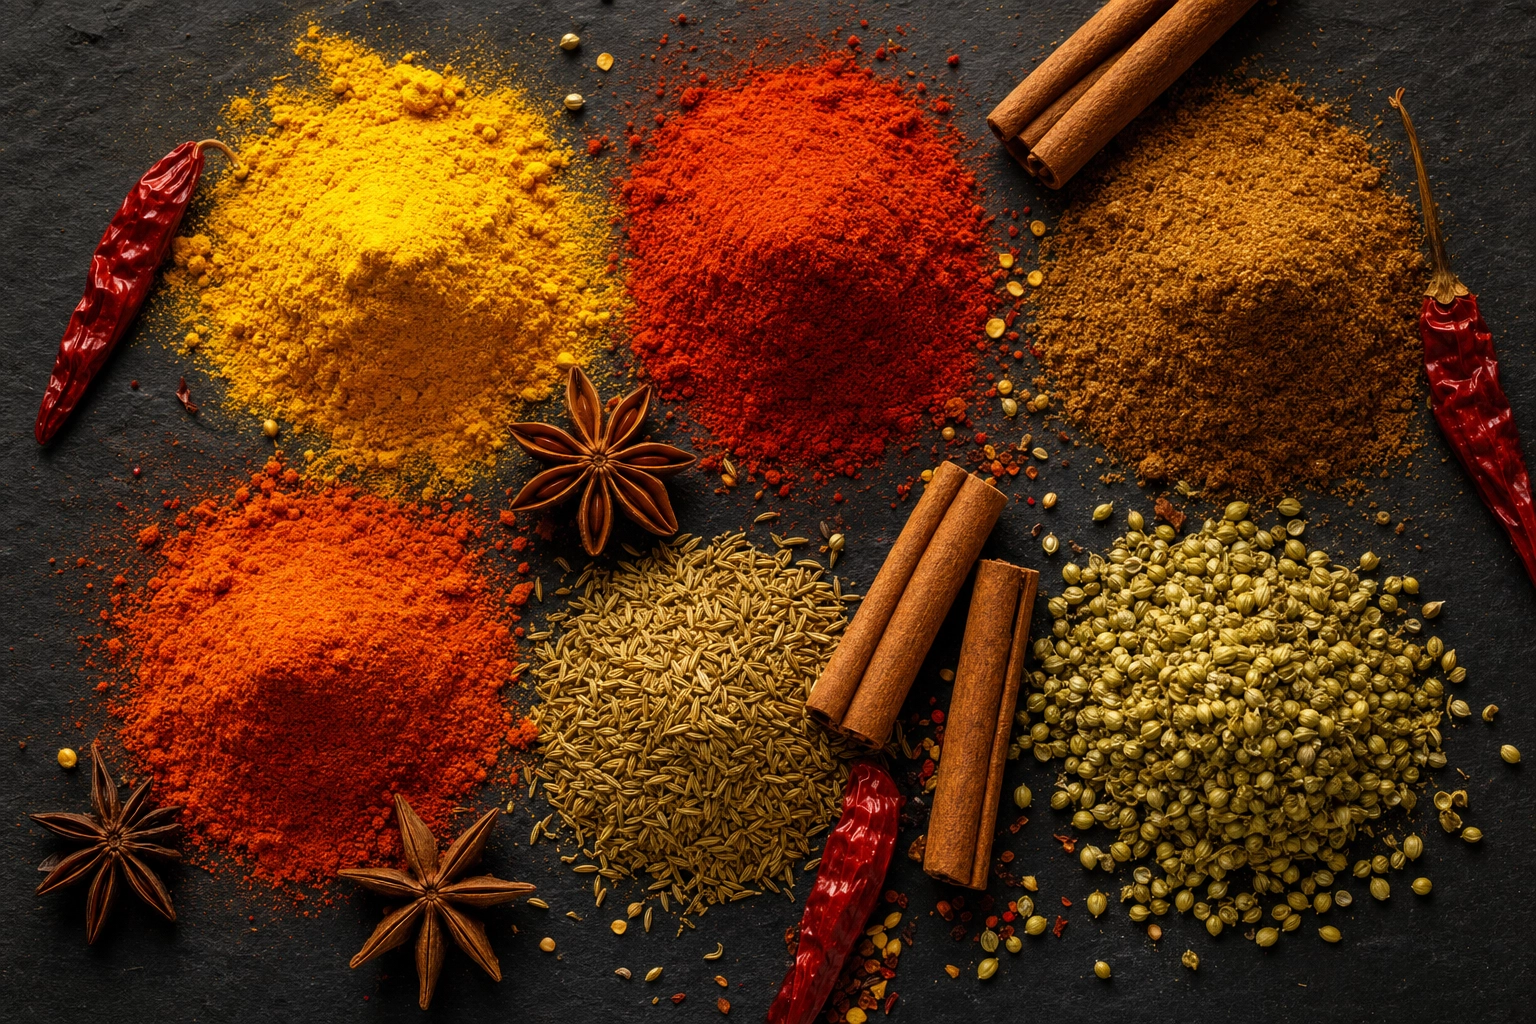 Overhead flat-lay of colorful Indian spices including turmeric, red chili powder, garam masala and cumin in mounds
Fix white balance first. If the rice looks blue or the plate looks orange, no amount of saturation will save it. Warm the temperature and nudge the tint slightly toward magenta until the rice looks like rice.
Adjust color by dish:
- Yellow curries (dal, korma): bump yellow saturation a touch and drop its luminance for richness instead of fluorescence; nudge the hue toward orange.
- Red gravies (makhani, rogan josh): shift red slightly toward orange with only a small saturation bump — reds saturate fast.
- Green chutney and herbs: pull down yellow saturation to kill the fluorescent-green look.
Stay subtle. The cardinal sin is the radioactive curry — that over-orange, over-saturated filter look. Keep saturation gentle, lift shadows slightly, and use a soft S-curve. For the full Lightroom workflow, see our food color grading guide.
Don't Forget the Rest of the Menu
Curries, biryani, and tandoori are the headliners, but a full Indian menu has more — and each category has its own quick trick.
Breads. Naan, roti, and paratha are pale and flat, so they need raking side light to reveal the char spots, blisters, and brushed butter. Stack or fan them and tear one piece for a fresh, handmade feel.
 Stack of charred tandoori and garlic naan brushed with butter and coriander in a cloth-lined basket
Paneer and veg. Green palak paneer and orange paneer makhani are colour opposites — shoot them side by side for instant contrast, and keep the white paneer cubes proud on top so they read clearly against the gravy.
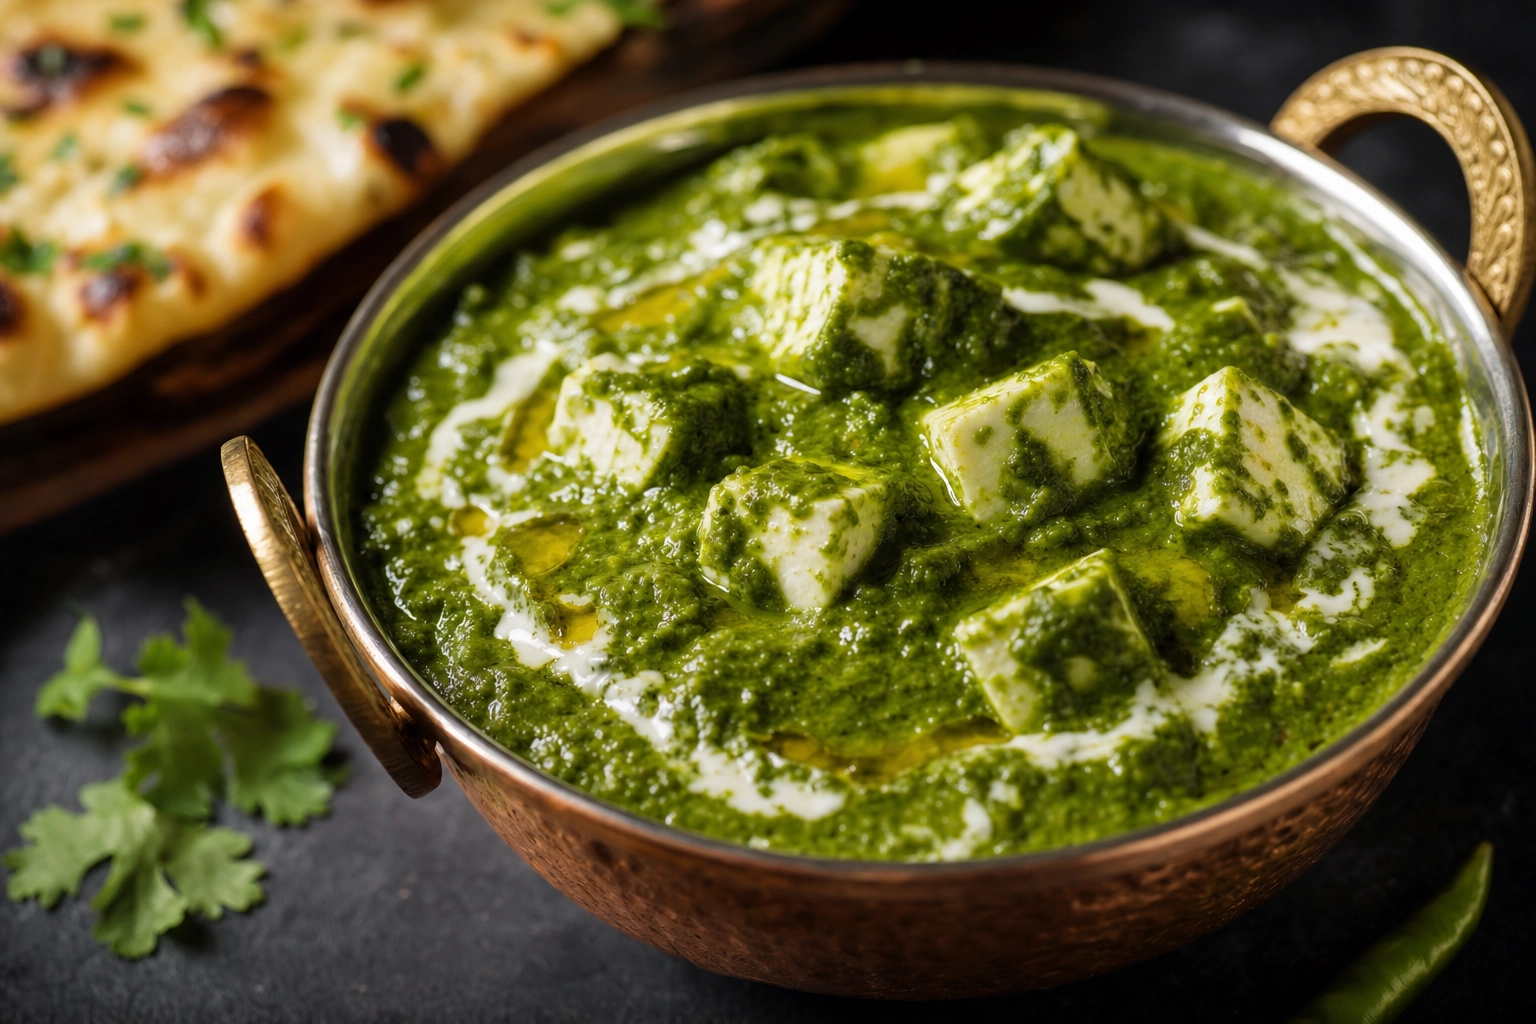 Close-up of green palak paneer with white paneer cubes, a cream swirl and naan, showing strong color contrast
Street food and chaat. Samosas, pani puri, and bhel are all crunch and colour. Shoot close, add the chutneys and yogurt at the last second, and finish with a shower of sev and pomegranate so nothing looks soggy.
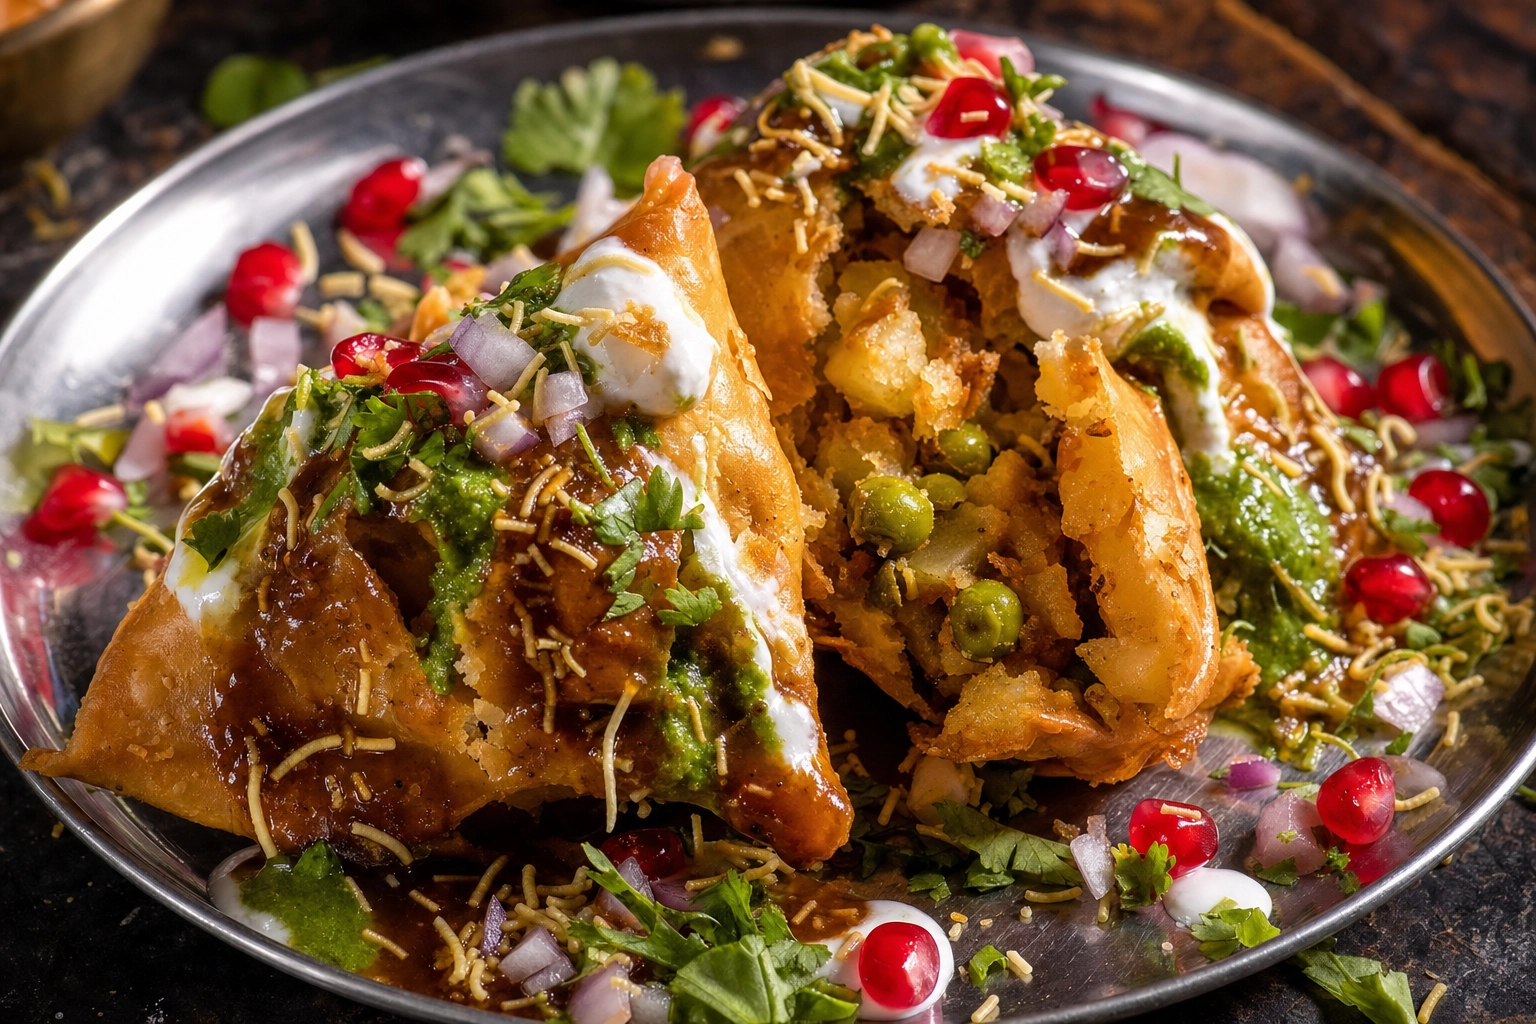 Close-up of crispy samosas with tamarind and mint chutney, yogurt, sev and pomegranate, an Indian street food chaat
South Indian. Idli, vada, and dosa are pale, steamed, and glossy, so ease off the light to protect the whites and let the sambar and coconut chutney bring the colour.
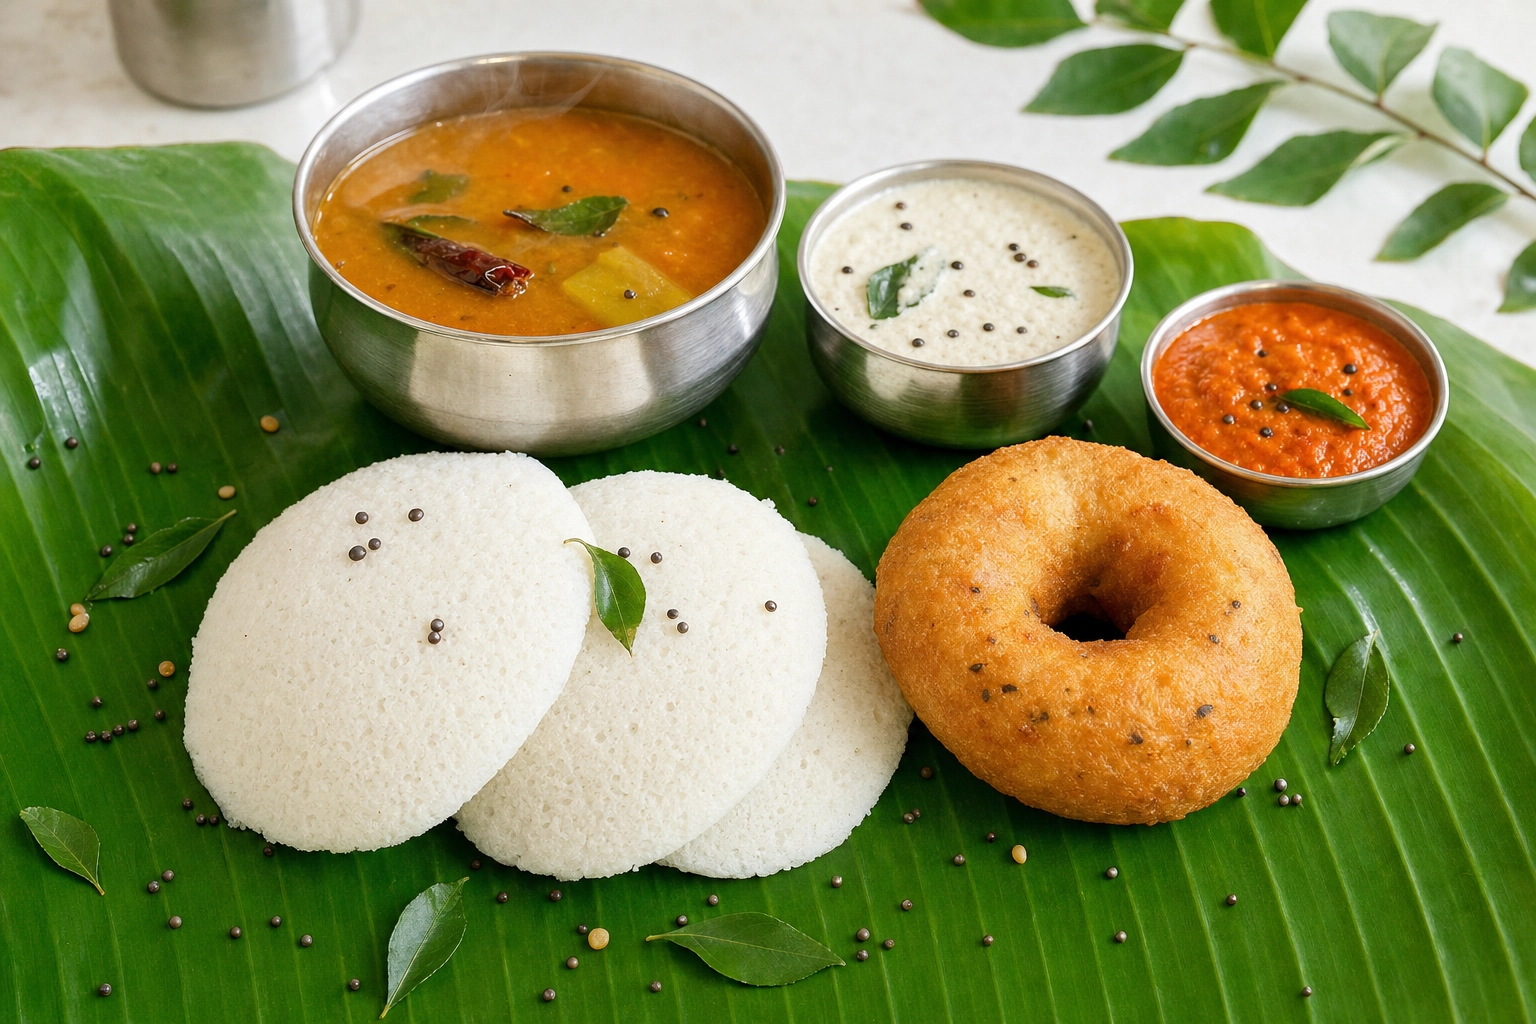 South Indian breakfast of white idli and golden vada with sambar and coconut chutney on a banana leaf
North Indian classics. Chole bhature, rajma chawal, and chana masala pair a rich brown gravy with fluffy white bread or rice — use the bread as a bright counterpoint and a wooden board for warmth.
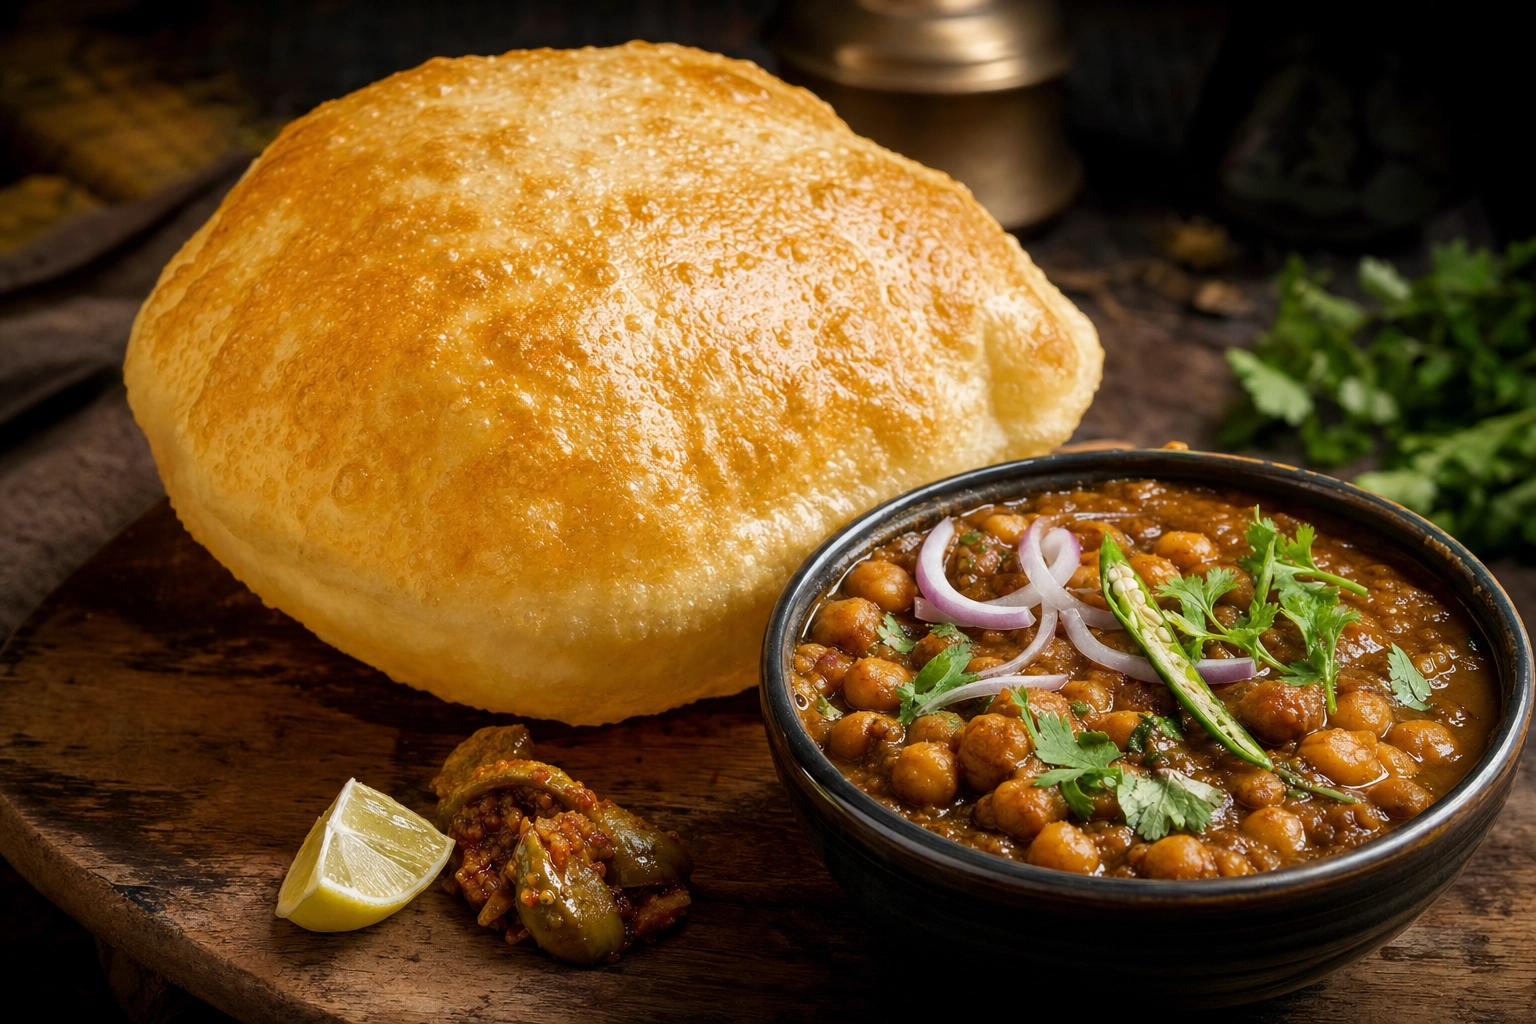 North Indian chole bhature with a puffed fried bhatura bread and a bowl of spiced chickpea chole
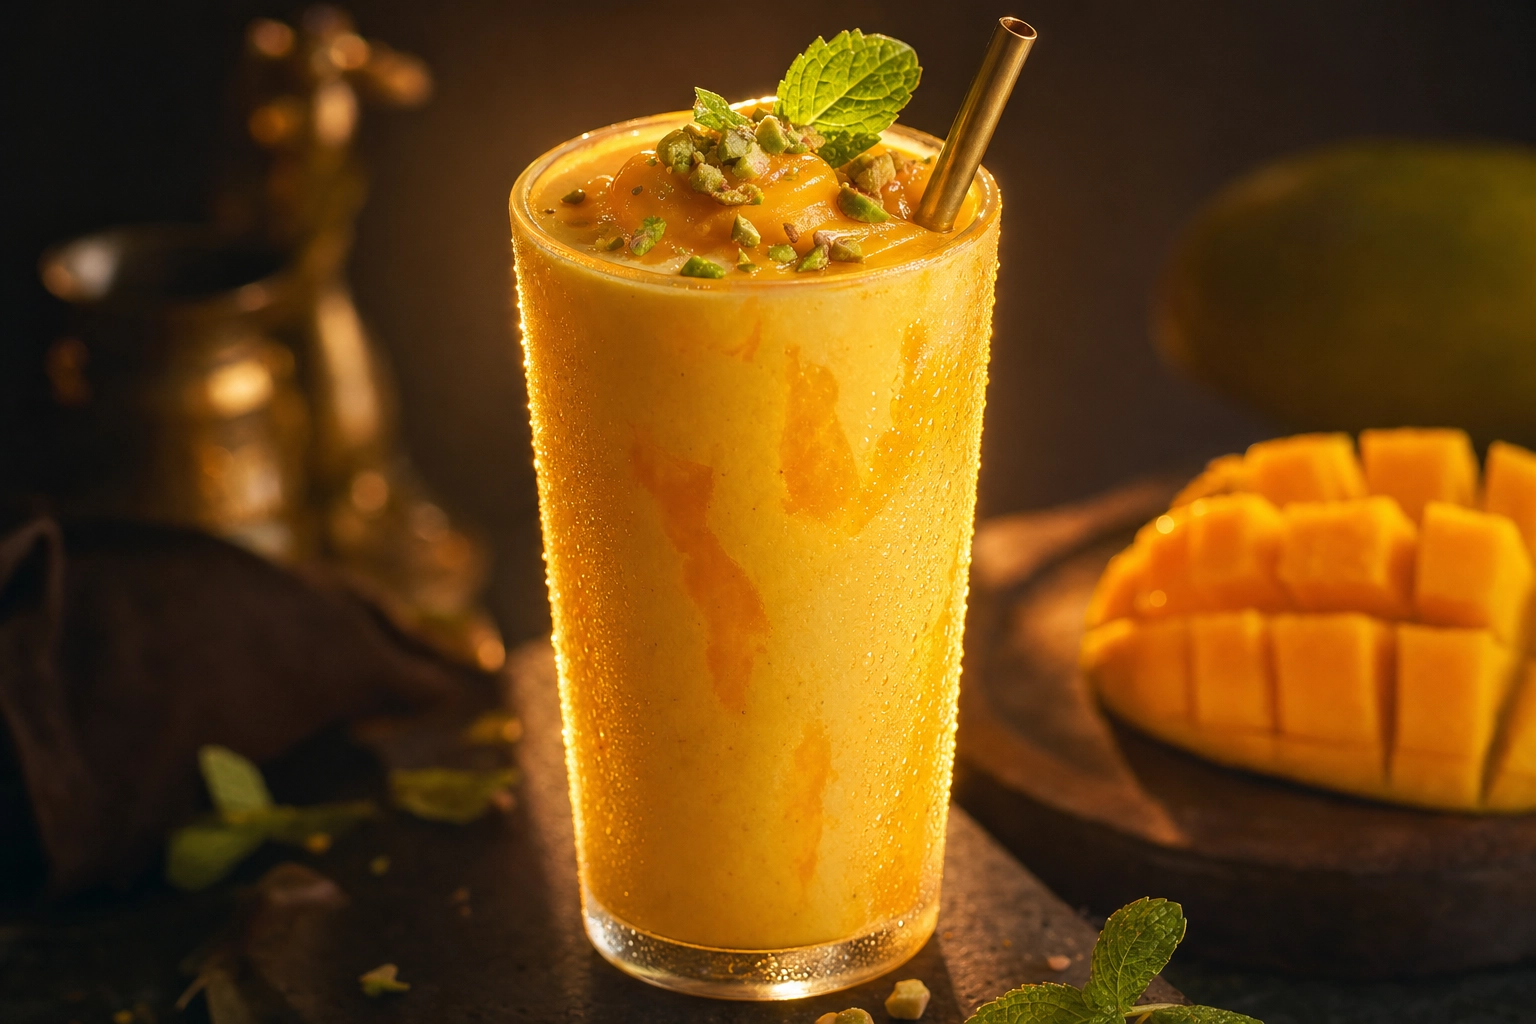
Drinks. Backlight a glass of mango lassi or a kulhad of masala chai so it glows, and catch the steam or condensation. A clay cup or brass tumbler adds instant authenticity.
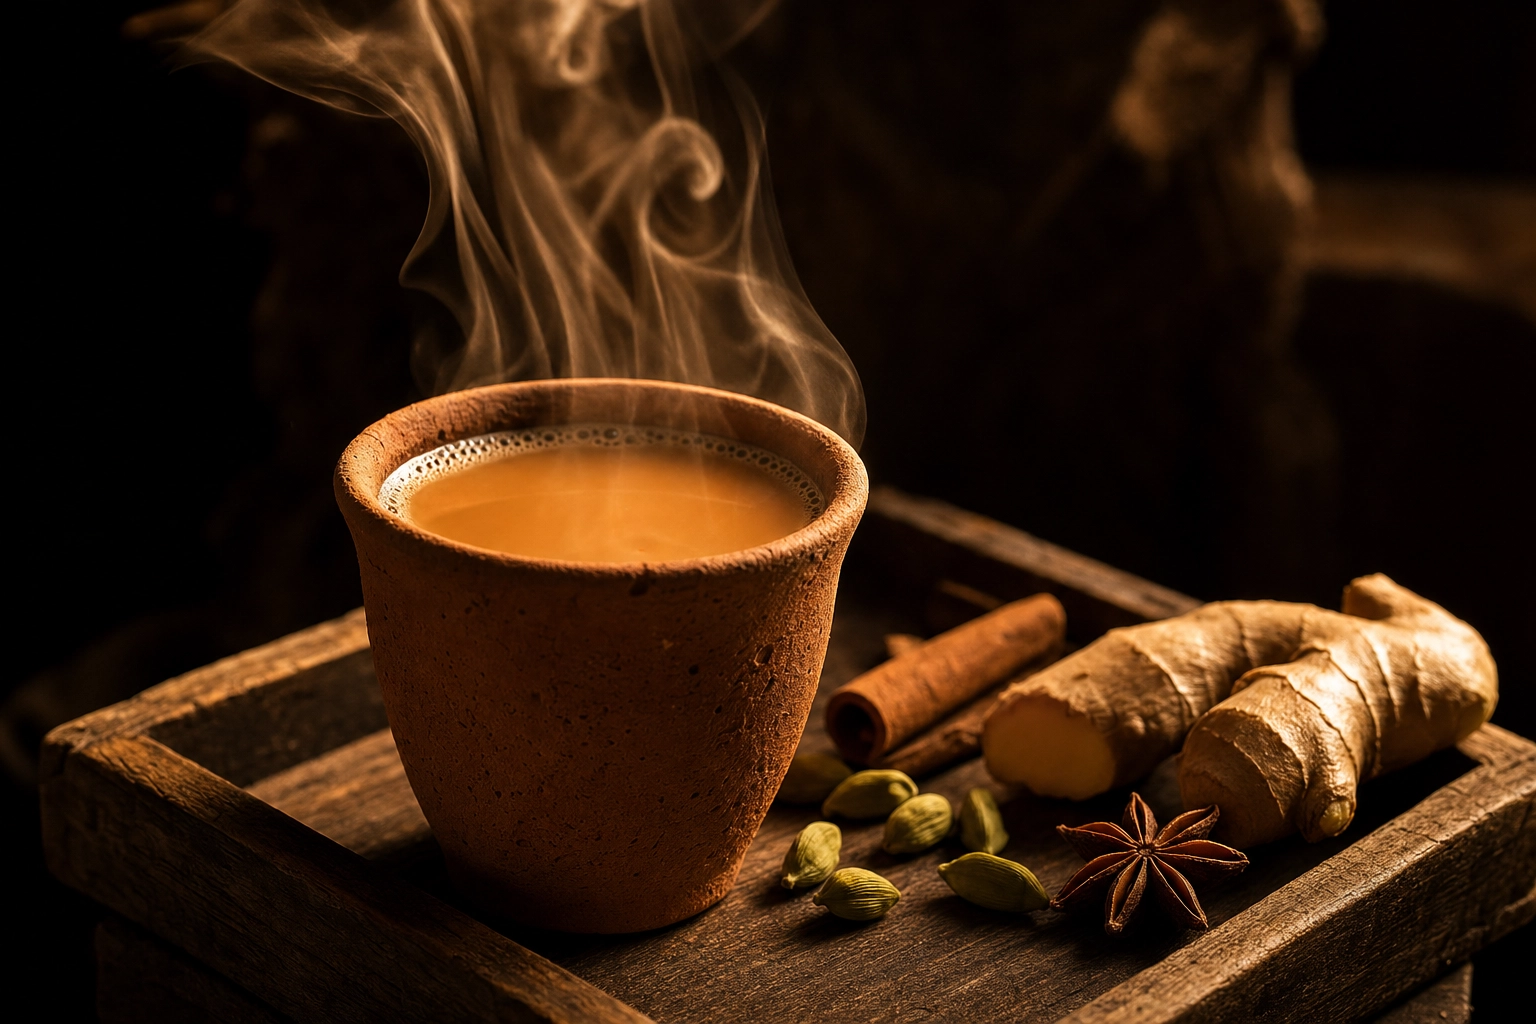 Backlit clay kulhad of steaming masala chai with cardamom, cinnamon and ginger on a wooden tray
Sweets. Mithai like gulab jamun shine when a side light catches the syrupy glaze; a sheet of edible silver vark or a few pistachio slivers reads as premium.
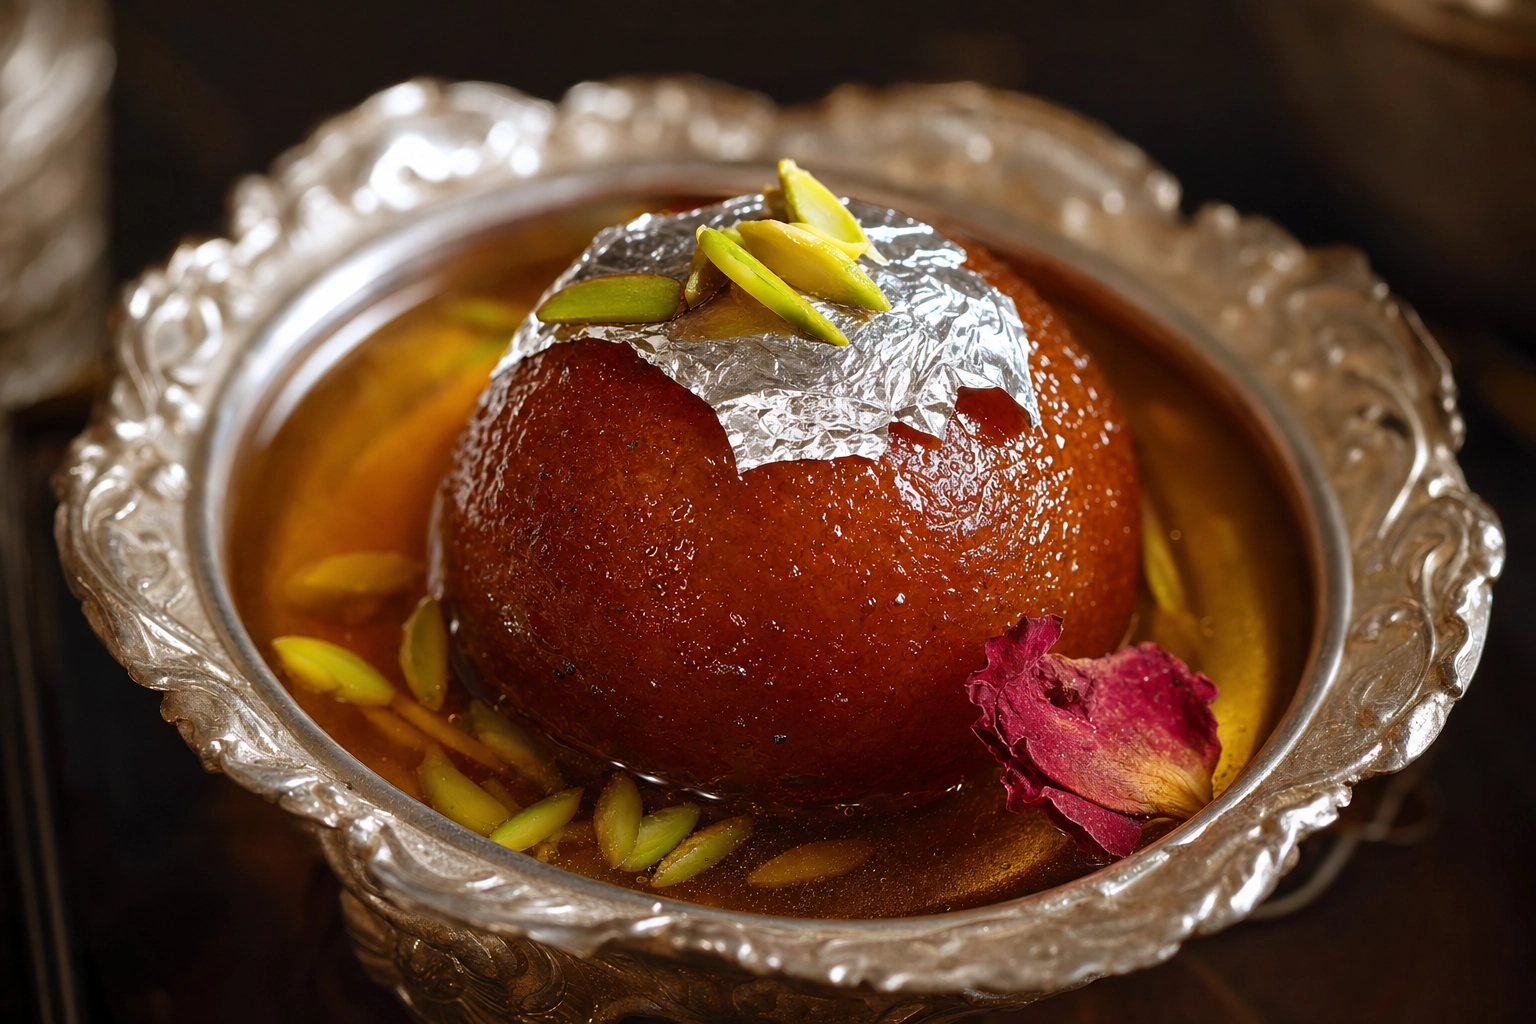 Close-up of glistening gulab jamun in saffron syrup topped with silver vark and pistachio, an Indian sweet
Before & After: Rescuing a Phone-Shot Curry
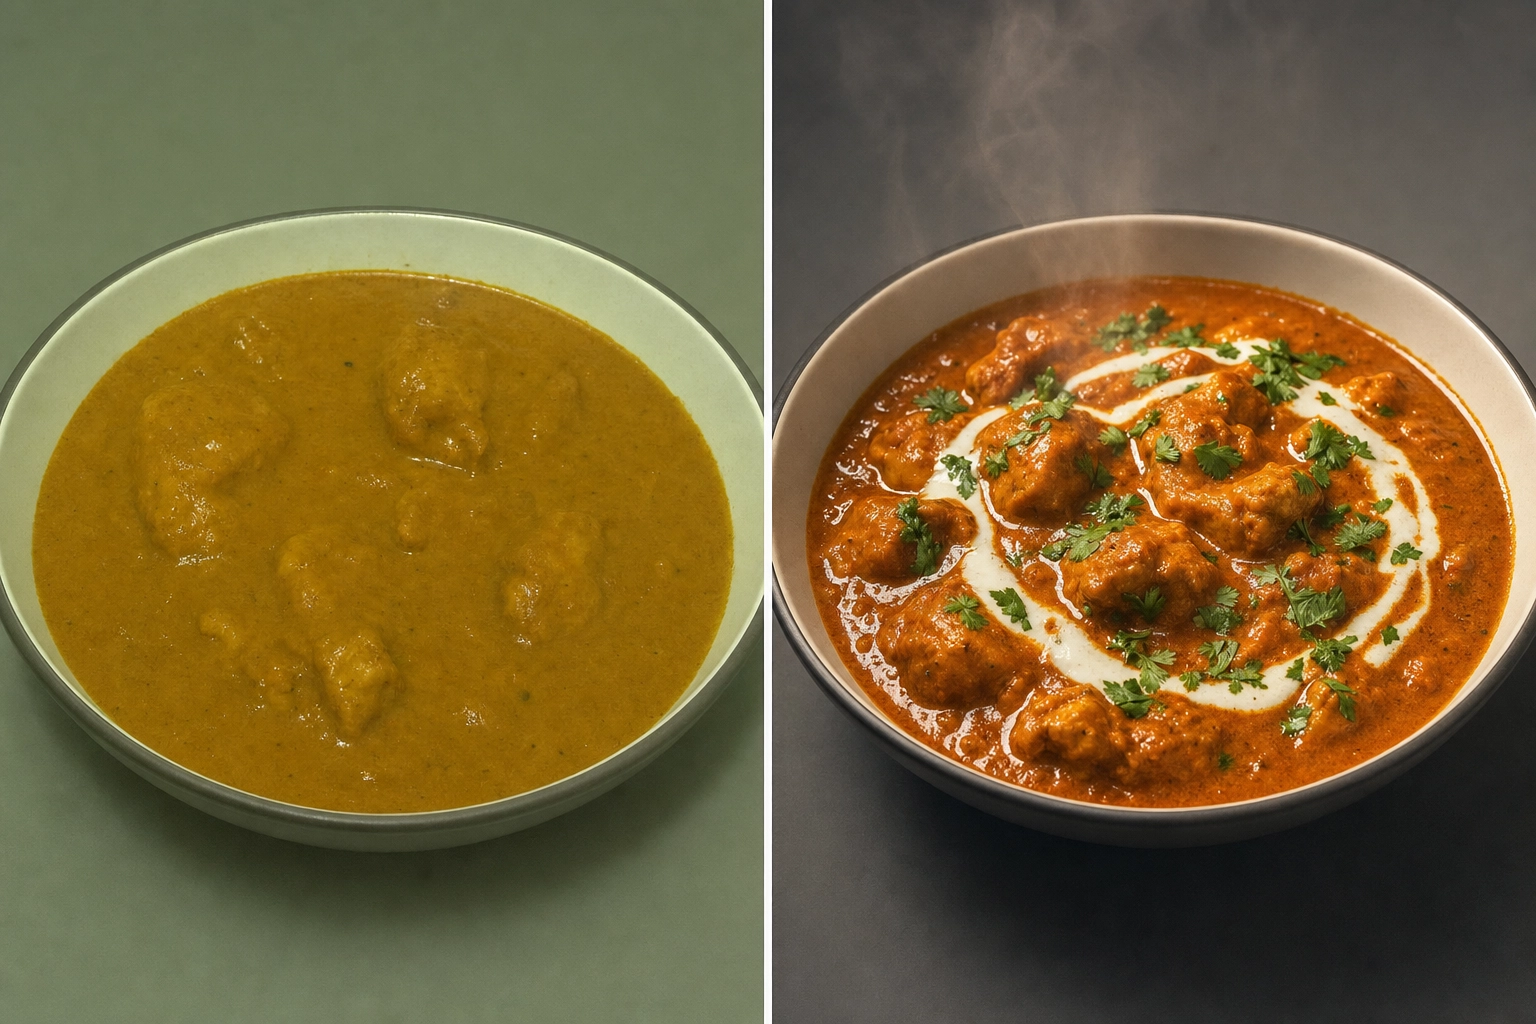 Before and after comparison of butter chicken: a dull flat phone photo versus a warmly lit, garnished, styled version
A typical "before": butter chicken under a yellow-green ceiling light, shot flat from above, no garnish, the gravy one muddy tone and the chicken invisible. It's the photo on half the Indian menus on every delivery app.
The "after," with a few fixes: white balance pulled to a clean warm tone; shadows lifted for depth; a swirl of cream and coriander for contrast; the chicken nudged up out of the sauce and caught by side light; a little steam. Suddenly it looks like something you'd pay for. (For real-world before-and-afters, the r/foodphotography community is a goldmine.) You can get there manually — or in about 90 seconds.
The 90-Second Shortcut: AI Built for Indian Dishes
Real restaurant life rarely includes a north-facing window, a reflector, and a spare hour per dish at dinner rush. That's the gap AI food photography fills. FoodShot AI takes the photo you already shot on your phone and turns it into a menu-ready image in about 90 seconds — at roughly 95% less than the $500–$2,500 a professional shoot costs. It enhances your real dish — relighting the gravy, cleaning the background, bringing out steam and texture — rather than inventing a fake curry you don't serve.
What makes it work for Indian food:
- Cuisine-aware styles that understand brown and red gravies, layered biryani, and charred tandoori instead of treating your korma like a salad.
- Builder Mode to combine a surface, plate, and dish so a thali and a curry bowl share one look.
- My Styles — upload a reference photo so every dish matches your brand across the whole menu.
- 4K, print-ready output with a commercial license on paid plans.
If you're building a full photo menu for delivery, that consistency keeps every tile looking like the same restaurant. See how it fits your workflow on our AI food photography for restaurants page, browse looks on the food photography by cuisine hub (or by food type), then drop a photo into the AI food photo editor and watch a brown blob become a hero shot. When it comes to Indian food photography, your dishes simply demand more deliberate light and styling than a burger — nail the four shots, the lighting, and the grading, or let AI handle it.
Frequently Asked Questions
How do you photograph Indian curry so it doesn't look flat and brown?
Light it from the side or back rather than head-on, and give a dark gravy more light than you think it needs, bouncing a white reflector into the shadows. Then add garnish — coriander, a red chili, a swirl of cream — and lift a few pieces of meat above the sauce so the dish reads as food, not a flat field of brown.
What is the best lighting for Indian food photography?
Soft, directional natural light from a window at the side of the dish, with a reflector opposite to fill the shadows. For tandoori and grilled items, harder light works better because it reveals char and texture. Whatever you use, avoid your phone's flash — front-on light flattens food and bounces ugly reflections off glossy gravies.
How do you make biryani look good in photos?
Shoot from a low side angle, not overhead, so the layers and depth of the rice show. Style it with crispy fried onions (birista), a halved boiled egg, meat peeking through, and a scatter of mint, with raita alongside. Separated, glistening grains and a little steam make biryani images look freshly dum-cooked.
How do you take good pictures of butter chicken?
Use a lighter-colored bowl to contrast the orange gravy, mound the chicken above the rim, and finish with a swirl of cream and a pinch of kasuri methi. Side lighting brings out the glossy sheen of the makhani, and a warm white balance keeps it appetizing rather than radioactive. The same moves work for most red and creamy curries.
What camera angle is best for Indian dishes?
It depends on the dish: a 90-degree overhead for thalis and spreads, 45 degrees for curry bowls, a low side angle for biryani and layered dishes, and a tight close-up for tandoori where texture is the star. Matching the angle to the dish is the fastest way to make your Indian food photography look intentional.
Can AI really turn my phone photos of Indian food into professional menu images?
Yes — modern AI food editors relight, color-correct, and restyle your existing photo into a studio-quality image in about 90 seconds. FoodShot's cuisine-aware styles are tuned for the brown and red gravies, layered biryani, and charred tandoori that trip up generic editors, and it enhances the real dish rather than fabricating a fake one. It's the most realistic way for a busy kitchen to get a full menu of consistent Indian food images.