Mexican Food Photography: Tacos to Birria, Styled
You already know your food is good. The al pastor glistens off the trompo, the birria comes out crimson and dripping, the salsa verde practically glows. So why do your phone photos make it all look... brown?
If you've ever searched for mexican food images hoping yours would look half as good, you're not alone — Mexican food is one of the hardest cuisines to photograph well. The problem usually isn't your phone or your food. It's that nobody told you the handful of tricks that turn a messy plate into a menu-ready shot. Whether you run a taco truck, a neighborhood taqueria, or a ghost kitchen, this is your restaurant-owner's guide to how to photograph Mexican food: why it fights the camera, the framing trick that fixes most shots, the five photos every menu needs, and how to keep your colors bold.
Quick Summary: Mexican food shoots poorly because it's "formless" — tacos spill, beans turn to mush, and bold colors muddy under bad light. The fix is structure: frame the chaos with the tortilla or plate, shoot five specific shots (taco lineup, birria dip and cheese pull, overhead spread, salsa color close-up, cross-section reveal), light for color with soft natural light, and add fresh lime and cilantro at the last second. Shoot on a phone, then fix color, char, and background with an AI editor in about 90 seconds.
Why Mexican food images are so hard to get right
Ask any food photographer which cuisine gives them the most trouble, and Mexican food lands near the top. Photographing Mexican food well means solving several problems at once, and the reason great mexican food images are so hard to capture is right there on the plate.
It's "formless." A taco isn't a sculpted object like a macaron — it's a fistful of meat, onion, and cilantro spilling out of a soft tortilla. Bowls pile and settle. Melted cheese pools. Smothered burritos vanish under sauce. There's no clean silhouette for the camera to grab.
Then there's the mush. Refried beans, rice, diced fillings, crema — up close, they read as one brown blur, and mush is the enemy of an appetizing photo. And the colors fight: red salsa, green cilantro, white crema, and gold cheese all in one frame. It's gorgeous in person, but under the wrong light it muddies fast.
The reframe: that chaos is its superpower. It just needs structure.
The framing tricks that tame the chaos
When photographing tacos, most people try to fix a weak shot by adding more — more toppings, props, and food in the frame. That's backwards. The fix is structure.
Use the tortilla as a frame. A tortilla is a built-in border: fold, cup, or pinch it so the meat and salsa sit inside a clean edge instead of sprawling. It corrals the chaos and gives the eye one tidy shape.
Give the spill a boundary. When the dish isn't wrapped, use whatever edge you have — a plate rim, a cazuela, butcher paper, or the round border of a comal — to say "one organized plate," not "a hurricane hit the table."
Pick one hero and leave space. Choose a single taco or bowl and let clean, empty space surround it. That negative space gives the eye a place to rest. (These are the same food styling fundamentals that work for every dish.)
Isolate the details. If a combo plate is visual noise, shoot one corner instead of the whole storm.
Match angle to shape. Tall subjects (a birria stack, a burrito in profile, a michelada) want a 25–45° angle; flat spreads (a taco lineup, nachos) want a near-90° overhead view.
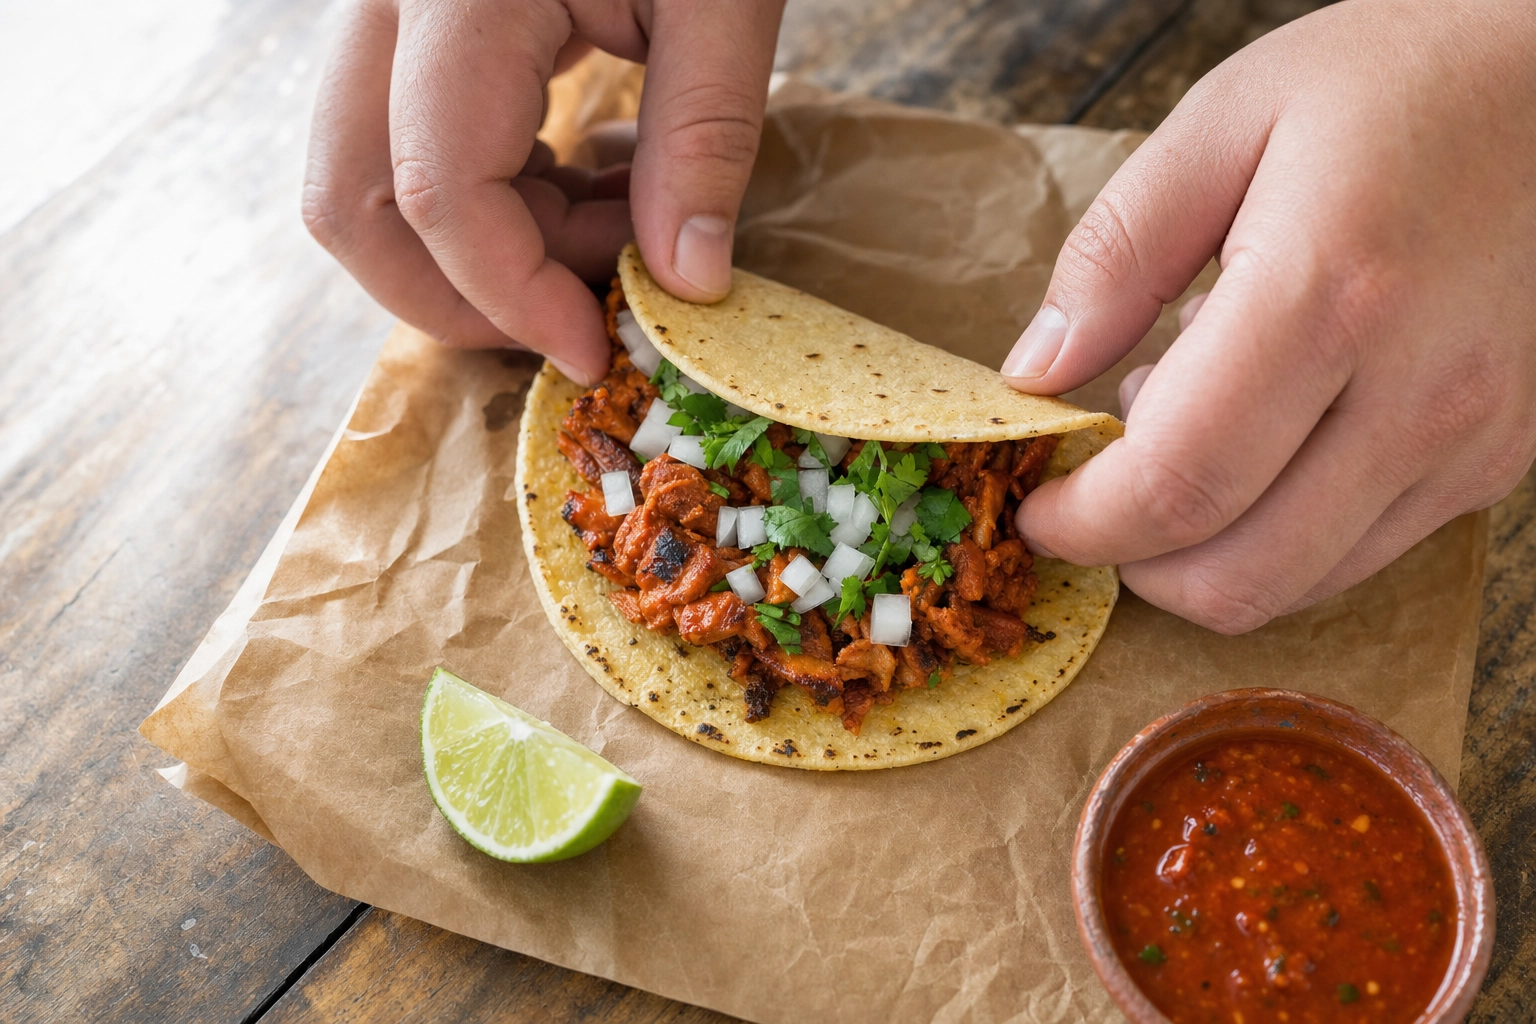 Hands folding a corn tortilla to frame al pastor, onion and cilantro on butcher paper — Mexican food styling tip
The 5 shots behind standout Mexican food images
You don't need fifty photos to sell your menu — you need five that work hard, the backbone of great Mexican food images for any taqueria. Shoot them the same way every time and your whole menu starts to look like one confident kitchen.
1. The taco lineup
Your workhorse shot, and the one most likely to earn the tap on a delivery app. Line up three to five tacos in a row, slightly overlapping, on butcher paper or wood. Shoot from a low 30–45° angle so the front taco is sharp and the line trails out of focus behind it. Vary the fillings so the colors tell a story — charred al pastor, crispy carnitas, a bright fish taco — and keep garnish fresh and minimal.
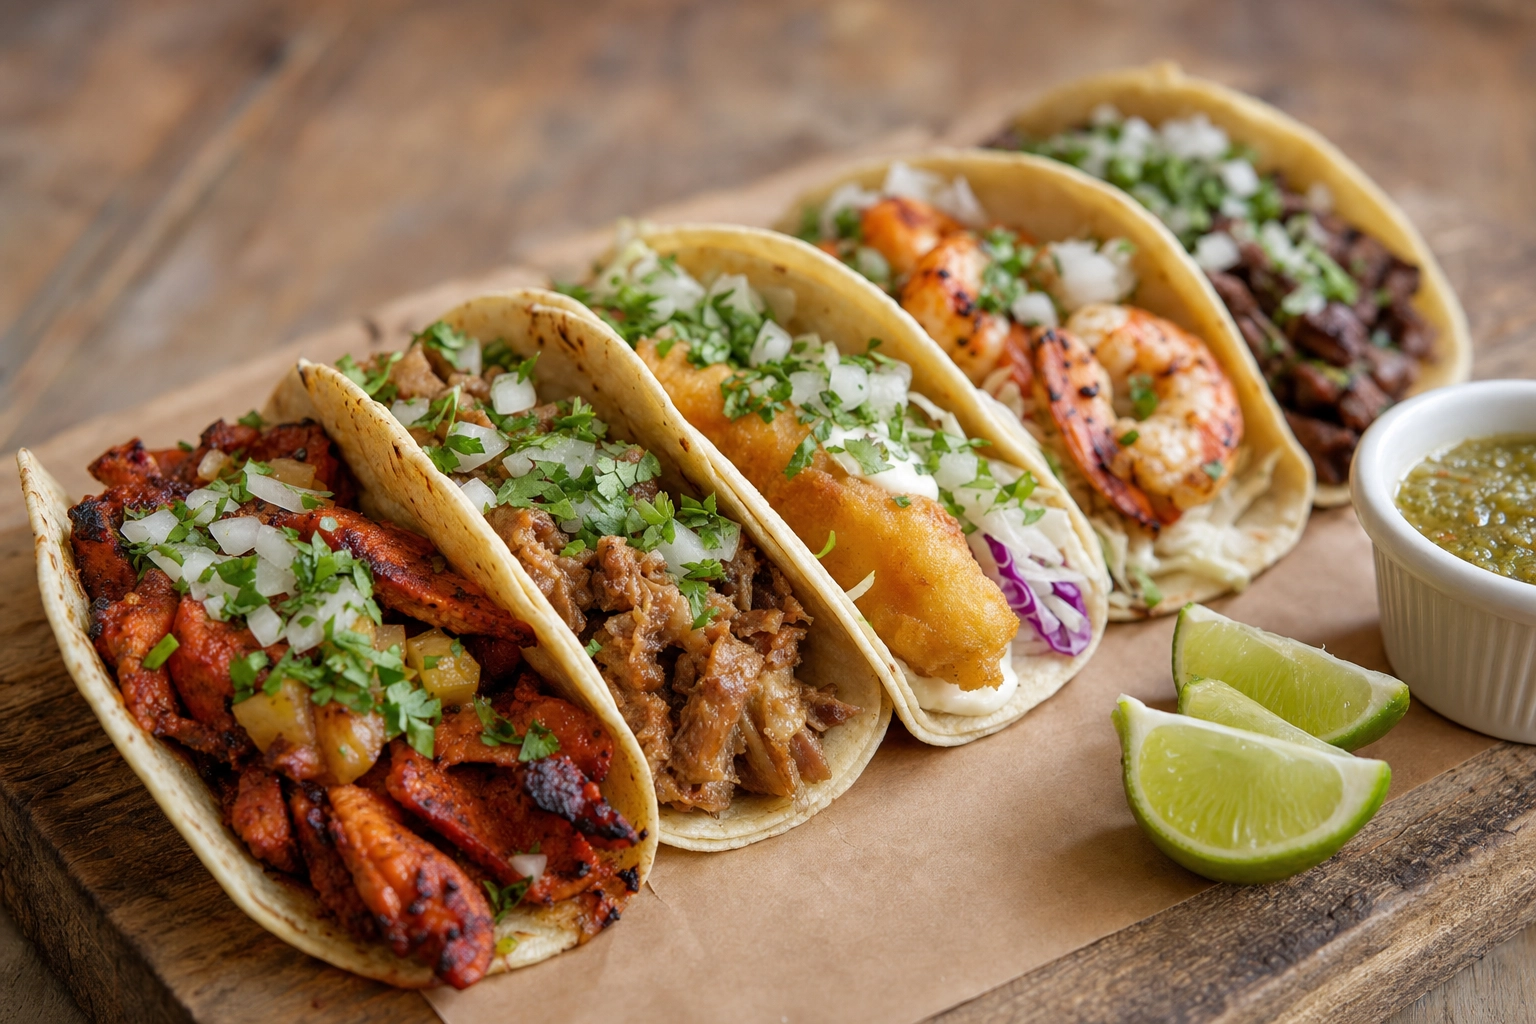 Lineup of five varied street tacos on butcher paper at a low angle — taco photography menu shot
This is the heart of taco photography, and exactly what our AI taco photography styles are tuned for — holding the tortilla char and meat glisten that flat phone lighting kills. One clean lineup can anchor your online menu, your social feed, and your delivery apps at once.
2. The birria dip and cheese pull (the shot that goes viral)
If one Mexican dish was built for the camera, it's birria. Birria is a chile-braised stew from Jalisco — traditionally goat, now often beef — slow-cooked in a deep red adobo of dried chiles, garlic, and spices. The viral version is quesabirria: a Tijuana-style taco dipped in the chile-stained fat, crisped on a comal with beef and Oaxaca cheese, and served with consommé for dunking.
It gives you two of the most shareable shots in food photography:
- The dip. Hold the taco and catch it mid-dunk into the consommé, broth dripping, from a slight side angle. The motion sells it.
- The cheese pull. Pull a quesabirria apart so the Oaxaca cheese stretches; backlight it so the cheese glows.
Work fast — a quesabirria looks its best for maybe 60–90 seconds before the sheen dulls. A little rising steam reads as "fresh and hot."
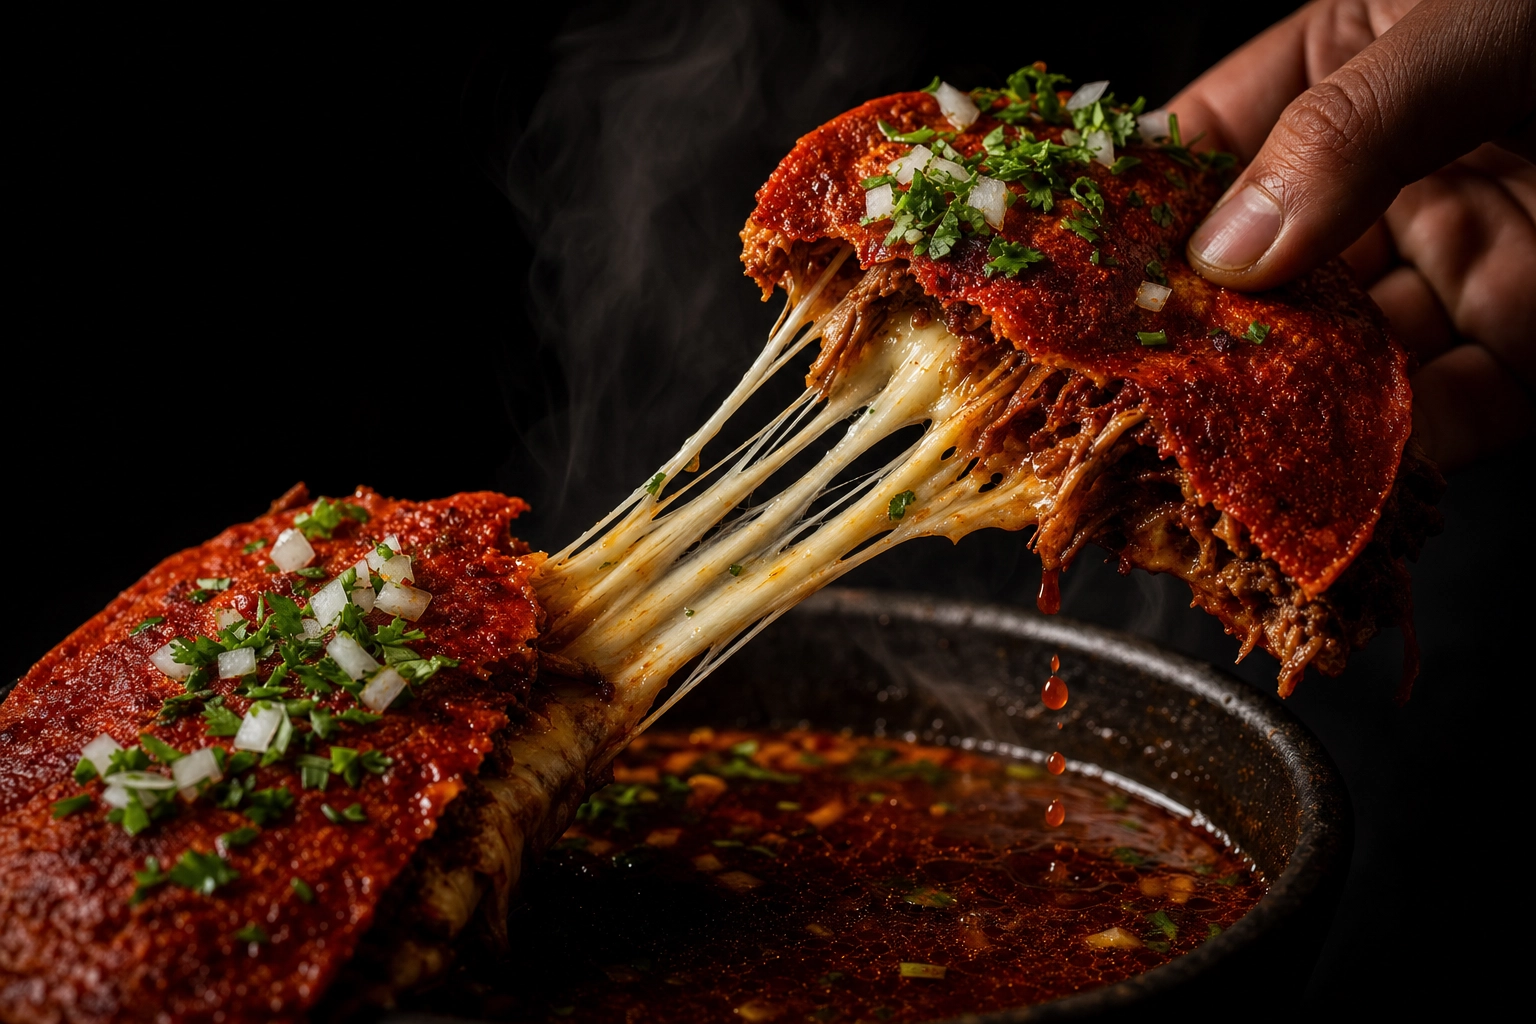 Quesabirria birria taco cheese pull over steaming red consommé — dramatic moody Mexican food photography shot
3. The overhead spread
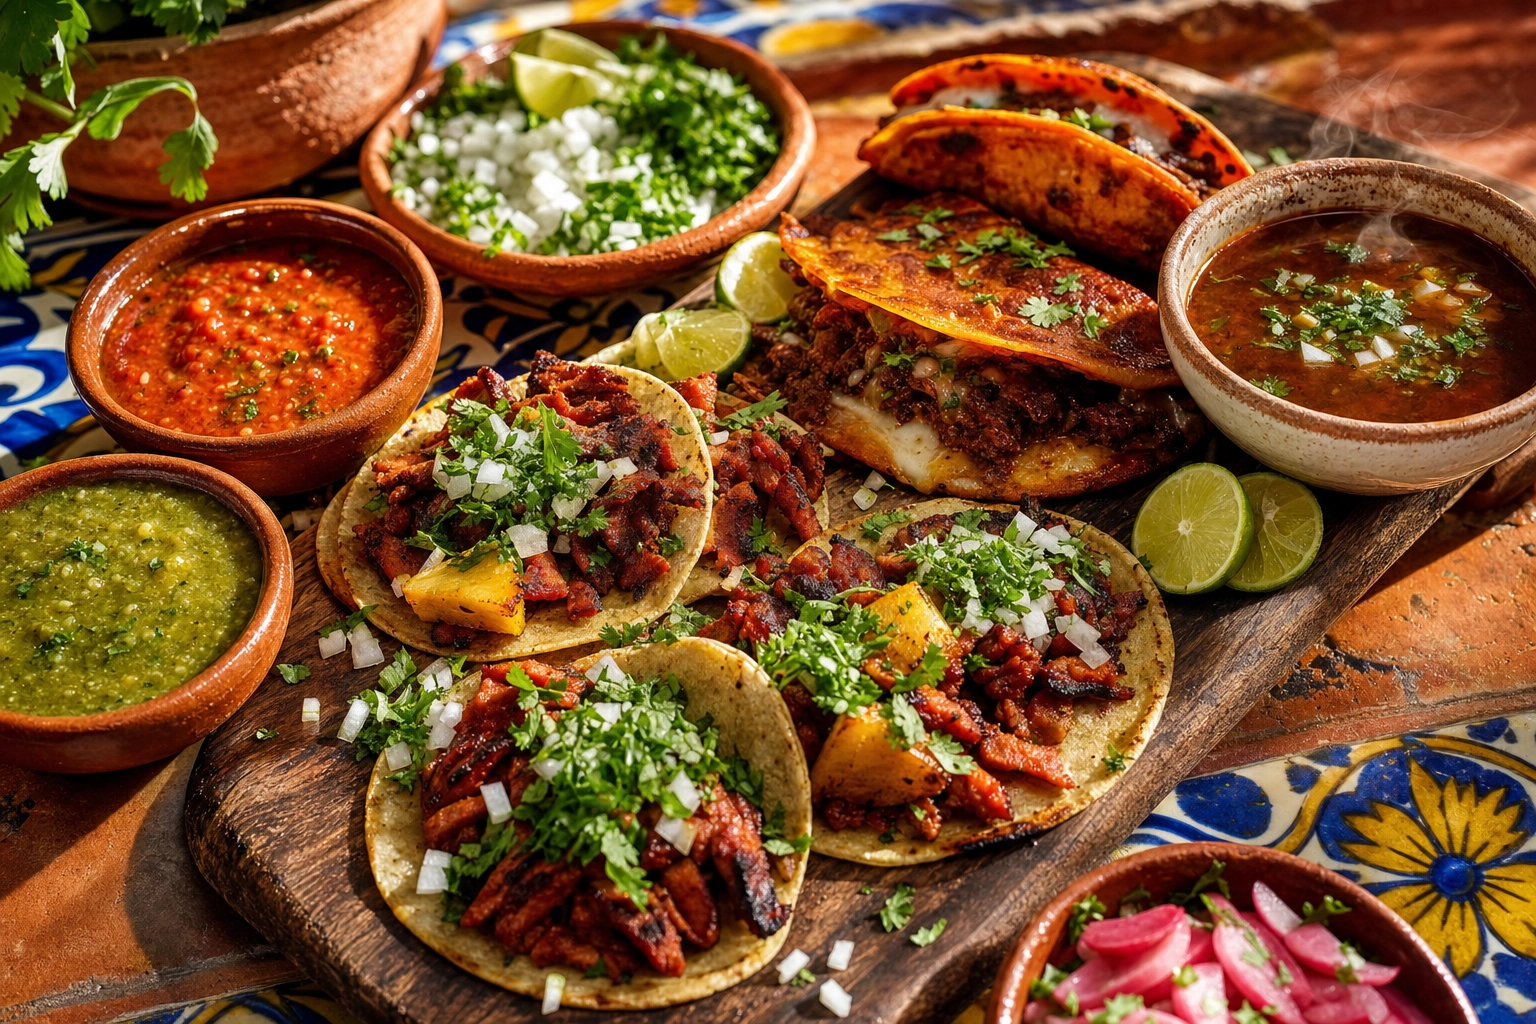
To show abundance — a full combo, "the works," or a catering layout — go overhead. A 90° flat-lay fills the frame with dishes, salsas, chips, and lime at once. The trap is clutter; the fix is structure. Arrange elements on a loose grid or triangle: anchor with the biggest plate, balance with two or three more, fill gaps with small salsa bowls, and leave breathing room so each stays legible.
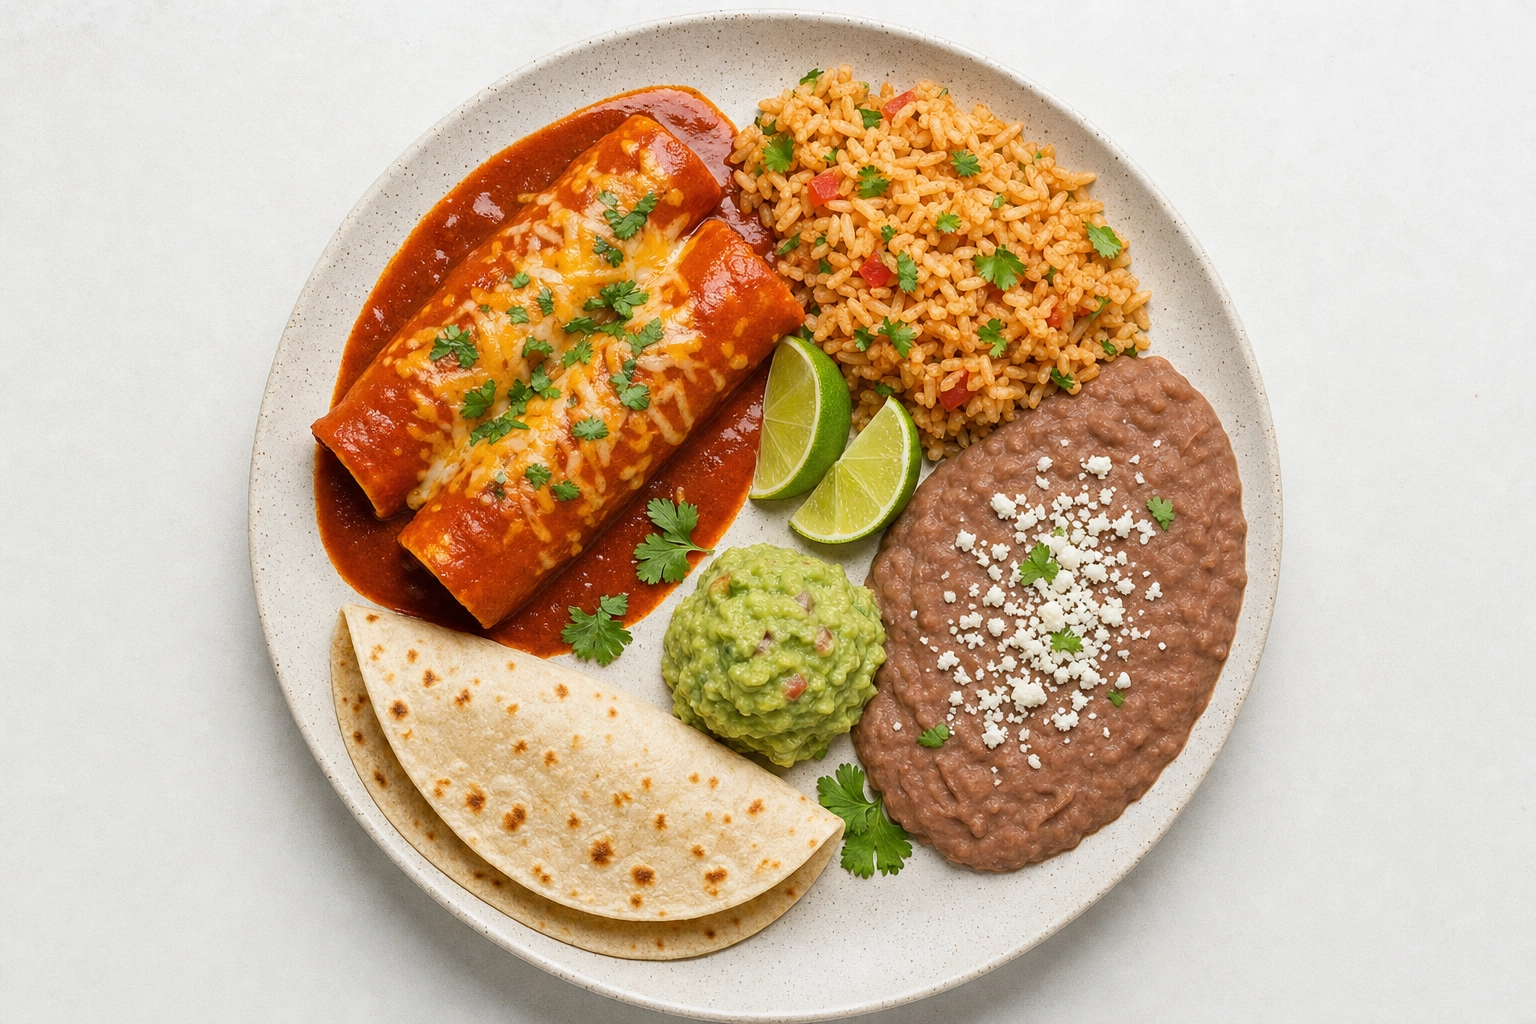 Overhead flat-lay of a Mexican combo plate — enchiladas, rice, beans and guacamole arranged for the camera
Overhead is also the most forgiving angle for formless food — looking straight down at pozole or enchiladas, you see toppings and color, not a sad side profile. It's ideal for a catering portfolio.
4. The salsa and garnish color shot
The detail shot that proves you're the real thing. Get macro-close on your salsas and garnishes: salsa verde, salsa roja, guacamole, pico de gallo, pickled onions, lime. Color accuracy is the highest-stakes detail here — salsa verde should read vibrant tomatillo green, not olive; salsa roja should look charred red-orange, not ketchup. Shoot in clean, neutral light and avoid direct flash, which turns red salsa brown. Serve each salsa in its own ramekin so the colors stay in clean blocks.
5. The cross-section reveal
Some Mexican food hides its best feature inside. A burrito looks like a beige log — but slice it and you reveal carne asada, cheese, rice, beans, and (in a California burrito) crispy fries. That cross-section is what makes people hungry. Cut cleanly with a sharp knife, wipe the blade between cuts, and stand the halves up so the camera sees the layers straight on. This is the idea behind burrito cross-section photography, and it works beyond burritos too — bisect a quesadilla, halve a torta, or cut a chile relleno to show the molten center.
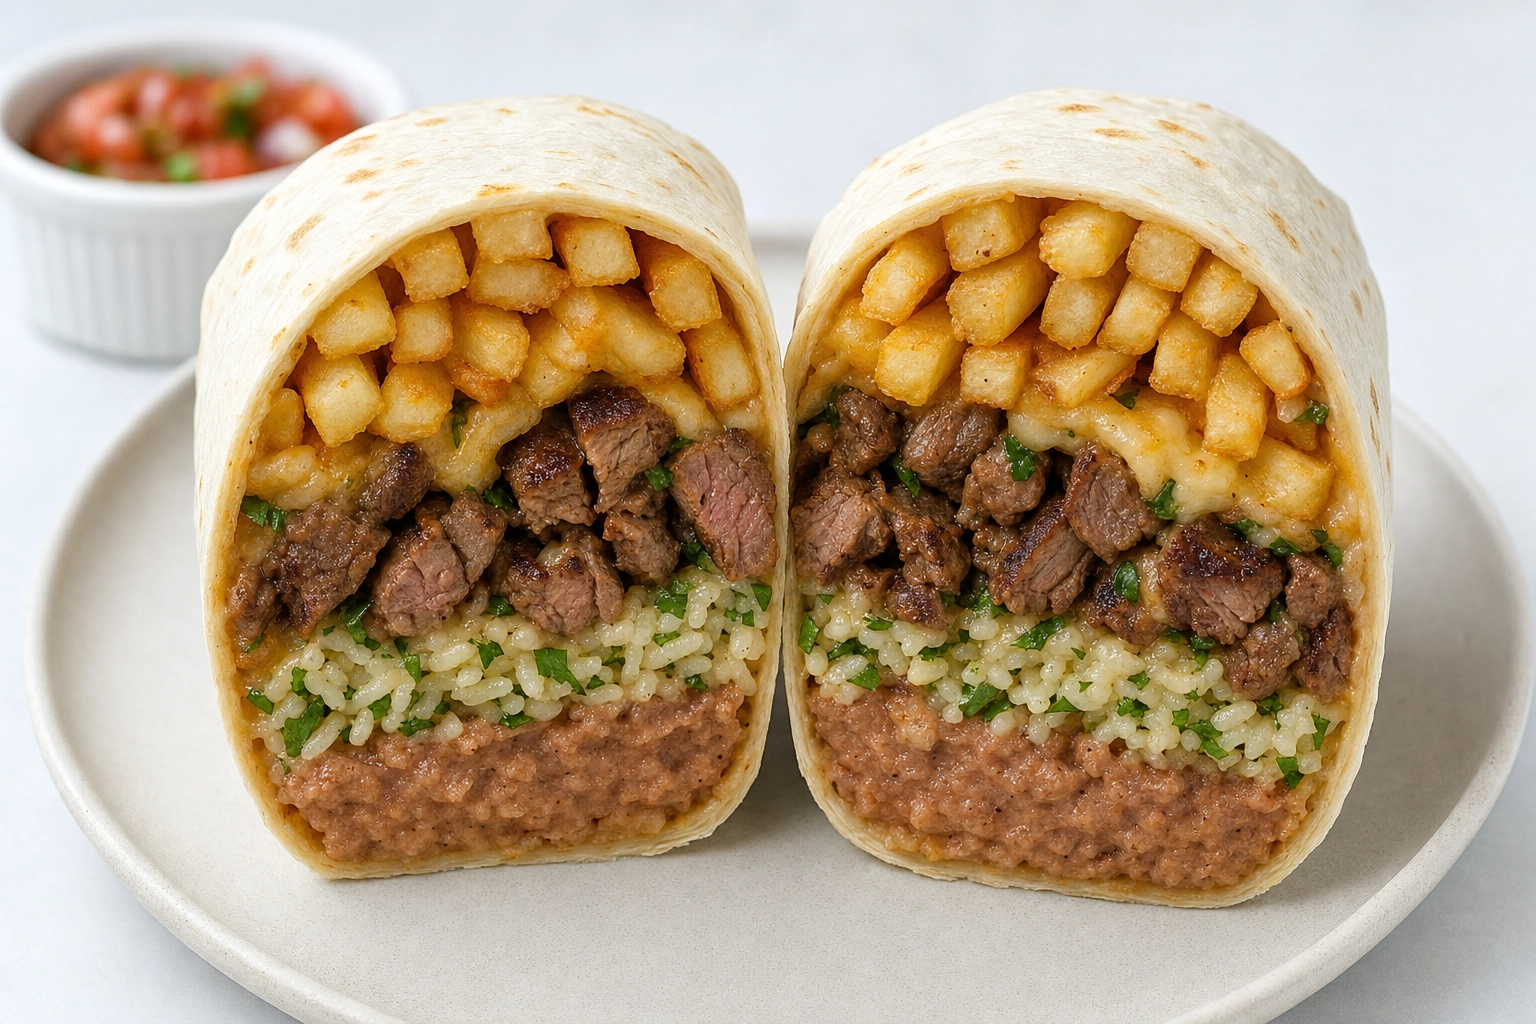 California burrito sliced to show layered cross-section of carne asada, cheese, rice, beans and fries
Lighting that keeps Mexican colors bold and accurate
Lighting is make-or-break here because you're juggling so many bold colors at once. Nail it and your photos look fresh and true; miss it and even great cooking falls flat.
Use soft, natural light. A big window is the best (and cheapest) light you have. Light the dish from the side or slightly behind at about 45°, softened with a sheer curtain. Shooting in soft, directional daylight renders red, green, white, and gold accurately all at once.
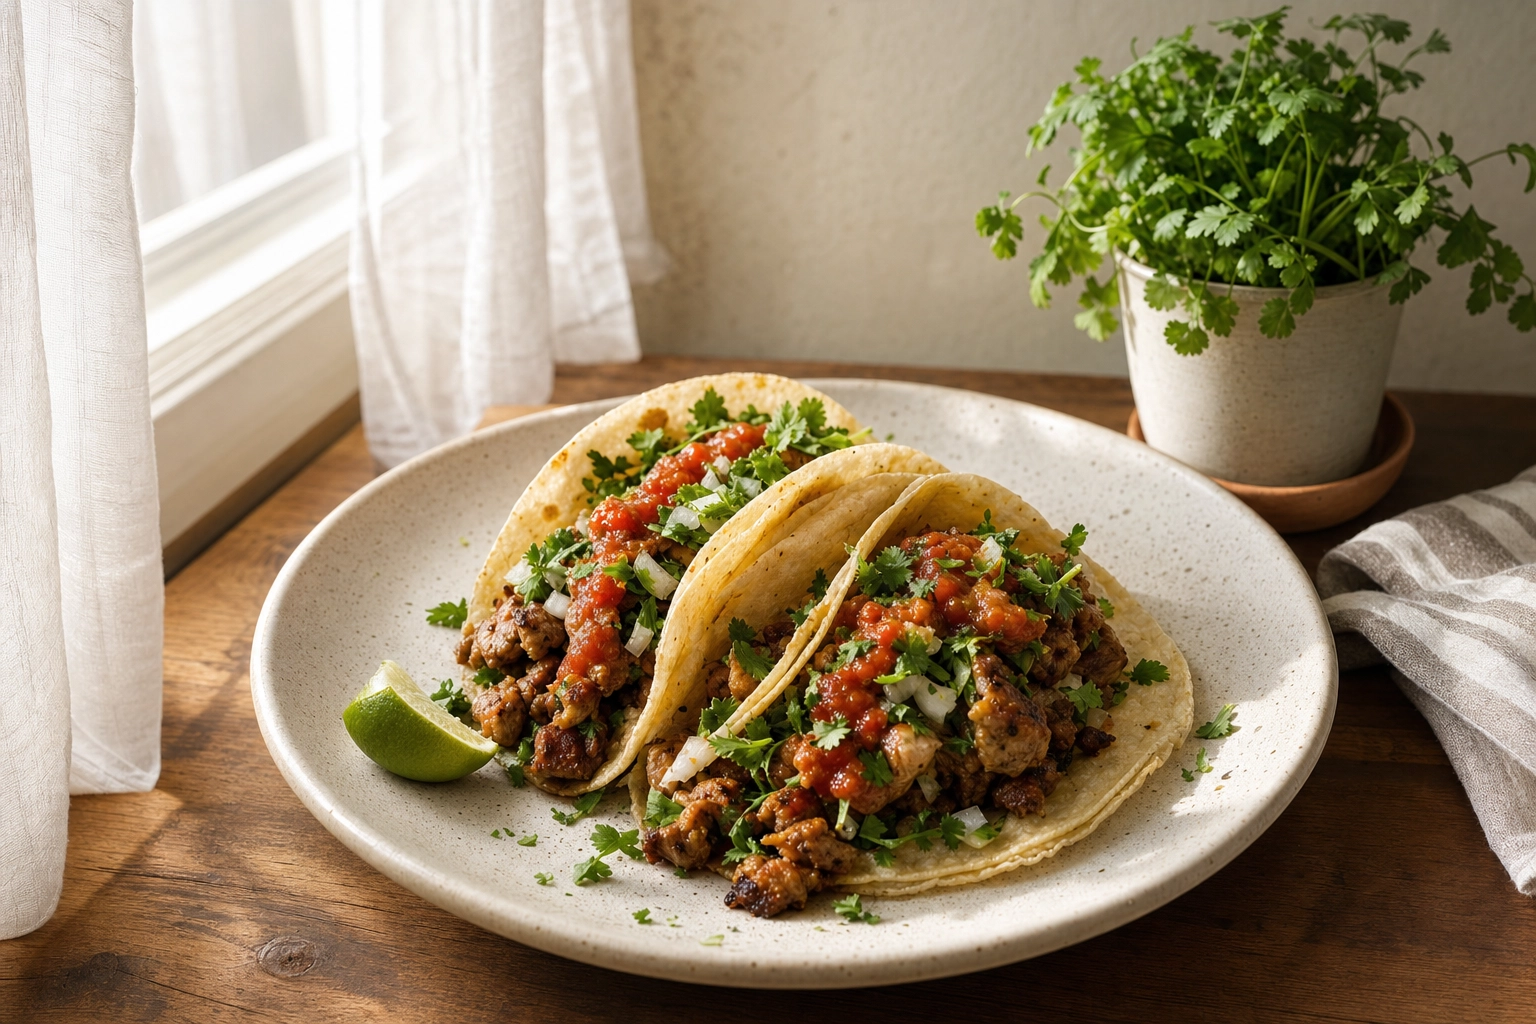 Street tacos lit by soft natural window light through a sheer curtain — Mexican food photography lighting
Kill the flash. Direct on-camera flash is the number-one killer of taco photos — it turns red salsa brown, mutes cilantro, and blows out crema. If the kitchen is dark, move the food to a window.
Watch your whites. Yellow tungsten light makes crema, onion, and cotija look dingy. Shoot in daylight or correct the color temperature afterward.
Pick a surface that pops. Bold food looks bolder on muted, matte backgrounds — weathered wood, butcher paper, terracotta, or blue-and-yellow talavera tile; dark slate for a moody look. Lean on complementary contrast: warm food on cool blue-gray, green dishes on terracotta.
Styling the details: lime, cilantro, and salsa
The gap between a good taco photo and a great one is the last 30 seconds of styling. A few quick tips:
Add cilantro last. Herbs wilt fast on hot food. Hold your brightest sprigs back, add them right before shooting, and pat them dry so they don't look slimy.
Style the lime with intent. Place a wedge cut-side toward the camera, and give the dish a final squeeze or a light spritz of water to bring back fresh glisten.
Use color accents. Radish discs, pickled red onion, crumbled cotija, or a dried chile break up the brown.
Block your salsas. Keep each salsa in its own ramekin so the colors stay clean and distinct.
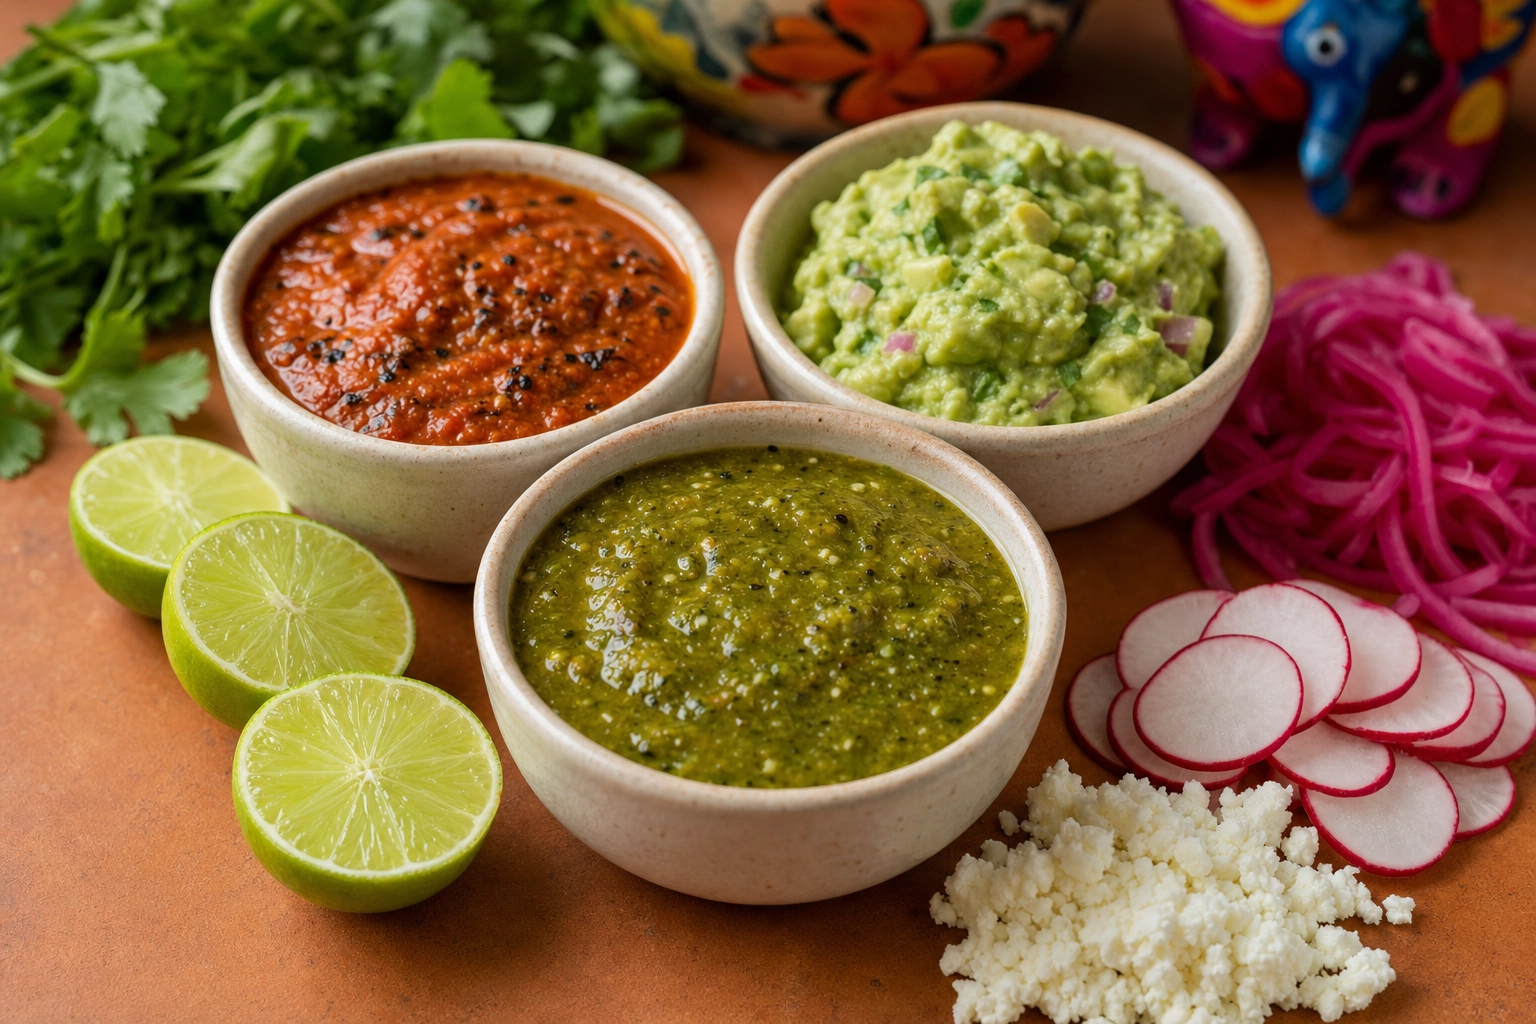 Salsa verde, salsa roja and guacamole with lime, radish and cilantro on terracotta — Mexican color styling
And watch the clock: char, glisten, and cilantro fade within a minute or two. Set up the shot first — angle, light, background — then bring the food in hot and shoot.
Before and after: fixing a phone taco photo
Here's a typical phone taco photo straight off the line, and everything working against it:
- Yellow light that makes crema and onion look dingy.
- A flat, head-on angle that hides the fillings.
- A dull tortilla, its char lost to bad light.
- Messy edges and a cluttered background of squeeze bottles and prep trays.
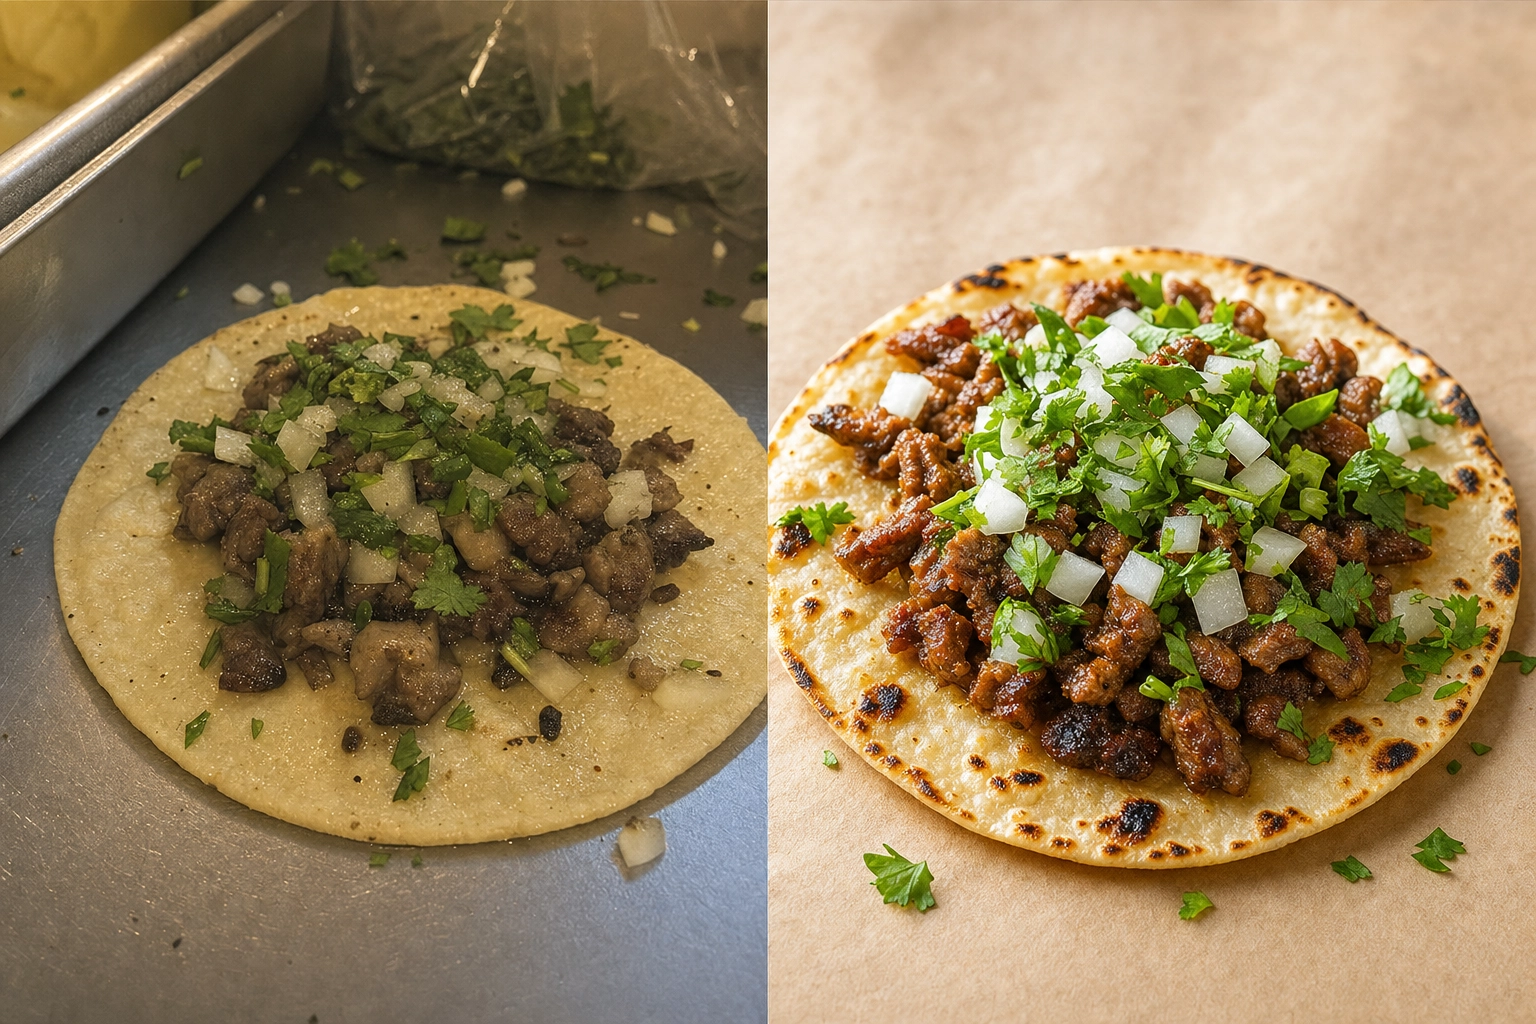 Before and after of a phone taco photo — dull yellow-lit version beside a bright menu-ready Mexican food image
You can fix a lot in the moment: carry the plate to a window, drop to a 30° angle, wipe the rim, and add a fresh cilantro sprig and lime wedge. But you can't always stop service to chase window light — and that's where editing comes in. A modern AI food photo editor can correct the yellow cast, bring back char and glisten, swap the chaotic background for clean butcher paper or talavera tile, and lift the colors so the salsa reads true — turning a phone snap into menu-ready mexican food images in about 90 seconds, at a fraction of a photo shoot's cost.
Keep your Mexican food images on-brand across the menu
One stunning photo is nice. A menu where every plate looks like it came from the same kitchen is what builds a brand. Most restaurants miss this — a bright birria shot, a dim phone taco, and a lunchtime combo become three different "restaurants" on one menu. Lock one look (same surface, light direction, framing, and color) and apply it everywhere.
It matters most on delivery app menus, where your taco thumbnail sits next to burgers, pizza, and poke bowls all fighting for the same tap — a consistent, high-contrast set of mexican food pictures wins that wall and lifts your online ordering pages. Across multiple locations, consistency matters double — the flagship's al pastor should look like the same dish as the new store's. That brand-wide polish is exactly what AI food photography for restaurants delivers. (Curious how other cuisines handle it? Browse food photography by cuisine.)
Frequently Asked Questions
How do I make Mexican food look less messy in photos?
Give the chaos a frame. Use the tortilla to corral the fillings, or lean on a plate rim, cazuela, or butcher paper for a clean boundary. Then pick one hero, leave negative space around it, and skip the minefield of mush — don't make plain beans or rice the star.
What is the best angle for taco and burrito photography?
Match the angle to the shape. Tall items — a stacked birria taco, a burrito in profile — look best at 25–45°. A burrito shot straight head-on looks like a beige tube, so turn it or cut it for a cross-section. Flat scenes like a taco lineup want a near-90° overhead view.
How do I photograph birria tacos to get the cheese pull and consommé dip?
Shoot two frames, fast. For the dip, catch the taco mid-dunk into the consommé with broth dripping, from a slight side angle. For the cheese pull, pull a quesabirria apart so the Oaxaca cheese stretches, with a little backlight. You have about 60–90 seconds before the crispy red tortilla dulls.
Why does my salsa look brown or dull in photos?
Usually it's the flash, which turns red salsa brown and mutes greens. Shoot in soft, natural window light, keep the salsa in its own ramekin so the color stays pure, and skip warm yellow kitchen bulbs. Fix any leftover cast in editing.
What background or surface works best for Mexican food pictures?
Matte, muted surfaces that let bold color pop: weathered wood, butcher paper, terracotta, or blue-and-yellow talavera tile for a bright feel, or dark slate for moody. Use complementary contrast — warm food on cool blue-gray, green dishes on terracotta.
Can I get professional Mexican food images without hiring a photographer?
Yes. Shoot the best phone photo you can using the tips above, then use an AI food photo editor to correct color, restore char and glisten, swap the background, and apply a consistent style — a menu-ready shot in about 90 seconds. It's how many taquerias get studio-quality mexican food photos without a full shoot. Try FoodShot AI's vibrant Mexican styles free on your own dishes.
