Taco Photography: Tortillas, Toppings & Truck Menu Shots
A great taco is a small miracle of texture and color — charred tortilla, glistening meat, bright cilantro, a spoonful of salsa that's basically edible neon. Yet taco photography is brutally unforgiving: point a phone at that same taco without a plan and it turns into a beige lump under fluorescent light — salsa gone brown, cheese blown out to a featureless white blob, the whole thing flat and sad. The food didn't change. The photo just failed it.
That gap is exactly why so many taco photos look nothing like the real thing. Tacos don't hold a clean silhouette like a burger or a pizza, they're assembled from a dozen small ingredients fighting for attention, and the best ones look their absolute best for maybe ninety seconds. This guide covers the real challenges of Mexican food photography, the five shots every taquería and taco truck needs, the lighting and angles that make colors pop, how to shoot each style from al pastor to birria, and how to get menu-ready taco pictures even when you're working one-handed out of a service window.
Quick Summary: The secret to great taco photography is soft, warm side light and a 45-degree angle, captured within 60–90 seconds of plating while the meat still glistens. Use the tortilla to frame the fillings, and shoot multiple varieties top-down in odd-numbered groups of 3 or 5. When a phone snap still falls short, an AI food photo editor can turn it into taqueria-grade taco photos in about 90 seconds.
Why taco photography is so hard
Most food photography problems come down to one or two variables. Tacos pile on at least four at once, which is what makes them some of the toughest subjects in Mexican food photography.
They're formless. A burger stacks into a tidy tower. A taco is a soft fold barely containing a landslide of meat, onion, cilantro and sauce. Without structure, the fillings spill and the eye has nowhere to land. The trick professional shooters lean on: let the tortilla do the work. The fold itself is a frame — angle the taco so the tortilla cups and contains the fillings instead of letting them sprawl across the plate.
The color is gorgeous chaos. Red salsa, green cilantro and avocado, white crema and cheese, yellow corn, brown meat — a single taco can carry every color on the wheel. That's why tacos are so appetizing in person and so easy to ruin on camera. Cram all those colors edge to edge and the photo reads as noise. Good taco photos pick a hero color, give it room, and let the rest play support.
You're racing the clock. This is the one most people miss. Meat glisten — that wet, just-cut sheen on al pastor, carnitas or barbacoa — peaks roughly 60–90 seconds after it comes off the trompo or plancha, then dulls as it cools and the surface dries. Fresh cilantro starts wilting within minutes above about 70°F. A taco has a short window where it's photogenic, and it closes fast. Shoot first, plate second, eat third.
Static or action — pick your story. A clean, static hero shot shows the build and works for a menu. A hand-held shot mid-bite, a birria taco dunked into consommé, a cheese pull stretching apart — that conveys joy, scale and freshness in a way no plated shot can. Both are right; they just do different jobs, and the best Mexican restaurants shoot both.
There's a fifth, sneakier problem: the "mush." Mexican food is full of small, soft, similarly-colored components — diced meat, refried beans, rice, crumbled cheese. Up close they read as an undefined paste. The fix is restraint: don't try to show everything. Focus on one clean, well-defined area of the taco and let the rest fall softly out of focus.
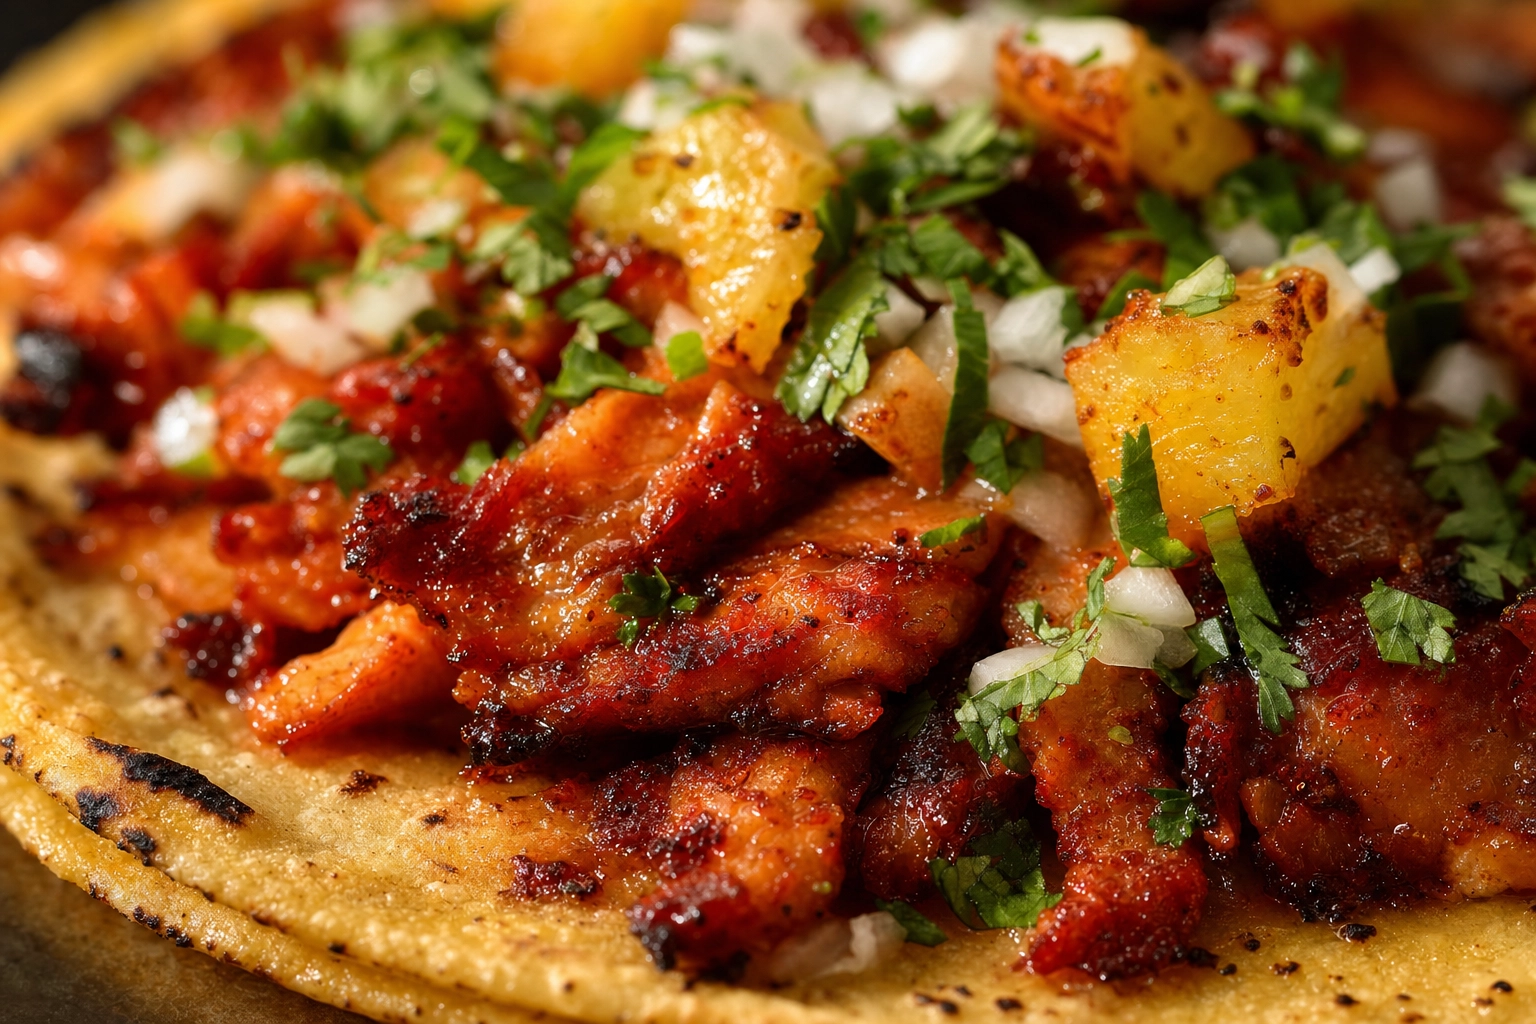 Macro close-up of an al pastor taco showing tortilla char, meat glisten and pineapple, taco texture detail
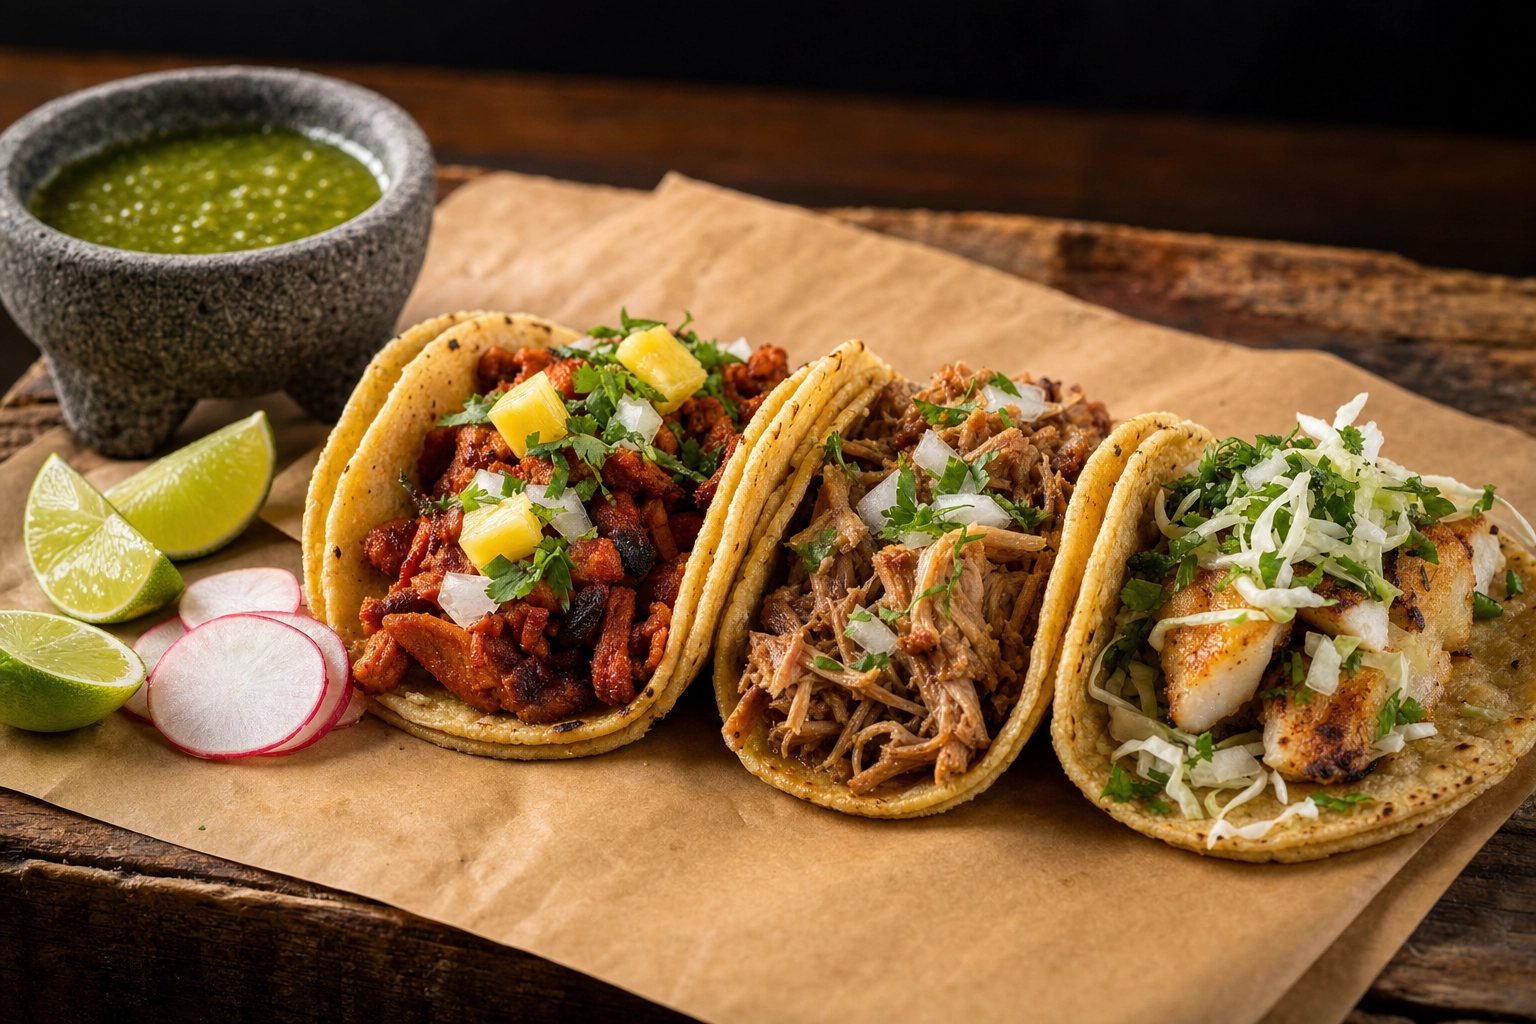
The 5 taco shots every menu and feed needs
You don't need fifty angles of one taco. You need five purposeful shots that each do a job — on the menu, on Instagram, on your delivery listing, and on your truck. Great taco photography starts with a shot list built around these five.
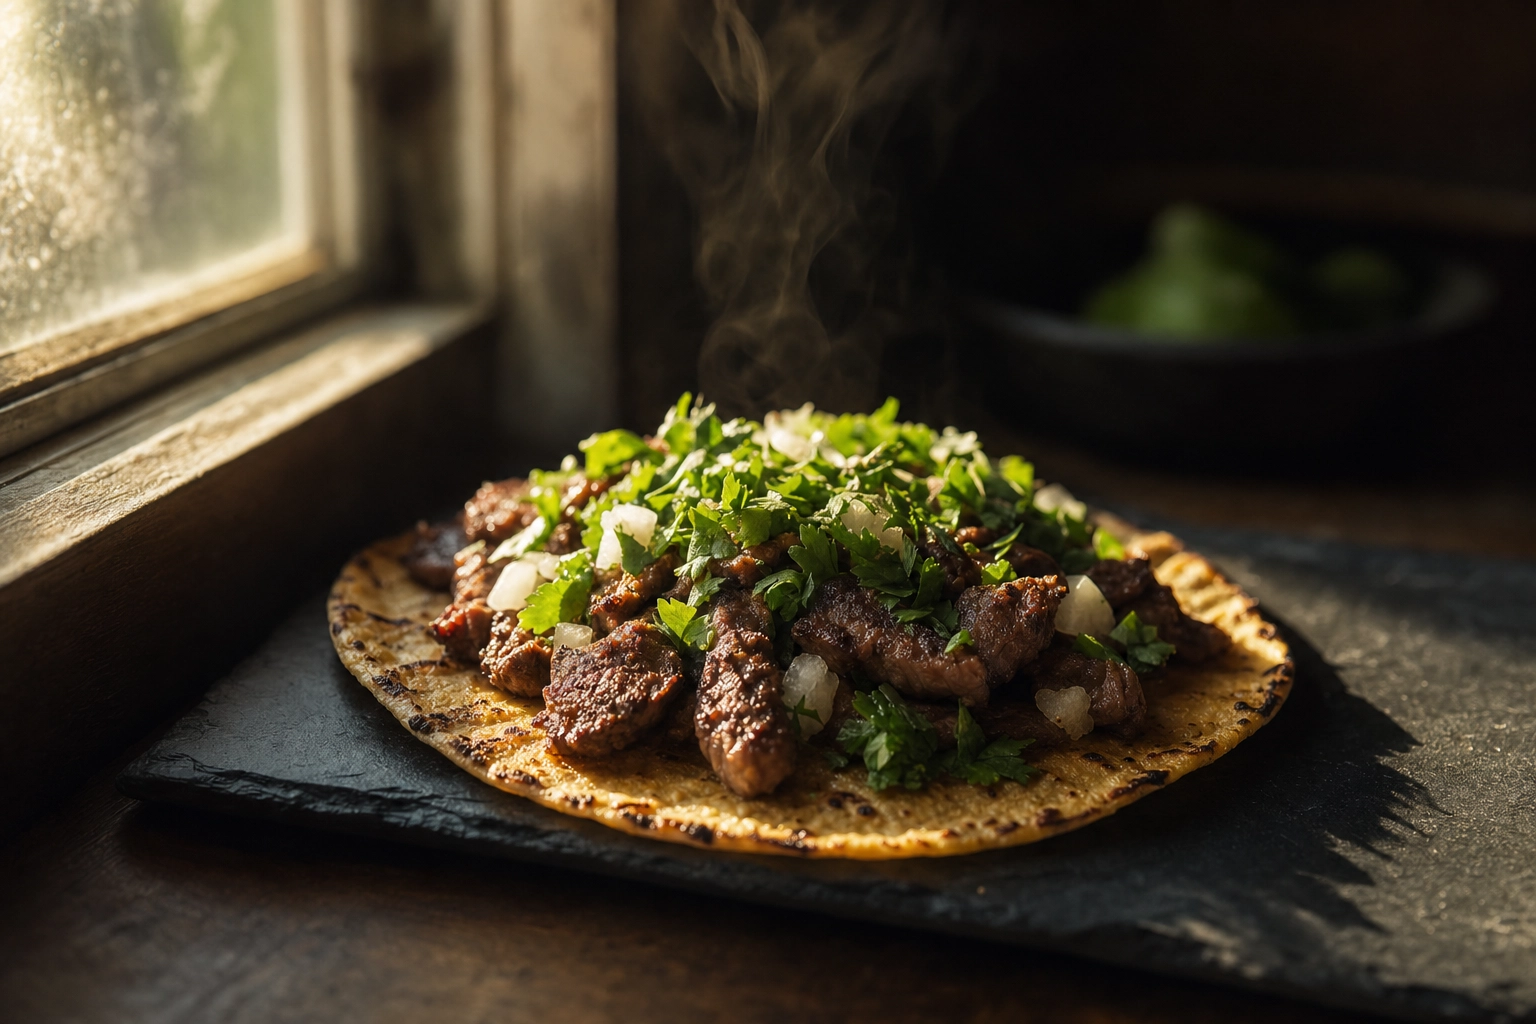
1. The single hero (45-degree, toppings visible)
This is your workhorse menu shot. Photograph a single, perfectly built taco at a 45-degree angle — the "three-quarter" view that shows both the fillings and the height of the fold. Nudge the taco slightly open so the camera sees the layers: char on the tortilla, glisten on the meat, garnish on top. This is the image that sits next to the price on your restaurant menu and headlines your Uber Eats or DoorDash listing.
2. The top-down lineup of 3–6 varieties
Lay out three to six taco varieties and shoot straight down at 90 degrees. A top-down flat-lay shows your whole Mexican menu at a glance — al pastor, carnitas, fish, birria — and it's the most shareable, save-worthy taco image on social. Group in odd numbers (three or five beat four or six) and alternate colors so two red-sauced tacos aren't sitting side by side.
3. The hand-held eating action shot
Someone holding a taco, mid-pull, sauce about to drip — this is the picture that makes people hungry. It adds a human element, communicates real size, and proves the food is fresh and handmade. The birria dip, the cheese pull, the squeeze of lime, the first bite all live here.
4. The salsa and cilantro macro detail
A tight close-up of a salsa ramekin, a scatter of cilantro and onion, a lime wedge glistening with juice. Detail shots sell craft and freshness, break up a feed of full-taco photos, and remind people the salsas are made in-house — perfect filler content between bigger posts.
5. The taco truck or taquería context shot
Your signage, your window, your trompo spinning, a taco handed across the counter. A context shot anchors the food in a real place, builds brand recognition, and does double duty as your restaurant's Google Business cover photo, a delivery-profile header, and an Instagram story. People don't just buy tacos — they buy your tacos, and this is the shot that says where to find them.
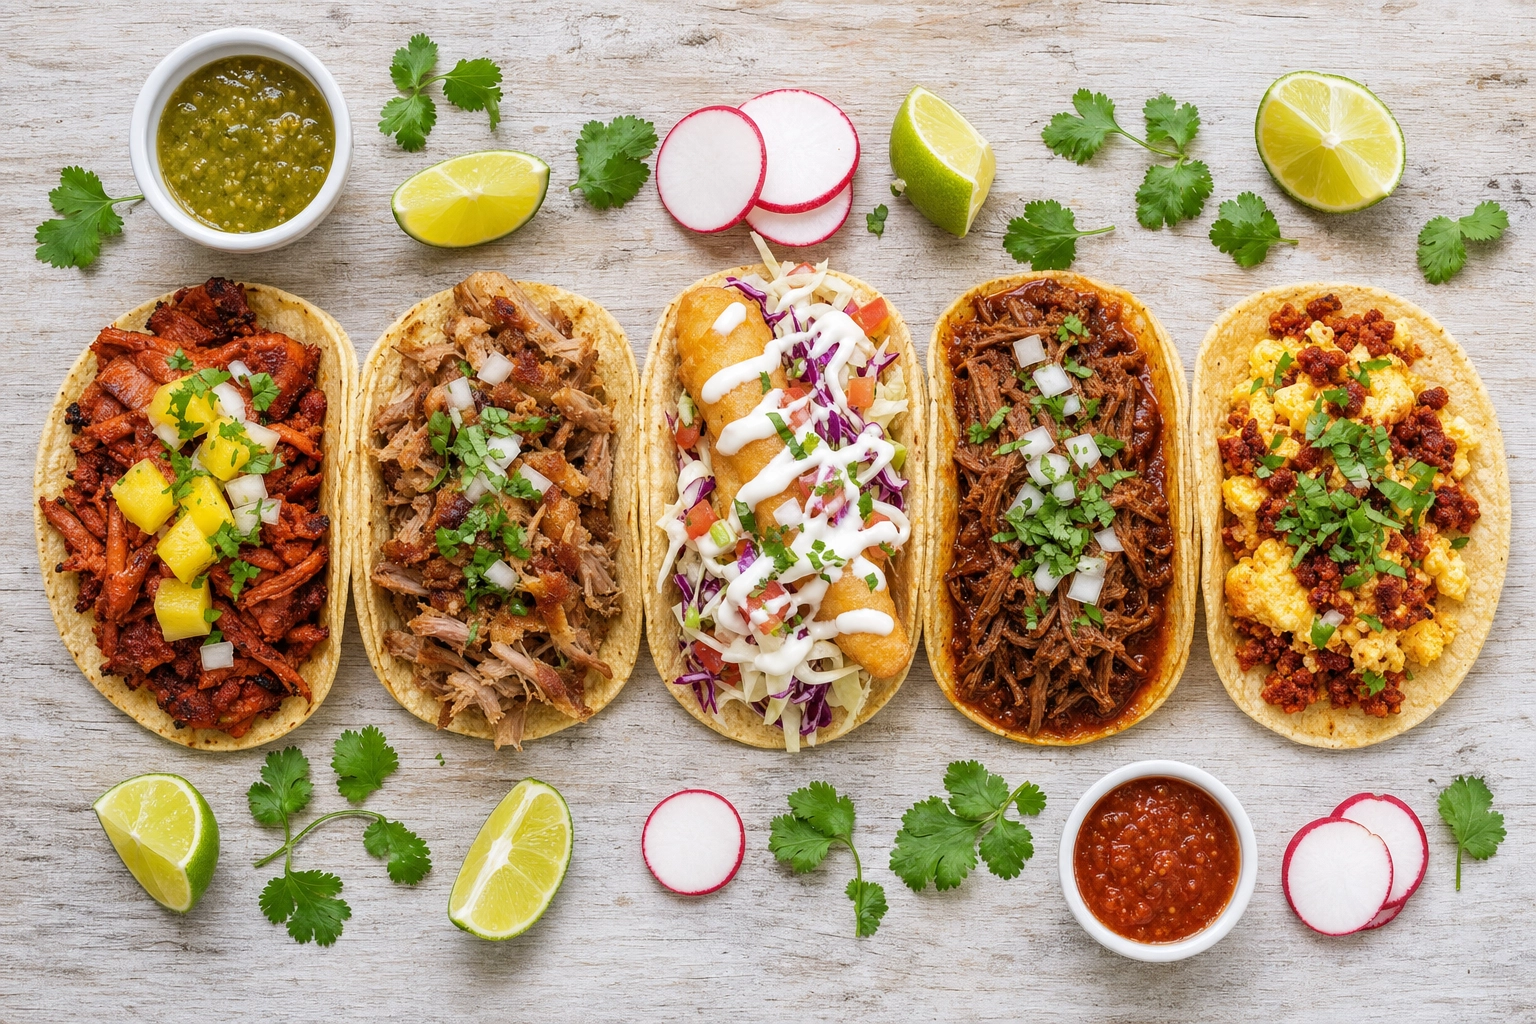 Top-down flat-lay of five taco varieties — al pastor, carnitas, fish, birria and breakfast — for menu photography
Taco photography lighting: warm side light that pops color
If you fix only one thing about your taco photography, fix the light — it's the foundation of all good food photography.
Use soft, warm side light. Light coming from the side — a big window to the left or right of the taco — rakes across the surface and reveals everything that makes tacos look good: the char and speckle on a corn tortilla, the wet sheen on the meat, the individual leaves of cilantro. Light coming straight from the front, like an on-camera flash, flattens all of that into a single dull plane.
Chase natural light when you can. Soft daylight — an overcast sky, open shade, or the warm light of early morning and late afternoon — renders the reds, greens and yellows of Mexican food more truthfully than almost any artificial source. Indoors, set up next to your biggest window. The closer and softer the light, the better tacos look.
Expose for the whites. This is the mistake that quietly ruins half of all taco photos. Crema, sour cream and melted cheese clip to pure, textureless white the instant a scene is even slightly overexposed. Pull your exposure back until the whites just hold detail, then let the rest of the frame sit a touch darker. On a phone, tap the brightest part of the taco and drag the exposure slider down. A blob of blown-out crema can't be recovered later; a slightly dark photo can be brightened.
Kill the flash. Direct flash is the enemy of good Mexican food photography. It flattens texture, throws hard shadows, and — worst of all — shifts red salsa toward a muddy brown-orange that looks nothing like the real thing. In a dark space, move the food toward whatever soft light exists rather than firing a flash at it.
Backlight for gloss. Want salsa to look wet and a birria consommé to glow? Put the light behind and slightly to the side of the dish. Side-back lighting catches the sheen on sauces and the steam off hot meat, giving you that glistening, just-served look.
 Single taco lit by warm side window light revealing tortilla char and meat texture, taco lighting demonstration
Taco photography angles and composition
Once the light is right, your angle decides whether all those toppings read as appetizing or as a mess — it's the next big lever in food photography.
Match the angle to the shot. Use 45 degrees for a single taco (it shows fillings and shape), a flat 90-degree overhead for lineups and plated combos, and a low, eye-level angle for anything with drama — a dripping birria taco, a cheese pull, a stacked street-taco order. Long, narrow shapes common in Mexican food, like a rolled taquito or a burrito, almost always look better turned to a 45-degree angle than shot head-on.
Let the tortilla frame the fillings. Position the taco so the fold of the tortilla contains and frames the meat and garnish rather than letting them spill toward the camera. The tortilla becomes a natural border that organizes the chaos.
Compose with intent. Group tacos in odd numbers — three or five — which the eye finds more natural than even rows. In food photography, leading lines (the edge of a sheet of butcher paper, a row of lime wedges, a streak of salsa) point toward your hero taco, and the rule of thirds still applies: a taco placed slightly off-center usually beats one dead in the middle.
Garnish like you mean it. A few deliberate props do the cultural and visual heavy lifting: a small mound of chopped cilantro and white onion, a fresh lime wedge, a couple of radish discs, a tangle of pickled red onion. These add color exactly where you want it and instantly signal "real taquería." Accent the taco — don't bury it.
How to shoot every type of taco
Not all tacos want the same treatment. Authentic Mexican food spans a huge range — from a Mexico City street-taco stand to a Tex-Mex restaurant in Texas — and each style has its own hero detail. Good Mexican food photography means matching your approach to the dish, so here's how to flatter the big ones.
Street tacos, al pastor and carnitas
Street tacos are small, built on doubled corn tortillas, and dressed simply — cilantro, white onion, a wedge of lime, salsa, often served on butcher paper. Keep it honest: the warm taquería-counter light of a Mexico City corner stand, a 45-degree angle, minimal props. The double tortilla and the char are the stars.
Al pastor is all about the trompo-shaved pork — a method central Mexico adapted from Lebanese shawarma and made unmistakably its own. Photograph it in the first 60–90 seconds while the meat still shines: charred edges, a glossy chile-red marinade, bright flecks of pineapple. A little pineapple catching the light goes a long way.
Carnitas lives or dies on those crispy, caramelized edges. Angle the light to skim across the meat so the golden-brown crunch casts tiny shadows and looks crisp rather than greasy. A 45-degree view shows both the tender interior and the crackly bits.
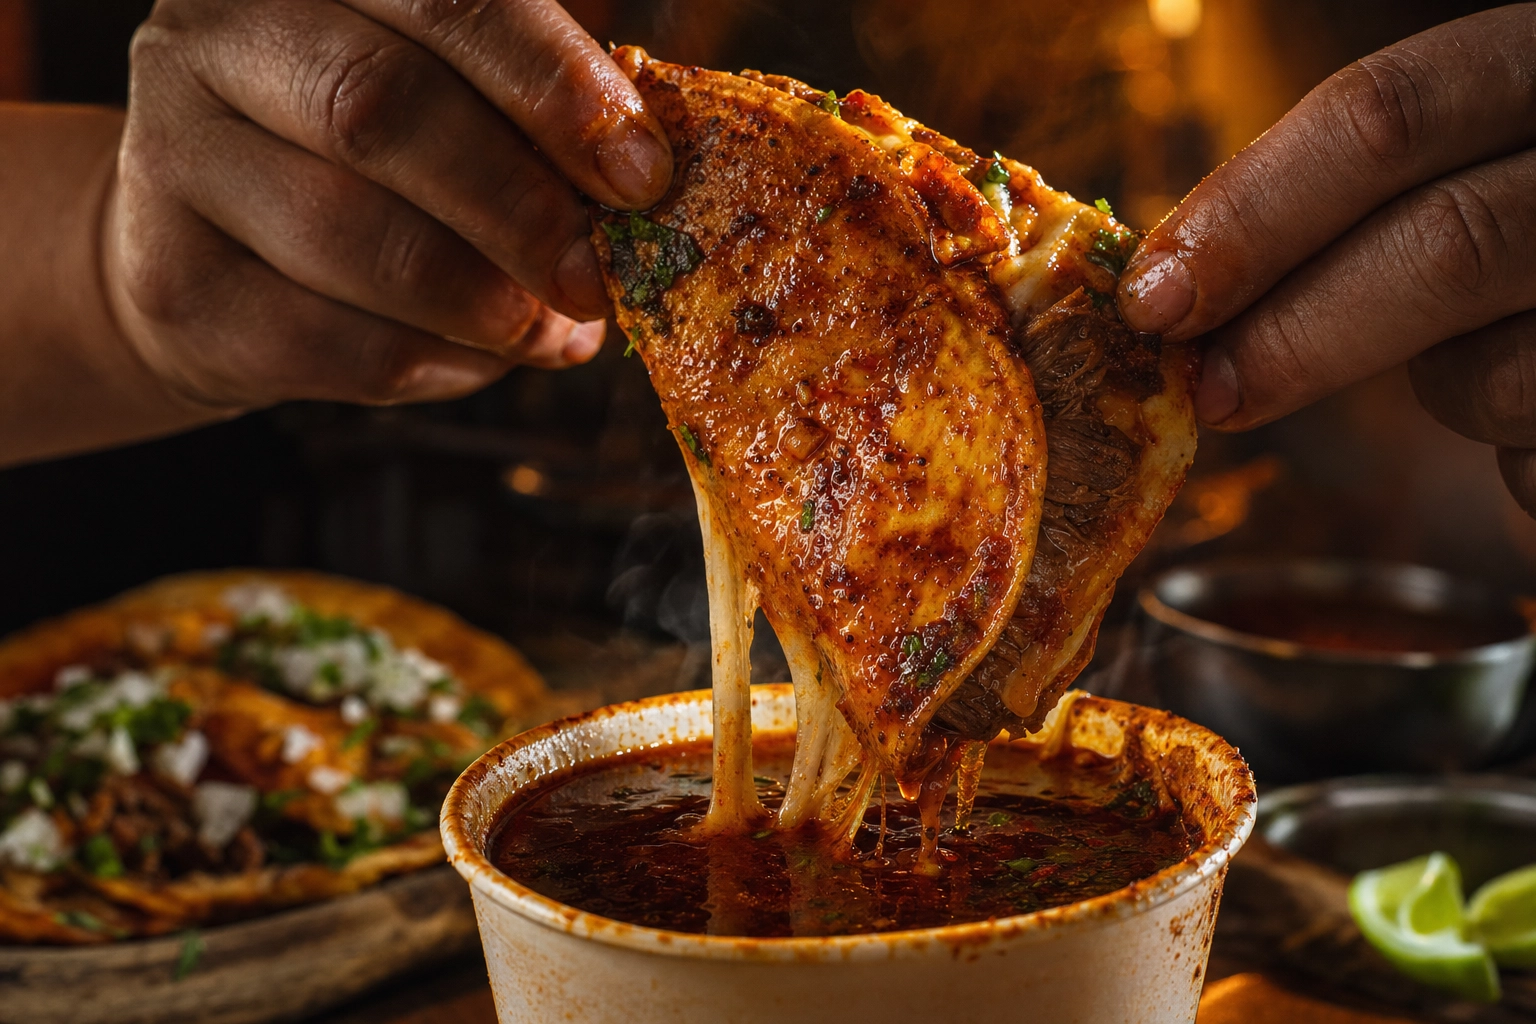 Hands dipping a quesabirria taco into red consommé with a melted cheese pull, birria taco action shot
Birria, fish, breakfast and hard-shell
Birria is the Mexican social-media superstar, and for good reason. Beef birria (birria de res) and the U.S. quesabirria trend — melty Chihuahua cheese, brick-red chili grease — practically beg for an action shot. Shoot at eye level: the taco mid-dip into a cup of red consommé, or a slow cheese pull as it separates. Side-back light makes the grease and broth glisten. This is the rare taco where messy is the message. The dish has deep regional roots in Mexico — from Jalisco-style goat birria to Tijuana-inspired birria de res, as guides like the L.A. Times 101 Best Tacos list document — and that authenticity is worth showing.
Fish tacos are a texture story: crispy Baja-style beer batter (or a clean grilled fillet), crunchy cabbage slaw, a drizzle of crema, lime, cilantro. Light them bright and cool-clean to match their coastal personality, and shoot close enough to show the crag of the batter.
Breakfast tacos — the Austin tradition of egg, chorizo, bacon, potato and cheese folded in a warm flour tortilla — want soft morning side light. Catch a wisp of steam or a bit of melt and you've nailed it. Shoot one slightly open to show the scramble inside.
Hard-shell Tex-Mex tacos are a layering exercise: seasoned ground beef, shredded lettuce, cheddar, diced tomato in a crisp U-shaped shell. Shoot straight on or at a gentle 45 to show the stacked strata, and watch for stray crumbs and shell cracks, which read as sloppy. One note on tortillas in general: corn reads as small, authentic and street (its char and speckle are a selling point worth lighting for), while flour reads larger, foldable and Tex-Mex — the default for breakfast tacos and their close cousin, the burrito.
Salsa and sauce photography
Salsas aren't a footnote — across Mexico, every region keeps its own, and for a lot of taquerías the sauces are the whole personality. The salsas that define a Mexican restaurant's character deserve their own place in your food photography.
Color accuracy is everything. The difference between a vibrant tomatillo-green salsa verde, a red-orange salsa roja con chile de árbol, a deep mahogany salsa macha flecked with seeds, and a pale-green avocado-crema is exactly what tells customers what they're getting. Get the white balance wrong — or fire a flash — and every one drifts toward an unappetizing brown. Shoot in neutral daylight and check that the colors on screen match the colors in the bowl.
Style them simply. Serve salsas in small ramekins or, for hero shots, a stone molcajete. Fill to the brim so the sauce reads generous, then wipe the rims clean — a smeared edge is the fastest way to look messy. Top each with a tiny, relevant garnish: a cilantro leaf on the verde, a few sesame seeds or a floating chile on the macha.
Make them glisten. Backlight or side-back light brings out the gloss that makes a sauce look fresh. If a salsa has been sitting and the surface looks dull, the classic stylist's fix is the lightest brush of neutral oil to wake the sheen back up. A single deliberate drip down the side of a ramekin adds appetite; a chaotic splatter across the plate does not.
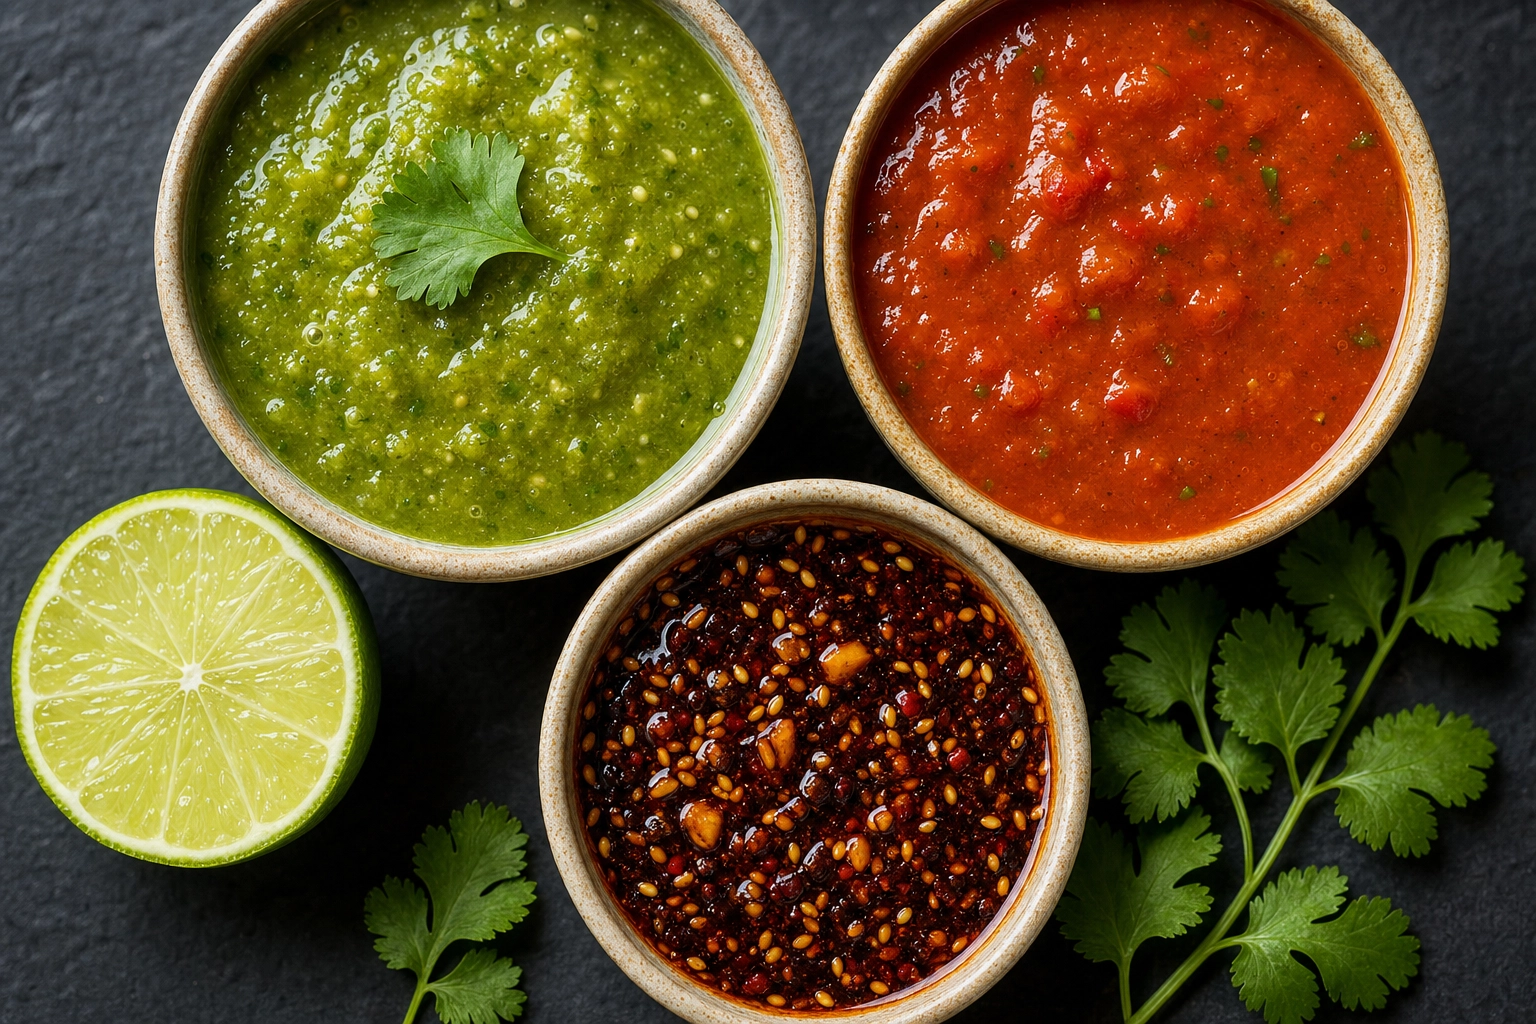 Three Mexican salsas — verde, roja and salsa macha — in ramekins showing accurate color and gloss, salsa photography
The taco truck workflow: great photos in a cramped window
Most food photography advice assumes a studio, a tripod, and unlimited time. A taco truck has a two-foot service window, a phone, harsh noon sun or a dim parking-lot glow, and a line out the door. Here's how to get menu-grade shots anyway.
Pre-stage one clean surface. Designate a small, clean board or tray near your window and keep it wiped down. That's your photo set — you're not redecorating the truck, just keeping one tidy, neutral spot where the light is decent.
Shoot during prep, not during the rush. The best moment to photograph a dish is when you build the first or best plate of a batch, before the lunch crowd hits. Take thirty seconds then, while the meat is fresh off the heat and you're not slammed.
Work fast and deliberately. Set the taco into the softest light you've got, brace your phone against something steady, tap to focus on the meat (not the tortilla edge), and fire 3–5 frames before the glisten fades. Move slightly between frames so you have options. You're done in under a minute.
Batch your specials. When you roll out a weekly special or a new item, photograph it in that same prep-time session so you're not scrambling for content later. A consistent setup also keeps every shot looking like it belongs to the same Mexican kitchen — which matters even more if you run multiple locations. Our food truck photography guide and tips on food truck menu design go deeper on turning these shots into menu boards and a cohesive brand, and the dedicated taco truck photography page covers the full workflow.
 Taco truck at dusk with a taquero handing tacos through the lit service window, taco truck context shot
Fix it in 90 seconds: AI taco photo enhancement
Here's the honest truth: even with the right angle and the best window in the building, a phone photo taken on a busy line often comes out fine — not menu-grade. Hiring a professional food photographer fixes that, but a single session runs anywhere from several hundred to a few thousand dollars, and you'd rebook every time you launch a special. That math rarely works for an independent taquería, a single truck, or a small Mexican restaurant.
This is the gap AI was built to close. With FoodShot AI's taco photography tool, you upload that imperfect phone snap and get a taqueria-grade, menu-ready image back in about 90 seconds — for roughly 95% less than a traditional shoot. The whole point is preserving the details that make a taco look real: the char on the tortilla, the glisten on the al pastor, the vibrancy of the cilantro, and accurate salsa color (no more flash-browned roja).
A few things it does especially well for Mexican food photography:
- 200+ styles tuned for different registers — bright, light-wood street-taquería looks for Instagram; warm cantina tones for Tex-Mex combos; dramatic, dark editorial backdrops for trompo-cut al pastor and barbacoa.
- Builder Mode composes the scene one decision at a time: pick the surface (butcher paper, Mexican tile, terracotta, a clean enamel plate), the vessel, the props (lime wedges, radish, pickled onion, salsa ramekins), and the lighting.
- My Styles locks one consistent look across your whole menu and every location — upload three or four reference photos and every new taco matches, so your restaurant menu, your delivery app photos, and your Instagram grid all look like the same place.
- 4K output sharp enough for printed menu boards, A-frames and digital displays, not just phone screens.
One important caveat, because honesty matters: this is a food photo editor, not a food generator. It enhances a real photo of your real taco — it can't invent a dish you didn't cook, and the free plan's exports are watermarked and meant for personal use until you're on a paid plan. Give it a clean, in-focus starting point and it'll do the rest. The same approach works across your whole menu, from burger photography to burrito photography.
If you run tacos through it regularly, the pricing scales with volume: a free tier with 3 credits to test it, Starter at $15/month for 25 credits with a full commercial license, and Business and Scale plans (the latter with bulk processing) for restaurants and trucks photographing dozens of items and specials a month.
Frequently asked questions
How do I photograph multiple taco varieties in one shot?
Shoot straight down from directly overhead (90 degrees) for a flat-lay, group the tacos in odd numbers — three or five look more natural than even rows — and alternate them by color so two similar tacos aren't side by side. Leave a little breathing room between each one, add a couple of shared props like lime wedges and salsa ramekins to tie the set together, and keep the background simple so the variety itself is the star.
How do I capture tortilla texture and char so it doesn't look flat?
Light is the whole answer. Use soft light coming from the side rather than the front — side light rakes across the tortilla and casts tiny shadows in every char spot and speckle, which is what makes texture read. Front light and direct flash flatten all of that out. Get close, focus on the tortilla surface itself, and avoid overexposing, which washes char marks away to a uniform pale tan.
Should I shoot tacos hand-held or flat on a plate?
Both, because they do different jobs. A plated shot at a 45-degree angle is your clean, reliable menu and delivery-app image. A hand-held shot — someone holding the taco mid-bite, a birria dip, a cheese pull — adds energy and human scale and tends to perform best on social media. If you only have time for one, shoot the plated 45-degree hero; it's the most versatile taco picture you can make.
How do I keep a taco from falling apart on camera?
Build it tighter than you'd serve it and prop it from behind. A small, hidden toothpick or two can hold a folded taco upright or keep fillings from sliding — and toothpicks are easy to retouch out of the final image. You can also lean the taco against a lime wedge, a second taco, or the rim of a plate just out of frame. Shoot quickly, because tortillas soften and slump the longer they sit.
How do I get the birria dip and cheese-pull shot?
Shoot at eye level so the action is in profile, and have a second person do the dipping or pulling while you focus on firing frames. Put your light behind and slightly to the side so the consommé and melted cheese catch a glossy highlight. Time it for the moment of maximum stretch or the instant the taco lifts out of the broth, dripping — and take a burst of shots, because the perfect frame lasts a split second.
What's the best lighting for taco photos?
Soft, warm, natural side light. A big window with daylight (or open shade and golden-hour sun outdoors) renders the reds, greens and whites of Mexican food most accurately, and side direction brings out texture and glisten. Expose for the whites so crema and cheese don't blow out, and never use a direct on-camera flash — it flattens the food and turns red salsa brown.
Tacos are one of the hardest foods to shoot and one of the most rewarding when you get it right. Nail the warm side light, the 45-degree angle, and the 60–90 second glisten window, frame the fillings with the tortilla, and capture your five core shots — and you'll have taco images that finally do your food justice. When service gets in the way of a perfect shot, a quick AI cleanup gets you taquería-ready in about 90 seconds. Whether you run a street stall in Mexico City or a taco truck across town, your Mexican restaurant deserves photos as good as the food. ¡Buen provecho!
