Brunch Photoshoot Ideas for Cafes and Restaurants
 Ali Tanis17 min read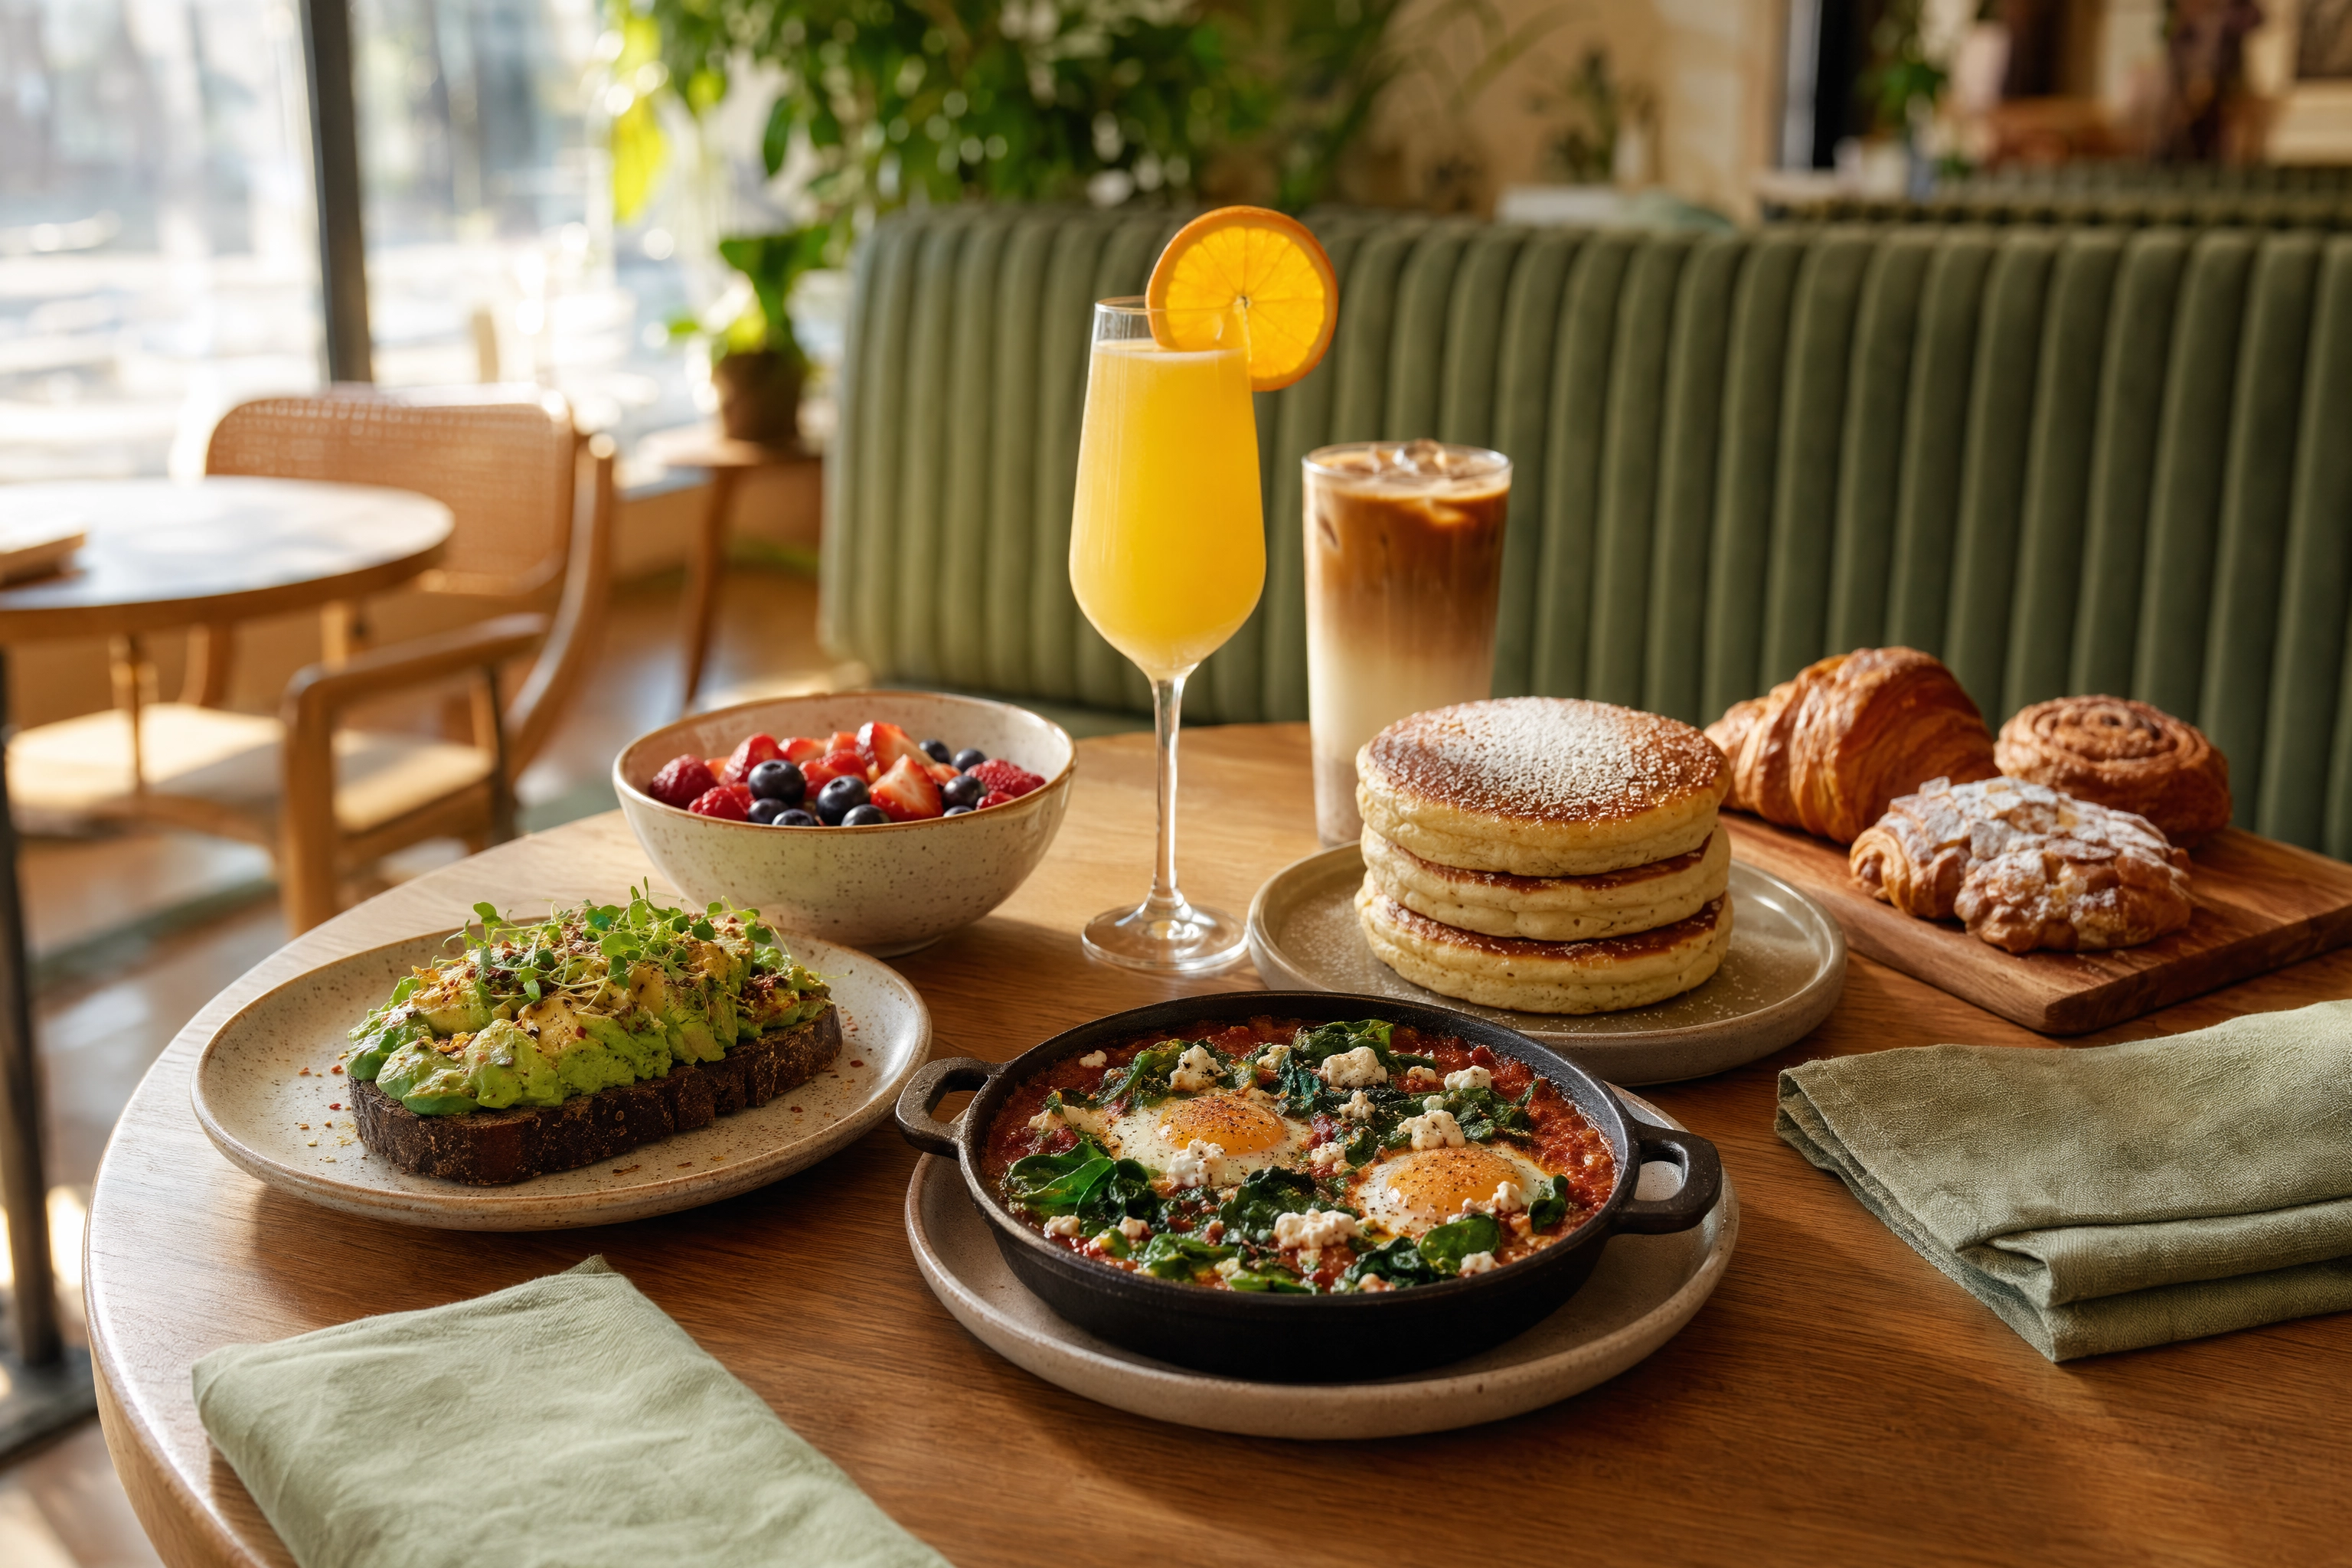
A brunch photo has a different job than a breakfast photo. Breakfast has to make one plate look good. A brunch photoshoot has to make four friends agree on a Saturday.
That difference is a shot list, not a slogan. Breakfast is a dish category — eggs, a stack, a yolk, a pour. Brunch is a social occasion, and the thing being sold is the table: two hours, several plates, somebody's third coffee. Photograph one plate of eggs beautifully and you have made a breakfast photo. Photograph the spread, the light through the window and the drinks nobody has touched yet, and you have made a brunch photoshoot.
It is worth the morning. Square's analysis of roughly 800,000 restaurants found that Saturday between 8 a.m. and 1 p.m. now takes more than 10% of all restaurant dining dollars, up from 8.5% in 2019, overtaking Friday lunch as the industry's peak period. That is the service your images are selling. Below are 12 named brunch photoshoot setups, in the order a cafe can shoot them in one mid-morning, plus the two things that quietly ruin most brunch photos.
Quick Summary: A brunch photoshoot sells an occasion, so the hero is the table, not the plate — shot from standing height at about 30 degrees with the room visible behind it. Work by a window with the ceiling lights off, let coffee and mimosas carry the color, and cut the eggs first, because a yolk only looks its best for about a minute.
What the pin boards get right and wrong
Search this topic and the results are pin boards and stock libraries. That is not a failure of the search engine — it is genuinely where brunch inspiration lives, and a pin board is a fine mood source. Pinterest is where your guests explore brunch ideas before they book, so it is worth knowing what those pins actually are.
Here is the catch. Almost every pin you will find is a styled home table: linen, fresh flowers, gold cutlery, a bagel board nobody in a working kitchen has time to assemble. It sets an aesthetic, not a spec. Build a brunch photoshoot by copying a pin exactly and you get an image that looks nothing like your dining room, which is the one thing a brunch photo has to do.
Use the pins for palette and prop ideas. Use the setups below for what you actually shoot in a working cafe.
Brunch is an occasion, not a dish
The plate-level craft is already solved and it is not what this page is for. How to break a yolk so it glows, how to make syrup fall in a slow ribbon, how to keep bacon crisp rather than greasy — our breakfast photography guide covers dish work in detail, and pancake and waffle photography covers stacks. Use those for the plate.
This page covers everything around the plate, because that is what people are choosing when they choose brunch. Look at any brunch image that made you want to go, and you will find at least three of these in frame:
- More than one plate. Abundance is the message. A single dish alone reads as a quick lunch.
- A drink with color. Coffee, a mimosa, a green juice, an iced tea with fruit in it.
- A piece of the room. A banquette, a chair back, a window, a plant. Context is what separates brunch from a product shot on a paper backdrop.
- Evidence of people. A pulled-out chair, two napkins, a cup already half drunk.
Strip those out and you are back to breakfast photography — useful, but a different message. The rest of this brunch photoshoot guide is about getting all four into the frame.
Table ideas: the spread is the hero
Four ways to shoot the table itself — the backbone of any brunch photoshoot. Shoot all four and one morning gives you a month of content.
1. The three-quarter table hero
Set it up: Stand at the end of the table, camera at chest-to-shoulder height, roughly 30 degrees above the tabletop. Crowd the plates into the near half of the frame. Put the tallest objects — glasses, a carafe, a coffee cup — at the back so the composition has height. Open the aperture, or use portrait mode, so the chairs behind melt into soft shapes.
The mistake: Shooting into an empty room with the interior lights on, so the background goes muddy brown. The background is not filler here. It is half the message.
Best for: Your homepage, your reservations page, the first image in any brunch post. This is the most useful frame you will shoot all day.
2. The overhead grid
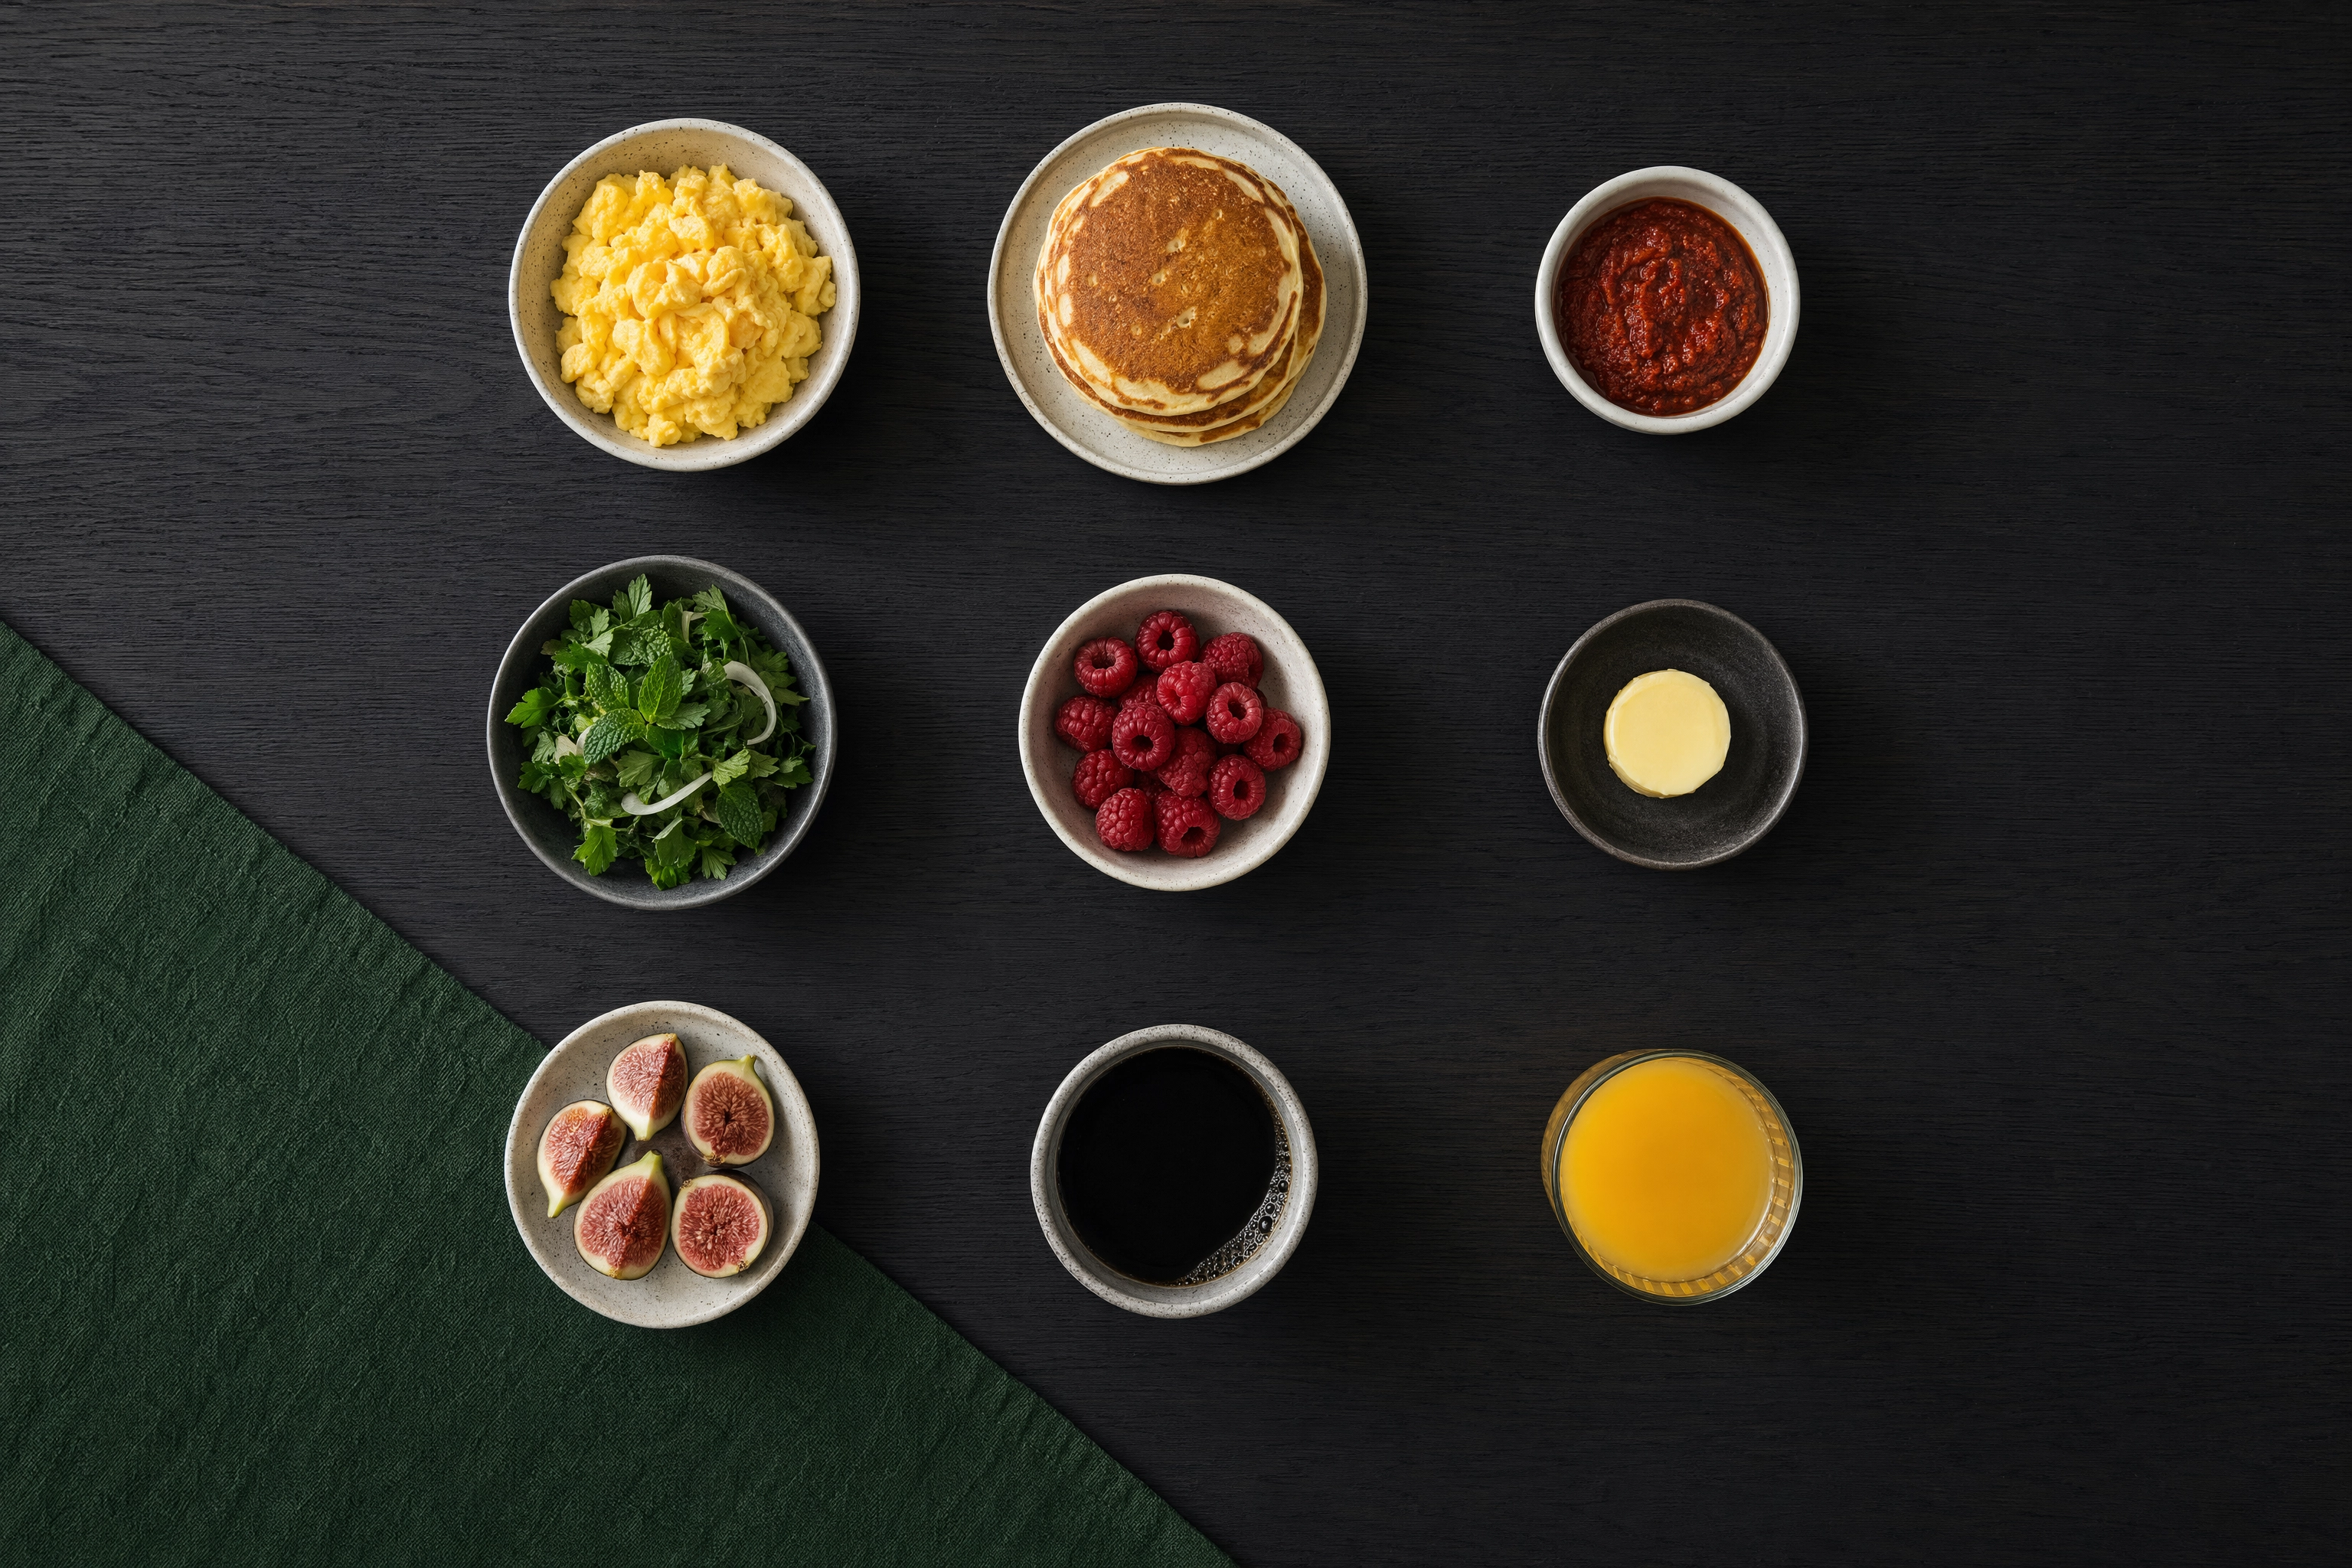 Overhead grid of nine small brunch plates evenly spaced on a dark oak table for shareable social content
Set it up: Camera flat at true 90 degrees, six to nine small plates with even gaps, one board or linen runner cutting a diagonal so it does not look like a spreadsheet. Build a color triangle — yellow, red, green — and let the negative space breathe.
The mistake: Using it as a delivery menu tile. Uber Eats requires a single centered item, so a nine-plate grid is an instant rejection. This is a marketing image.
Best for: Social, and anything you want saved or pinned. It crops to square and 4:5 without losing a dish, which is why it survives every platform redesign.
3. The corner crop
Set it up: Drop to table level, get close, and frame one corner: half a plate, a jam pot, the base of a glass, the rest of the spread falling out of focus behind it. Nothing needs to be finished. Nothing needs to be centered.
The mistake: Backing up. The point is that the frame cannot hold everything, which is what implies there is more.
Best for: Stories, second-slide carousel images, and the day the kitchen only has two dishes ready. It is the easiest brunch shot to get right.
4. The room, set and empty
Set it up: Before anyone sits down, shoot the dining room wide with one table fully set — cloth, glassware, a small vase, sun on the wall. No food, or almost none. If you have a patio, shoot the outdoor tables the same way while the sun is still low.
The mistake: Shooting it dead-on and flat. Find a diagonal: shoot down the length of a banquette so tables repeat into the distance.
Best for: Local search listings, private-hire pages, and the "we are open Sunday" post. Pair one room shot with one food shot in every carousel and the account stops looking like a menu.
Light ideas: brunch has the best light of any service
This is the real advantage of the brunch daypart. Dinner is shot under tungsten and candles. Lunch gets hard overhead sun. Brunch runs from 9 a.m. to 2 p.m., which is exactly when a window hands you big, soft, directional light for free. Three ways to use it in a brunch photoshoot.
5. The 10 a.m. window seat
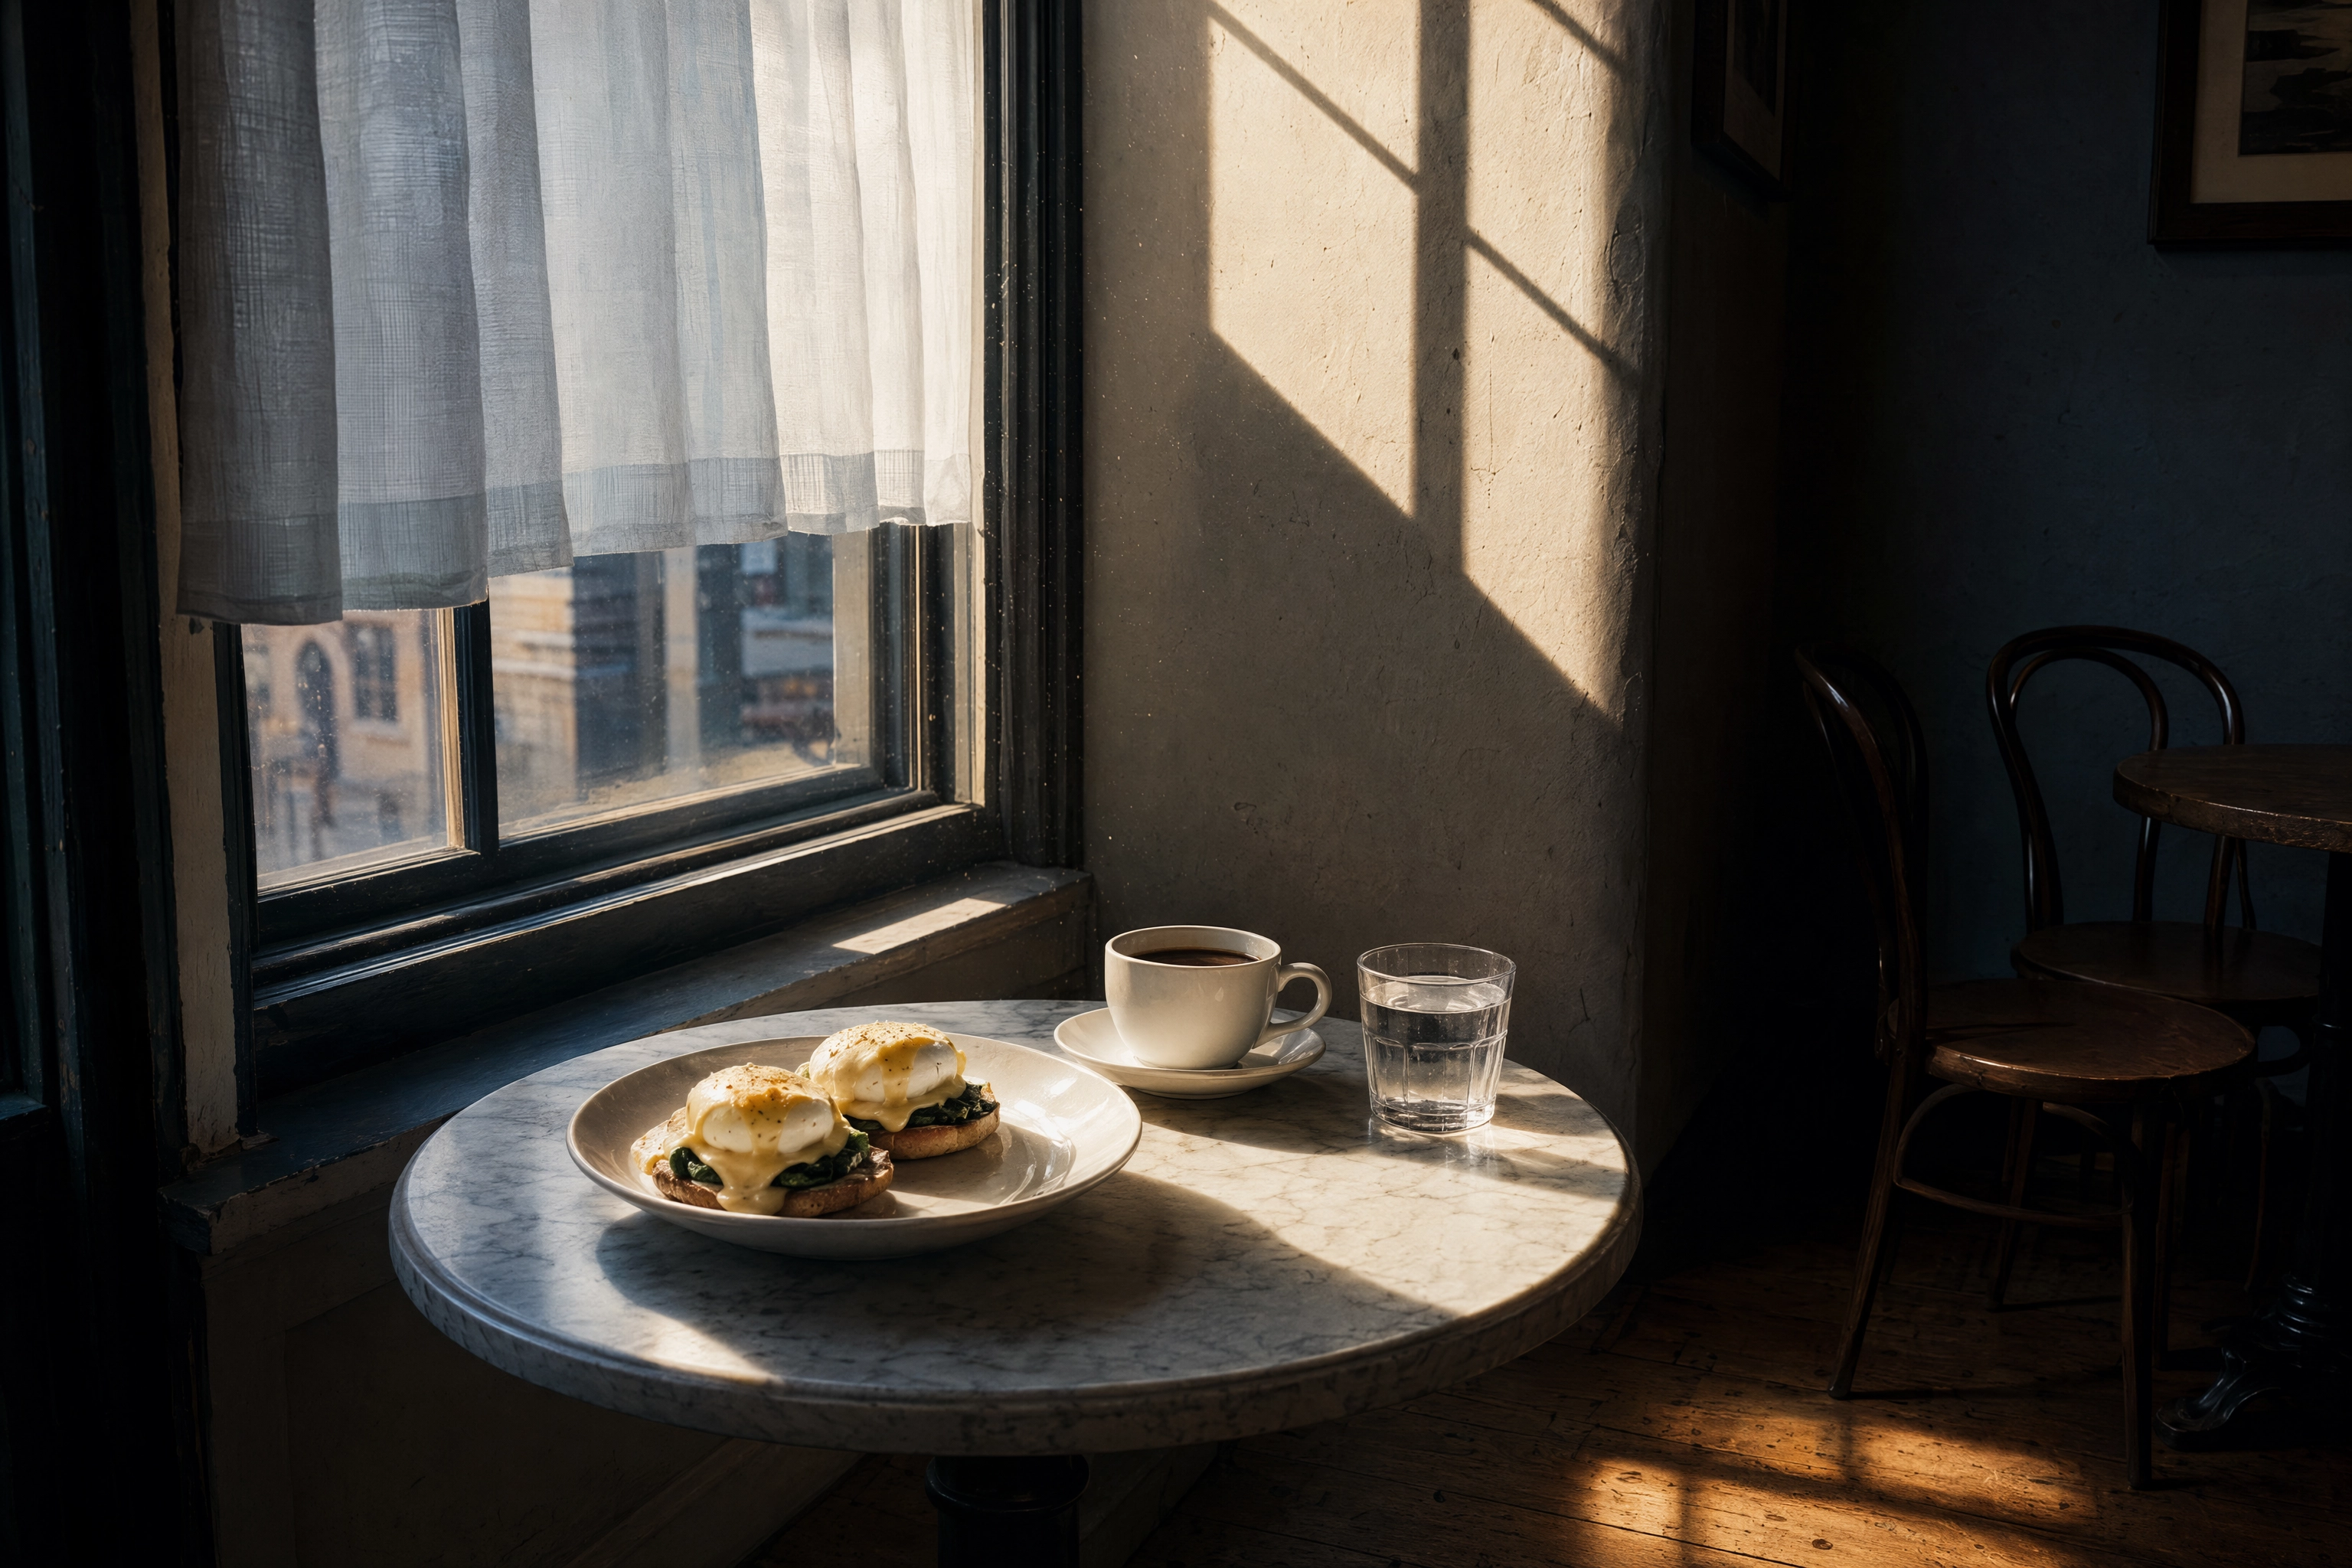 Cafe window table lit by a hard morning sunbeam with window-frame shadows raking across the wall
Set it up: Move the shoot to the table with the biggest window, and keep the light at roughly 90 degrees to the camera so it rakes across the food and separates texture from shadow. If the sun is hard, tape tracing paper to the glass or pull a sheer curtain. Prop a white menu card opposite the window to bounce fill into the shadow side.
The mistake: Shooting with the window behind you. Front light flattens everything and kills the appetite in one frame.
Best for: Everything. If you fix one thing this year, fix which seat you shoot in.
6. Backlight the glassware
Set it up: Put the drinks between the window and the lens. Juice, iced coffee, a mimosa, a bottle of cold brew — anything translucent lights up from behind and glows. Drop your exposure a stop so the highlights hold.
The mistake: Backlighting the food too. Opaque things — eggs, potatoes, toast — fall to silhouette. Keep the plates side-lit and let the glasses be the ones that glow.
Best for: Drink menus, the top of a Sunday post, and any frame that needs a hit of color.
7. Kill the ceiling lights
Set it up: Switch off the pendants and spots above your table before the first frame. Then shoot.
The mistake: Leaving them on. Warm bulbs and daylight are different color temperatures — roughly 2,700K against 5,500K — so you get orange highlights and blue-gray shadows in one image. No edit fully separates them again, and it is the most common reason a brunch image looks amateur without anyone being able to say why.
Best for: Every shot in the building. This is the free upgrade, and the easy one.
The supporting cast: coffee, mimosas and juice
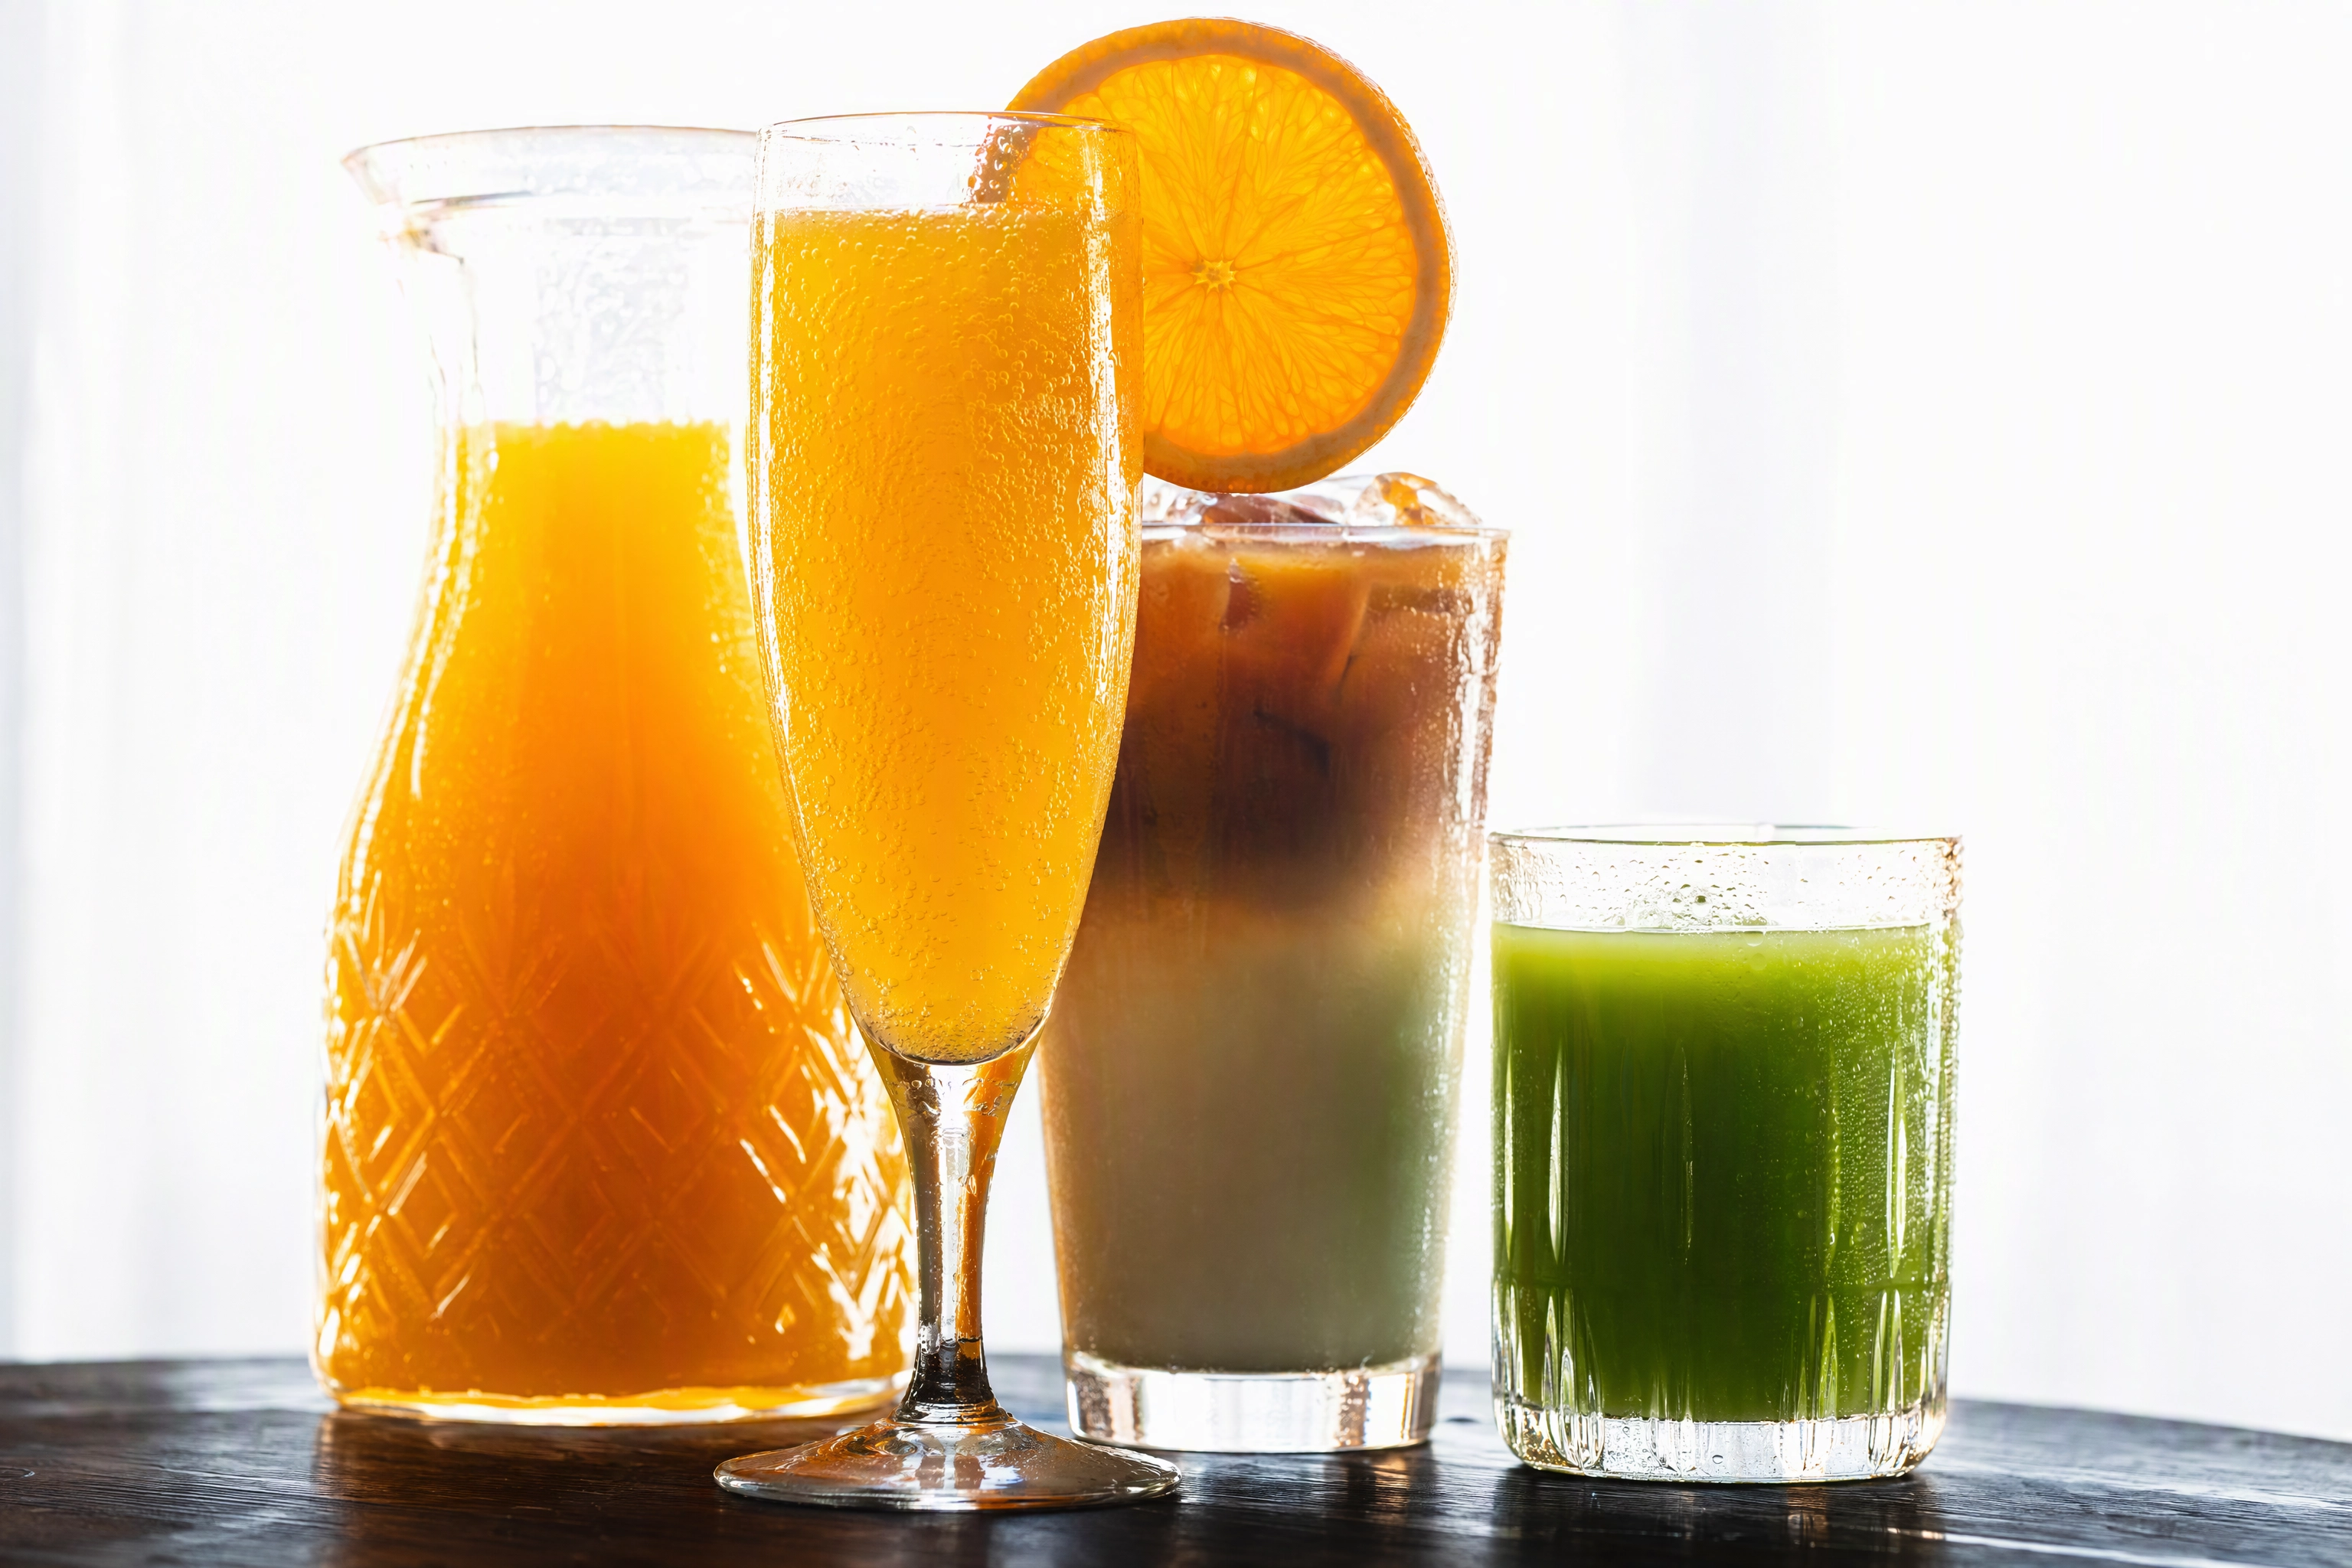 Backlit brunch drinks cluster with mimosa, iced latte and green juice glowing against a bright window
Drinks do three jobs at once: they add height, they add the color the food often cannot, and they say "weekend" faster than any caption.
8. The mimosa at the frame edge
Set it up: Tall glass, back third of the frame, to one side — never dead center behind the food. Chill the glass first so it fogs, and shoot within a minute while the bubbles are still climbing. A wide orange wheel on the rim gives the eye somewhere to land.
The mistake: Pouring early. Flat sparkling wine photographs like apple juice.
Best for: Bottomless brunch promos, weekend menu boards, anything aimed at a group booking or a birthday date.
9. Coffee as the anchor, not the subject
Set it up: A cup and saucer in a top corner, slightly out of focus, with the spread in front of it. That one object dates the whole image to morning before anyone reads a word.
The mistake: Waiting. Latte art holds its definition for about two minutes, so shoot the coffee first and let it sit in frame while you work on the food. If drinks are central to your brand, our coffee photography guide goes deeper on pours and crema.
Best for: Cafes especially. It is the cheapest way to make a plate of food read as a cafe rather than a kitchen.
10. The condiment still life
Set it up: Hot sauce, jam, a butter dish, a small syrup jug, salt and pepper, gathered into one deliberate cluster and shot close at table level. Real props, from your own tables.
The mistake: Treating them as clutter and clearing them out of every frame. These objects are the cheapest seasonal refresh you own: swap the jam for stewed fruit in October, add something green in spring, and the same dish reads as a new dish.
Best for: Filler frames that do not look like filler, and the small squares that sit between hero images in a grid.
Human energy without a face in the frame
Brunch is the most social service you run, and images that feel social outperform images that feel staged, so plan at least one of these ideas into every brunch photoshoot. You do not need a model to get there — and you probably do not want one, because a recognizable face needs a release form and dates the shot the moment that haircut goes out of style.
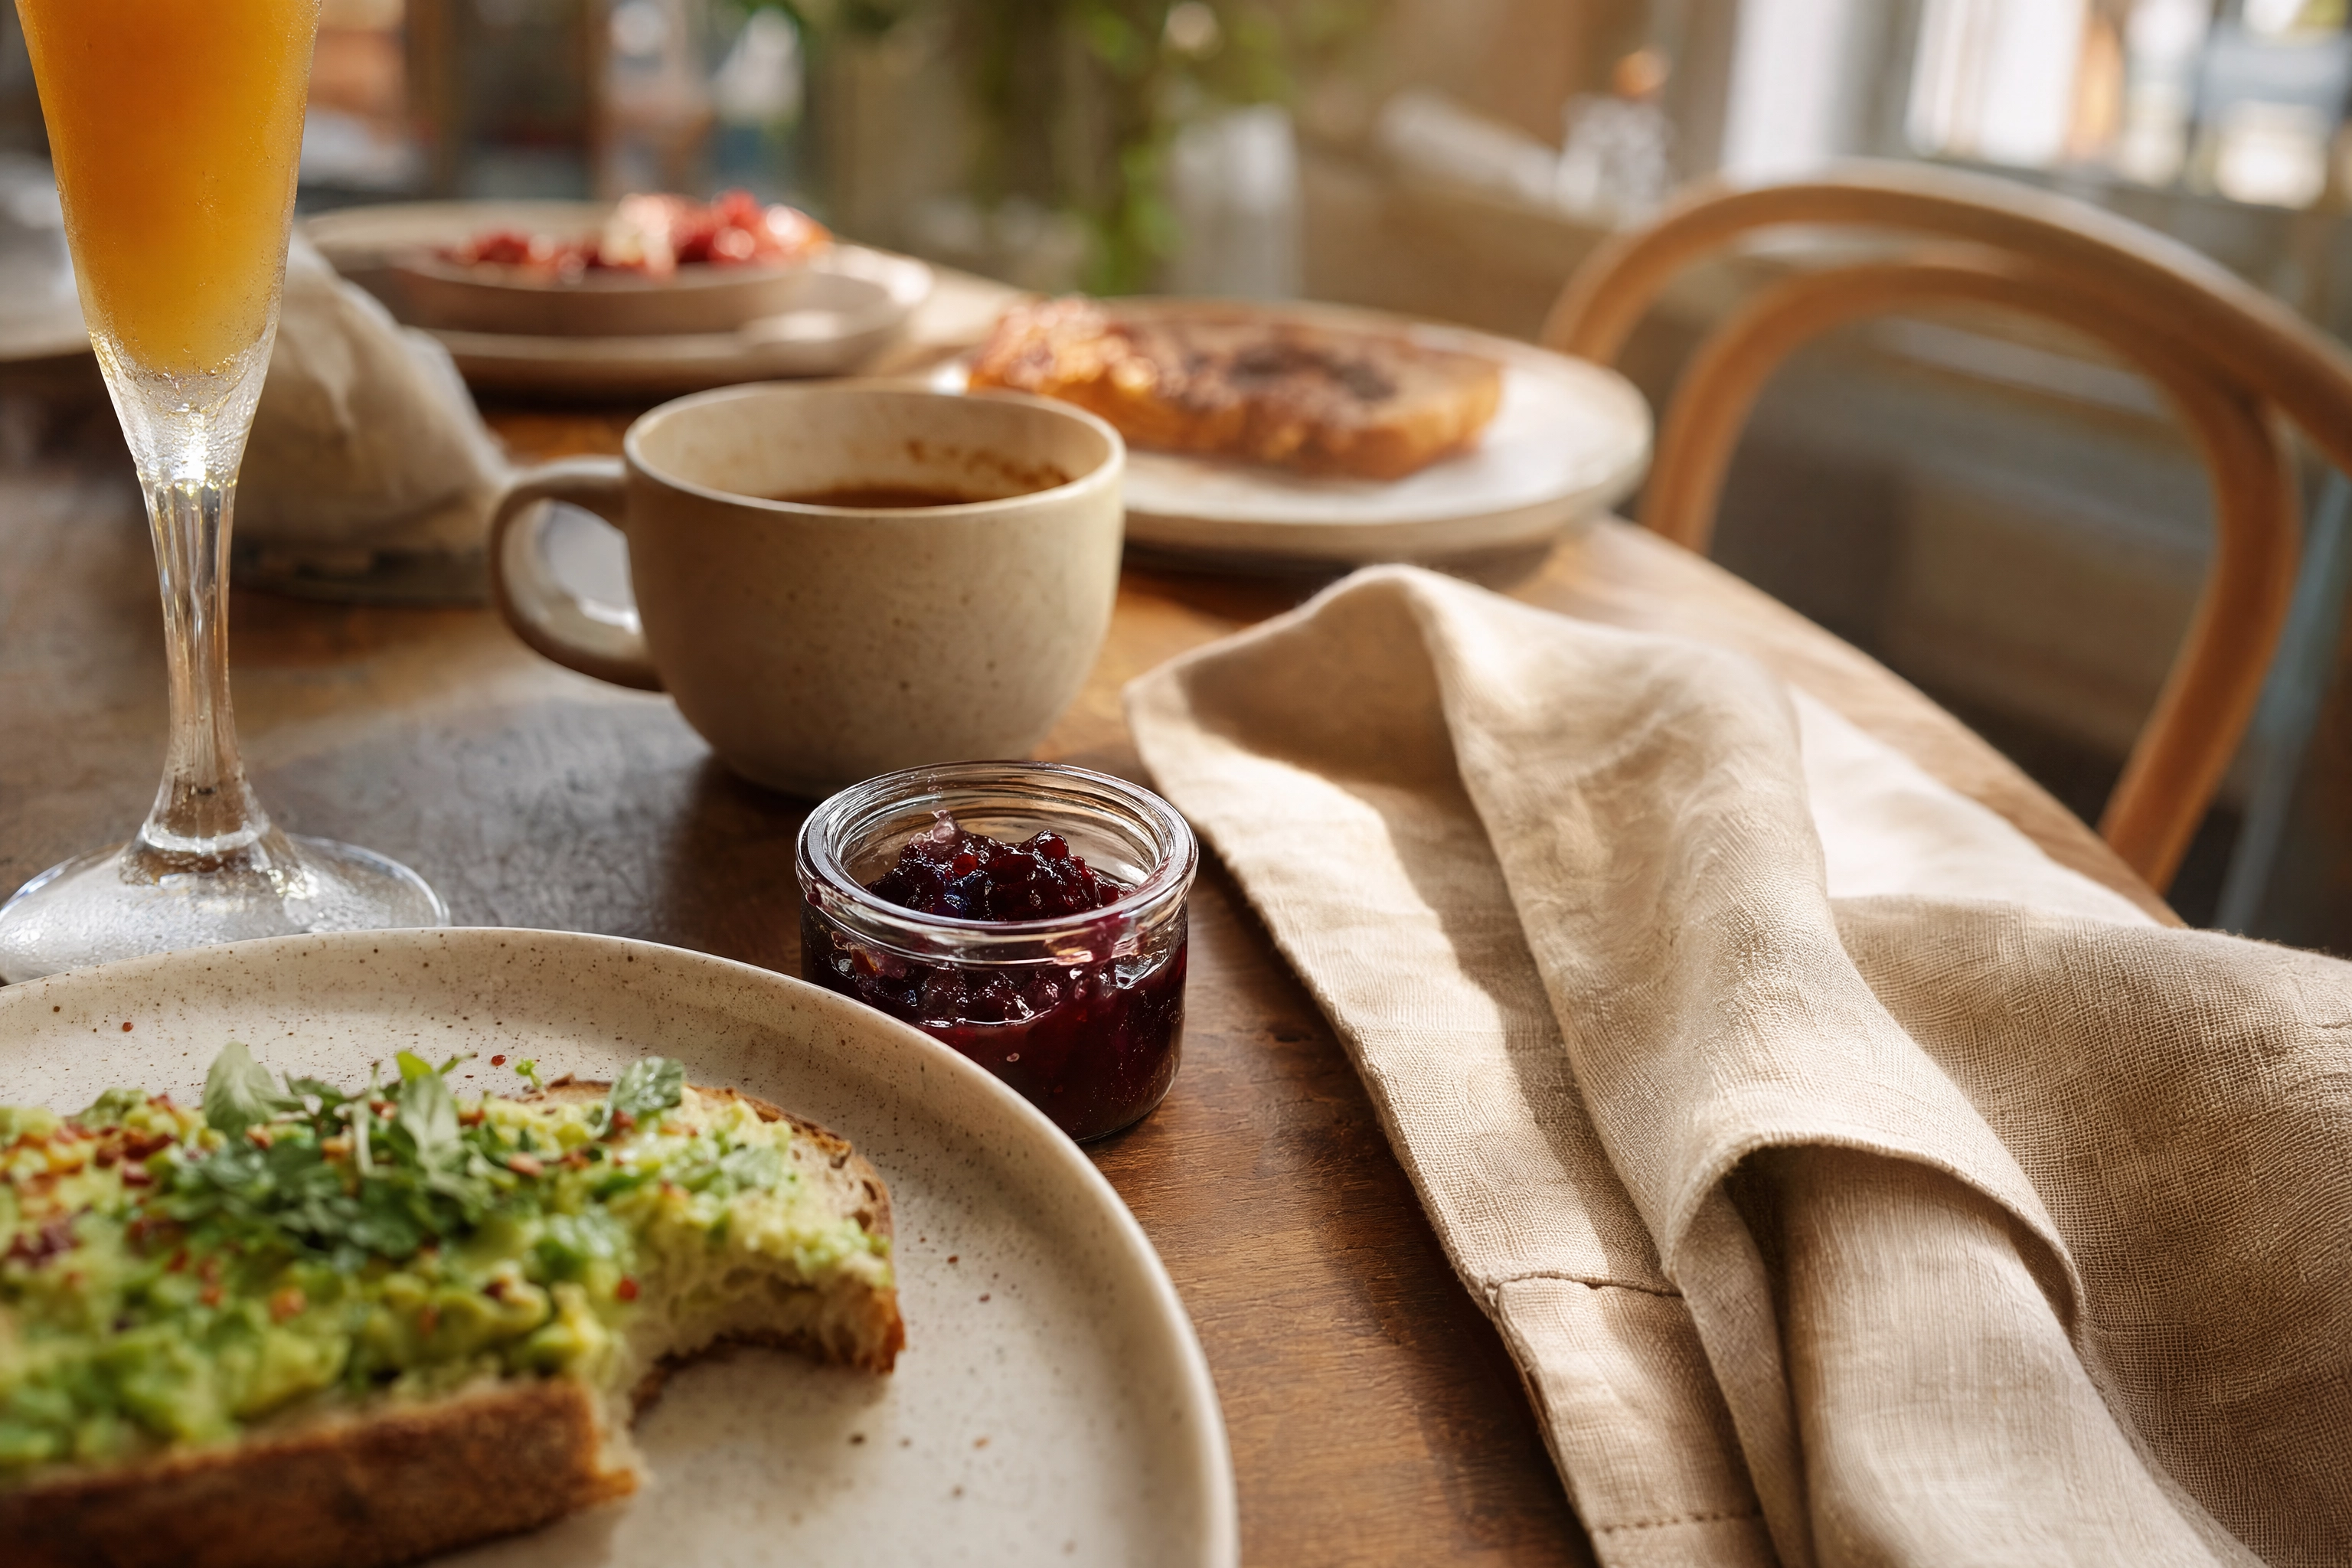 Table-level corner crop of a brunch spread with a half-eaten plate and pushed-out chair implying a shared table
Three ways to imply people instead:
- Hands, mid-action. A hand setting down a plate, tilting a carafe, reaching for the last piece of toast. Shoot at 1/250 or faster or the motion smears.
- The between-courses table. Napkins folded back, a cup half drunk, two chairs pushed out at slight angles. Nobody in frame, everybody implied — and it beats a stock photo of happy strangers every time.
- Two settings, not four. An intimate table reads warmer and happier than a banquet. If you want scale, shoot down the length of a long communal table instead.
Two practical notes on hands. Delivery platforms are strict here: on Uber Eats menu tiles, hands are the only exception to the no-people rule, so a reach-in shot is safe there while a laughing group is not. And if you are generating or enhancing images with AI rather than shooting them, our own image guidance keeps hands out of product imagery entirely — AI-rendered fingers are the fastest way to make a beautiful image look fake. Shoot hands live; keep them out of generated frames.
The eggs problem: shoot the cut first
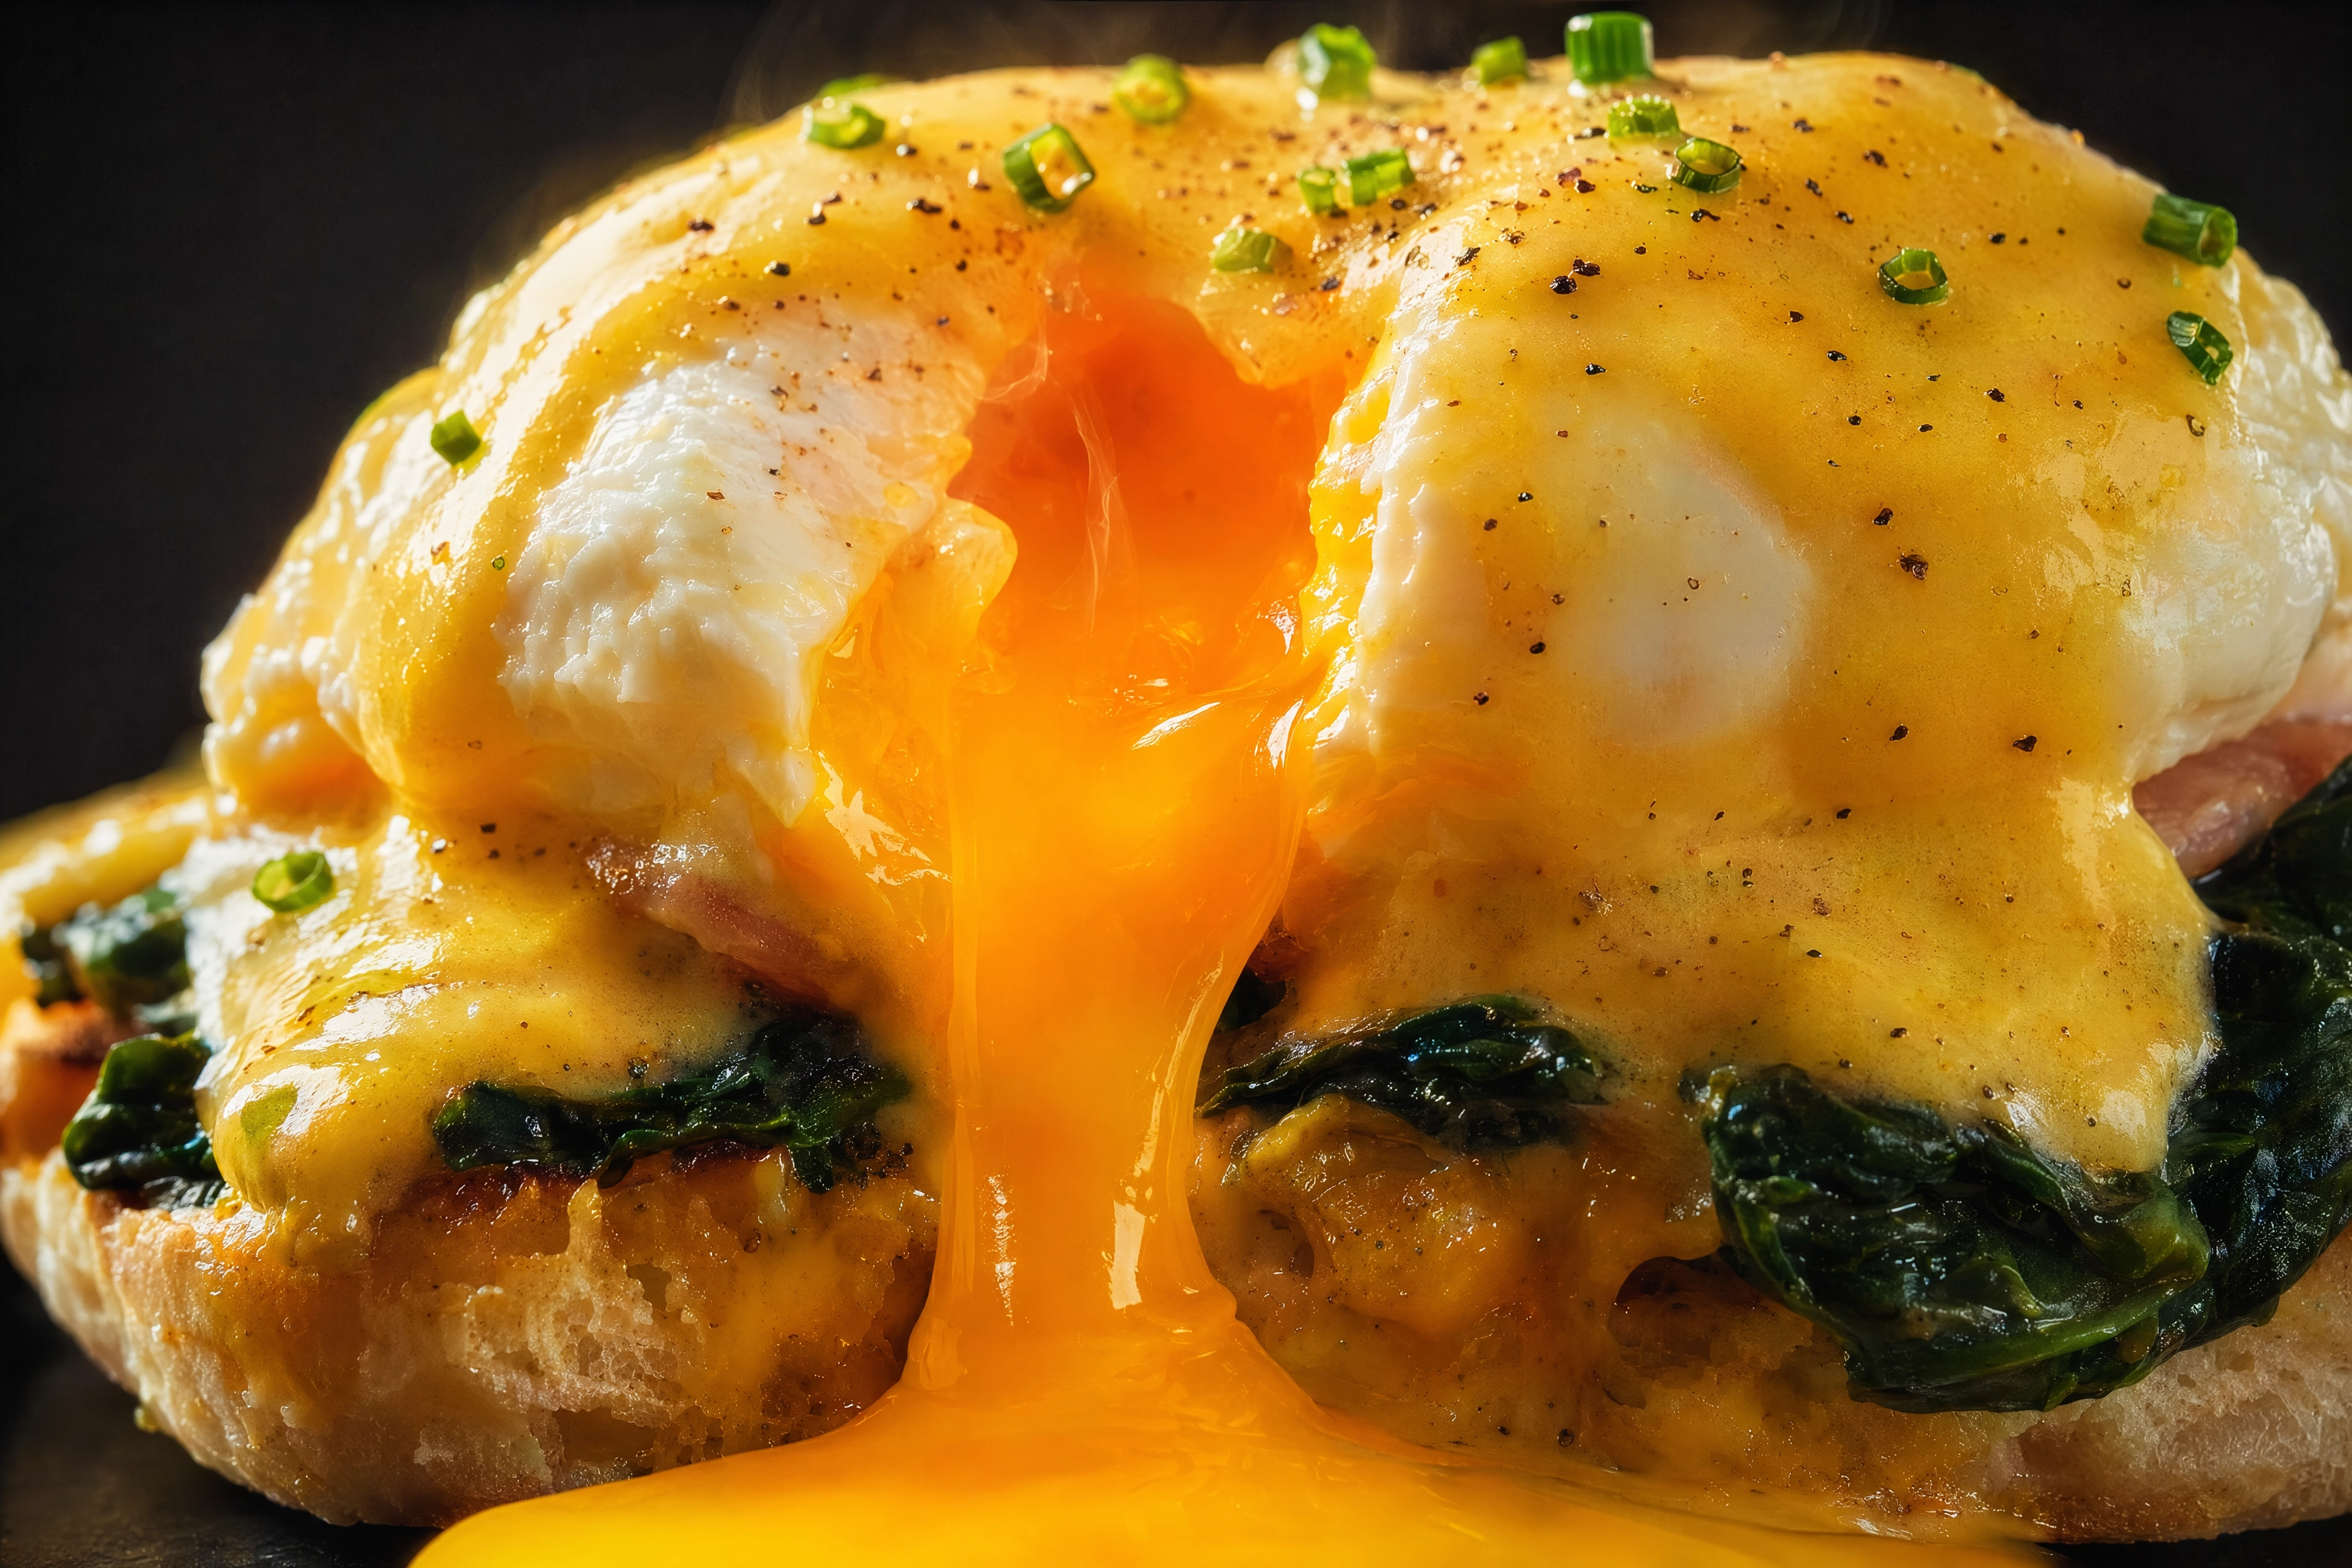 Macro of a just-cut eggs benedict with yolk flowing over hollandaise, the shot to capture in the first minute
Eggs are the only part of a brunch photoshoot on a clock. Everything else is patient: pastries and muffins hold for hours, fruit holds, toast holds long enough. Eggs do not.
A runny yolk is at its best for roughly a minute after it hits the plate. Then the surface skins over, the gloss goes matte, and the color drifts from orange toward dull yellow. Hollandaise sets a film across the same window, so a benedict on toasted English muffins is on an even shorter clock. Poached eggs weep water onto the plate. Scrambled eggs stiffen at the edges within two or three minutes under any light warm enough to shoot by.
So invert the usual order and build the table in reverse:
- Props and empty glassware first. Cloth, cutlery, vase, condiments, angles.
- Drinks second. Coffee poured and shot immediately, juice and mimosas placed.
- Cold and dry plates third. Pastries, muffins, waffles, fruit, salads, toast — anything that is not temperature-critical.
- Eggs last, and shoot the cut inside the first minute. Compose the frame while the plate is still in the kitchen, pre-focus on the yolk, then cut and fire a burst.
You get one attempt. You cannot un-cut an egg, and a second one costs another four minutes of kitchen time on a day when the kitchen has other jobs.
If eggs are your centerpiece, plate two: cut one at 45 degrees for the menu and one close and low for social. Shakshuka and spinach benedict give you the same problem with more color, so treat them the same way. Then let the eggs go cold and spend the rest of your time on the parts of the table that will wait for you.
Shoot on the brunch cycle, not the shoot cycle
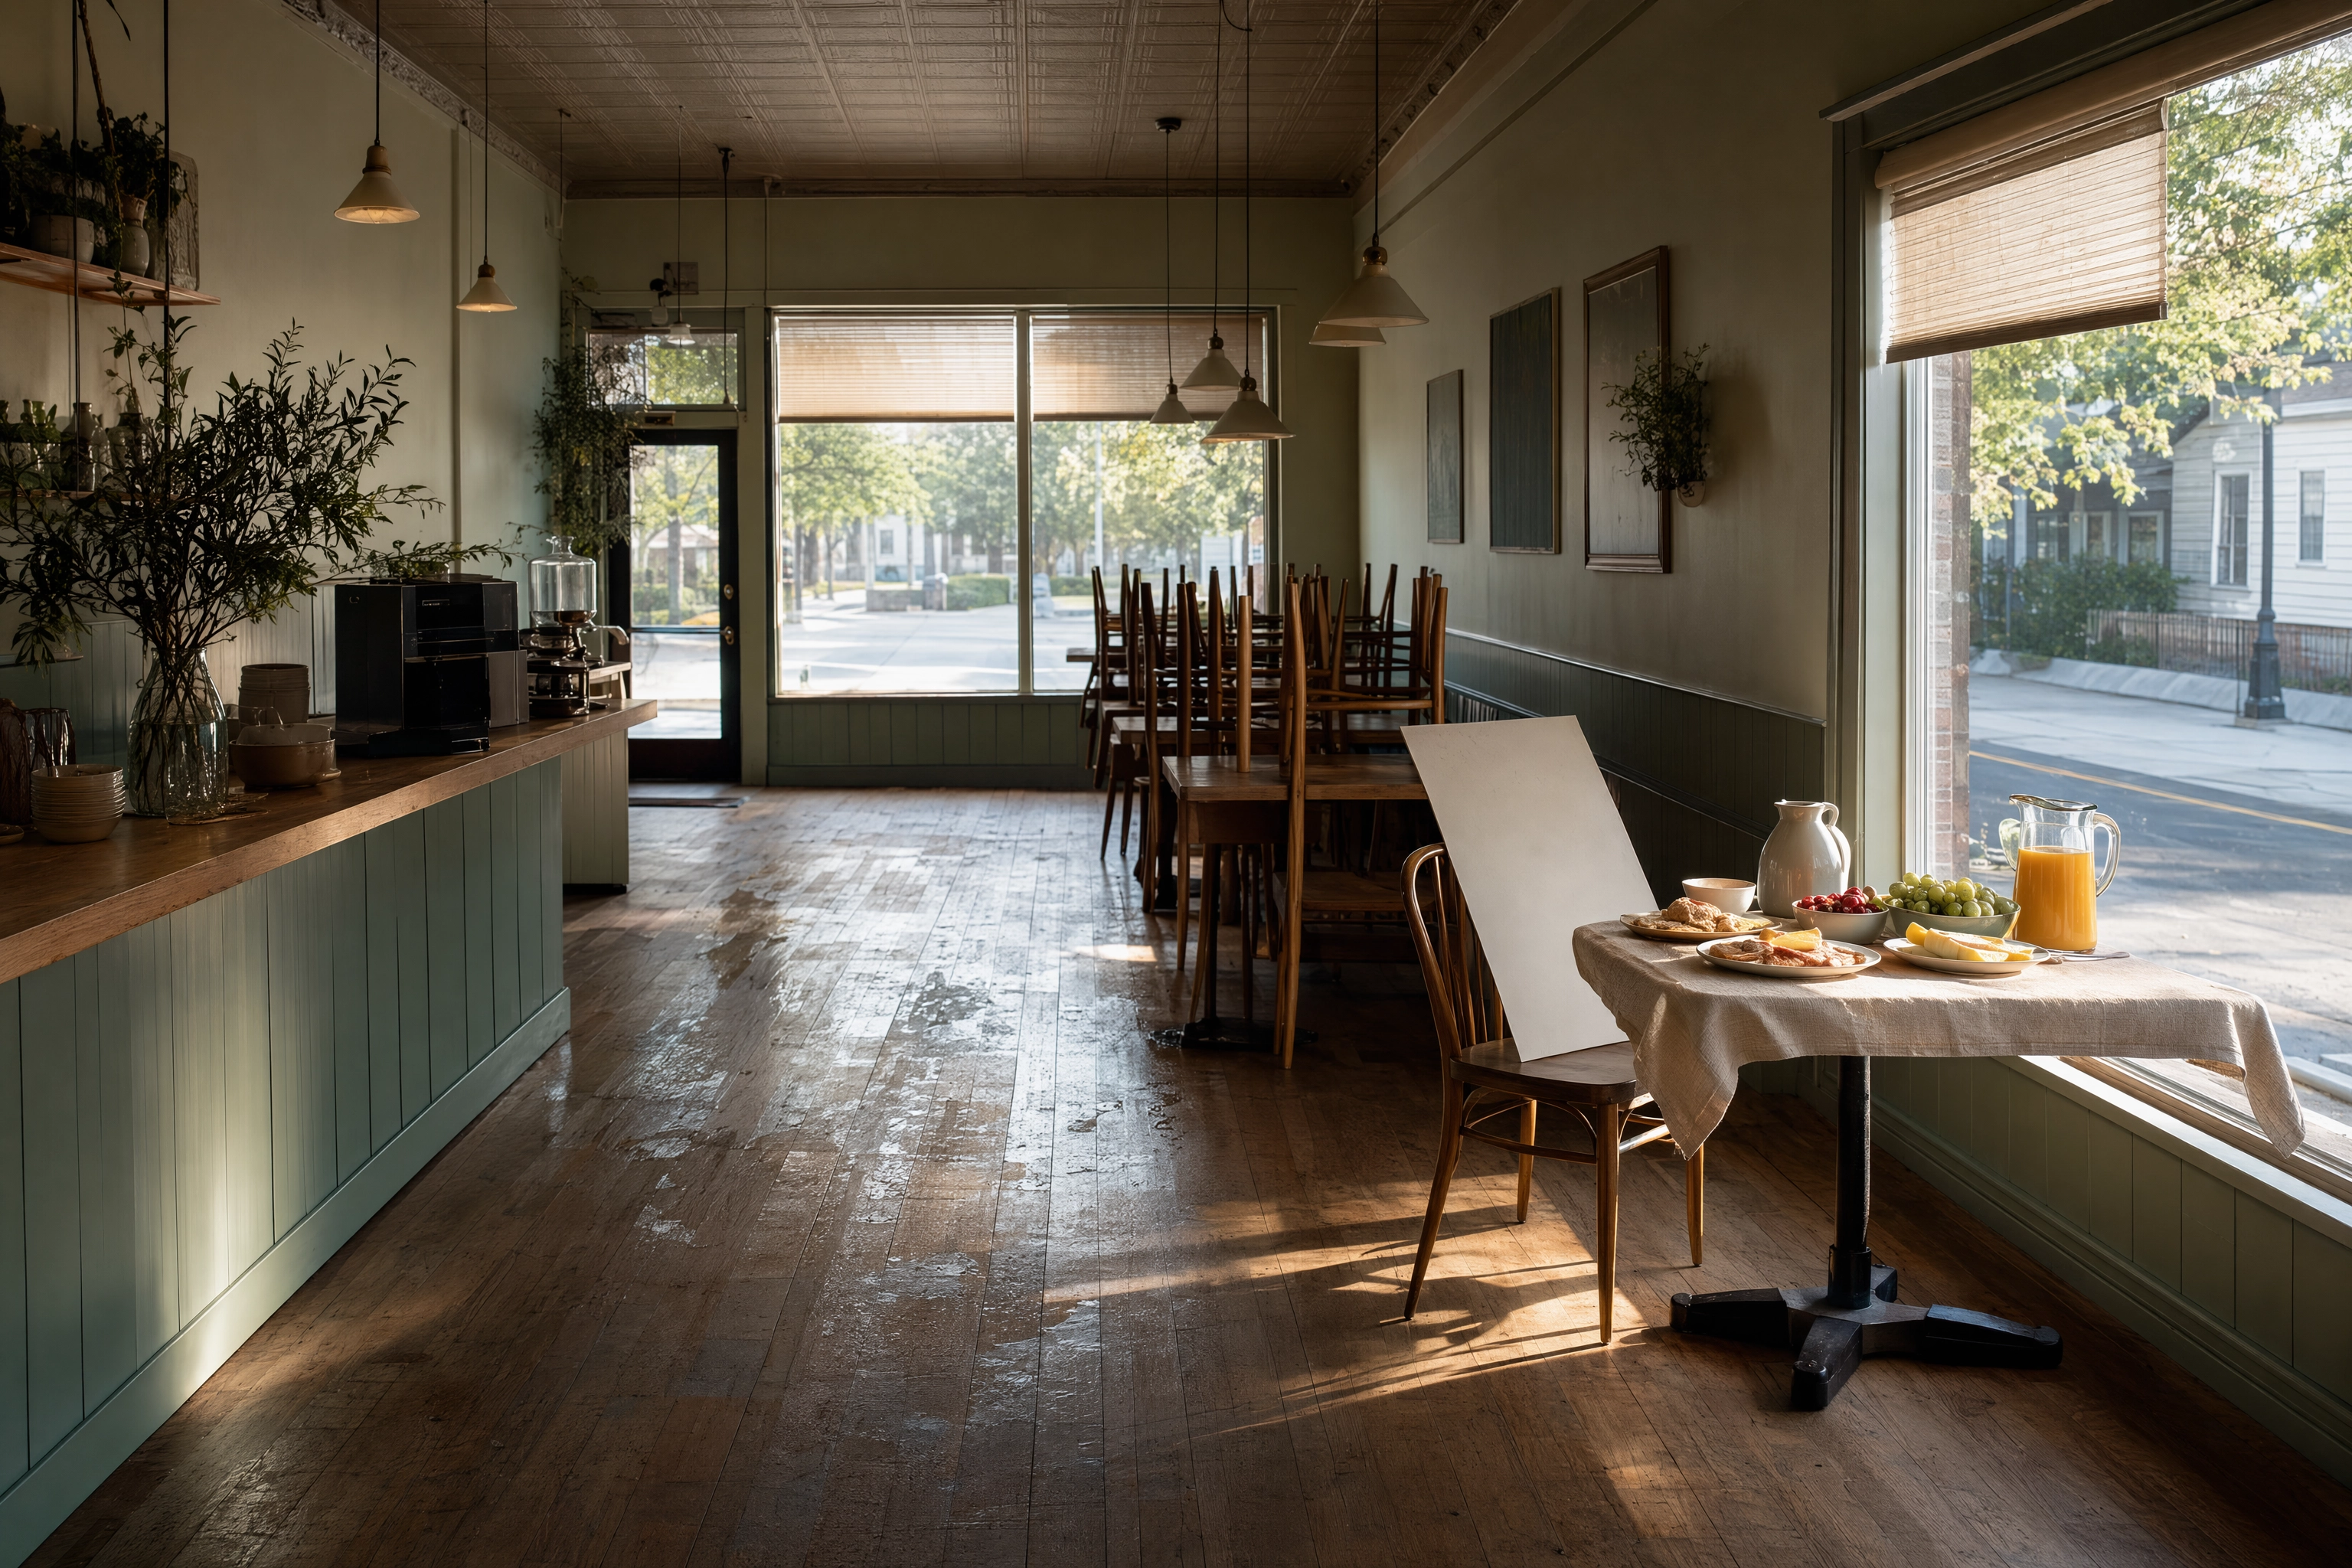 Empty cafe on a weekday morning with one window table styled for a brunch photoshoot in low sun
Most cafes try to run a brunch photoshoot during brunch. It never works. The room is full, the light is blocked by people, the kitchen has no spare hands, and you are holding a table on your highest-revenue morning.
Shoot Tuesday at 10 a.m. instead. Same sun, same seat, same menu, no covers. The kitchen can plate properly, you can move furniture, and nobody is waiting on the table you are standing over.
A realistic session for a cafe looks like this:
- 90 minutes, one server or manager helping, four to six dishes plated in waves.
- Order of work: room shot, drinks, dry plates, table hero, overhead grid, eggs.
- Output: eight to twelve keepers, which is a month of social plus a menu refresh.
Then tie reshoots to the menu rather than the calendar. Four sessions a year covers most cafes: a spring menu change, a summer patio look, an autumn warm-up, and the December holiday brunch. Between those, the prop swaps in idea 10 keep the feed from repeating itself.
One timing note for the marketing side. Weekend covers are largely decided Thursday and Friday, so images posted midweek do the booking work. A great shot posted Sunday afternoon is a nice memory of a service that already sold out. Our cafe menu photography page covers what to do with the files once you have them, and the 27 food photoshoot ideas hub covers setups for every other service you run, from lunch to dinner, and works together with the ideas here.
The brunch shot list
Print this brunch photoshoot shot list and hand it to whoever is holding the camera.
| Shot | Angle | Where it runs |
|---|---|---|
| Room, set and empty | Wide, diagonal, standing | Local listings, hire pages |
| Table hero | ~30°, standing height | Homepage, hero images |
| Overhead grid | True 90° | Social, saved posts, print menus |
| Corner crop | Table level, tight | Stories, carousels |
| Drinks, backlit | Eye level into the window | Drink menu, weekend posts |
| Egg cut | 45° plus one low close-up | Menu, appetite-driving posts |
| Hands mid-action | 45°, fast shutter | Social only |
| Single dish, centered | 45° or 90°, clean background | Delivery apps, ordering pages |
The last row is the one people forget. Everything above it sells the occasion. Only that final frame is legal on a delivery tile. Shoot both on the same morning and you have covered the whole funnel — Pinterest-style inspiration at the top, a clean single-item shot at the bottom.
Twelve ideas, one morning, and a room that photographs like somewhere friends want to spend two hours together. That is the whole brunch photoshoot — and it is why cafes and restaurants that shoot the table outsell the ones that only shoot the plate.
Frequently Asked Questions
What is the difference between a brunch photoshoot and breakfast photography?
Breakfast photography is dish-led: one plate, one hero element, usually a yolk or a stack. A brunch photoshoot is occasion-led: the table, several plates, the drinks, and enough of the room to show where you are. Same food, different message — one sells a dish, the other sells a Saturday with friends.
How long does a brunch photoshoot take for a cafe?
About 90 minutes for four to six dishes, if you shoot on a quiet weekday morning and plate in waves. Expect eight to twelve usable frames. Attempting the same thing during a live weekend service usually takes twice as long and produces worse light.
Can I do a brunch photoshoot with just a phone?
Yes, and for table shots a phone is arguably better — small enough to get low at table level, light enough to hold true 90 degrees overhead without a rig. Shoot in the brightest window seat, turn off the ceiling lights, tap to set exposure on the brightest part of the food, and save portrait mode for the three-quarter hero.
What should be on the table for a brunch photoshoot?
Three or four dishes at different heights and colors, at least two drinks (one hot, one cold and colorful), a basket of pastries or muffins, a few condiment props, linen, and two place settings. Leave some negative space. A generous table reads as abundance; a completely covered one reads as chaos.
Can I use a brunch table photo on delivery apps?
No — multi-item images fail platform review. Uber Eats requires a single centered item with no text, no strong shadows and no people apart from hands, and other delivery apps apply similar rules. Shoot table spreads for social and your website, then shoot one clean single-dish frame per menu item for the apps.
How often should a cafe reshoot its brunch photos?
Four times a year suits most cafes, tied to menu changes rather than the calendar. Between sessions, swapping condiments, linens and seasonal garnishes lets the same dishes photograph as fresh ideas without booking another shoot.