Food Truck Photography: Get Menu-Ready Photos on the Go
You're running a 200-square-foot kitchen on wheels, the lunch rush hits in 12 minutes, and DoorDash just rejected three of your menu photos. Welcome to food truck photography — a problem traditional food photography guides don't solve, because they assume you have a studio.
This guide is built for the way food trucks actually work: small spaces, outdoor light, and a line of customers who don't care about your aperture settings. By the end of it, you'll know the five shots every truck needs, the $150 kit that fits in your glove compartment, and a 90-second workflow that turns a phone snap into a menu-ready image before the next customer pays.
Quick Summary: Food truck photography succeeds when you stop trying to copy restaurant studio setups and start working with what you have — phone, natural light, and a serving window. Build a 5-shot food truck photo library (signature dish, menu board, customer action, truck exterior, ingredient close-up), keep a compact kit on board, and use AI editing to skip post-production. Most trucks can shoot, edit, and publish a new menu image in under two minutes.
Why Food Truck Photography Is a Different Beast
Restaurants get a kitchen, a window with controlled north light, and time. Food trucks get 14 to 26 feet of metal, midday sun, and a line of people who came for the lunch break, not the photo shoot. That's the food truck photography problem in one sentence.
The good news: customers care about your photos more than ever. GrubHub's own data shows menu items with photos get up to 70% more orders. Industry studies put the sales lift from professional menu photography at 20-35% in order volume and around 6.5% per item that has an image attached. For Gen Z customers, 46% say food photos directly influence what they order.
Now translate that into food truck math. The average US food truck pulls in $346,000 a year, according to FoodTruckProfit's 2026 industry survey. A 10% lift from better photos is $34,600 — money that lands in your pocket because you spent ten minutes shooting a beauty plate during prep. Photos aren't a marketing nice-to-have on a food truck. They're a revenue lever.
The catch: traditional food photography advice doesn't fit a truck. You can't move your kitchen to north-window light. You can't wait for the photographer's schedule. You can't carry a softbox to a Tuesday lunch service. So we'll work with the constraints, not against them.
The 4 Unique Challenges Food Trucks Face (And How to Solve Each)
Every food truck photography problem comes back to one of four constraints: space, light, speed, or gear. Solve all four and the rest is easy.
Challenge 1: You Have No Space for a Photo Setup
The average food truck galley is 14 to 26 feet long, with active prep space measured in square inches once your fryer, flat top, and prep table are in. There's no room for a flat-lay table, a backdrop stand, or a softbox.
You don't need any of those things. You need three workarounds:
- Use the serving window ledge as your shooting surface. It's already at a comfortable height, it gets the best light in the truck, and it costs nothing.
- Carry a 24×24 inch foldable backdrop board with a dark wood finish on one side and matte black on the other. It folds flat against the cab wall and gives you a clean surface anywhere.
- Step outside. A small folding side table set up by the truck during slow periods turns the parking lot into a studio.
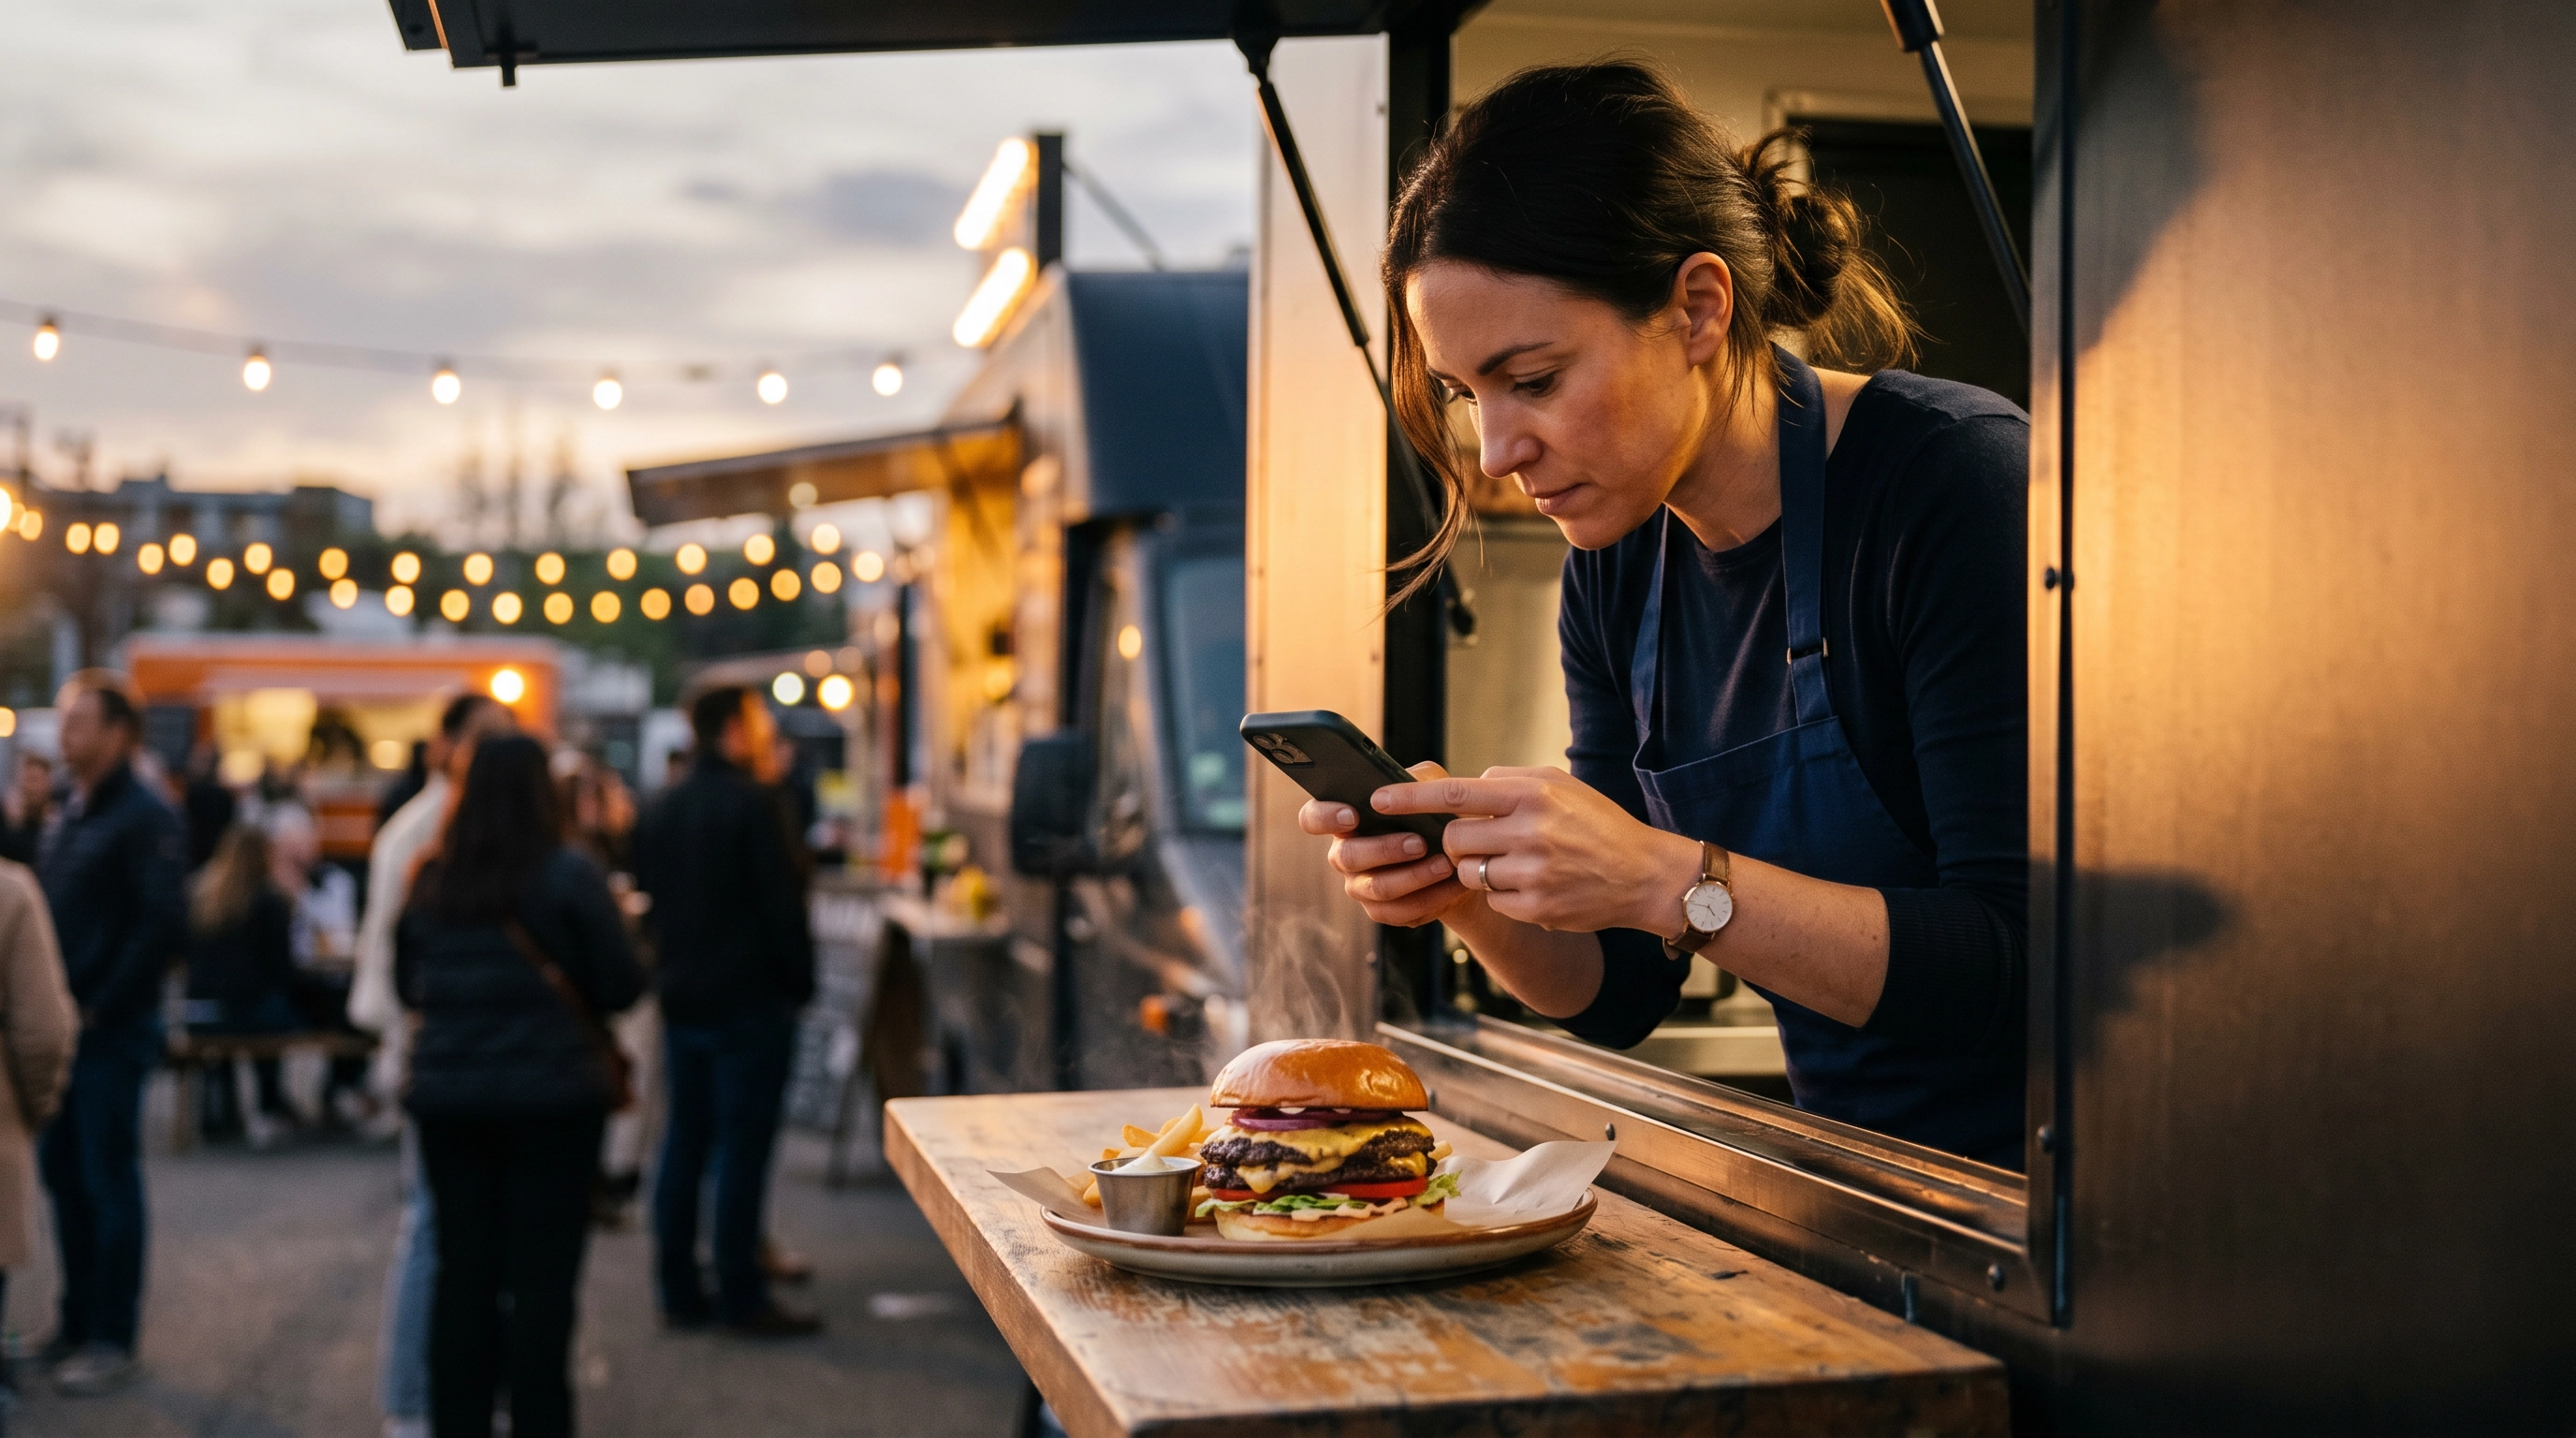
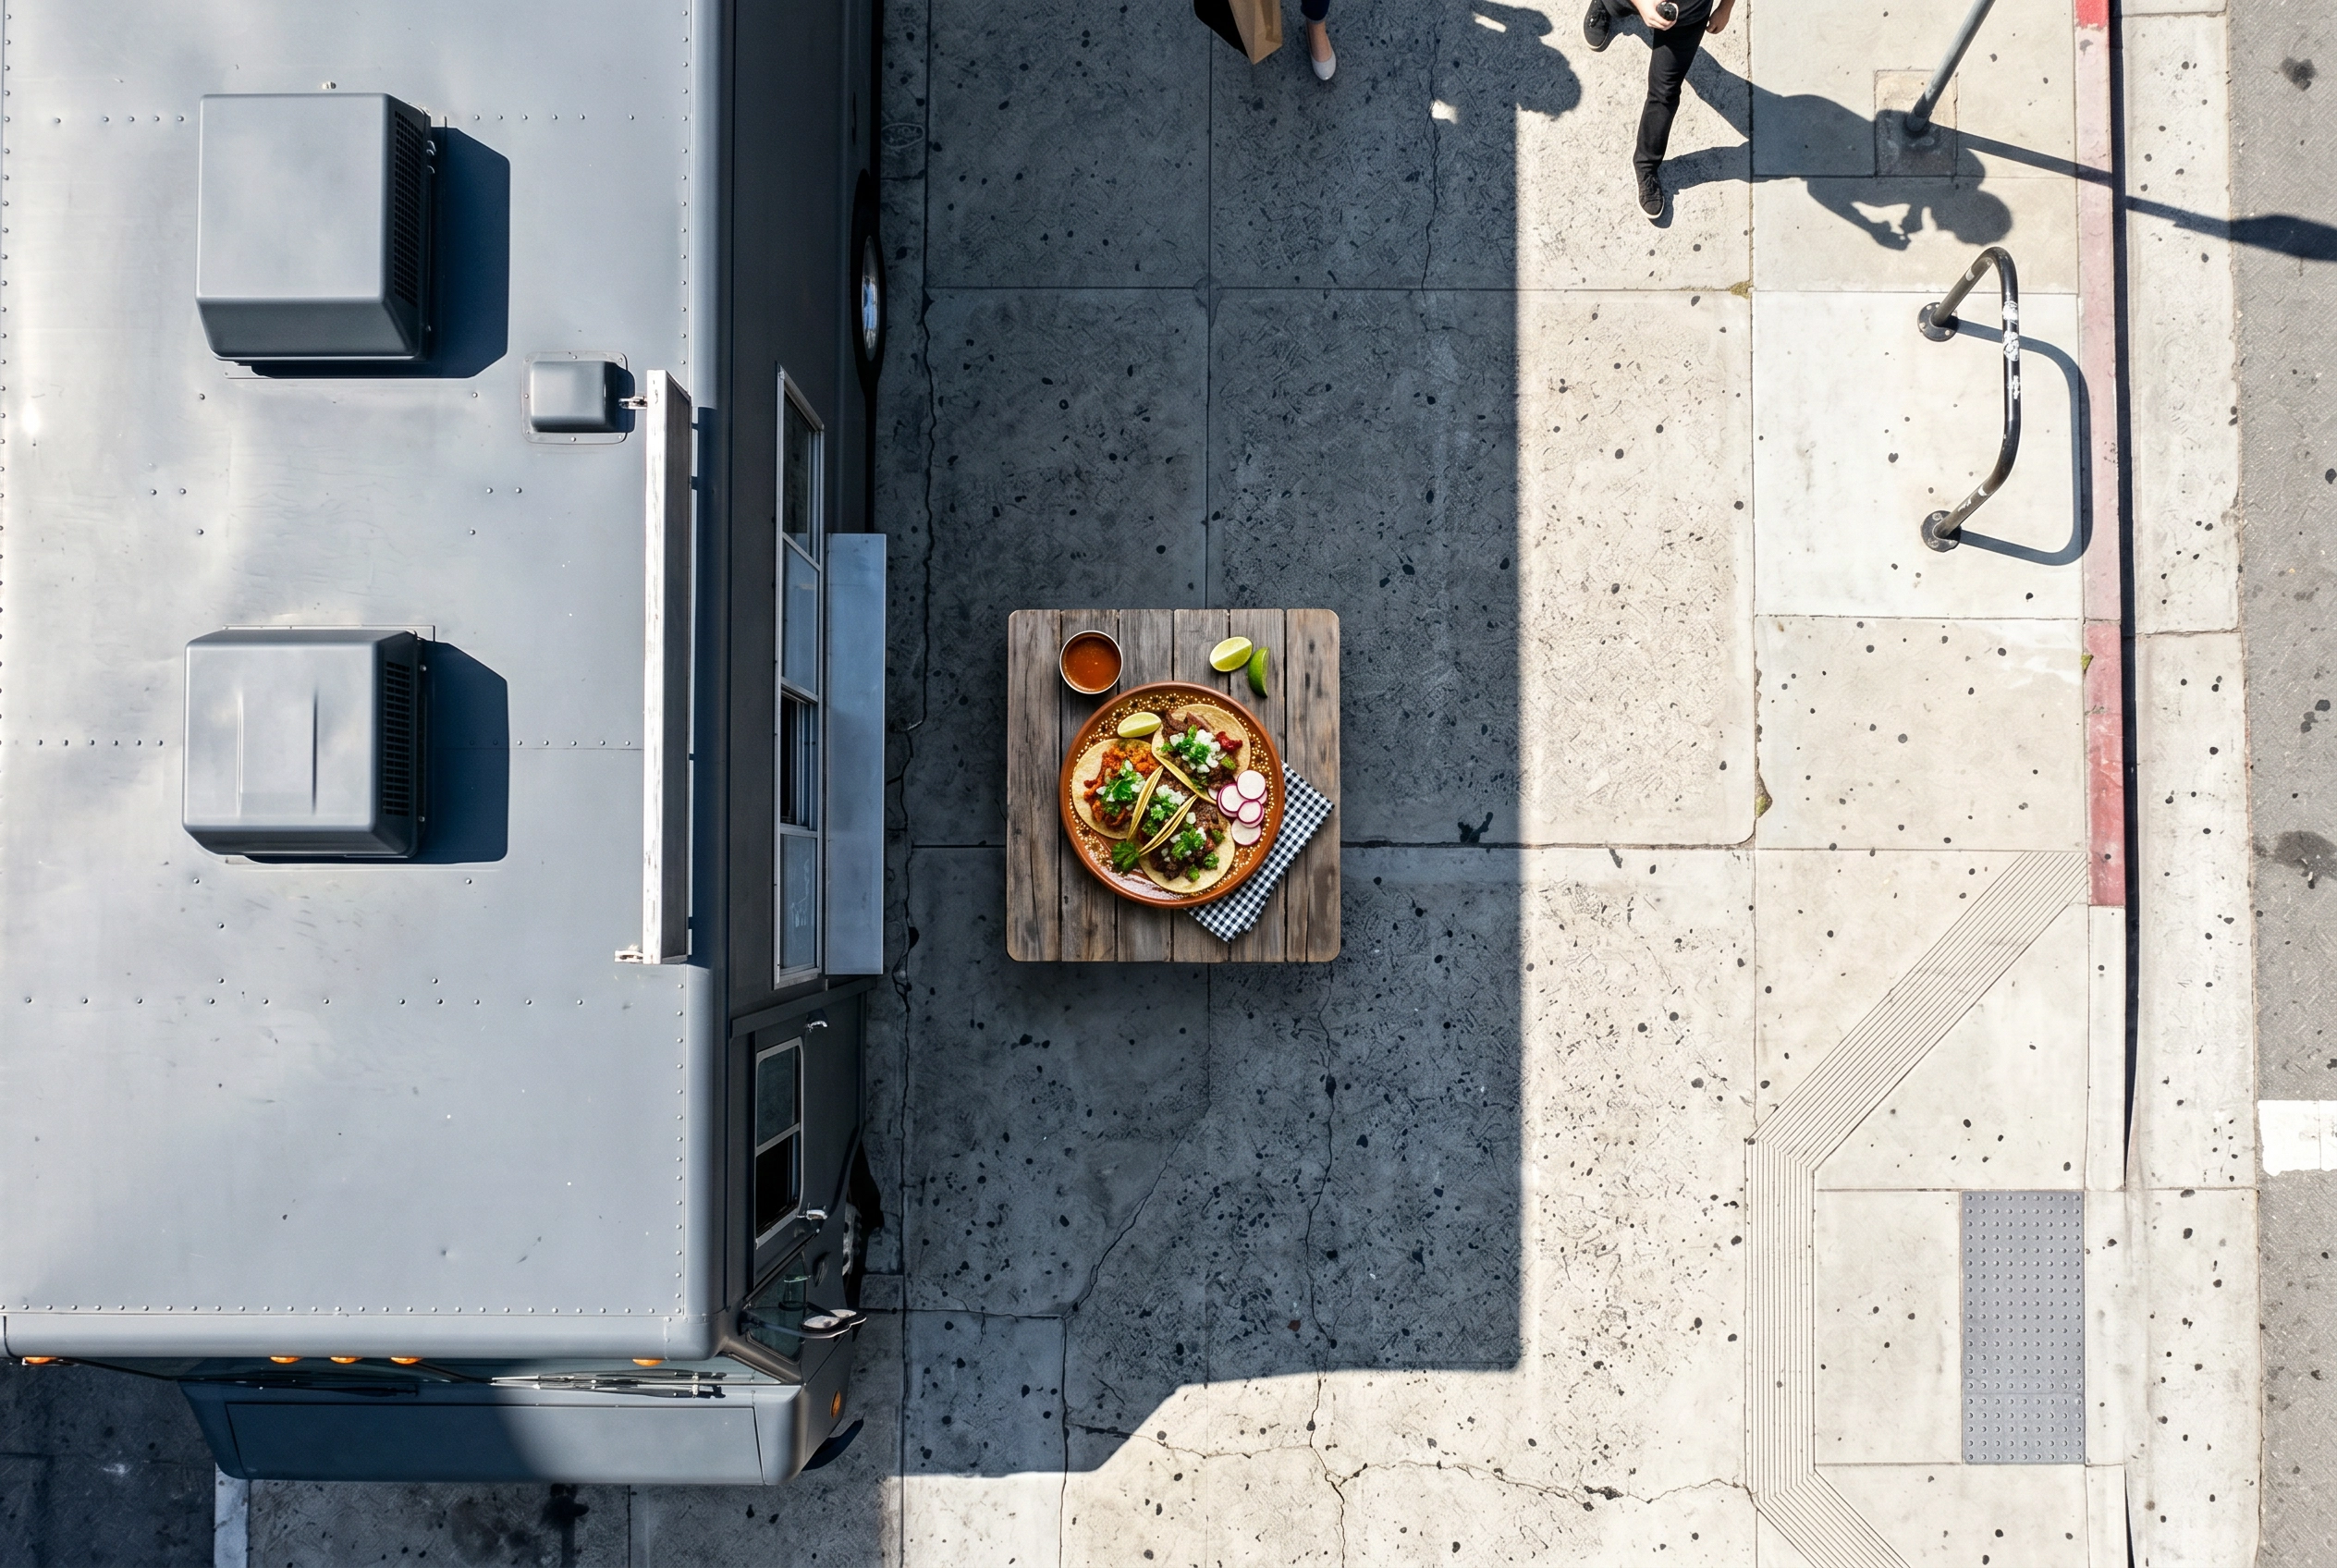
Bonus: the truck's exterior wall — especially if it's matte black or a deep neutral — is a free, brand-consistent backdrop. Hold the plate up against it and shoot at 45 degrees.
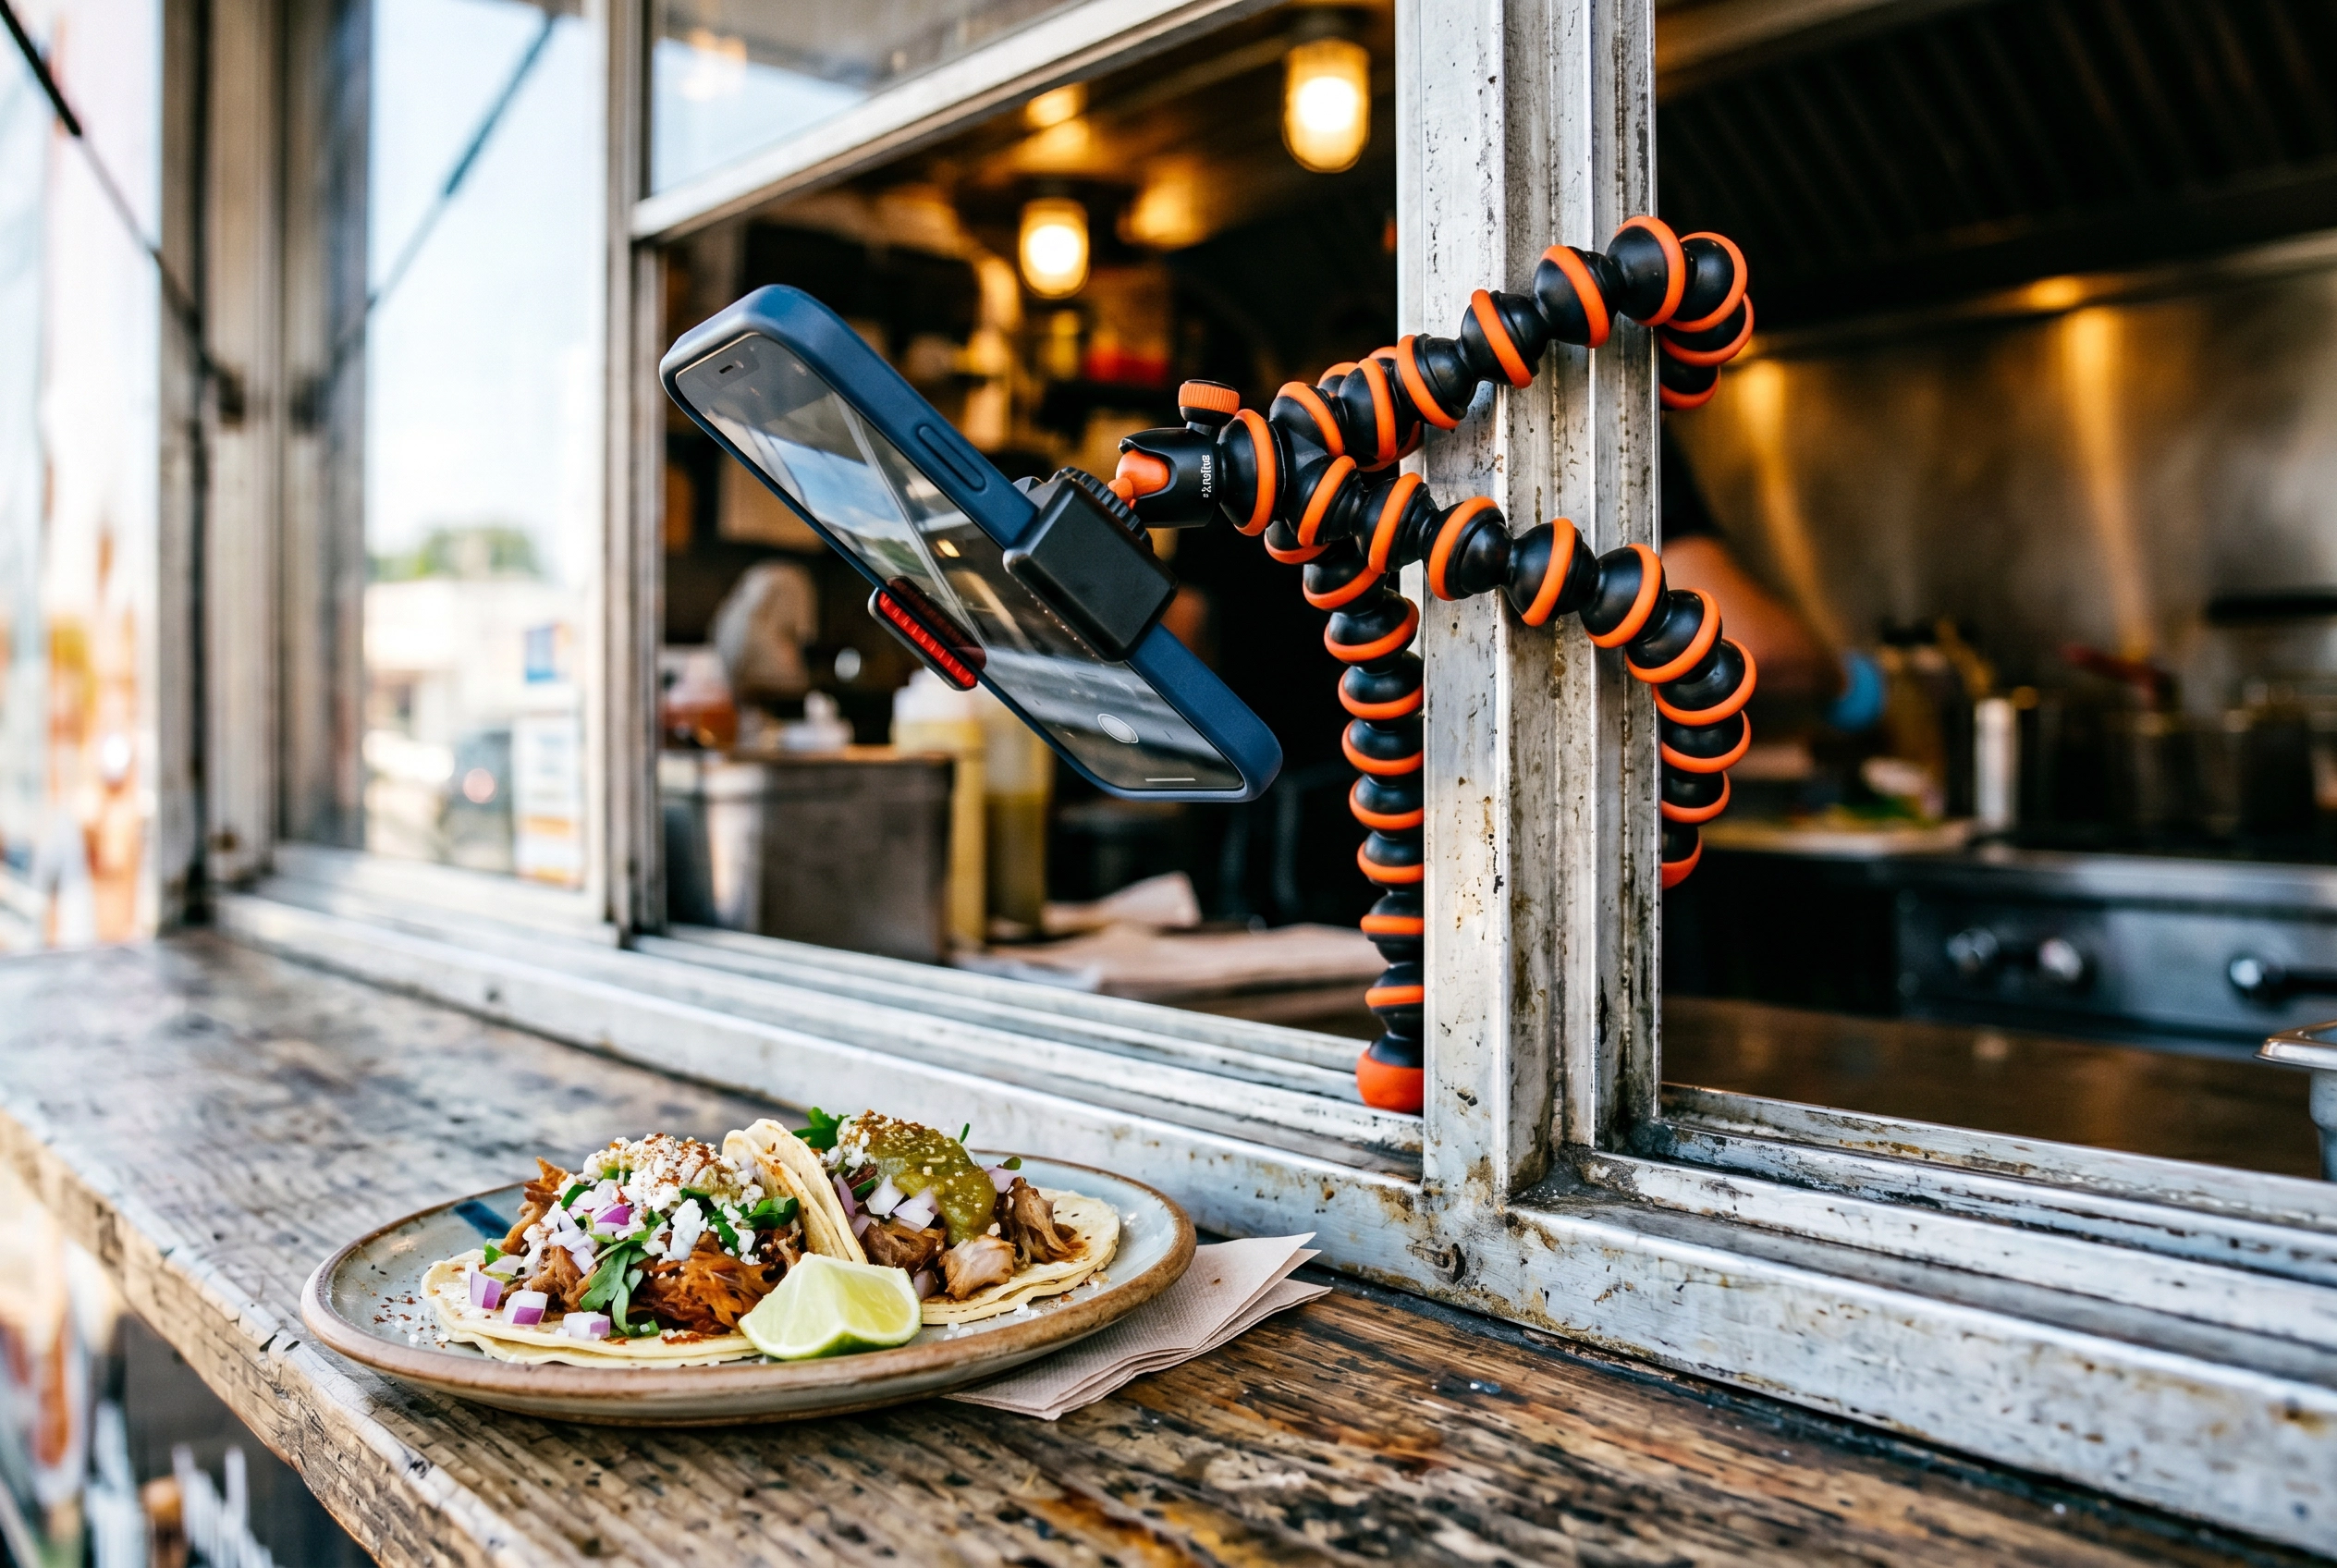 Flexible phone tripod wrapped around food truck serving window frame with smartphone photographing styled taco plate on the window ledge
Challenge 2: Outdoor Lighting Is Beautiful — and Brutal
Natural light is free, soft, and flattering. It's also unpredictable. The same parking spot that gives you cinematic light at 6:30 PM gives you blown highlights at 1:00 PM. Here's how to read your light for food truck photography.
The good windows: Golden hour — about an hour after sunrise and an hour before sunset — gives warm, soft, directional light that makes any dish look better. Cloudy days are the underrated favorite of professionals; clouds work like a city-sized softbox. Cool, even, no harsh shadows.
The bad window: Roughly 10 AM to 2 PM in direct sun. The light is straight overhead, hard, and contrasty. Shadows go pitch black. Whites blow out. Even the best phone HDR can't fully save it.
The "truck cave" trap: Standing in the deep shadow next to your truck feels like the right move, but it's often too dark. The food turns dim and underexposed. Instead, position the dish in open shade — about three to four feet from the truck's edge, where you're protected from direct sun but still catching plenty of indirect skylight. That's the sweet spot.
 Open shade lighting technique with food truck blocking direct sun and dish positioned in soft indirect light three feet from truck edge
DIY diffusers and reflectors: A white bedsheet or a piece of parchment paper held above the food softens harsh midday sun. A $15 collapsible 5-in-1 reflector (or even a rectangle of white foam board) bounces light back into shadows from the opposite side. These two cheap tools turn the worst light into the best light.
When in doubt, the truck itself becomes your diffuser — it's a giant rectangle of metal that blocks direct sun. Stand the dish on the shady side of the truck's body, then bounce or fill from the front.
Challenge 3: Customers Are Waiting
You don't have 30 minutes between orders. You have 60 to 90 seconds, and you're sweating from the flat top. According to Toast's 2026 food truck industry report, 63.6% of operators report evening (5-8 PM) as their peak hours — meaning your shooting window is in the morning prep cycle, not during service. Three workflow tricks make this manageable:
- Pre-shoot one "beauty plate" at the start of service. Before the rush hits, plate one of every featured item just for the camera. Five minutes of focused shooting beats 50 frantic seconds between orders.
- Shoot every new menu item the first time you cook it that day. Your prep cook is making the daily special at 10:45 AM and the line doesn't form until 11:30. That's your shoot window.
- Skip post-production with AI. This is the actual game-changer. The reason most food trucks have ugly menu photos isn't bad shooting — it's that nobody on the truck has time to edit. AI editing tools take a phone snap and produce a menu-ready image in about 90 seconds, with no Lightroom skills required.
A realistic weekly cadence: shoot Tuesday during prep, edit Wednesday morning, post Thursday. Or, with AI, shoot at 10:30, post by 10:35.
Challenge 4: You Can't Carry a Studio Kit
Storage on a food truck is sacred. Every cubic inch is supposed to hold ingredients, paper goods, or backups. So your photo gear has to live in the glove compartment or a single small bin.
The good news is that "compact" doesn't mean "compromised" anymore. Phone cameras have caught up with mid-range DSLRs for menu work. The full kit you actually need totals $110 to $200 and fits in a small zippered pouch. Here's exactly what's in it.
The Compact Food Truck Photography Kit
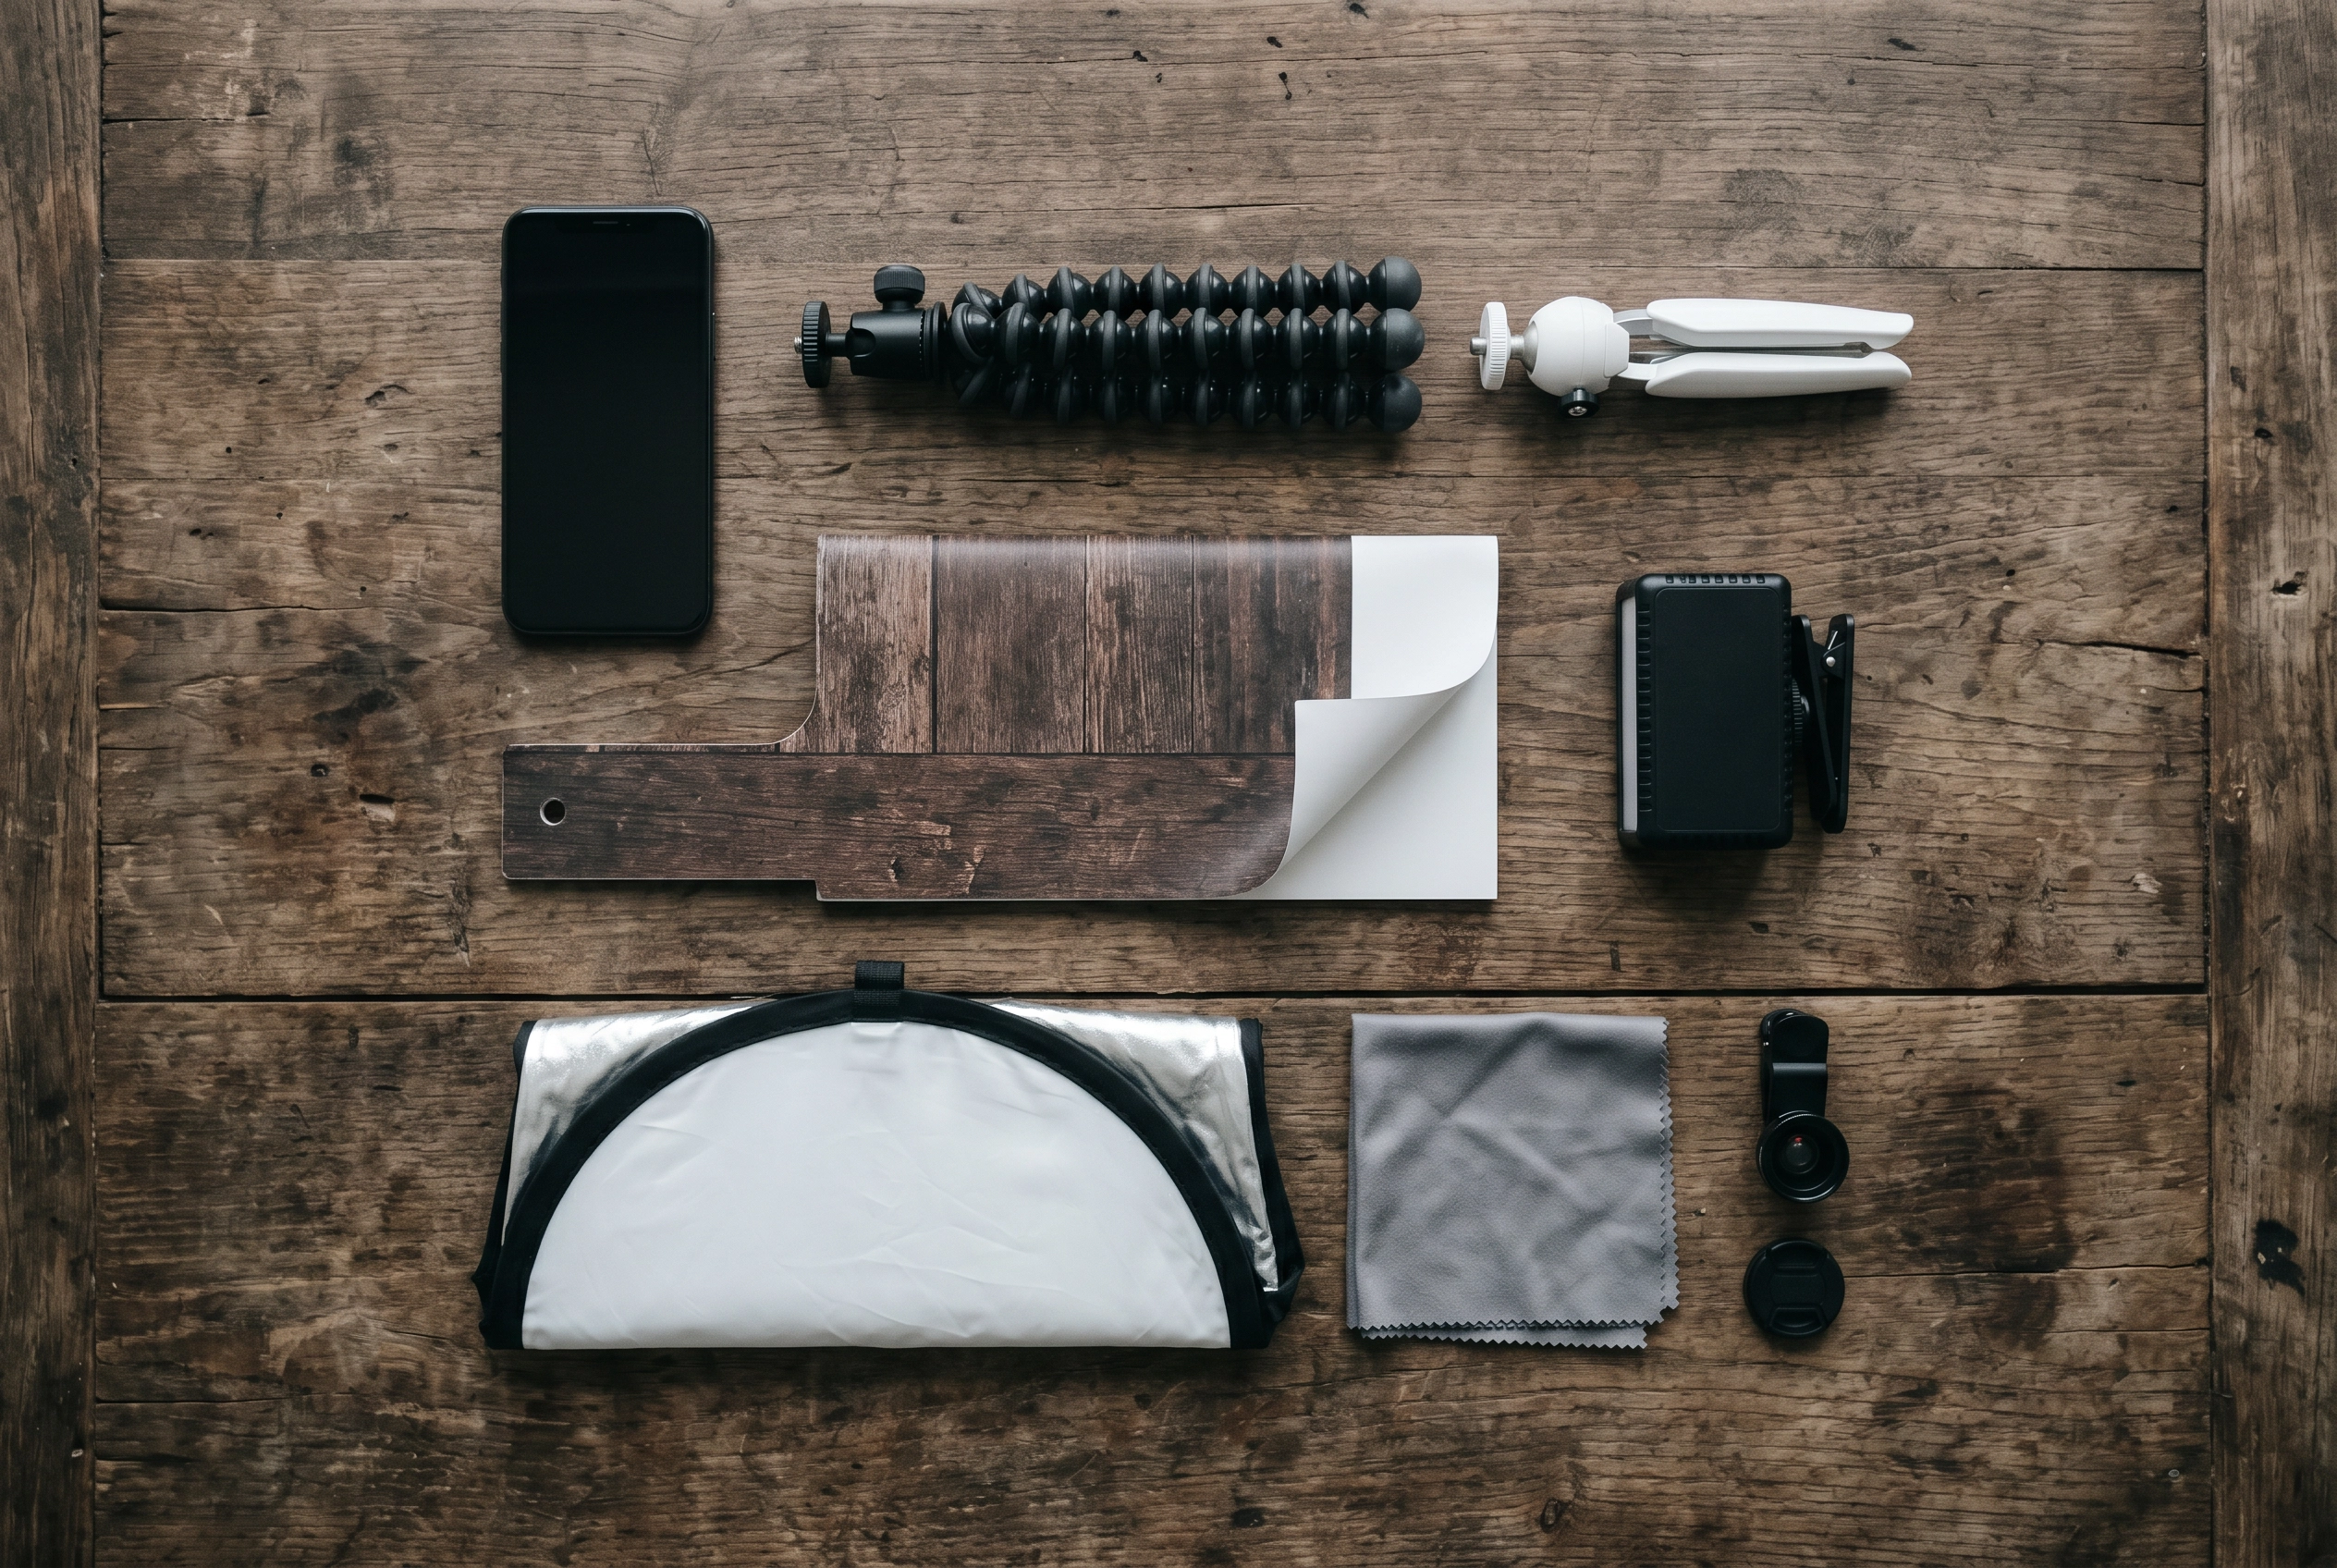 Compact food truck photography kit flat lay with phone, flexible tripod, reflector, clip-on light, foldable backdrop and accessories on wood table
You don't need everything below from day one, but each item earns its place when you add it.
- Your phone. An iPhone 12 or newer, a Samsung Galaxy S20 or newer, or a Google Pixel 6 or newer is more than enough resolution for menu boards, delivery apps, and social media. The camera you already own is the right camera.
- Flexible phone tripod ($25-50). A GorillaPod-style tripod with bendable legs wraps around hooks, side-view mirrors, awning poles, and railings. You can mount your phone overhead above the serving window ledge in seconds.
- Tabletop tripod ($25). A Manfrotto PIXI-style mini tripod is the size of a sausage roll and gives you a stable base on the window ledge or any flat surface.
- Clip-on LED light ($20-60). A small rechargeable LED panel — a Lume Cube Panel Mini or a similar pocket light — fills shadows when overcast turns to dusk. Battery powered, no outlet required.
- 5-in-1 collapsible reflector, 12 inch ($15-25). Bounces light, diffuses light, gives you silver fill or warm gold fill depending on which surface you flip out. Folds flat to the size of a CD case.
- Foldable backdrop board, 24×24 inch dual-sided ($25-40). Dark wood on one side, matte black or marble on the other. Lives flat against the cab wall.
- Microfiber cloth. Free with most lens orders. Cleans your phone lens (which gets surprisingly dirty in a kitchen) and the serving window glass.
- Optional: clip-on macro lens ($15). For ingredient extreme close-ups — chile flakes, sesame seeds, glistening cheese pulls.
Total: about $150 if you skip the macro lens. That's less than 0.05% of an average truck's annual revenue, and it's the only photography hardware investment most trucks ever need.
The 5 Essential Shots Every Food Truck Needs
Every food truck has the same five photos to capture. Get this set, and you've covered roughly 95% of the food truck images you'll ever need for menu boards, delivery apps, social media, your Google Business Profile, and press kits.
Shot 1: The Signature Dish Hero
This is the one item that defines your truck — the dish that goes on every poster, the photo on your Instagram bio, the centerpiece of your menu board. If a customer remembers one thing about you, this is the photo they're remembering.
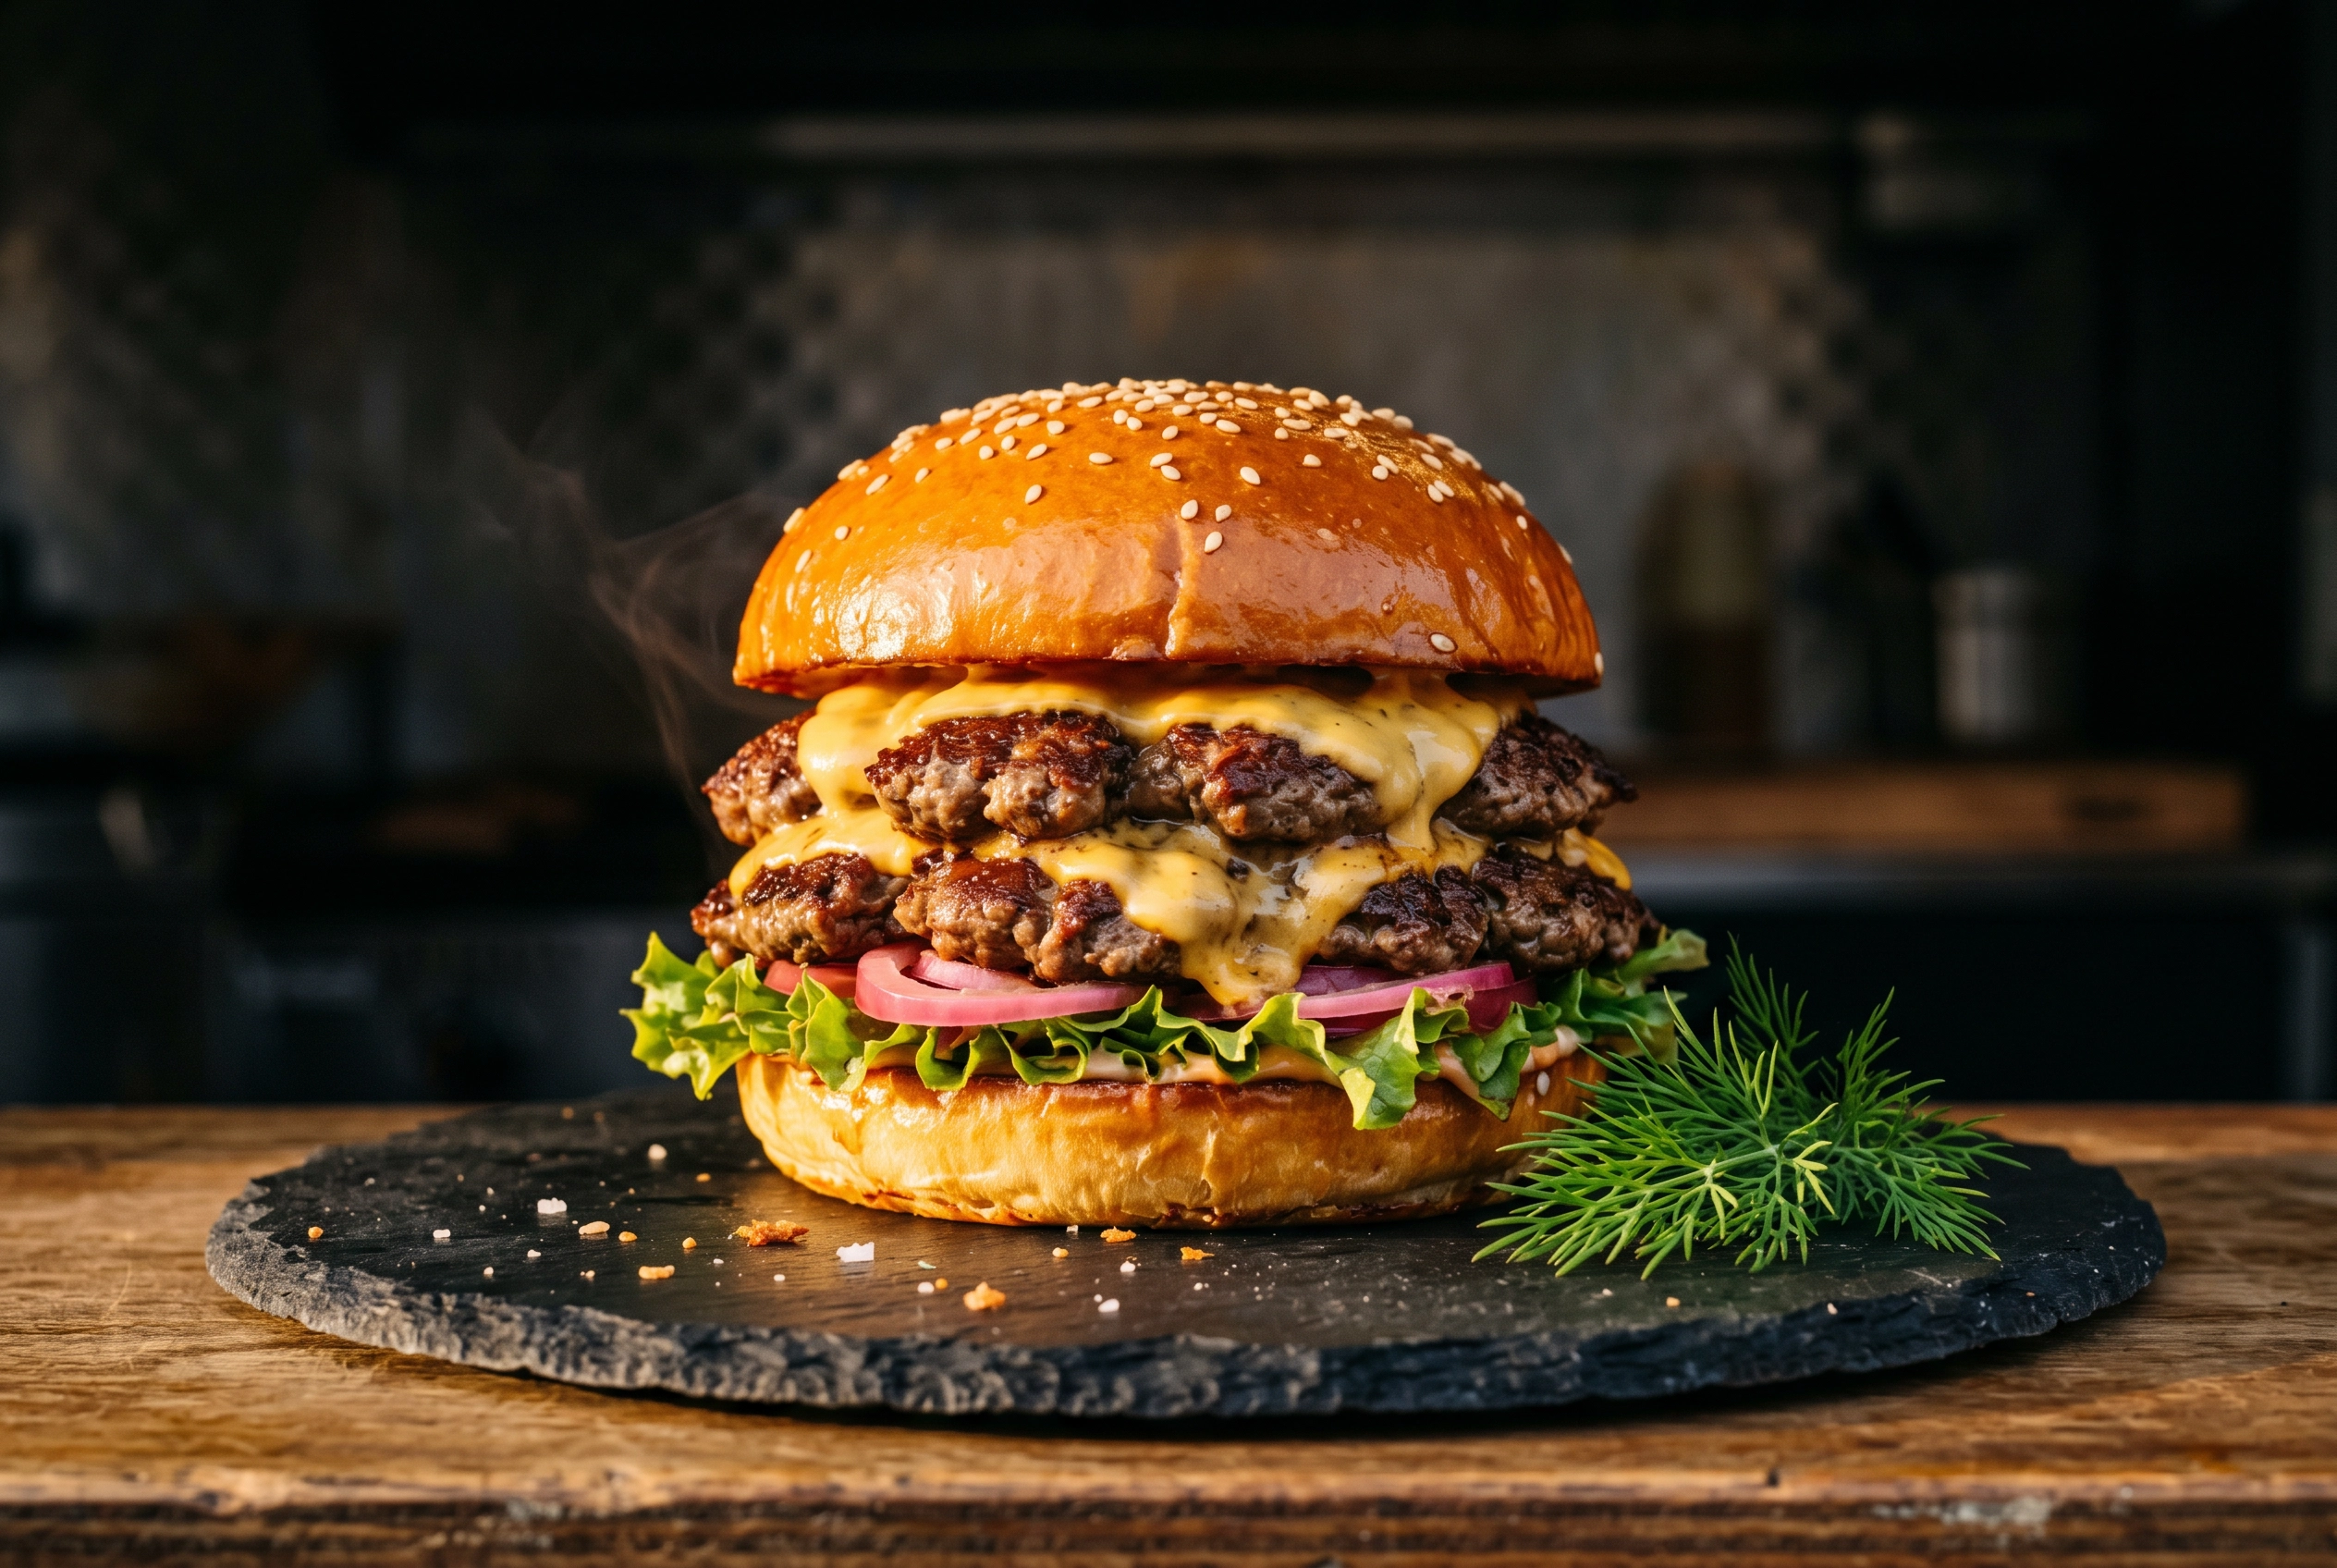 Signature dish hero shot of a stacked double smash burger photographed at 45 degrees with dramatic side lighting on dark slate plate
Angle: Shoot at 45 degrees for layered foods like burgers, sandwiches, tacos, and tortas — it shows dimension and storytelling. Shoot from directly overhead (90 degrees) for bowls, pizzas, and anything where readability matters more than depth (this is also what delivery apps prefer).
Background: Keep it dark and neutral. Matte black, slate, weathered wood, or even your truck's painted exterior. Busy backgrounds compete with the food.
Plating: Wipe the plate rim with a damp napkin before the shot. A drip on the edge separates amateur from professional faster than any camera setting. Add a single bright garnish for color contrast — fresh herbs against a brown sauce, a lime wedge against a dark mole, a parsley leaf against a pale risotto.
Where it goes: Homepage of your website, Google Business Profile cover, delivery app primary image, the giant photo on your menu board, every press article.
Shot 2: The Menu Board Trio
You actually need three menu board photos, not one. Each does a different job.
- Full menu board straight-on. Customers screenshot this to read the menu. Pin it to your Google Business Profile. Use it in Instagram Highlights so people checking your page can see what you serve before they walk up.
- Three-quarter angle with the truck in frame. This is the lifestyle shot — the menu board in context, the truck identifiable, real-world scale. Goes in IG carousels and "things to try" features.
- Close-up on featured items or daily specials. Highlight your highest-margin items or limited-time offerings. The detail draws the eye.
Common pitfall: Glare on glass or laminated menus. Shoot at a slight angle (about 15 degrees off straight-on) to dodge reflections, or wait for a passing cloud to soften the light. For more on designing the menu board itself — layout, hierarchy, photo placement — check our deeper guide on food truck menu design.
Shot 3: Customer Action and Social Proof
These are the food truck photos that emotionally beat any product shot. A hand reaching for a wrapped taco at the window. A first-bite reaction. A line of customers stretching down the sidewalk on a Saturday afternoon. They tell prospective customers: this is real, this is loved, this is happening.
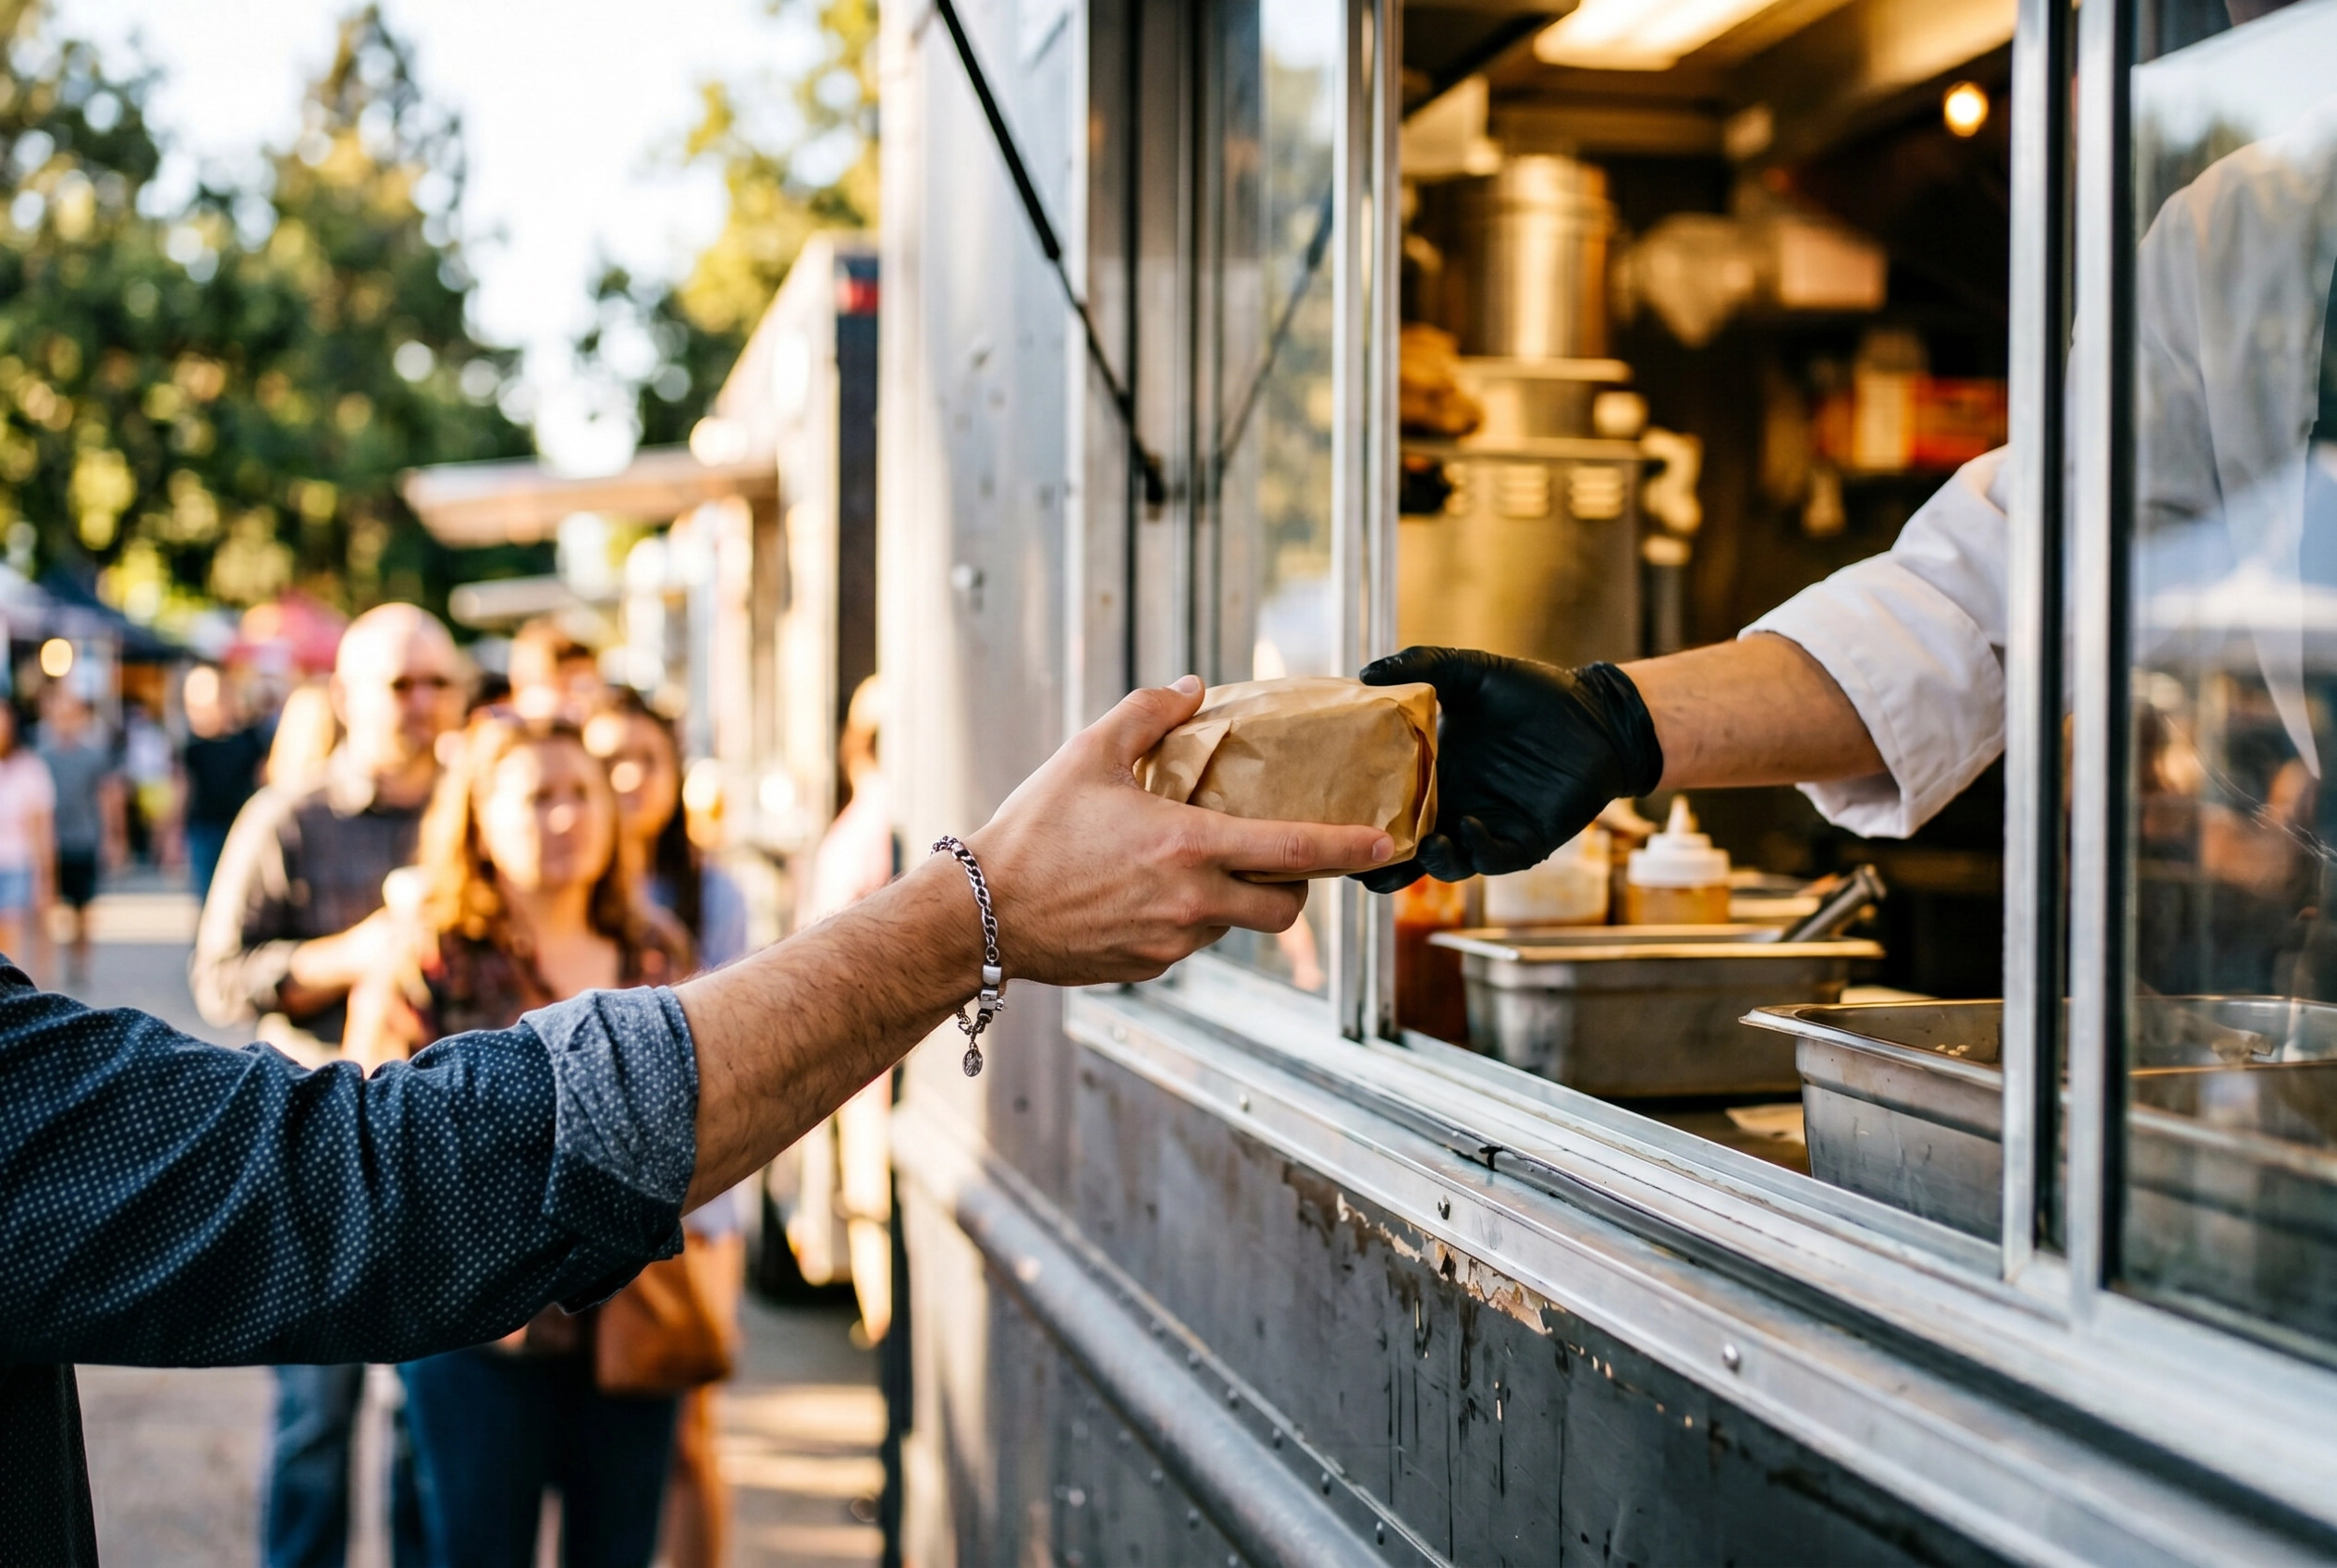 Candid food truck customer action shot of a hand receiving a wrapped rice bowl through the serving window with line visible behind
The rules:
- Always ask permission, especially with kids in frame. A quick "hey, mind if I grab a quick photo?" is fine. Most people say yes.
- Avoid posed/forced smiles. Candid wins. Shoot through real moments — passing the food, the laugh after the first bite, two friends sharing.
- Mind the background. Blur or crop out license plates, competing food trucks' branding, and anything cluttered. A clean frame keeps the focus on you.
The line shot in particular is gold. Wait for your busiest service, climb on a parking bumper for a slightly elevated angle, and capture the queue. That photo is worth more than any "we're popular" caption you could write.
Shot 4: The Truck Exterior
Most food trucks shoot their exterior wrong: midday, head-on, in flat parking-lot light. The result looks like a real estate listing.
The fix is one rule: shoot the truck during magic hour, the 30 minutes just before sunset or just after sunrise. Stand across the street so signage reads clearly. Shoot from a three-quarter angle so the front and side both show. Add foreground interest — a chalk sandwich board, a customer at the window, the menu board lit from inside.
 Vintage cream and teal food truck photographed at magic hour from across the street with warm window light and customer silhouettes
Where it goes: Google Business Profile main photo, IG bio image, website hero, press kit, the photo organizers and event coordinators want when they're booking you.
Pro move: Re-shoot the exterior every season. Autumn light at the same spot looks completely different from summer light. A fresh seasonal exterior shot in your library gives you year-round content variety.
Shot 5: The Process and Ingredient Close-Up
The behind-the-scenes shots are what build craft credibility. A chef's hands plating. Sauce being drizzled in slow ribbons. Smoke rising off the grill. Dough being stretched. Chiles being charred. These tell the story of the food before it ever hits the customer's hand.
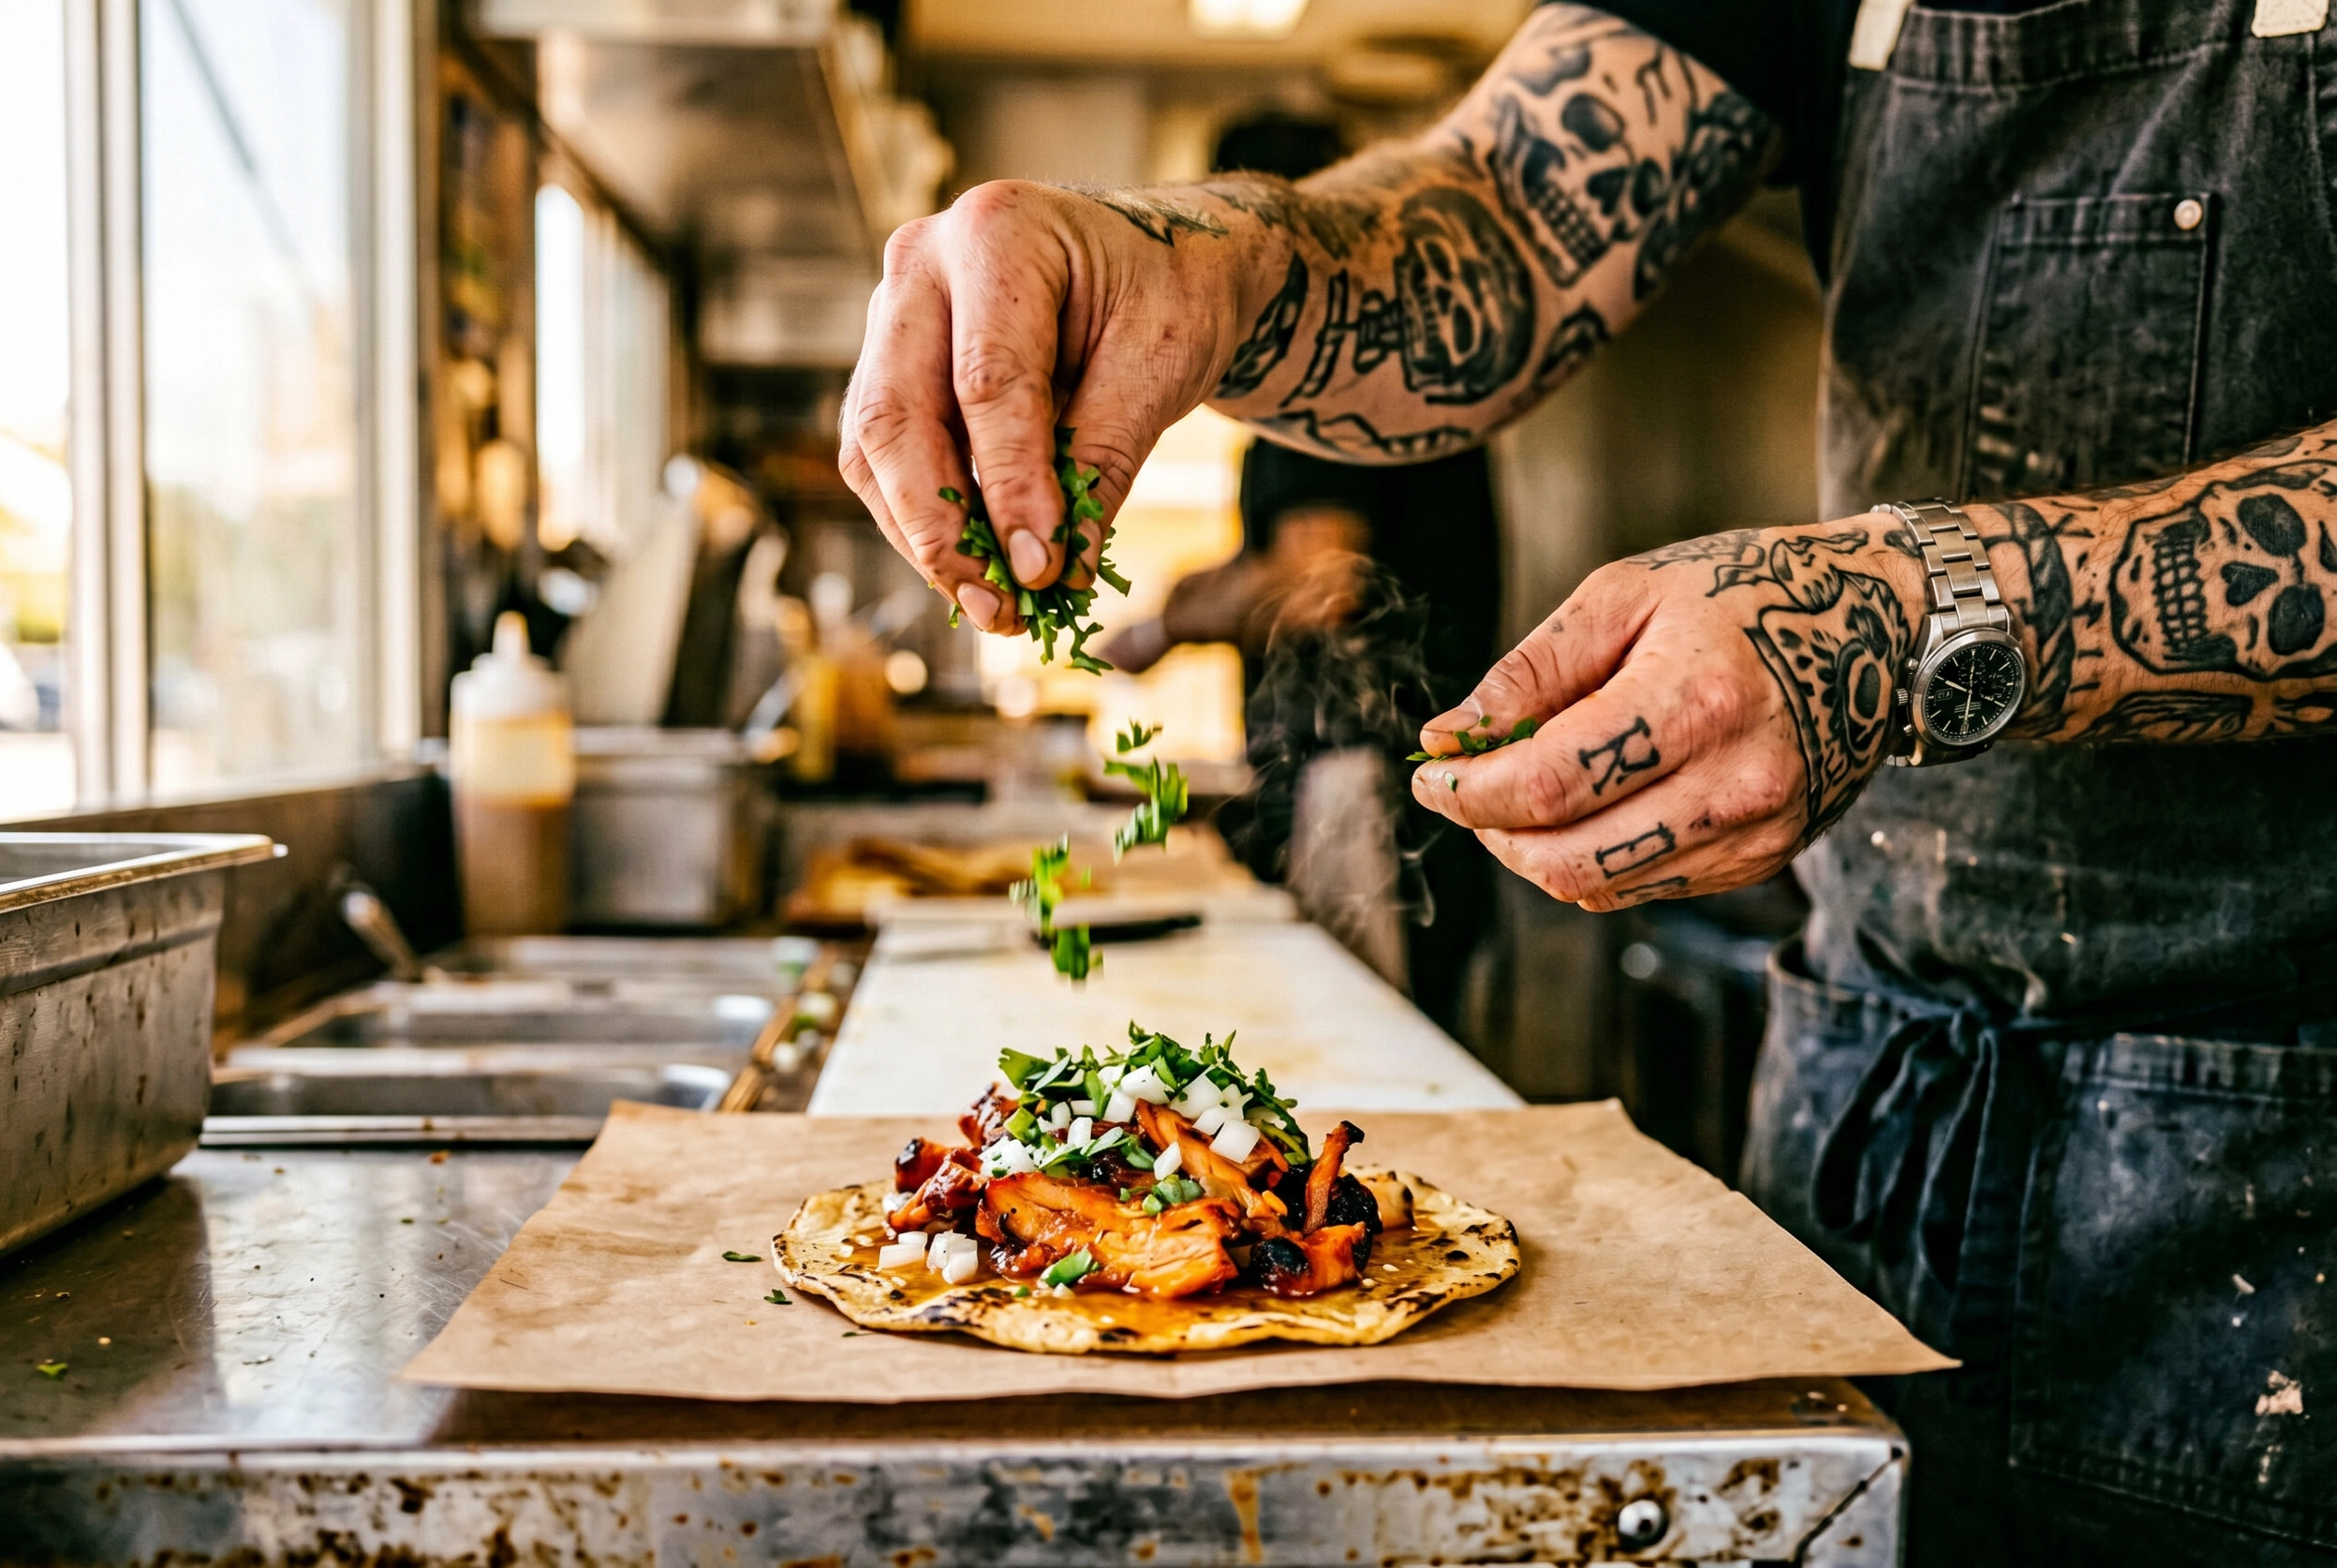 Food truck chef hands plating an al pastor taco with cilantro garnish in motion captured as a behind-the-scenes process shot
Ingredient close-ups work the same way: glistening lime wedges, the cross-section of a perfectly fried chile relleno, a cheese pull mid-air, the marbling of a brisket before slicing.
Why these win: They give you endless social media content (every shift creates new process moments) and they signal craft. A taco truck that posts the moment fresh masa hits the comal is telling you something a stock photo can't.
Tools: 1x phone lens at close distance, or add a clip-on macro lens for the extreme detail shots. Shoot continuously during a process — sauce being poured, smoke rising, dough being stretched — and pick the single best frame later.
The 90-Second Workflow: Snap, Upload, Done
Here's the actual workflow that fits between customer orders. This is what makes food truck photography possible without hiring help.
Step 1 (5-10 seconds): Shoot. Plate the dish on the window ledge. Frame it on your phone, tap the food to focus, tap and hold to lock exposure, shoot 3-4 frames at slightly different angles. Use the 1x lens. Never digital zoom.
Step 2 (10 seconds): Upload. Open an AI food photo editor, drop the best frame in, and pick a style preset based on where the image is going — Delivery for app listings, Menu Board for in-truck signage, Social for Instagram-ready square crops.
Step 3 (90 seconds): AI processing. The app handles lighting cleanup, background polish, plate-edge wipes you missed, and resolution upscaling to 4K. You don't need to know Lightroom, Photoshop, or color theory.
Step 4 (15 seconds): Download and post. Save the result. Upload to DoorDash, Uber Eats, your IG, your menu board, your Google Business Profile.
Total: roughly two minutes from shooting to live image. Compared to traditional photography — where a session costs $500-1,500 and turnaround is 3-7 days — this is a fundamentally different economic equation. You can shoot and publish a daily special between morning prep and the lunch rush. The same approach scales to delivery menus too — see our breakdown of AI food photography for the technical details.
One important rule: AI enhancement preserves the actual dish. It doesn't fabricate ingredients you didn't put in, and it doesn't change portion size. This matters because DoorDash, Uber Eats, and Grubhub all enforce a "Representative Principle" — your photo has to honestly represent what the customer receives. AI cleanup of lighting and background passes the test. Adding a fake mountain of cheese does not.
The full workflow is built into our food truck-specific photo styles and presets, with delivery-app-ready aspect ratios pre-configured so you don't have to think about cropping.
Phone Camera Settings That Actually Matter for Food Truck Photography
You can spend a year reading camera blogs, or you can lock in these six settings and call it done.
 Hands holding a smartphone tapping to focus on a banh mi sandwich for food truck photography demonstrating the phone camera setup
- Tap to focus on the food, not the background. The phone defaults to wherever it thinks the "subject" is. Override it.
- Lock exposure. On iOS, tap and hold on the food until you see "AE/AF Lock." On Android, the gesture is similar. This stops the camera from constantly re-adjusting brightness as you move.
- Turn off flash. Always. Direct flash creates flat, ugly light with harsh shadows behind the plate. There is never a good reason to use it on food.
- Enable HDR for high-contrast outdoor shots. When you have bright sky plus shaded food in the same frame, HDR balances both.
- Use the 1x lens. Digital zoom is a lie — it's just cropping the same image, throwing away resolution. Move closer or crop later instead.
- Shoot wider than you need. A wide capture lets you crop to 16:9 for DoorDash, 5:4 for Uber Eats, 4:3 for Grubhub, and 1:1 for Instagram from a single source image.
For the granular settings — composition, white balance, the timer trick for stability — our complete phone food photography guide goes deeper on every technique.
5 Common Food Truck Photography Mistakes (And the Fix)
These five mistakes show up on roughly 80% of food truck Google Business Profiles. Each takes ten seconds to fix.
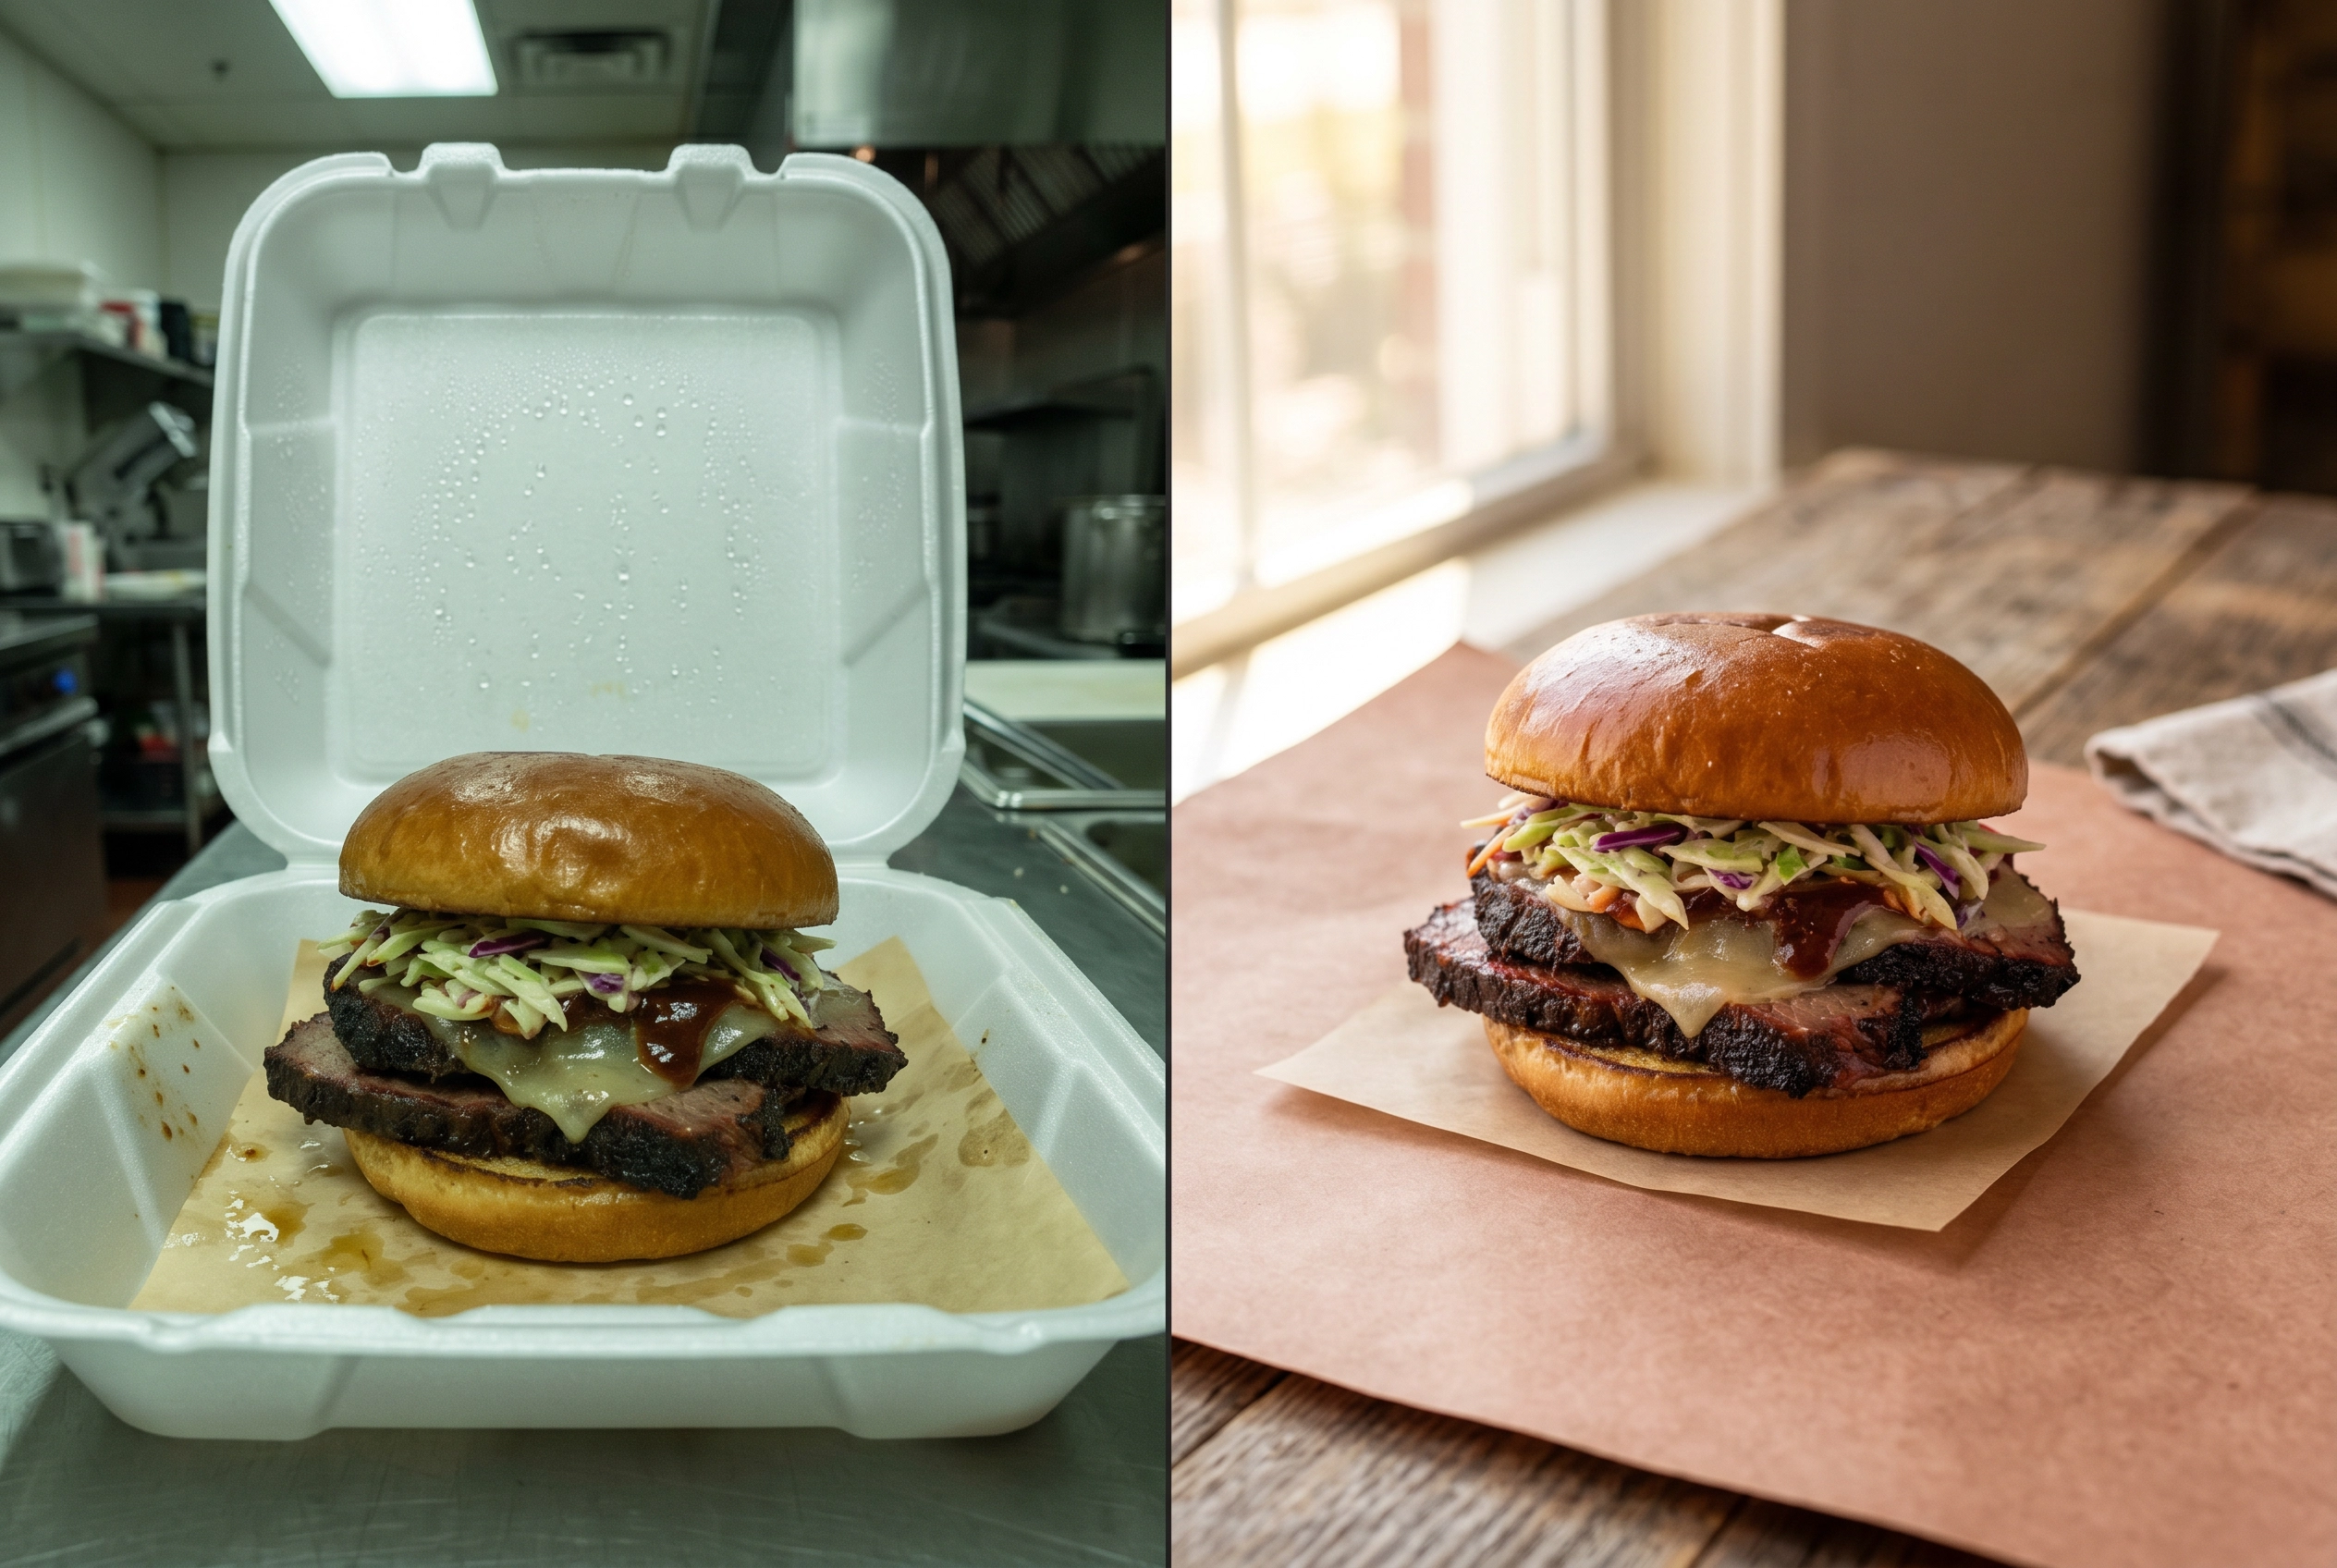 Food truck photo comparison showing brisket sandwich in styrofoam container with bad lighting versus the same sandwich plated on butcher paper in natural light
- Shooting straight into harsh midday sun. Result: blown white highlights and pitch-black shadows. Fix: Move into open shade three feet from the truck, or wait for golden hour.
- Using the truck's interior fluorescent or LED lights. Result: a green or yellow color cast that no amount of editing fixes cleanly. Fix: Shoot near the open serving window where natural light dominates, or step outside entirely.
- Photographing food in styrofoam containers. Result: the food looks like landfill, even if it tastes amazing. Fix: Plate on a real plate or a piece of butcher paper for the photo, then box it for the customer.
- Forgetting to wipe sauce drips from the plate edge. Result: amateur signal that the eye picks up immediately, even if the viewer can't articulate why the photo looks "off." Fix: Keep a folded napkin in your back pocket. Wipe before every shot.
- Including license plates, competing logos, or messy backgrounds. Result: distracted, unprofessional, sometimes a privacy issue. Fix: Pre-clear your shot zone before service, or crop tight in post.
For more on the underlying principles — angles, styling, lighting fundamentals — see our breakdown of food photography mistakes to fix first.
Frequently Asked Questions
What's the best time of day to photograph food truck food?
Golden hour — about one hour after sunrise and one hour before sunset — gives you soft, warm, directional light that flatters food. Cloudy days are also excellent because the cloud cover acts like a giant natural diffuser, eliminating harsh shadows. The window to avoid is roughly 10 AM to 2 PM in direct sun, when overhead light blows out highlights and crushes shadows. If you must shoot midday, move the dish into open shade about three to four feet from the truck.
Do I need a real camera, or is my phone enough for a food truck?
Your phone is enough. Modern phones (iPhone 12 or newer, Samsung Galaxy S20 or newer, Google Pixel 6 or newer) capture more than enough resolution and dynamic range for menu boards, delivery app listings, social media, and most marketing uses. A DSLR or mirrorless camera only matters if you're printing 24×36 inch banner wraps or shooting commercial CPG packaging. For 99% of food truck photography needs, the camera matters far less than the lighting and the post-processing.
How do I photograph food when there's a line of customers?
Three tactics: (1) Pre-shoot one "beauty plate" before service starts — five focused minutes beats 50 frantic seconds. (2) Capture every new menu item the first time you cook it that day, before the line forms. (3) Use AI editing to skip post-production entirely, so the workflow from snap to live image takes about two minutes instead of two days. Keep your kit (phone tripod, clip-on light, foldable reflector) within arm's reach so setup is zero seconds.
What size should food truck menu photos be for DoorDash and Uber Eats?
DoorDash requires a minimum of 1400×800px in 16:9 aspect ratio, under 16MB, JPG or PNG. Uber Eats needs menu items at 1200×800px in 5:4 ratio, with the profile/cover image at 1920×1080px in 16:9. Grubhub is the most flexible at 1024×768px in 4:3. The smart workflow: shoot one wide source image, then export different crops for each platform rather than reshooting. For platform-by-platform specifics, our delivery app photo requirements page has the full cheat sheet.
Is it worth hiring a professional photographer for a food truck?
For most trucks, no — at least not for menu work. A professional shoot runs $500-1,500 per session and takes 3-7 days for delivered files. For a 12-item menu, that's a real investment with a long turnaround. AI-enhanced phone photography produces comparable menu-board quality at cents per image, available in 90 seconds. The hybrid approach that works best: use AI for ongoing menu and social photos, then hire a pro once a year for a small batch of premium hero shots — your signature dish, your truck exterior, and a brand library of 8-10 lifestyle frames.
Can I use AI-enhanced photos on delivery apps?
Yes. DoorDash, Uber Eats, and Grubhub all permit AI-enhanced photos, with one consistent rule across all three: photos must accurately represent what the customer actually receives — the "Representative Principle." That means cleanup of lighting, background, and resolution is fine. Adding ingredients that aren't in the dish, exaggerating portion size, or fabricating a dish that doesn't exist on your menu is not. FoodShot AI's enhancement is built around this principle — it improves the photo of your real food without altering the dish itself.
What kind of food truck photo ideas work best on Instagram?
The five-shot framework above gives you about a month of weekly posts. Beyond that, the food truck photo ideas that consistently perform are: the "first cook of the day" prep moment (story-friendly), close-up sauce or cheese pulls (Reels gold), customer line-of-the-day at peak service (social proof), and seasonal menu reveals (anticipation builders). Always shoot more than you need — three to five frames per moment — so you have variety in the editing pass.
Your Next Customer Is Already Looking at Your Photos
You don't need a studio to compete with restaurant photography. You need a system: the five essential shots, a $150 kit that fits in a glove compartment, and a 90-second workflow that turns a phone snap into a menu-ready image.
The food truck industry is now a $4.71 billion global market growing at 6.5% annually per Mordor Intelligence's 2026 market analysis. The trucks pulling ahead aren't the ones with the biggest marketing budgets. They're the ones whose photos make a stranger walking past stop, look, and get in line. That's a decision made in less than two seconds, and it's made on your photos before it's made on your food.
The fastest way to test the workflow: snap a photo of your best-selling dish right now, on whatever phone you have, in whatever light you have. Drop it into FoodShot AI's free plan — 3 credits, no credit card — and see what comes out 90 seconds later. If the result fits on your menu board, you've just replaced your biggest marketing bottleneck.
Your next customer is already deciding. Make sure they're looking at the version of your food truck photography that earns the order.
