Pasta Photography: Twirls, Sauces & Plates for Menus
Pasta is a magician's trick in reverse. On the table, a steaming bowl of cacio e pepe or a tangle of spaghetti pomodoro looks irresistible. Point a phone at it, though, and the magic vanishes — the strands flatten into a beige knot, the sauce dulls, and what felt like dinner now looks like leftovers. Good pasta photography is the craft of closing that gap: making the camera see what your guests see. Done right, it doesn't just decorate a menu — it sells the next plate.
This guide is the technique, not the fluff. We'll cover why pasta fights the lens harder than almost any other food, how to build the twirl shot that stops thumbs mid-scroll, the five frames every Italian menu needs, lighting for sheen and sauce, shape-by-shape tactics from spaghetti to orecchiette, and how to handle each sauce family. By the end you'll be able to shoot pasta photos that look professional even from a phone — and you'll know the 90-second AI shortcut for when you don't have time to plate three test bowls.
Quick Summary: Great pasta photography comes down to five shots — a twirled hero, a top-down bowl, a sauce close-up, a dry-pasta product shot, and a pasta-being-served moment. Shoot within two minutes of plating, light from the side at 45°, pull a small portion into a tall twirl (never a flat tangle), and use garnish and contrast to fight pasta's natural color monotony. When the clock beats you, an AI food photo editor turns a decent phone snap into a menu-ready image in about 90 seconds.
Why Pasta Is One of the Hardest Dishes to Photograph
Most foods give you a window. Pasta gives you a stopwatch — and a color problem, and a geometry problem, all at once.
Here's what you're actually fighting:
Sauce coverage vs. noodle visibility. This is the central tension of every pasta photo. Drown the dish and you lose the pasta's identity — a bowl of bolognese becomes an anonymous red mound. Use too little and the noodles look dry and undersauced. The sweet spot is coating, not burying: enough sauce to cling and glisten, with the strands and shapes still reading clearly.
 Overhead bowl of spaghetti buried under heavy brown bolognese showing the sauce coverage and color monotony challenge
Color monotony. Pasta lives in a narrow palette — wheat, beige, brown, and tomato red. A frame with nothing but those tones reads flat and muddy. Every great pasta picture smuggles in contrast: the green of basil, the black of cracked pepper, a dusting of pale pecorino, a red chili, a wedge of lemon. Without it, the eye has nothing to grab.
Twirl height. A pile of pasta lying flat in a bowl looks like leftovers. The same pasta lifted into a tall, tight nest looks like a chef plated it. Height equals appetite — and we'll get to exactly how to build it.
Garnish freshness. Basil wilts and darkens within minutes under warm light. A bright herb is your best contrast tool, but only if it's fresh, so it goes on last, just before you shoot.
The cooling clock. This is the brutal one. Hot pasta's glossy sheen — the thing that makes it look alive — starts to fade almost immediately. Sauces congeal, cheese sets, steam stops. You have roughly two minutes before a beautiful plate turns into a tired one.
None of this is hard once you know the traps, but it does explain why so many pasta pictures look flat. And it's worth solving, because diners eat with their eyes first. Menus with professional photography increase sales by 20–45%, and on delivery platforms the effect is even sharper — DoorDash's 2026 data shows restaurants can see up to 13% higher average sales just by adding photos to more than half their menu items. For the full business case across every channel, our restaurant food photography guide breaks down the numbers. Pasta is a menu's emotional anchor — it earns the effort.
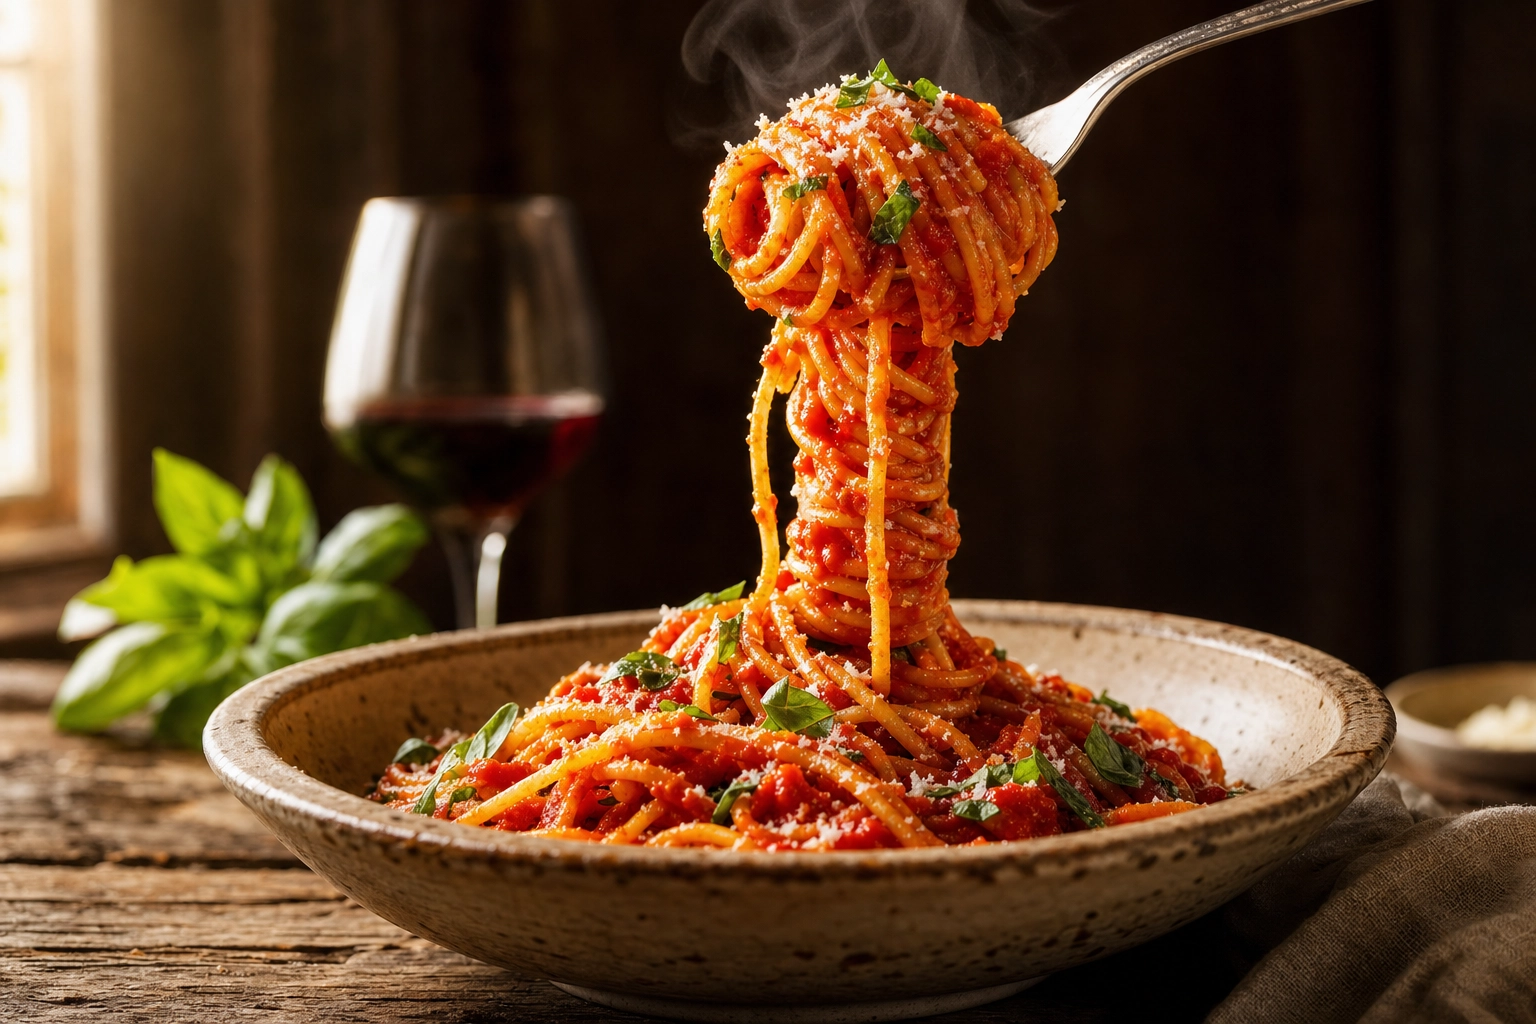
The Pasta Twirl: How to Build the Shot That Stops the Scroll
The twirl is to pasta what the cheese pull is to pizza — the centerpiece of great pasta photography and the single image that makes someone stop scrolling and start craving. (If you shoot both, our pizza photography guide covers the cheese-pull version of the same idea.) A twirled forkful or a neat coiled nest does three things at once: it adds height, it implies motion, and it shows off the strands. Here's how the pros build it.
Use a carving fork and a ladle. This is the restaurant plating trick, and it's the most reliable way to get a tight nest. Drop a small amount of pasta into the curve of a ladle (or a large spoon), set the tines of a long carving fork into the center, and twirl the fork while the ladle holds everything in place. The pasta coils around the fork into a compact spiral. Move the loaded fork over the plate, gently nudge the nest off, and slowly pull the fork straight up and out.
 Hands coiling spaghetti into a tight nest using a carving fork and ladle, the restaurant pasta twirl technique
Go small. The single biggest twirl mistake is too much pasta. A full portion becomes a sprawling tangle that collapses under its own weight. Grab far less than a serving — you can always tuck more around the base after the nest is set. A small amount twirls tighter and stands taller.
Build height with pasta, not props. Believable pasta photography uses the noodles themselves for height — not a bowl flipped upside down or cardboard hidden underneath. A genuinely tight twirl holds its own shape. If you need a little lift, coil a base layer first and set the hero nest on top.
For the mid-air editorial shot, switch to burst mode. Want that magazine-style forkful suspended above the bowl with strands trailing down? Twirl a forkful, lift it just above the dish, and hold your phone's shutter to fire a burst (continuous shooting on iPhone, burst mode on Android). You'll get forty frames; one or two will have the strands falling exactly right. Shoot from a low angle so the trailing pasta reads against the background, not the table.
Finish for realism. Once the nest is plated, trim stray loose ends with kitchen scissors for a clean silhouette, then tug one or two strands loose so it doesn't look too engineered. A little controlled imperfection reads as appetizing; surgical precision reads as fake.
One caution: heavily sauced strands are slippery and won't hold a twirl. For the hero twirl, toss the pasta lightly, build the nest, then spoon extra sauce around and over it once it's standing. For more hands-on plating tricks like this — steam, garnish, and the rest — our food styling guide goes deep.
The 5 Pasta Shots Every Italian Menu Needs
Five frames, five jobs. Shoot these five pasta photos and you'll have everything a menu, a delivery listing, and a month of social posts require.
1. The Twirled Hero
The money shot. A forkful or a tight nest, photographed at a 45° angle or a low 10–20° angle that emphasizes height. Light it from the side so each strand casts a tiny shadow and the sauce catches a highlight. This is your spaghetti photography signature — the frame that goes at the top of the menu page and leads your Instagram feed. It works for any long pasta: spaghetti, linguine, bucatini, tagliolini.
2. The Top-Down Bowl
Shot from directly overhead (90°), with the lens parallel to the table. This is the workhorse for bowls, brothy or short-shape pasta, and full table scenes — and it's the format delivery apps love because it crops cleanly to a 1:1 tile. Frame the whole bowl with a little breathing room so you can reuse the same shot for a menu thumbnail and an Instagram square. Overhead is also the most forgiving angle for a busy delivery-app photography lineup, since it reads instantly at thumbnail size.
3. The Sauce Close-Up
Get in tight. A macro shot of sauce clinging to noodles is pure appetite — it shows texture, gloss, and how the sauce coats every strand. Use a shallow depth of field so one cluster is razor-sharp and the rest melts away. This is the detail image that sells the dish on a menu's product page and makes a scrolling viewer feel the food before they read a word.
4. The Dry Pasta Product Shot
For pasta brands and packaging, the raw shape is the hero. Photograph uncooked pasta as a flat-lay or from a low angle on a clean, neutral, or dark surface. Rake a hard light across the shapes so the form pops — the ridges of penne, the twist of fusilli, the cupped curve of orecchiette. These are the pasta images that anchor a CPG label, an e-commerce listing, or a "fresh pasta made daily" feature on a website.
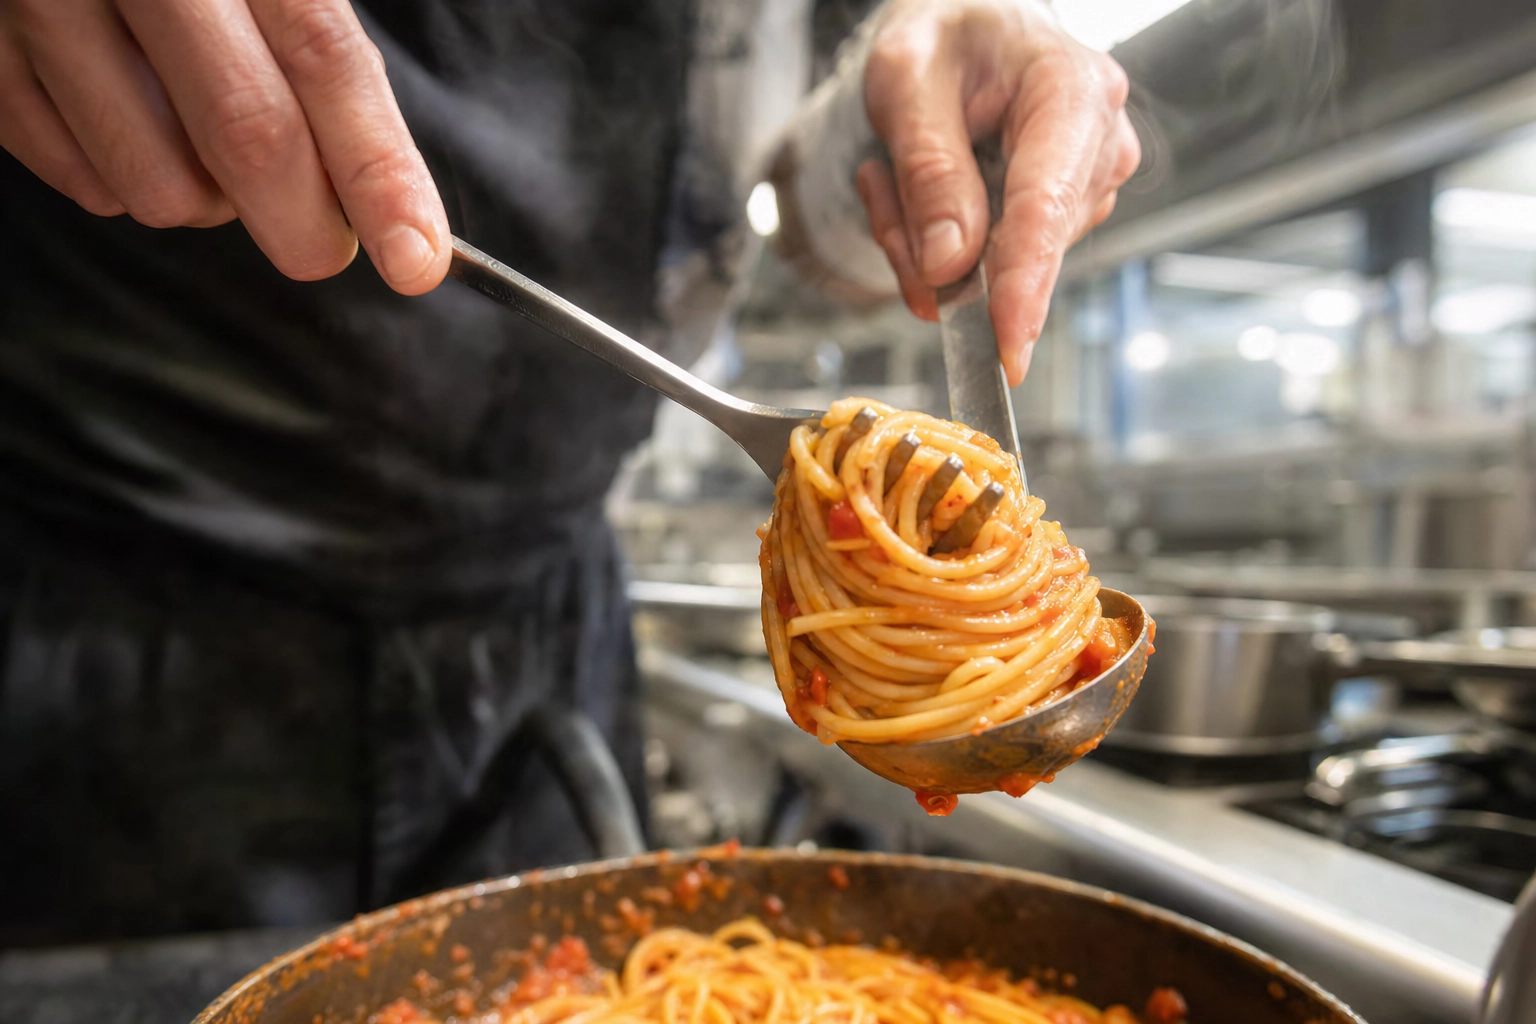
5. The Pasta Being Served
The human element. A hand lifting a forkful with strands still tethered to the bowl, a ladle of sauce mid-pour, a microplane shaving parmesan over the top, steam curling up. These frames sell freshness, scale, and a "this is happening right now" energy that static plates can't. Shoot in burst mode and keep it unstaged — hand-only crops are easiest to direct and avoid any model-release headaches.
Lighting Pasta: Sheen for Oil, Soft Top for Sauce, Side for Shape
Most pasta pictures fail at lighting before they fail at anything else. The good news: pasta wants one kind of light, and you already have it — a window.
 Bowl of spaghetti aglio e olio lit by dramatic 45-degree window side light showing strong shape and shadow
Side light at 45° is the universal standard. Position a soft, directional source — a north-facing window, or a diffused lamp — at roughly 45° to the side of the dish. Side light skims across the surface, revealing the texture of every strand, the ridges on a rigatoni, the layers of a lasagna. Top-down lighting and on-camera flash do the opposite: they flatten the food and blow the shine into ugly white hotspots.
Add a fill card. Directly opposite your light, prop a piece of white foam board, a folded napkin, or even a sheet of printer paper. It bounces a soft fill into the shadows so the dark side of the dish doesn't go murky. This one easy, free trick separates amateur pasta photos from professional ones.
Soft top or backlight for sauce and steam. A gentle light coming from behind the dish makes sauce glisten and renders rising steam as glowing wisps. Be careful, though — backlight is where exposures blow out. Keep an eye on your brightest highlights.
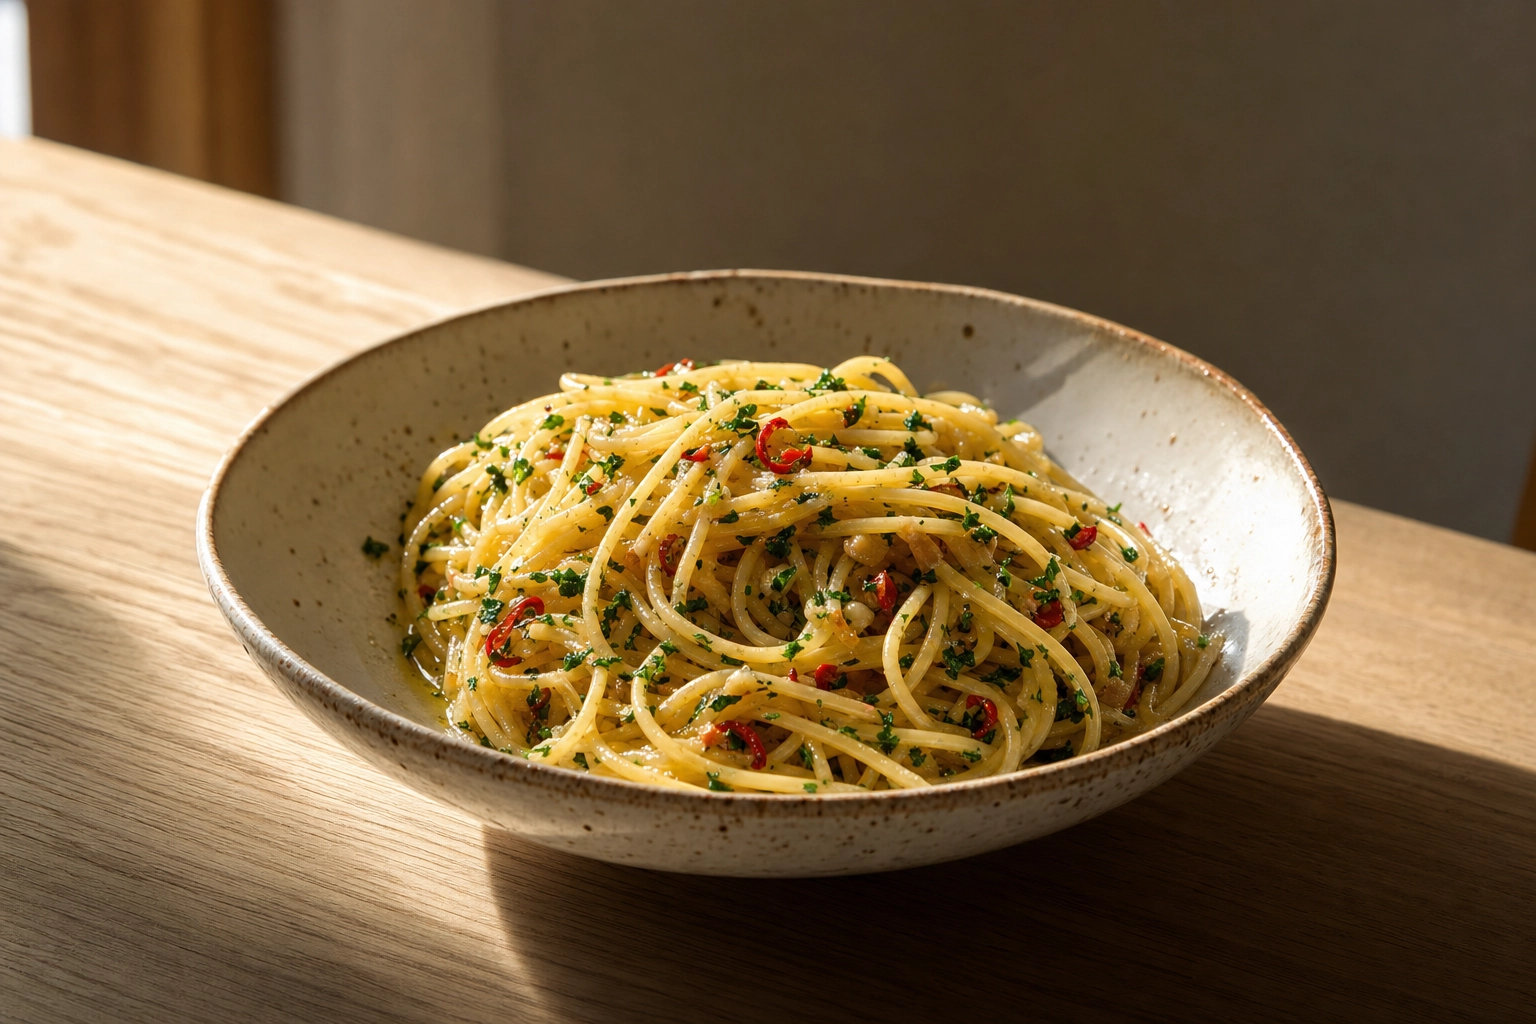
Rake the light for oil-based sauces. Aglio e olio, cacio e pepe, and other glossy, near-transparent sauces live and die on sheen. A low, grazing "raking" light catches the glisten of the oil and makes the dish look luscious instead of dry. Angle the light almost parallel to the plate.
Mind the sauce color. Tomato sauces need enough light to keep the red vibrant — underlit, marinara goes muddy and brown. White and cream sauces have the opposite problem: they reflect so much light that they clip to featureless white. For alfredo, carbonara, or cacio e pepe, pull your exposure down a touch to hold the texture. On an iPhone, press and hold on the dish until the focus box locks, then drag the little sun icon downward to darken the shot until the cream shows detail. A scatter of cracked black pepper gives the camera something to grab onto.
The Pasta-Type Playbook: Shape-by-Shape Tactics
Different shapes have different strengths. Match the angle to the pasta and you're halfway to a great shot.
Spaghetti & Long Pasta
The strand is the star. Build a tall twirl, shoot at 45° or a low angle, and light from the side so the individual strands separate visually. Bucatini, linguine, and spaghetti all reward the mid-air forkful. Keep the sauce light enough that the strands stay distinct.
Fettuccine, Tagliatelle & Pappardelle (Ribbons)
Wide ribbons are about fold and drape. Use tongs to lift and fold the pasta so the ribbons layer over each other like fabric, then shoot at 45° to show the coating. These shapes are built for cream sauces and slow-cooked ragùs — the sauce clings to the broad surface and photographs rich and glossy.
Lasagna & Baked Pasta (The Cross-Section)
Baked pasta is a layering story, so the shot has to show the layers. Cut a clean slice and photograph it straight-on or from a low side angle — never from overhead, which hides everything that makes lasagna special. Let the dish rest several minutes after baking so the portion sets and holds its shape instead of sliding into a heap. A dark plate or pan makes the pasta and sauce pop, and the curled, just-browned edges of cheese on top add the texture that says "fresh from the oven."
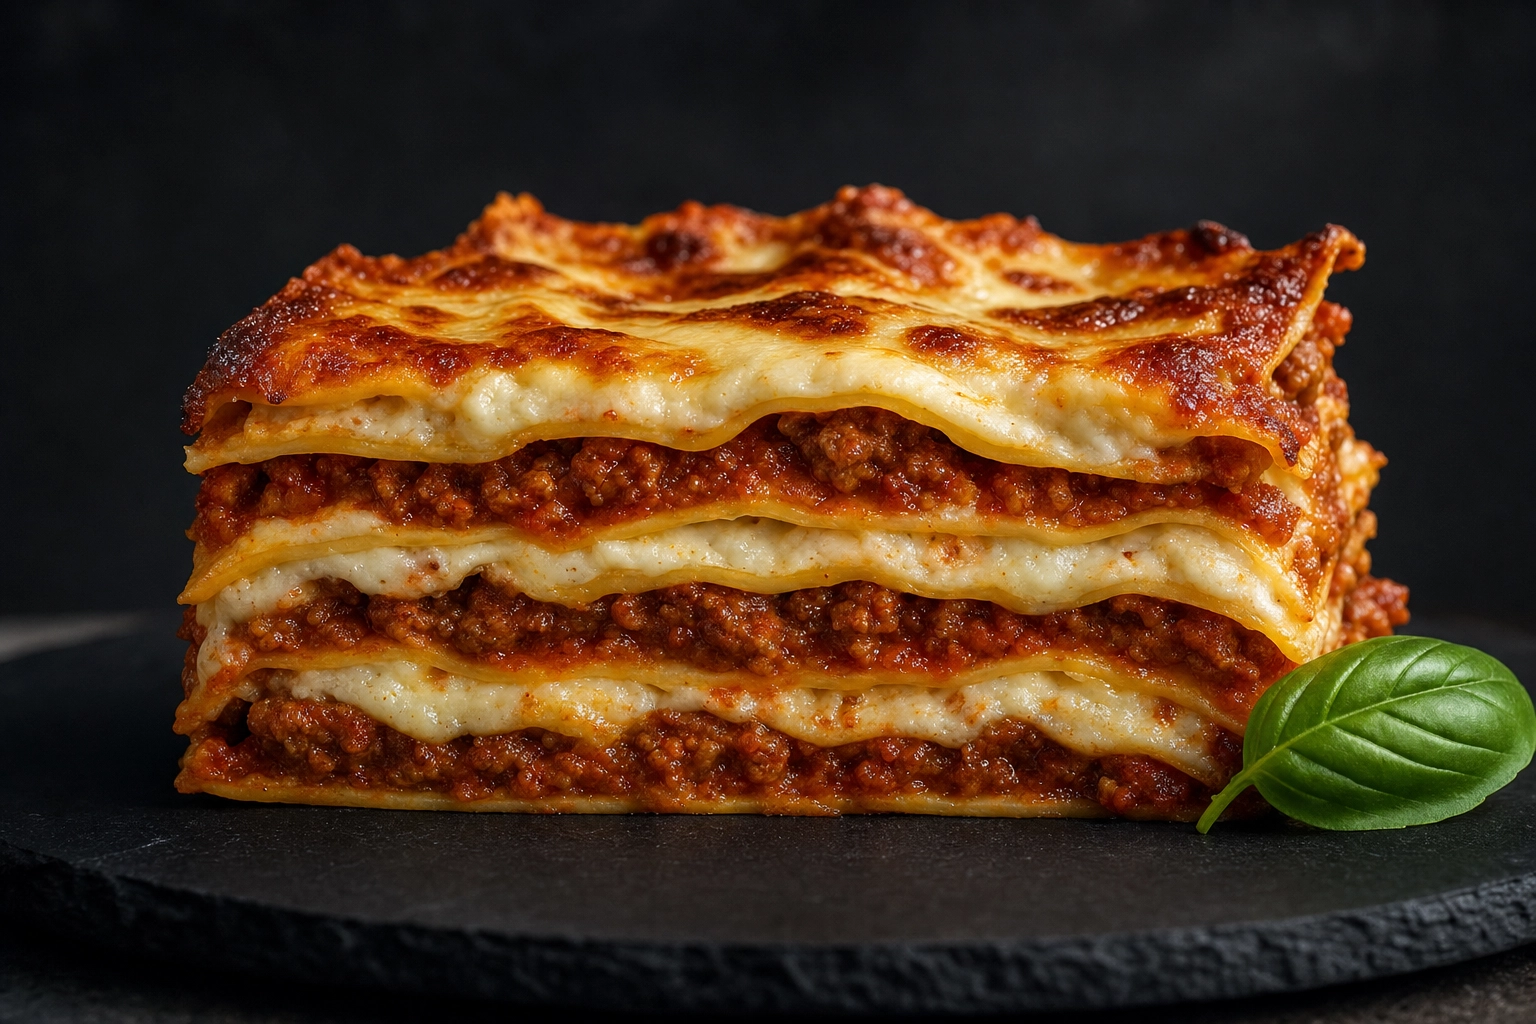 Straight-on lasagna cross-section on a dark slate plate showing distinct layers of pasta, ragù, béchamel and cheese
Ravioli & Stuffed Pasta
Stuffed pasta sells on craft. Show the count and the hand-pinched edges — three or four plump ravioli arranged with space between them beats a crowded pile. A 45° angle or a slight overhead works best. A light gloss of brown butter or oil over the top catches the light and signals freshness. Don't overcrowd the plate; negative space makes handmade pasta look precious.
Gnocchi, Penne, Rigatoni & Orecchiette (Short Shapes)
Short shapes are about texture and how they hold sauce.
- Gnocchi: Shoot overhead or at 45° in a skillet or shallow bowl. Show the pillowy shape and any golden pan-searing — those browned edges are the selling point.
- Penne & rigatoni: Get close enough to show the ridges and the sauce clinging inside the tubes. A 45° angle catches both the surface and the openings.
- Orecchiette: Shoot from overhead so the little "ear"-shaped cups read clearly — each one cradles a pocket of sauce or a bit of greens, as in the classic orecchiette con cime di rapa.
Sauce Photography: Color and Texture by Type
Sauce is what your camera is really selling. Each family has its own personality — and its own trap.
Tomato (pomodoro, marinara, arrabbiata). The goal is a vibrant, glossy red. Underexposed or over-reduced tomato sauce slides toward a muddy orange-brown that looks tired. Keep the light up enough to hold the red, shoot while the surface is still glossy, and break the monotony with fresh basil and cracked pepper. A few whole cherry tomatoes or a basil sprig on top reinforce the story.
Cream (alfredo, carbonara, cacio e pepe). Pale sauces are an exposure minefield — too bright and they turn into a white blob with no detail. Dial the exposure down until you can see the silky surface and the way the sauce ribbons around the pasta. Black pepper and a little grated pecorino or parmesan add the tonal contrast and texture the camera needs. A glossy, just-emulsified sauce photographs far better than one that has started to set.
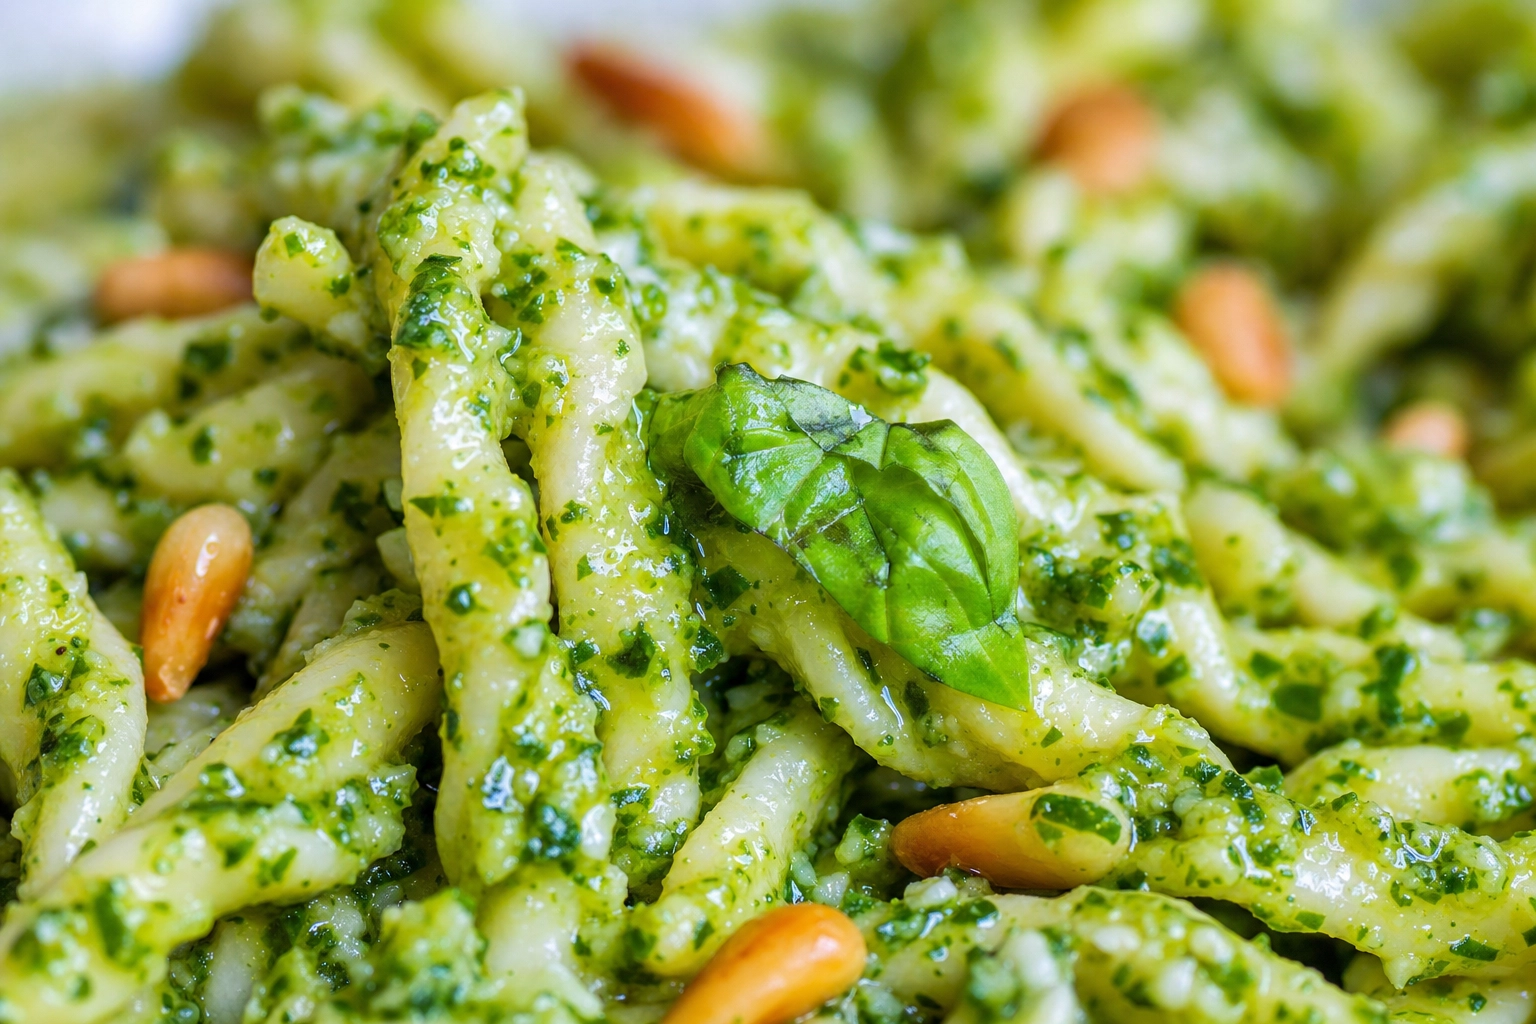 Extreme macro of trofie pasta coated in vibrant green basil pesto with pine nuts, sauce texture close-up
Pesto (Genovese). That vivid green is a gift — it's the natural contrast pasta usually lacks, popping beautifully against pale trofie or trenette. The catch: pesto's oil separates and dulls as it sits, sliding toward army-green. Toss it fresh right before shooting, and finish with a few pine nuts and a bright basil leaf to amplify the color.
Oil-based (aglio e olio). The hardest sauce to photograph because there's barely any sauce at all — just glistening, garlicky strands. This is where raking light earns its keep, catching the sheen so the dish looks luscious rather than bare. Add visible cues of flavor: golden garlic slivers, red chili flakes, a scatter of parsley. They give the eye color and tell the story of the dish.
The rule under all four: coat, don't drown. Sauce should hug the pasta and catch the light, never bury the shapes that make the dish recognizable.
Styling the Italian Table: Rustic Trattoria Context
Pasta doesn't live on a white void — it lives on a table with a story. The right context turns a good plate into convincing Italian food photography.
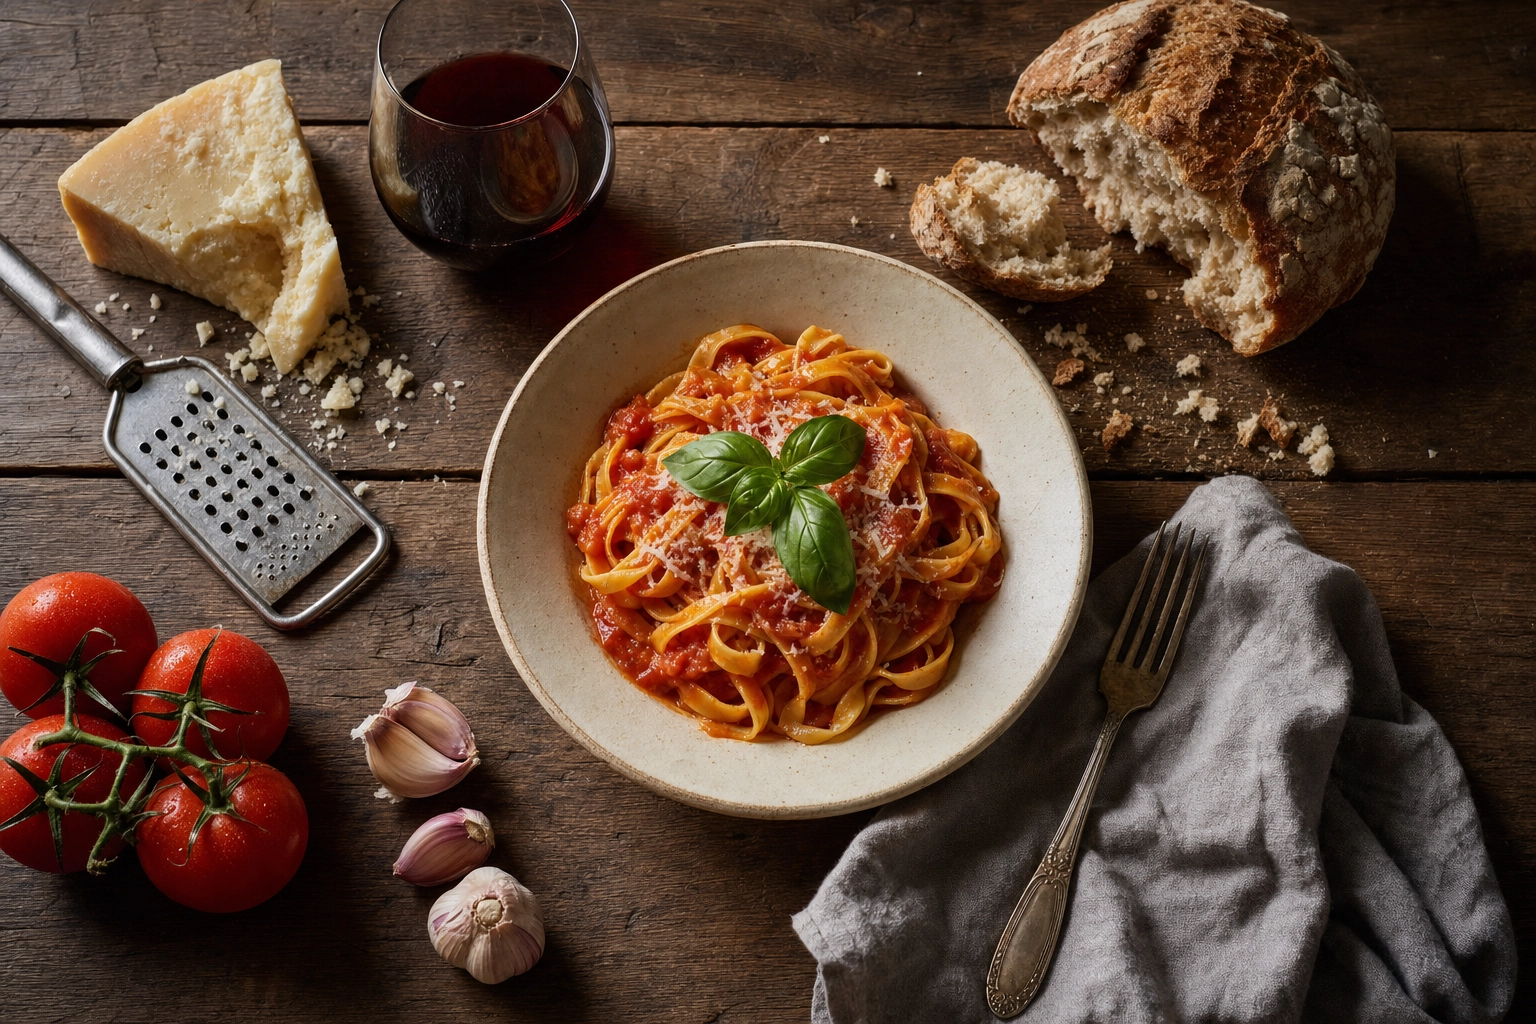 Overhead rustic Italian table styling with tagliatelle, parmesan and grater, red wine, bread, garlic and tomatoes
Build a trattoria, not a studio. The props that read instantly as Italian: a worn wooden table, a linen napkin, ceramic or terracotta bowls, a battered copper pan, a marble slab. Supporting characters earn their place — a wedge of parmesan with a grater, a glass of red wine just out of focus, a torn piece of crusty bread, a few cloves of garlic, a couple of San Marzano tomatoes on the vine. Each one whispers "someone is cooking here" without stealing the spotlight.
Set the mood with light and color. Two looks dominate Italian pasta pictures. The first is warm and moody — dark wood, deep shadows, a single shaft of window light, the feel of a candlelit osteria. The second is bright and Mediterranean — white linen, sunlight, fresh herbs, the Amalfi-coast lunch. Both work; just commit to one. Dark backgrounds are especially powerful because they let beige and red pasta pop off the frame.
Go minimal for fine dining. A high-end Italian tasting menu calls for the opposite of rustic clutter — a single perfect portion, generous negative space, and restrained, architectural plating on a large plate. If your restaurant sits at that end of the spectrum, our fine dining photography approach shows how to make one elegant forkful carry an entire frame.
Use leading lines. Angle a fork toward the plate, let a drizzle of sauce curve inward, point the fold of a napkin at the dish. These quiet lines guide the viewer's eye straight to the pasta. And resist the urge to over-style — whether the final image lands on a menu, a recipe page, or a delivery app, the most appetizing pasta pictures feel like a real meal a real person is about to eat, not a museum arrangement.
Common Pasta Photography Mistakes (and Easy Fixes)
Even good cooks repeat the same handful of errors. Here are the ones that flatten pasta photos most often — and the easy fix for each.
- Too much pasta on the fork. A giant forkful sags into a tangle. Fix: twirl a small portion for a tight, tall nest.
- Drowning the dish in sauce. Buried noodles read as a brown blob. Fix: coat lightly, then add a little extra sauce only where the camera can see it.
- Shooting straight down on a twirl. Overhead kills the height you worked for. Fix: drop to a 45° or low angle for hero forkfuls; save overhead for bowls and short shapes.
- Wilted, pre-added herbs. Basil baked on or sitting under lights turns black. Fix: add fresh garnish in the last few seconds before the shot.
- Flat overhead fluorescent light. It greys out sauce and erases texture. Fix: move to a window and light from the side.
- Waiting too long. A cold plate photographs dull. Fix: have the camera, lighting, and background ready, then shoot within two minutes.
Master those and most of your pasta pictures will fix themselves. For the dishes that still won't cooperate — the ones shot mid-rush under bad light — that's exactly where the AI workflow below earns its keep.
The 90-Second AI Workflow for Menu-Ready Pasta Photos
Here's the hard truth about traditional pasta shoots: you get one shot before the dish cools. Miss the focus, catch a wilted basil leaf, or spot a sauce smear on the rim, and you're cooking another plate and starting over. For a busy kitchen shooting forty menu items, that's a day you don't have.
This is where AI changes the math. Instead of a studio, you use the dish you already plated and the phone you already own.
The workflow is simple:
- Snap a clean phone photo of the real dish — decent light, the whole plate in frame. (You still need a genuine pasta photo to start; the tool enhances real food, it doesn't invent dishes that never existed.)
- Upload it to an AI food photo editor and pick a style. FoodShot AI ships with 200+ styles tuned for different jobs — a Fine Dining look for a tasting menu, a clean Menu style for your website, a punchy Delivery style for Uber Eats and DoorDash tiles.
- Get a 4K, menu-ready image in about 90 seconds, then export it with a commercial license on any paid plan.
A few features that matter specifically for pasta:
- Builder Mode lets you combine a background, a plate, and your dish — swap that fluorescent-lit prep table for a rustic trattoria board without re-plating a thing.
- My Styles locks a single look across your whole menu, so every primo matches even if you shoot them weeks apart or across multiple locations.
- Prompt edits let you type changes in plain language — "add fresh basil," "more sauce sheen," "darker rustic table" — and generate several variations from one upload.
- Bulk processing (on the Scale plan) runs a stack of dishes at once, which is how a trattoria refreshes an entire menu in an afternoon.
It's worth being clear about what AI won't do: it works from photos only (no video), and the free plan's exports are watermarked and personal-use only — you'll want a paid plan for commercial menu work. See pricing for the plan breakdown, or read how a full menu shoot comes together in our restaurant food photography guide. For Italian spots specifically, the AI pasta photography page shows before-and-after examples across spaghetti, lasagna, ravioli, and more.
Best for: trattorias and osterias, fresh-pasta bars, Italian-American restaurants, CPG pasta brands, and any delivery menu that needs consistent, appetizing tiles fast.
Frequently Asked Questions
How do you photograph a spaghetti twirl?
Use a carving fork and a ladle. Drop a small amount of spaghetti into the curve of the ladle, set the fork tines in the center, and twirl the fork while the ladle holds the pasta in place until it coils into a tight nest. Nudge the nest onto the plate and slowly pull the fork straight up. Shoot at a 45° or low angle with side lighting, and use a small portion — too much pasta collapses into a flat tangle instead of a tall, appetizing twirl. For a mid-air forkful, lift the twirl above the bowl and fire your phone in burst mode to catch the strands falling. It's the single most useful move in all of pasta photography.
How do you photograph a lasagna cross-section so every layer shows?
Cut a clean slice and shoot it straight-on or from a low side angle — never from overhead, which hides the layers entirely. Let the lasagna rest for several minutes after baking so the portion sets and holds its shape rather than sliding apart. Plate it on a dark surface to make the pasta, sauce, and cheese pop, and light it from the side at 45° so each layer of noodle, ragù, and béchamel casts a subtle shadow and reads distinctly. Wipe your knife clean between cuts to keep the edges sharp.
How do you photograph white or cream pasta without overexposing it?
Pull your exposure down. White and cream sauces — alfredo, carbonara, cacio e pepe — reflect so much light that cameras tend to clip them to a featureless white blob. On a phone, tap and hold on the dish to lock focus and exposure, then drag the brightness (sun) icon down until you can see the silky texture of the sauce. Avoid harsh top light; light from the side instead, and add cracked black pepper or grated pecorino so the camera has dark detail to hold onto against the pale sauce.
What is the best camera angle for pasta photos?
It depends on the dish. A 45° angle is the all-purpose default — it shows height, twirl, and sauce on most plated pasta. Use a 90° overhead for bowls, brothy pasta, short shapes, and delivery-app tiles. Use a straight-on side angle for anything with layers or height you want to show off, like lasagna or a tall twirl. When in doubt, 45° is the safest starting point for spaghetti photography and most menu shots.
How do you keep pasta from looking dull and cold on camera?
Speed and a little prep. Pasta's glossy sheen fades within about two minutes of plating, so have your camera, lighting, and props set up before the dish arrives. Cooking the pasta just shy of al dente helps it hold its shape and shine under lights. Toss it with a touch of oil for gloss, add fresh herbs at the very last second so they don't wilt, and shoot fast. A common stylist trick for the "just-served" look is to hide a freshly microwaved damp cotton ball behind the dish to keep steam rising.
Can you use AI to create menu-ready pasta photos?
Yes — as long as you start with a real photo of the actual dish. An AI food photo editor like FoodShot AI takes a phone snapshot of your plated pasta and restyles it into a studio-quality, 4K image in about 90 seconds, with styles for menus, delivery apps, and fine dining. It can swap backgrounds, match a consistent look across your whole menu, and add finishing touches like fresh basil or extra sauce sheen. It won't invent a dish from scratch — you need a genuine pasta photo as the starting point — but for turning everyday kitchen photos into professional pasta images, it replaces most of a traditional photo shoot at a fraction of the cost.
Trattoria-Ready in 90 Seconds
Pasta will always be a demanding subject — it cools fast, photographs flat, and hides its best qualities under sauce. But the craft is learnable: build a tall twirl, light from the side, fight the color monotony with fresh contrast, match your angle to the shape, and shoot before the sheen fades. Get those right and your pasta photos will finally look as good as the dish tastes.
And when the lunch rush leaves no time for a photo shoot, you don't have to choose between fast and beautiful. Snap the plate, upload it, and let FoodShot AI hand you a menu-ready, trattoria-grade image in about 90 seconds. Start with a few free photos and see your next primo the way your guests will.
