Fruit Photography: Capture Vibrant, Fresh Produce
Walk into any supermarket and you're standing in the best free photo studio in town. Strawberries, citrus, grapes, dragon fruit — each arrives pre-loaded with saturated color, intricate texture, and a built-in glow most subjects would kill for. The catch: fruit is unforgiving. Shoot it flat and it looks like a grocery flyer; shoot it well and people can practically taste it.
This guide covers how to capture vibrant, fresh-looking fruit photography — the five shots worth mastering, how to light each type of fruit, the water-droplet trick the pros rely on, color theory that makes produce pop, and how to edit for richness without tipping into cartoon territory. Whether you run a juice bar, sell at a farmers market, or just love the subject, you'll leave with a repeatable system.
Quick Summary: Great fruit photography comes down to four things: pick flawless, fresh subjects; match your lighting direction to the fruit's surface (backlight translucent citrus, side-light textured berries, soft-light whole fruit); add dewy water droplets for freshness; and edit with Vibrance — not Saturation — so colors stay rich, not radioactive.
Why Fruit Photographs So Beautifully
Most foods need a stylist to look their best. Fruit shows up already styled. Three qualities make it special:
- Color that's already there. One bowl of mixed berries covers half the color wheel — no props or sauces required. That full-spectrum saturation is why healthy-food brands lean on fruit images for anything that needs to feel fresh.
- Texture you can't fake. Glossy cherries, fuzzy peaches and kiwis, the bumpy drupelets of a raspberry, the powdery bloom on grapes, the dimpled skin of an orange — texture is what makes a flat image feel touchable.
- The way it plays with light. Slice a lemon thin and it becomes stained glass. Backlight grapes and they glow from within. Cut flesh drinks up soft light; waxy skins throw crisp highlights. No other food category responds to light this dramatically.
No surprise, then, that fruit and vegetables earn their own category at the World Food Photography Awards. Few subjects give beginners and pros this much to work with.
The 5 Fruit Shots Every Photographer Should Master
You don't need a hundred ideas — five reliable compositions cover almost any fruit, brief, or season.
1. The Single Hero Portrait
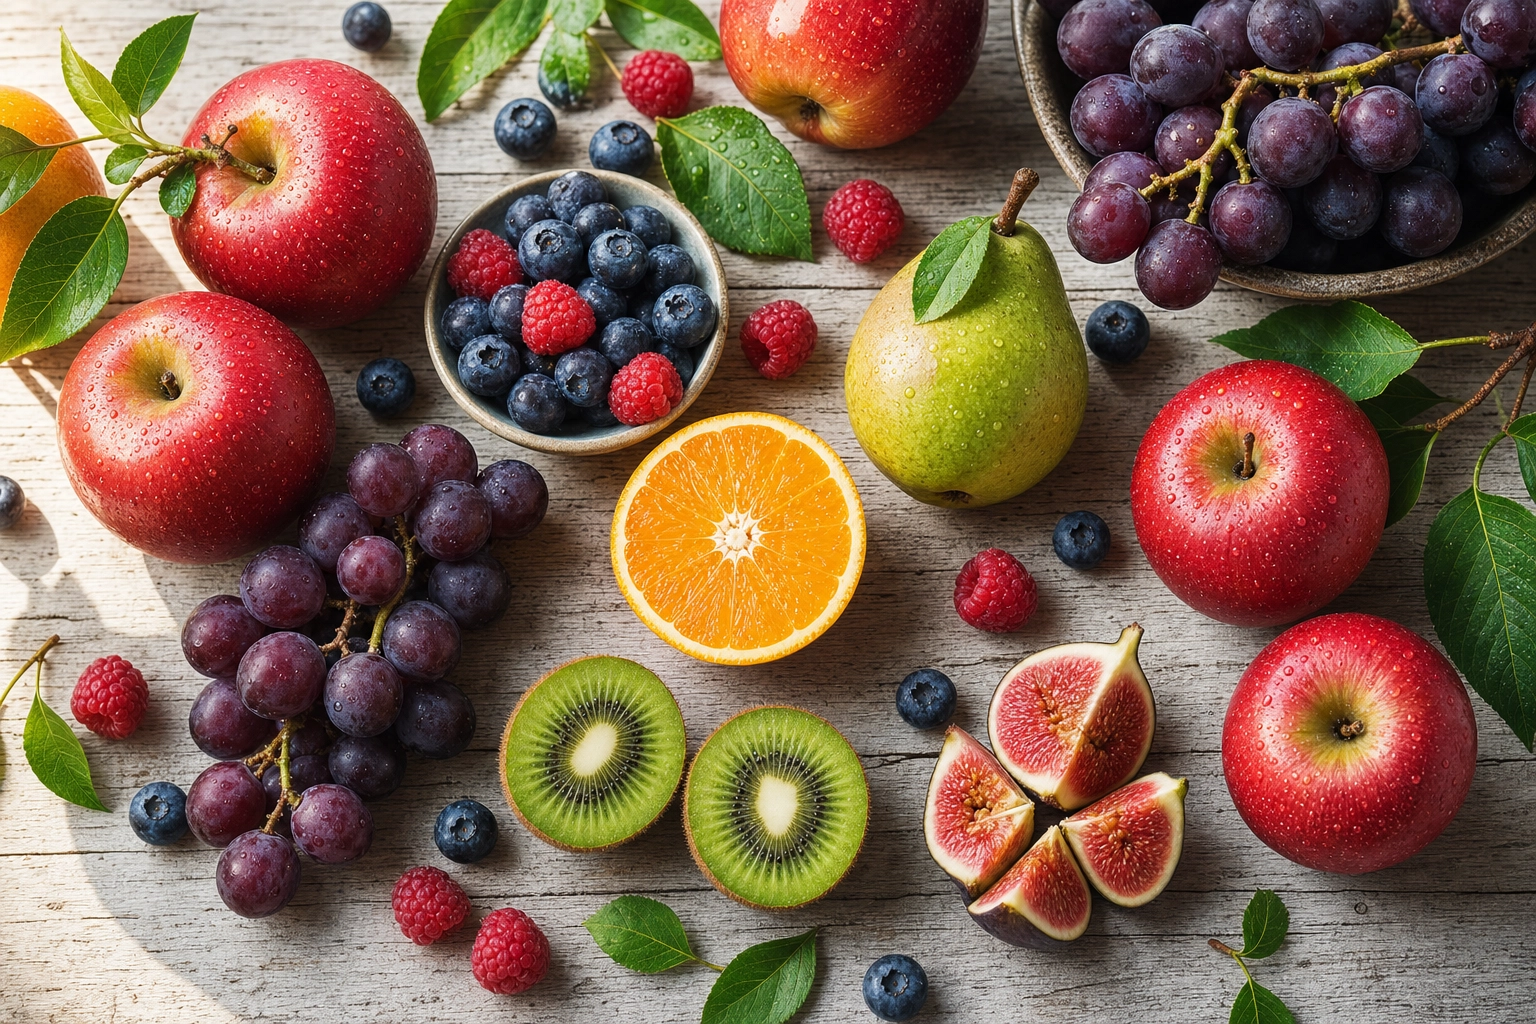
One flawless specimen against a clean background, with a shallow depth of field that melts everything behind it — your e-commerce and menu shot. It lives or dies on subject selection: hunt for a blemish-free apple, an unbruised pear, a strawberry with a perky green calyx. At this magnification, every flaw shows.
2. The Still-Life Arrangement
Group several fruits with a few props — linen, a wooden board, a ceramic bowl — for an editorial feel. Use odd numbers (threes and fives read more naturally than pairs), place key pieces on the rule-of-thirds lines, and build depth by staggering them front to back. A little intentional food styling goes a long way.
3. The Scattered or Cut Color Pop
Tumble berries across the frame or fan out citrus halves and shoot straight down for a graphic flat-lay. Here, color and shape do all the talking — perfect for social feeds and packaging.
4. The Water-Spritzed Freshness Shot
Nothing says "just-picked" like a scatter of water droplets. A light misting on grapes, apples, or cherries instantly reads as crisp and hydrated — so useful it gets its own section below.
5. The Cross-Section Reveal
Halve the fruit and show what's inside: the segments of an orange, the ruby arils of a pomegranate, the black-seed constellation of a dragon fruit, the jewel-like interior of a fig. The cross-section makes viewers taste the image — and it pairs beautifully with backlighting and close-up macro work.
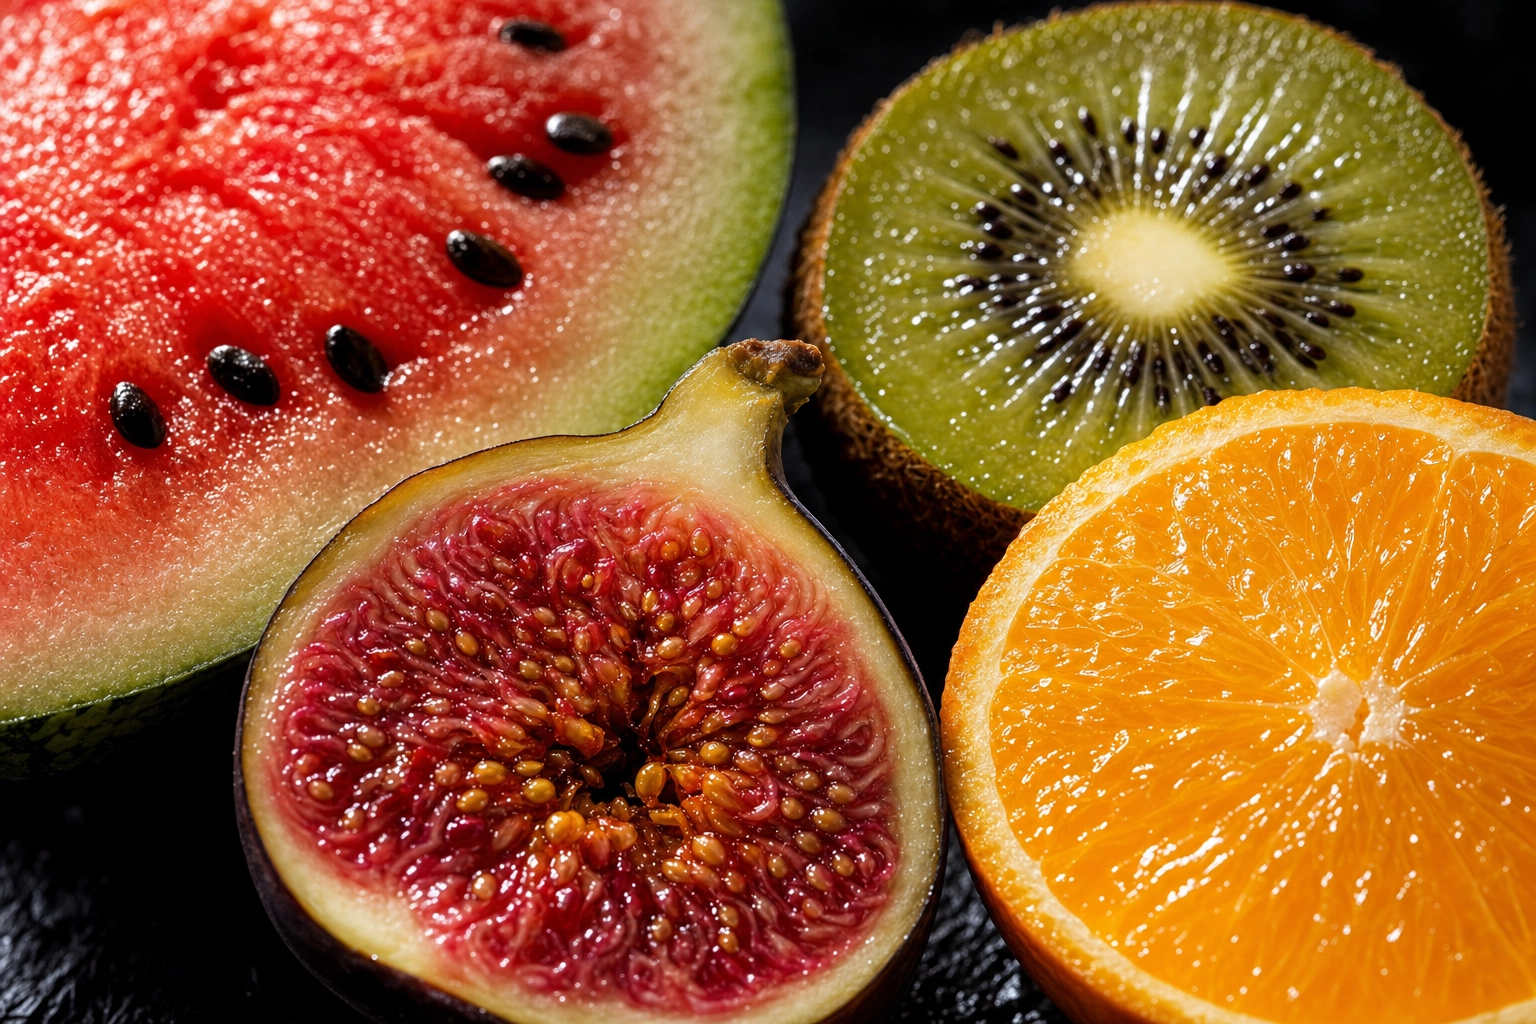 Macro cross-section fruit photography of halved watermelon, kiwi, fig and orange glistening on dark slate
How to Light Fruit: A Simple Direction-by-Texture Matrix
Forget expensive gear for a moment. The biggest lever in fruit photography is lighting direction — and the rule is simple: match it to the fruit's surface.
Backlight for Translucent Fruit (Citrus, Grapes, Kiwi)
Anything you can slice thin enough to let light through belongs in front of a backlight. Put your source behind the fruit — a window, an LED panel, even a phone light under a glass plate — and thin slices of lemon, orange, grapefruit, lime, or kiwi light up like stained glass, every segment and seed visible.
Backlighting's classic problem is exposure balance: you get either a blown-out background with lit fruit, or a bright background with a dark, silhouetted subject. Two fixes: bounce a white reflector onto the camera-facing side to lift the front, and for small slices, cut a fruit-shaped hole in black card so light passes only through the subject. That mask keeps the background clean and the glow concentrated.
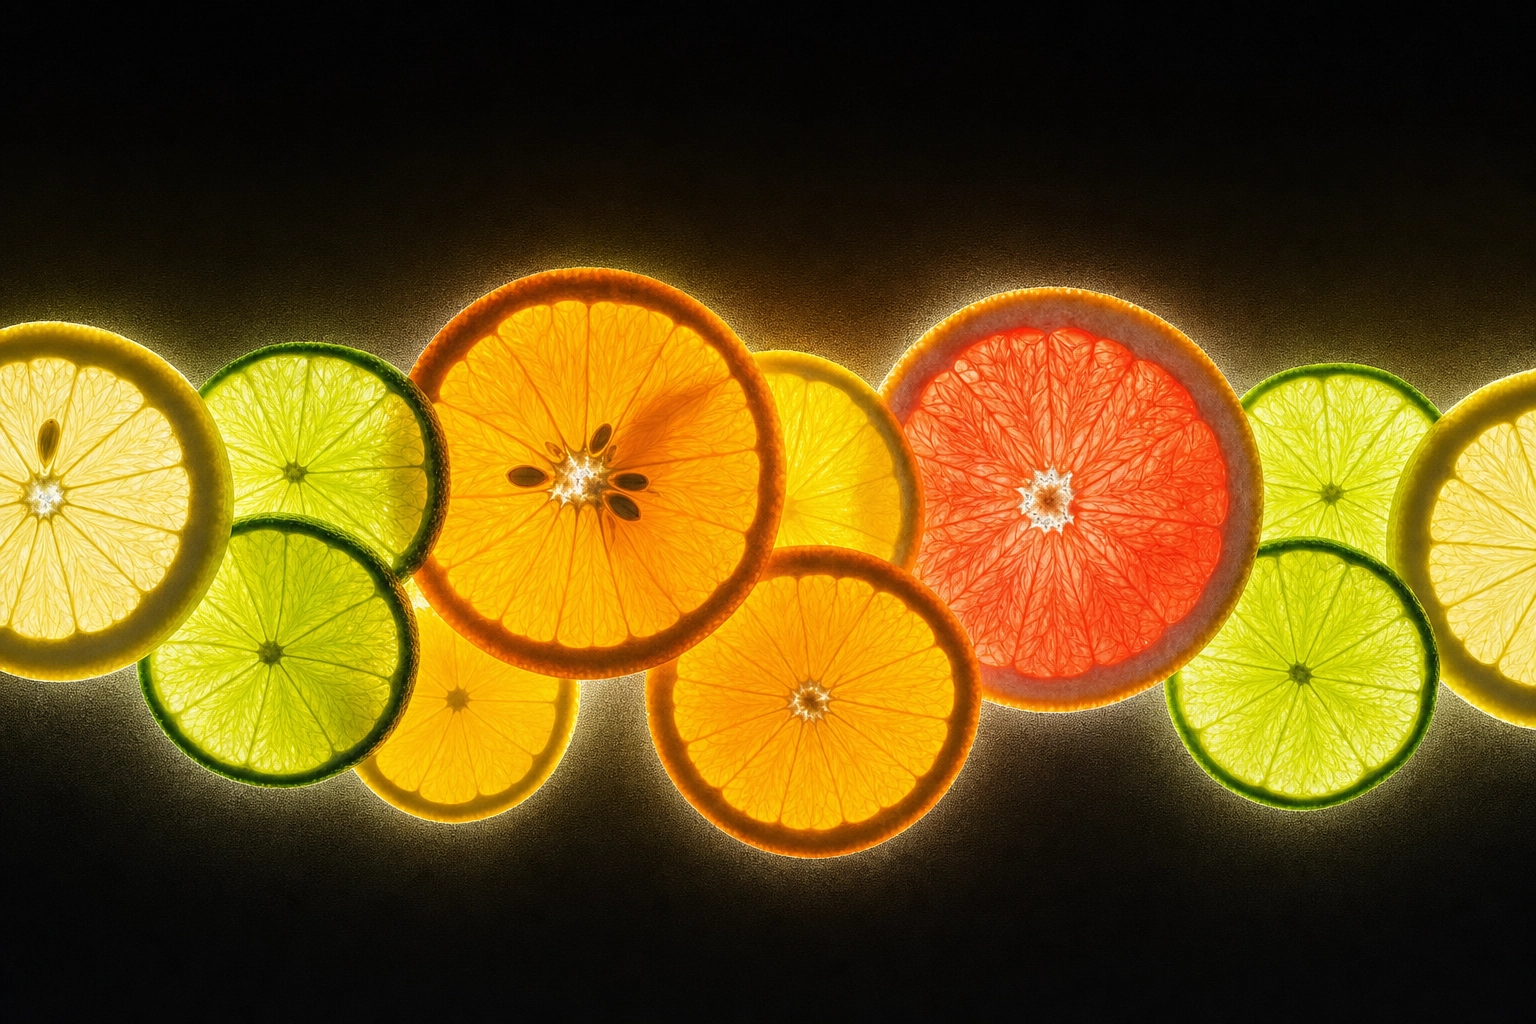 Backlit translucent citrus slices glowing like stained glass demonstrating backlighting in fruit photography
Side Light for Texture (Berries, Peaches, Pineapple)
When the story is texture, rake light across the surface from 45 to 90 degrees to the side. It skims over fuzzy peach skin, raspberry drupelets, and waxy cherry sheen, throwing tiny shadows that make texture pop. Fill the shadow side with a white card so darks keep detail instead of going muddy.
Soft Top or Front Light for Whole Fruit
Round, whole fruit looks best under a large, soft source — ideally natural light from a north- or south-facing window (no direct sun), or a softbox or scrim. On a harsh day, wait for clouds or tape a diffusion sheet over the window; soft light hides the hotspots that make apples look plastic. A reflector opposite opens the shadow side for an even, appetizing gradient.
The Water Droplet Trick: Real Condensation vs. Glycerin Spray
That dewy, fresh-from-the-market look is almost always added on purpose. Which method you choose depends on how long your shoot runs.
Plain water is cheap, natural-looking, and edible afterward. Load a fine-mist bottle, spritz from about a foot away, and shoot. The catch is speed — beads slide off smooth skins and evaporate within minutes. It's ideal for quick shots and for berries or grapes pulled straight from an ice-water bath (keep them chilling, pat lightly dry, and they photograph plump and crisp).
A 50/50 mix of food-grade vegetable glycerin and water is the studio standard for longer sessions. Glycerin is syrupy, so droplets bead up and stay put for hours without sliding or drying. Spritz it from a fine-mist bottle for an even coat, or place larger, deliberate drops with an eyedropper, syringe, or needle applicator. Corn syrup thinned with water is a budget stand-in.
A few details separate convincing droplets from obvious fakes:
- Match droplet size to the fruit. Fine mist for small berries; bigger placed drops for apples, melons, and glasses. Mixed sizes look most natural.
- Don't wipe the bloom. Grapes, blueberries, and plums wear a natural silvery coating called bloom — a freshness signal, not dirt. Handle them by the stem; rubbing it off makes them look old.
- Rule of thumb: water for fast, natural, eat-it-after shots; glycerin for long sessions and smooth surfaces that must stay perfect between frames.
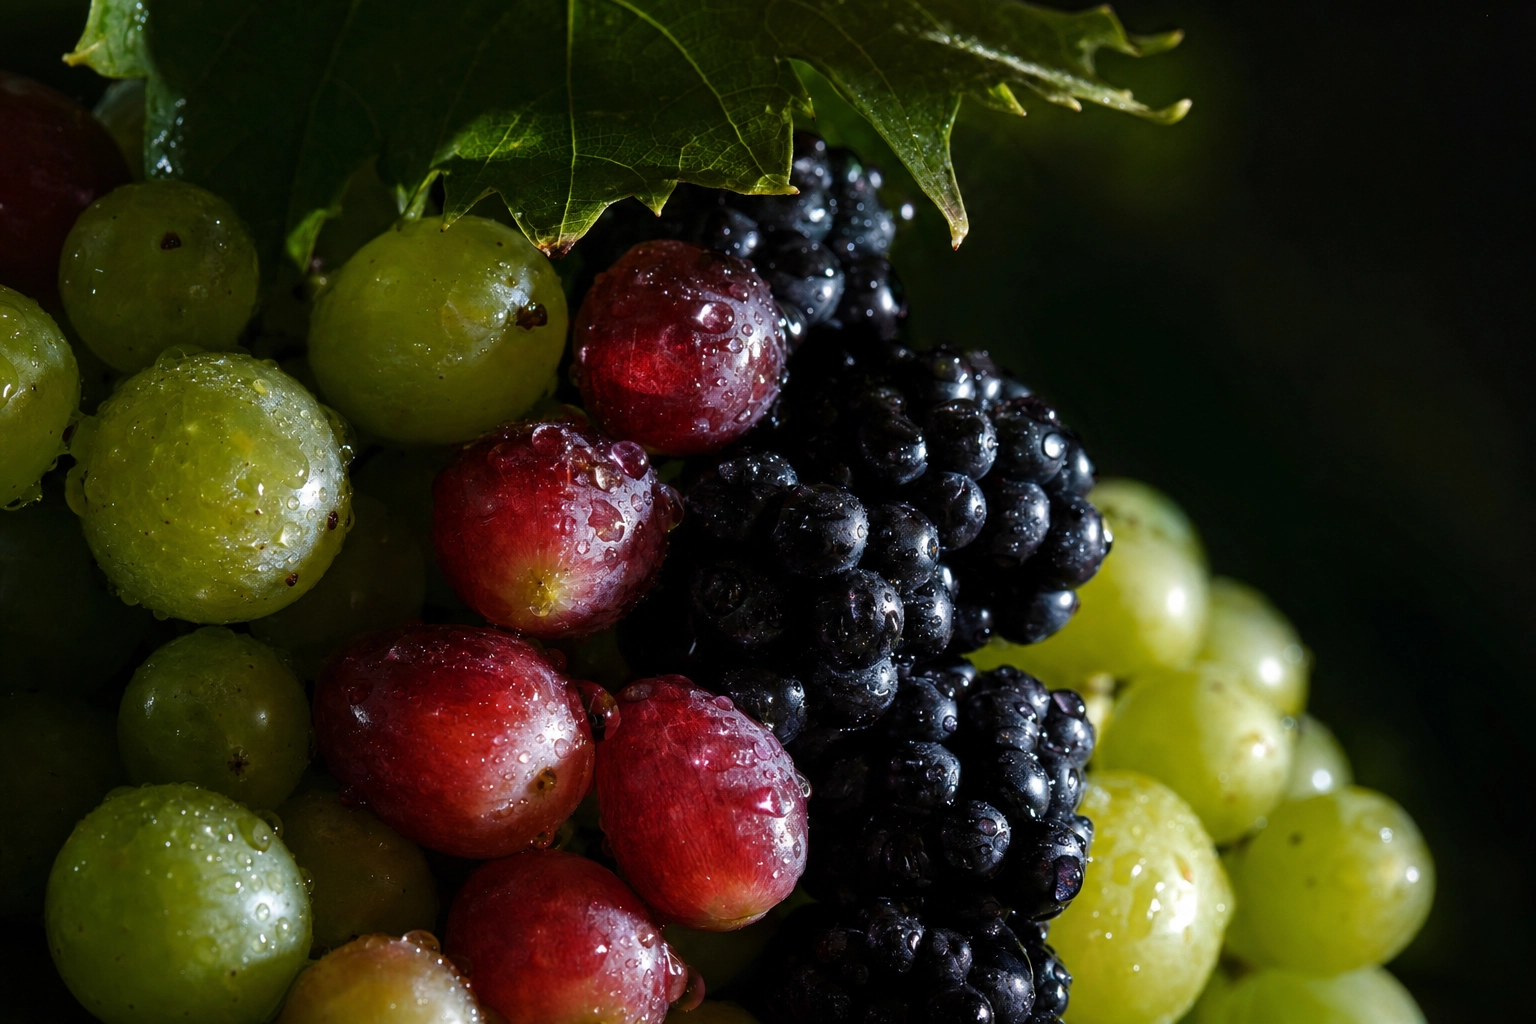 Side-lit grapes and blackberries with silvery bloom and water droplets in close-up fresh fruit photography
Fruit-by-Fruit Styling Tips
Every fruit has quirks. Here's a quick playbook for the ones you'll shoot most.
Citrus, Berries, and Exotic Fruit
Citrus is the most versatile subject you can buy. Halve it crosswise for the segment pinwheel, slice it paper-thin for backlit glow, and wipe stray pith off the cut face. A light spritz makes the flesh sparkle.
Berries reward restraint. Cluster them tightly rather than scattering a thin layer — abundance reads as fresh. Keep the bloom, and use side light to catch strawberry seeds and raspberry texture. They're made for close-up macro frames.
Exotic and tropical fruit — dragon fruit, pomegranate, passionfruit, mango, lychee — sell on drama. Hero the cross-section where the color contrast lives (hot-pink pitaya flesh, ruby arils) on a plain, neutral surface so nothing competes.
Apples, Pears, Melons, Squash, and Dried Fruit
Apples and pears have glossy skins that throw harsh hotspots — soften your light or flag the brightest reflection, and keep a leaf or stem for life. Cut surfaces brown fast (see the FAQ).
Summer melons are about the wedge: it shows the seed pattern and the gradient from rind to ripe center. Think bold, juicy color blocks.
Autumn pumpkin and squash flip the mood — matte skin, earthy tones, warm side light, and rustic wood or burlap for seasonal storytelling.
Dried fruit (figs, apricots, dates) is low in saturation and high in texture, so rake a warm light across the wrinkles and shoot on dark, neutral grounds. Most of these tricks carry over to vegetables, too.
Color Theory: Backgrounds That Make Fruit Pop
The fastest way to make fruit look more vibrant isn't a slider — it's the background behind it. Straight from the color wheel:
- Complementary backgrounds. Pair a fruit with its opposite and both intensify: orange citrus on blue or teal, red strawberries on green, yellow lemons on purple, deep grapes on mustard.
- The monochrome challenge. For an editorial look, match fruit to a background in the same hue — a red apple on red — and let shape, texture, and tone carry the image.
- The rainbow assortment. Line up produce in spectrum order — strawberry, orange, lemon, kiwi, blueberry, grape — for high-energy flat-lay images built for a juice or smoothie brand.
- Neutral grounds. Let the fruit lead: white reads clean and clinical, black turns fruit jewel-like, wood or linen feels rustic, and soft grey ceramic is the modern editorial default.
To go deeper on tone and mood, our color grading guide covers how palette choices carry across a brand.
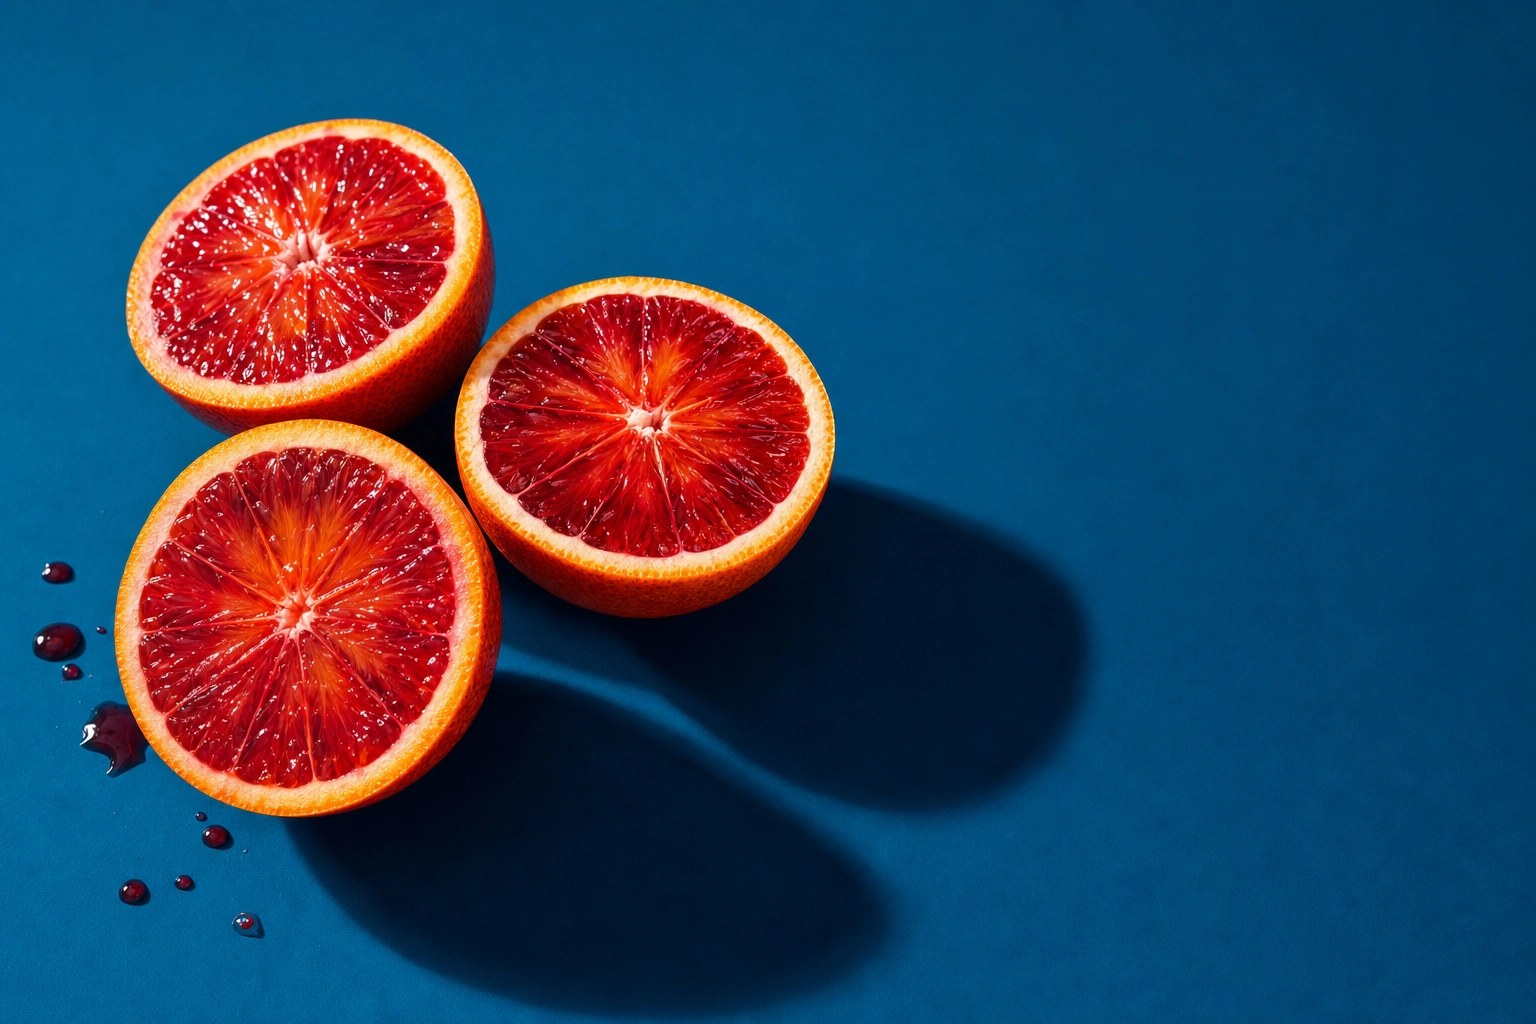 Halved blood oranges on a teal background showing complementary color theory in vibrant fruit photography
Editing for Vibrancy Without Going Neon
Here's where most fruit photos go wrong: someone drags Saturation to +40 and the strawberries turn radioactive. The fix is two sliders that look alike but behave nothing alike.
Saturation boosts every color equally, needed or not. Push it and vivid reds and oranges clip, lose detail, and turn plasticky.
Vibrance is the smart version: it lifts only muted, less-saturated colors and protects the strong ones. For food, that's exactly right — dull background greens come up while the ripe red stays believable.
A reliable workflow for rich, natural fruit:
- Set white balance first. Accurate color is the foundation.
- Fix exposure and contrast before color. Over-pushed contrast and clarity fake oversaturation on their own — and on juicy fruit, easing Clarity down keeps it soft, not crunchy.
- Add Vibrance modestly, and keep Saturation under about +10 if you touch it at all.
- Refine per color in HSL. The Luminance tab is the secret: raise a color's luminance to make it glow without adding saturation; lower it to deepen dark berries and grapes. Use the Saturation tab to lift just the reds for strawberries without touching the greens.
- Watch the histogram for clipping.
The goal is fruit that looks like the best version of itself — not a screensaver.
The AI Shortcut: Studio-Quality Fruit Photography in 90 Seconds
Everything above assumes you have the time, the gear, and a free afternoon. Plenty of fruit businesses don't. If you run a juice bar, a smoothie counter, a produce stand, or a relentless content calendar, you need vibrant fruit photos today.
That's the gap an AI food photo editor closes. Snap a clean, well-framed phone photo of your real fruit, smoothie, or platter, and FoodShot AI restyles it into studio-quality fruit photography in about 90 seconds — handling the lighting, gloss, and polish. Apply any of 200+ looks, lock a consistent style across a whole menu with brand reference photos, and export your images at 4K for print or delivery apps. For juice bars and smoothie shops, it's the difference between one good photo a month and a full, on-brand library.
One honest caveat: the tool elevates a real photo of your real fruit — it doesn't invent produce from a text prompt. Start with an actual shot and it does the heavy lifting from there. If desserts and drinks are on your menu too, the same approach carries over to our dessert photography guide.
 Fresh layered fruit smoothie in a tall glass on a sunlit juice bar counter surrounded by whole fruit
Ready to try it? Turn a phone snap into menu-ready AI fruit photography in seconds — paid plans start at $15/mo.
Frequently Asked Questions
How do I keep cut fruit from turning brown while I photograph it?
Cut apples, pears, bananas, and peaches brown fast because an enzyme (polyphenol oxidase) reacts with oxygen the instant the flesh is exposed — a process called enzymatic browning. On set: cut last and shoot fast, brush cut surfaces with full-strength lemon or lime juice (the acid stalls the enzyme), or dunk slices briefly in acidulated or lightly salted water and pat them dry. Keep spare cut pieces ready to swap in.
What is the best way to get realistic water droplets on fruit?
For a quick, natural look, mist plain water from a fine spray bottle and shoot right away. For longer sessions, mix 50/50 food-grade glycerin and water — the droplets bead up and hold for hours without sliding or evaporating. Use a fine mist on small berries and an eyedropper or needle applicator for bigger drops on apples and melons, and vary the sizes so it reads like real condensation, not a uniform spray.
How do you photograph dark berries differently from light-colored fruits?
Dark fruit (blackberries, blueberries, black grapes) absorbs light, so give it more plus a touch of fill — add a reflector or second soft light, ease off contrast so shadows don't crush to black, and in editing raise the luminance of the blues and purples to keep detail. Light, glossy fruit (apples, white grapes, melon) clips easily, so meter for the highlights, soften your source to tame hotspots, and protect the brightest tones. As a rule, dark fruit pops on light or warm backgrounds, pale fruit on dark or saturated ones.
What camera or phone settings work best for fruit photography?
Use your lowest ISO (100 if possible) for clean color, and a tripod so you can shoot a slower shutter without blur. For detail-rich still lifes and cross-sections, stop down to about f/8–f/11 for front-to-back sharpness; for a single hero, open to f/2.8–f/4 to blur the background. Shoot RAW (or your phone's ProRAW/RAW mode) for far more room to fine-tune color and recover highlights later.
Do I need a macro lens for close-up fruit photography?
No. A dedicated macro lens is wonderful for extreme detail like a single raspberry drupelet, but it isn't required. Most modern phones have a close-focus or macro mode that handles cross-sections and texture well, and on a camera you can get close with a standard lens or an inexpensive set of close-up filters. Good light and a steady tripod matter far more than the lens for sharp close-up fruit shots.
