12 Food Photography Techniques That Make Dishes Irresistible

You already own a decent camera — or at least a smartphone made after 2020. The equipment isn't what's holding your food photos back. It's how you arrange, frame, and capture what's already in front of you. These food photography techniques are the difference between a photo someone scrolls past and one that makes them tap "order now."
Quick Summary: These 12 food photography techniques — from rule of thirds placement to AI-powered enhancement — are what separate scroll-stopping food images from forgettable snapshots. Each one is specific, actionable, and works whether you're shooting on an iPhone or a full-frame DSLR.
Technique matters more than megapixels or lens price. And the good news is every food photography method below can be practiced today with whatever gear you already have.
If you're new to what food photography is and how it works, start there. Otherwise, let's get into the 12 techniques that actually move the needle.
Why These Food Photography Techniques Matter More Than Gear
Here's a truth professional food photographers won't always admit: a $400 phone with solid composition knowledge will outperform a $3,000 DSLR in the hands of someone who centers every shot and uses direct flash.
Composition, lighting, and styling are the real foundation of food photography. Your equipment matters — but only after you understand how to use these techniques. Research from Nielsen Norman Group confirms that authentic, well-composed images significantly outperform generic stock photos in user engagement. On food delivery platforms, that translates directly to click-through rates and orders.
These 12 food photography techniques are listed from foundational to advanced. Master the first few before layering on complexity.
1. Rule of Thirds — Off-Center Your Hero Dish
The rule of thirds is the single fastest food photography technique to improve your composition. Imagine two horizontal and two vertical lines dividing your frame into nine equal sections. Place your main dish at one of the four intersection points — not dead center.
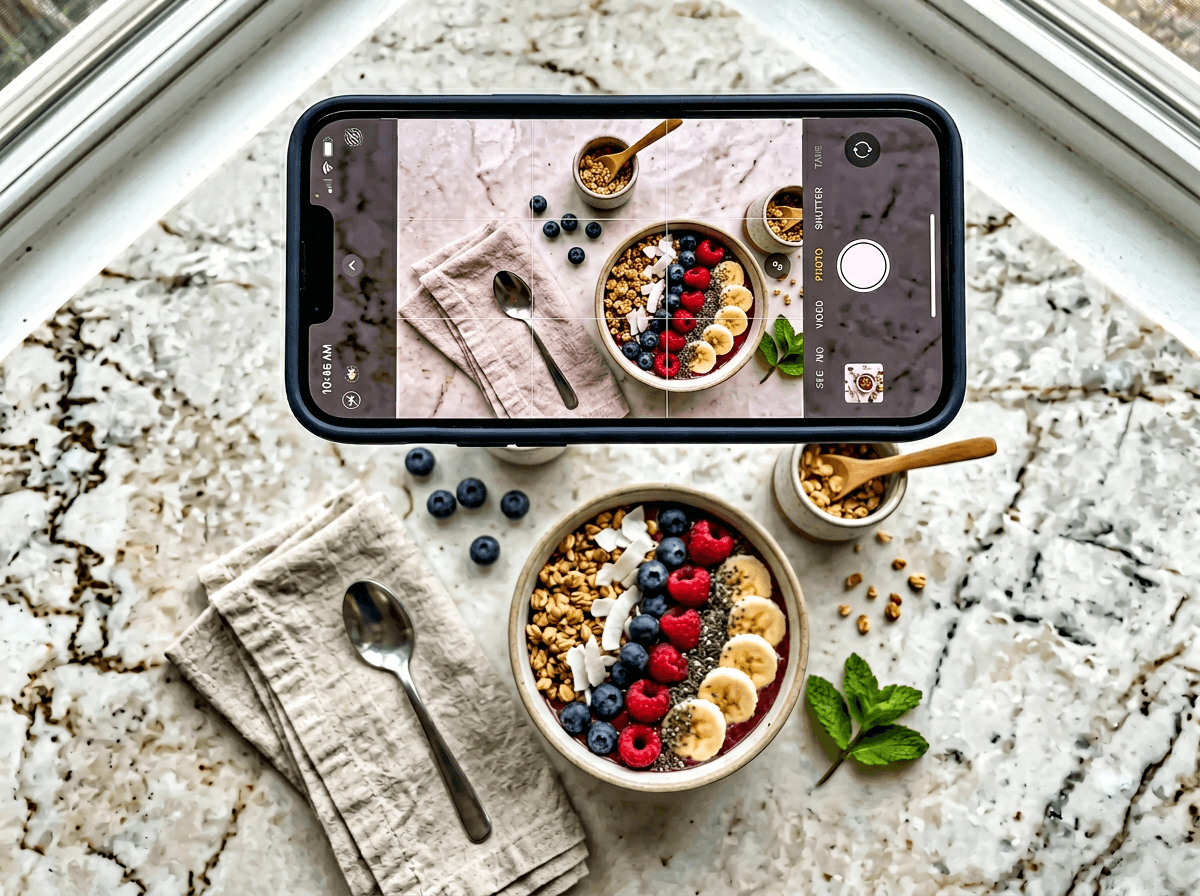 Rule of thirds grid overlay on smartphone camera app demonstrating food photography composition placement
Why it works: Centered subjects feel static. Off-center placement creates visual tension and gives the eye room to explore the frame. This principle comes from centuries of art composition and applies to food photography just as powerfully as it does to landscape or portrait work.
How to apply it:
- Enable the grid overlay in your camera app (Settings → Camera → Grid on iPhone)
- Position the tallest or most colorful part of your dish at an intersection point
- Leave the opposite side for supporting elements — a napkin, a drink, scattered ingredients
For single-plate hero shots destined for Instagram or delivery apps, the rule of thirds instantly adds a sense of intentionality. The dish looks placed, not plopped.
2. Leading Lines — Guide the Eye With Props and Ingredients
Leading lines are elements within your frame that direct the viewer's gaze toward your hero dish. Think of them as invisible arrows pointing at the food.
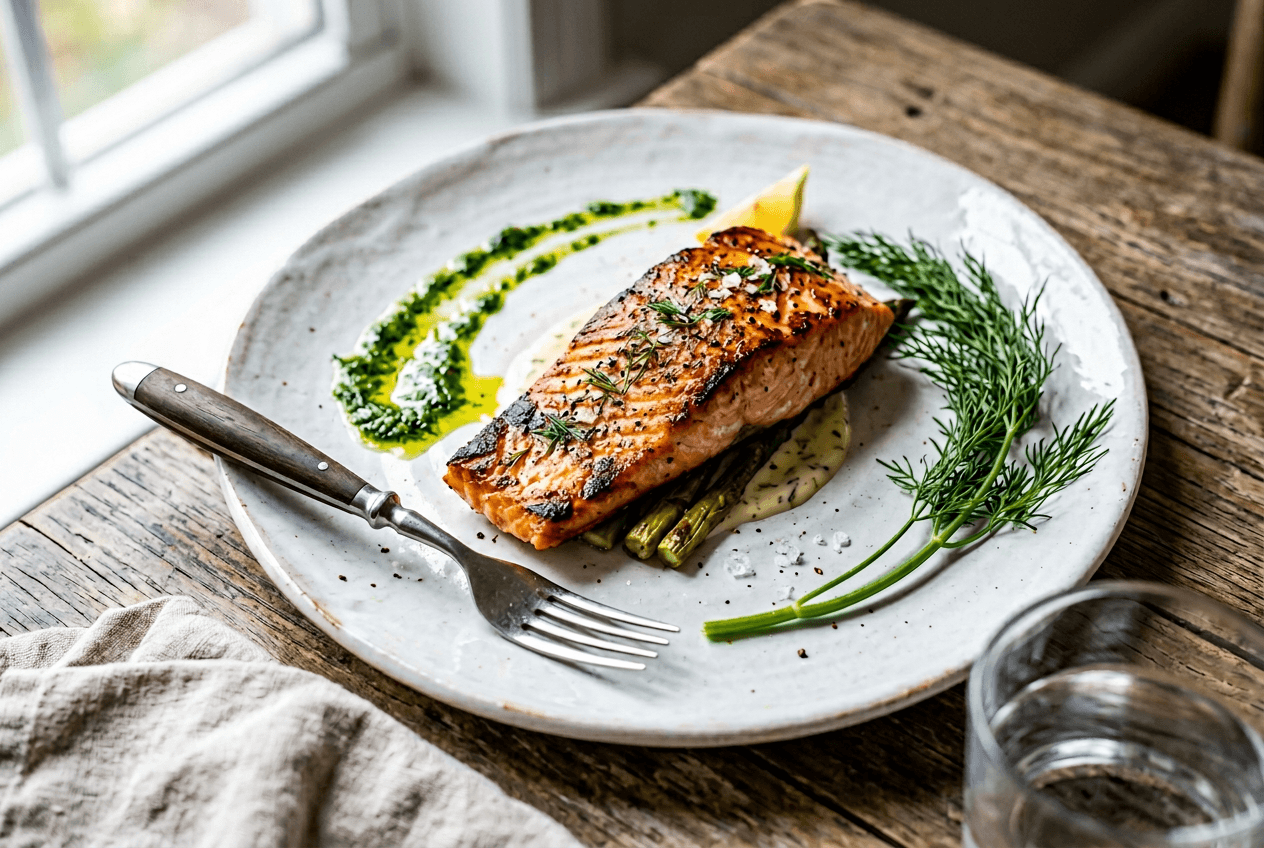 Leading lines food photography technique using fork handle and herb oil drizzle to direct eye toward salmon
Common leading lines in food photography:
- A fork handle angled toward the plate
- A sauce drizzle sweeping from edge to center
- A linen napkin folded diagonally toward the dish
- Herb sprigs or scattered ingredients curving inward
- The edge of a cutting board pointing at the star
Diagonal lines are the most dynamic — they create energy and movement in food photos. Horizontal lines (like a row of breadsticks) feel calm and orderly. Vertical lines (a tall pepper grinder, a standing bottle) convey structure and height.
The key principle: every prop in your frame should either lead to or frame the hero dish. If it doesn't do either, remove it — it's visual clutter.
3. Negative Space — When Less Becomes More
Negative space is the empty area around your subject. In food photography, it's the bare table, the clean background, the breathing room around a single plate.
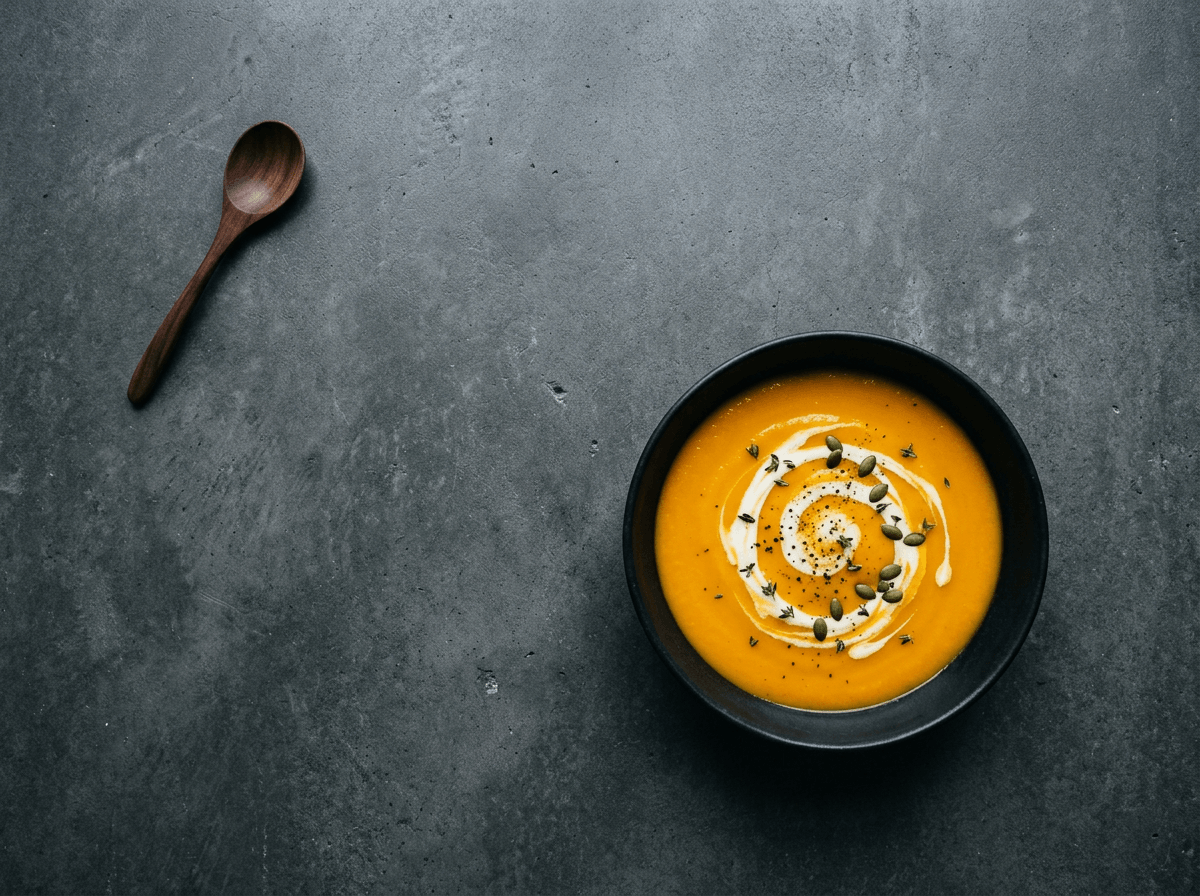 Negative space food photography technique with minimalist soup composition on dark surface
Why use negative space in food photos:
- It forces the viewer's eye directly to the food — no distractions
- It creates a sense of elegance and sophistication (fine dining menus use this extensively)
- It leaves room for text overlays on social media and restaurant menus
- It lets beautiful surfaces and backgrounds shine on their own
The overhead (90°) angle was essentially made for negative space. Shoot a single bowl of ramen from directly above on a clean marble surface, and you've got a shot that feels editorial.
The mistake to avoid: negative space isn't just "taking a photo from far away." The food should still feel close and detailed. Pull back selectively — leave empty areas on one or two sides while keeping the food large enough to see texture and color clearly.
4. The Hero Angle — Choosing Overhead, 45°, or Eye-Level
Every dish has a "best side." Choosing the right camera angle is the food photography technique that reveals it.
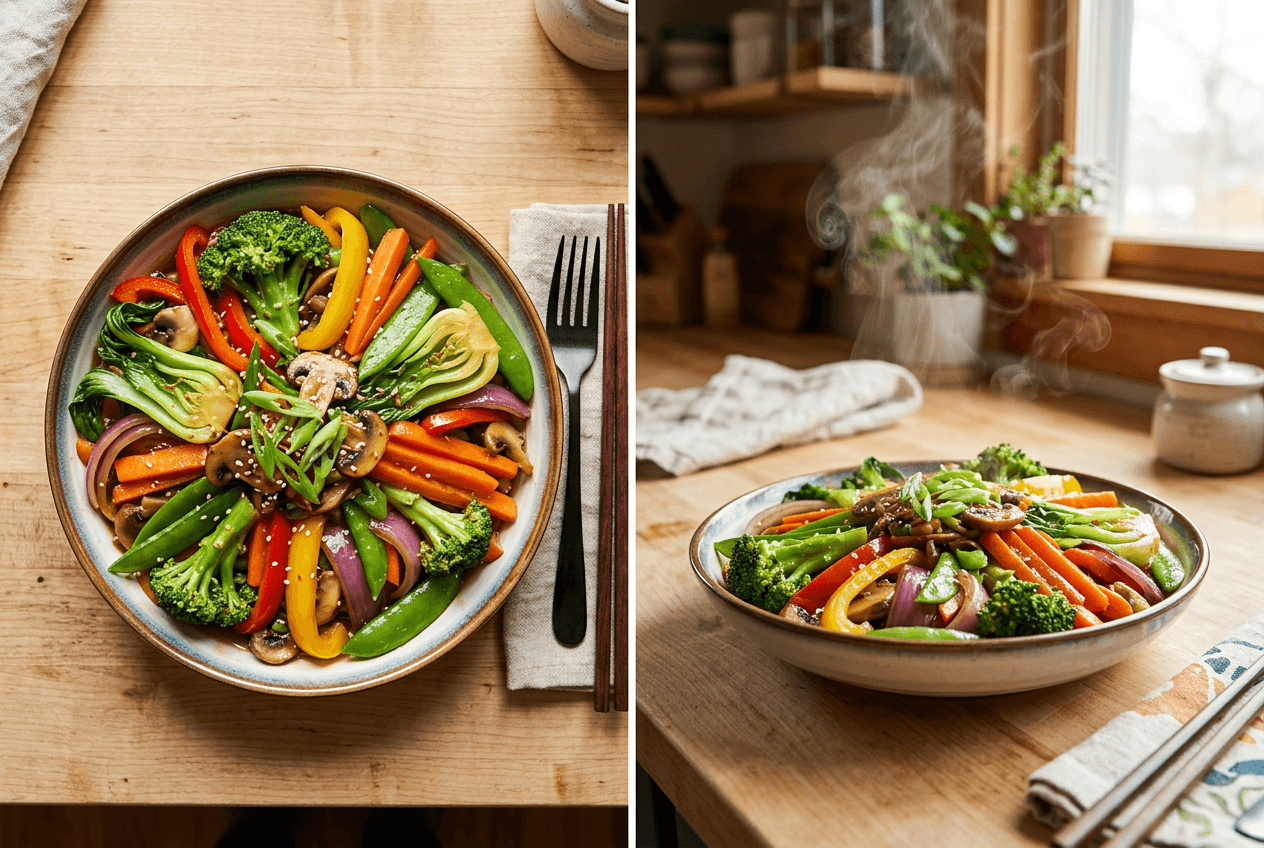 Camera angle comparison for food photography showing 90-degree overhead versus 45-degree perspective
45° angle (the workhorse): Best for most dishes. This is how you naturally see food sitting at a table. It shows the top and the sides — perfect for stacked burgers, layered cakes, bowls of pasta, and any dish with height. Shoot between f/2.8 and f/5.6 to separate the food from background clutter.
90° overhead (the flat lay): Best for flat dishes — pizza, salads, charcuterie boards, open-face sandwiches. Everything sits on the same focal plane, so shoot at f/8 to f/16 to keep it all sharp. This angle excels at showing pattern, color arrangement, and food styling details from above.
Eye-level (the dramatic shot): Best for tall items and drinks — a stacked club sandwich, a towering milkshake, a cocktail with garnish, layered pancakes with dripping syrup. Eye-level emphasizes height and creates an intimate "this is right in front of you" feeling.
Quick cheat sheet:
| Dish Type | Best Angle | Why |
|---|---|---|
| Pizza, salads, flat lays | 90° overhead | Shows patterns and full spread |
| Pasta, curry, stews | 45° | Shows depth and steam |
| Burgers, cakes, sandwiches | 45° or eye-level | Reveals layers and height |
| Cocktails, milkshakes | Eye-level | Emphasizes the glass and garnish |
| Soup with garnish | 45° | Shows both surface and bowl depth |
5. Depth of Field — Isolate Your Star or Set the Scene
Depth of field controls how much of your image is in sharp focus. It's one of the most powerful food photography techniques for directing attention — the difference between a dreamy, blurred-background hero shot and a crisp, everything-in-focus flat lay.
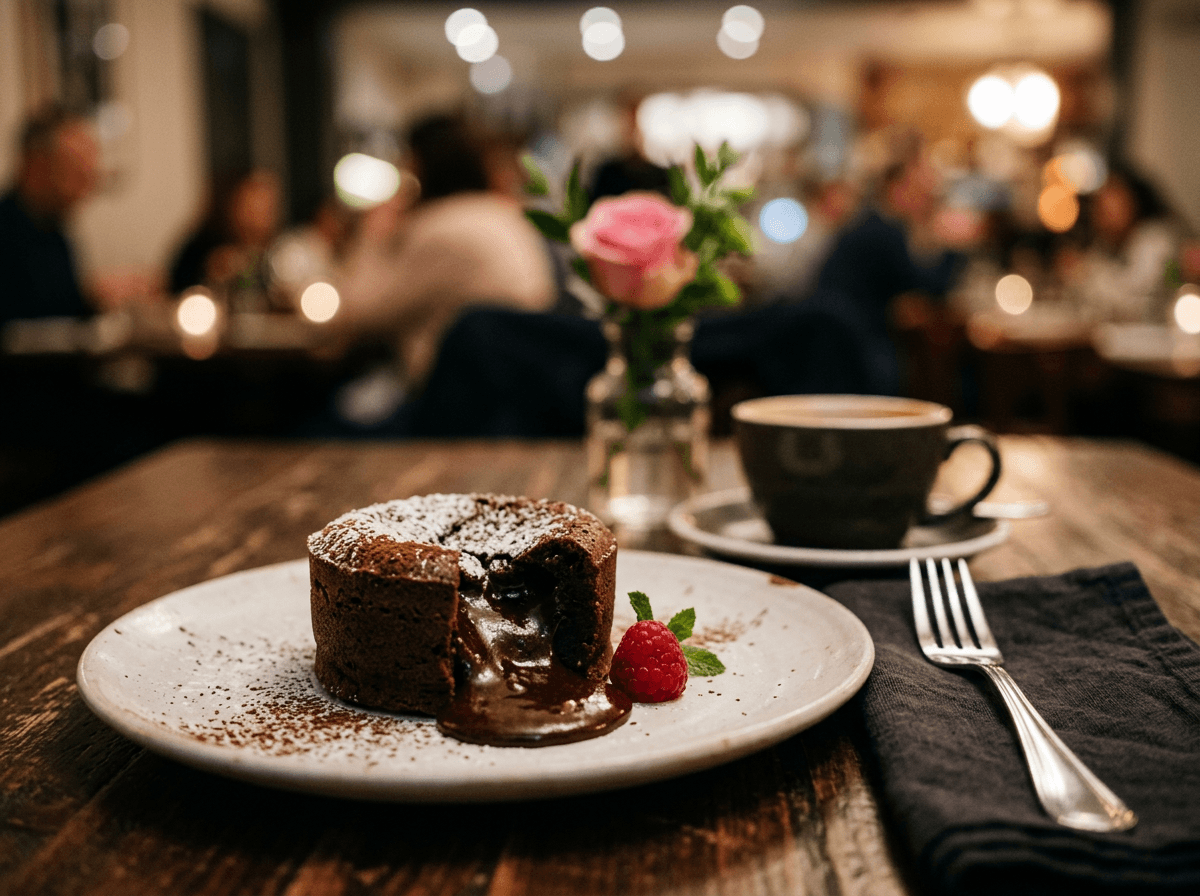 Depth of field food photography technique showing sharp foreground dessert with creamy bokeh background
Shallow depth of field (wide aperture, f/1.4–f/2.8): Blurs the background and foreground, making the hero dish pop. Perfect for 45° food photography shots where you want supporting props to tell the story without stealing attention. On smartphones, Portrait mode simulates this effect quite convincingly.
Deep depth of field (narrow aperture, f/8–f/16): Keeps everything sharp from edge to edge. Essential for overhead food photography shots and scene-setting images where every element matters equally.
The balance to strike: your props should be readable enough to contribute to the story, but soft enough that they don't compete with the food. A wine glass in the background should be recognizable but not razor-sharp. That sweet spot is usually around f/4 for 45° food shots.
If you're taking food photos with your phone, tap the screen to set your focus point on the food, then experiment with Portrait mode's blur intensity slider.
6. Triangular Composition — The Power of Three
Our brains are hardwired to find odd numbers more pleasing than even ones. This is the "rule of odds" — and in food photography composition, three is the magic number.
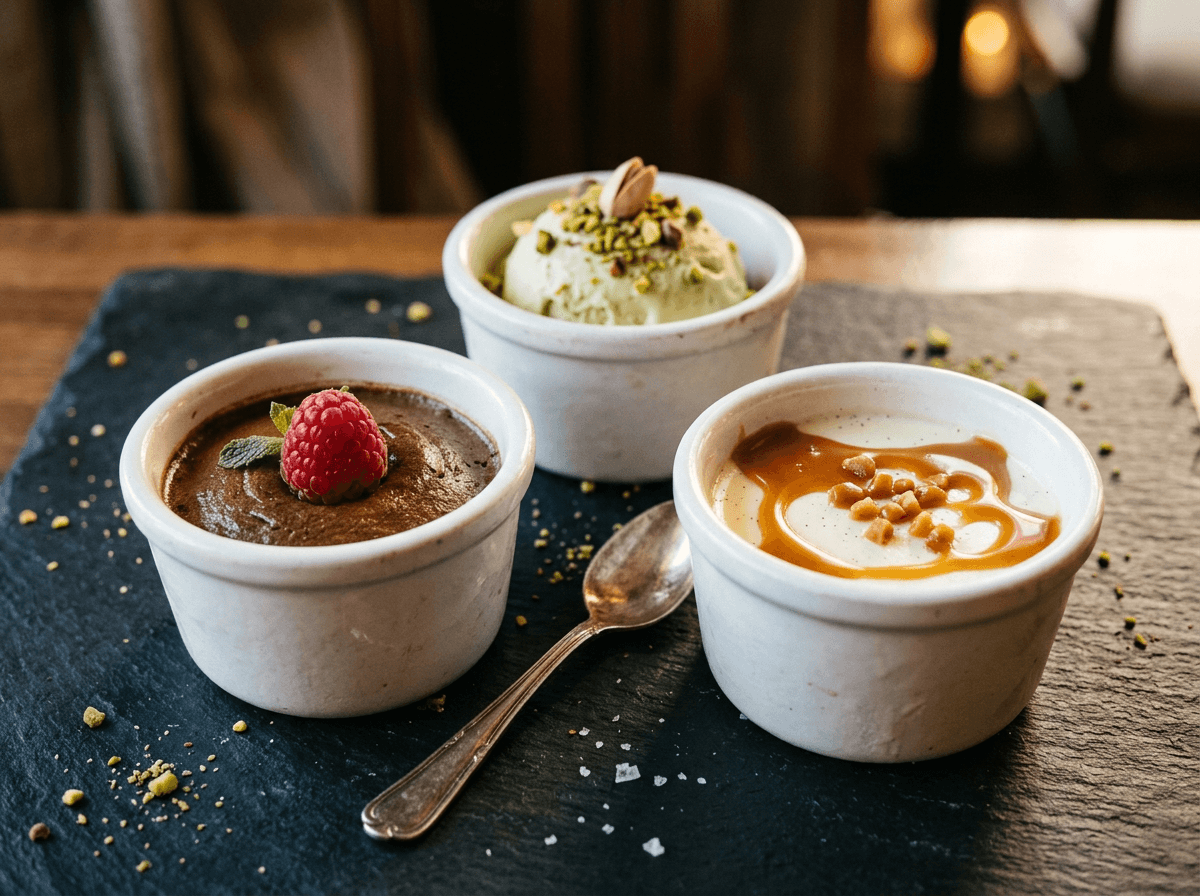 Triangular composition food photography technique with three dessert ramekins arranged in triangle formation
Place three elements in a triangular arrangement (two close together, one with breathing room), and the viewer's eye naturally travels in a loop: point to point to point and back again. It creates movement and balance in a still image.
Practical examples:
- Three bowls of soup arranged in a triangle, each at a different distance from the camera
- A main plate with a drink and a small garnish bowl forming three anchor points
- Three identical pastries, each slightly rotated for visual interest
This food photography technique works beautifully for multi-item shots on delivery platforms and for restaurant menu layouts where you need to show variety without chaos. Five elements work too — just arrange them in overlapping triangles.
7. Movement and Pour Shots — Capturing Action
Static food photos show you what a dish looks like. Movement shots show you what it feels like. A honey drizzle, a cheese pull, a dusting of powdered sugar — these are the shots that stop thumbs mid-scroll.
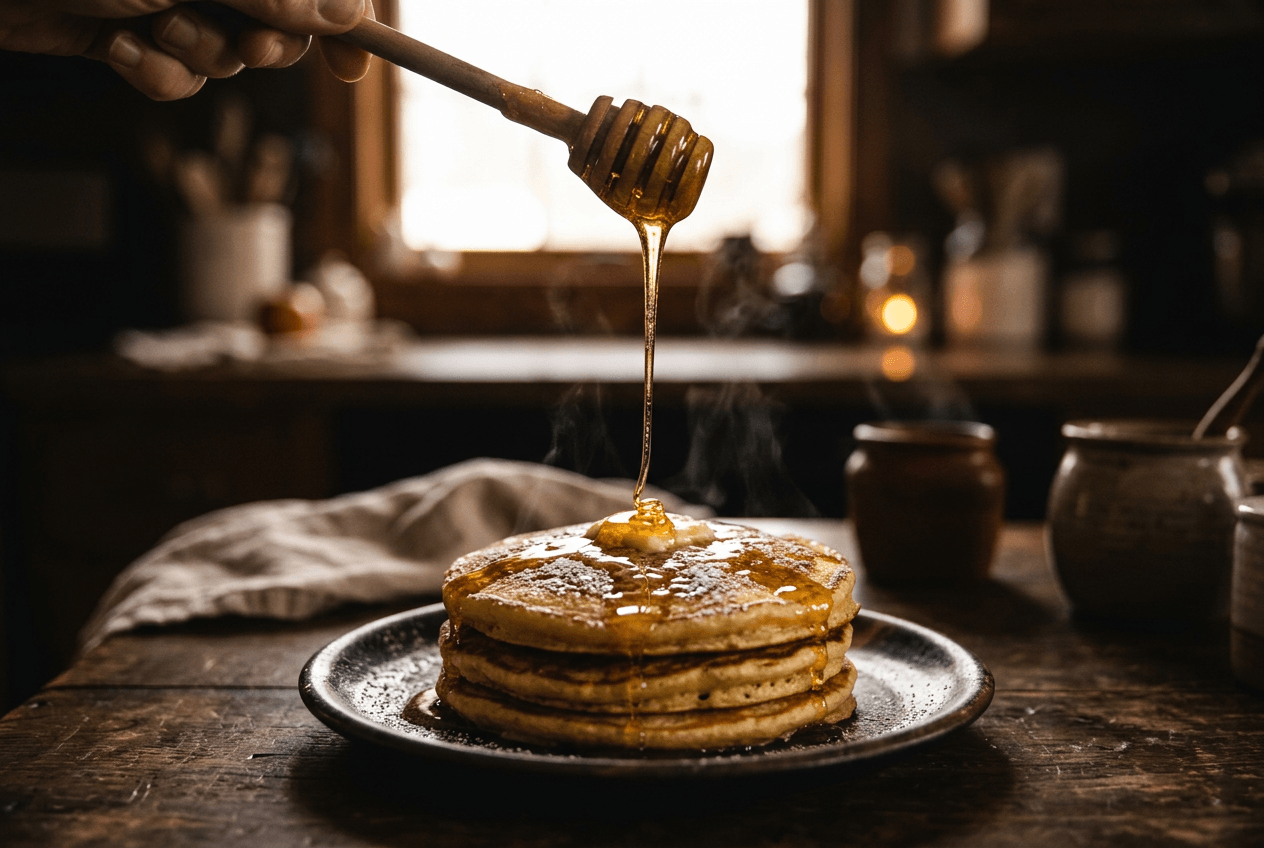 Movement pour shot technique in food photography showing honey drizzle frozen mid-air over pancakes
Camera settings for movement:
- Freezing action (crisp, sharp): Shutter speed 1/1000s or faster. Use burst mode. This captures honey mid-drip in crystal-clear detail.
- Motion blur (smooth, luxurious): Shutter speed around 1/60s. The liquid becomes a soft, flowing stream while the dish stays sharp.
Pro tips that save hours of frustration:
- Use a tripod or stable surface. Handheld camera + pouring hand = two sources of motion = blurry mess.
- Backlight your pour. Side or back lighting makes translucent liquids (honey, syrup, oil) glow beautifully.
- Practice extensively. Professional food photographers expect to take hundreds of shots to get one perfect frame.
- Consistency of the liquid matters. Too thick and it falls in clumps. Too thin and you can barely see it. Dilute or thicken as needed.
Cheese pulls are the hardest food photography technique to nail — the timing window between "not stretchy enough" and "snapped and drooped" is about half a second. Expect to melt, pull, and repeat many times.
8. Color Contrast — Make Garnishes Pop
Color is one of the most powerful yet underused food photography techniques. The right garnish on the right background can transform a dull photo into one that looks instantly appetizing.
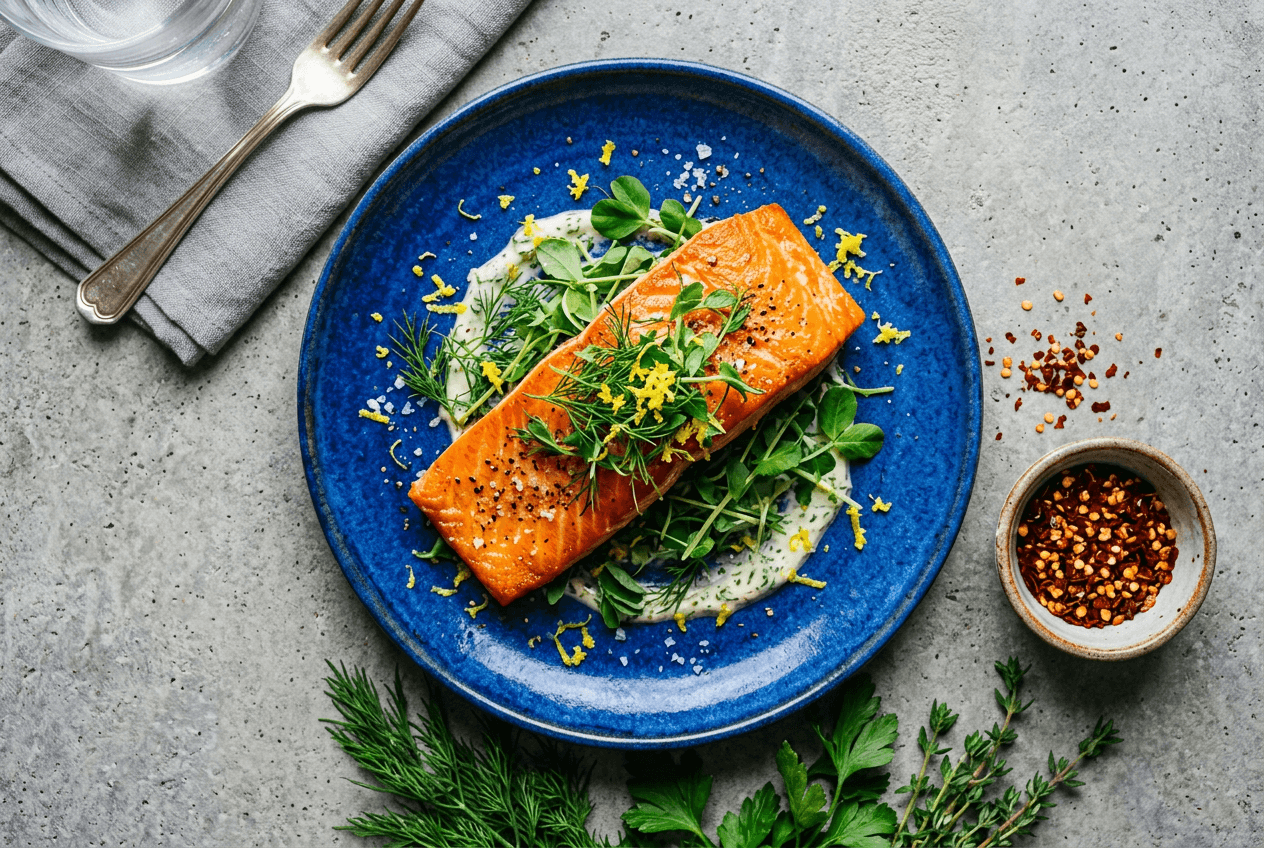 Color contrast food photography technique with complementary orange salmon and blue plate combination
Complementary color combos that work in food photography:
- Red tomatoes on green basil (classic Italian)
- Orange carrots or salmon on blue-grey slate
- Yellow lemon zest on deep purple açai
- Bright green microgreens on warm brown bread or dark chocolate
Monochromatic approach: Sometimes restraint is more powerful. Different shades of the same color family — a cream-colored soup on a white plate with beige linen and ivory props — creates a sophisticated, editorial look that food magazines love.
Don't forget the surface. A dark wooden board makes bright food sing. A white marble surface feels clean and modern. A warm terracotta plate adds rustic charm. Your background and surface color choices matter just as much as the food itself. See our guide to food photography props for specific surface and backdrop recommendations.
9. Texture Emphasis — Close-Ups That Make Mouths Water
Texture is what separates food that looks real and appetizing from food that looks flat and lifeless. Crispy crusts, bubbling cheese, glistening glazes, delicate sugar crystals — these details trigger a physical, almost visceral response in the viewer.
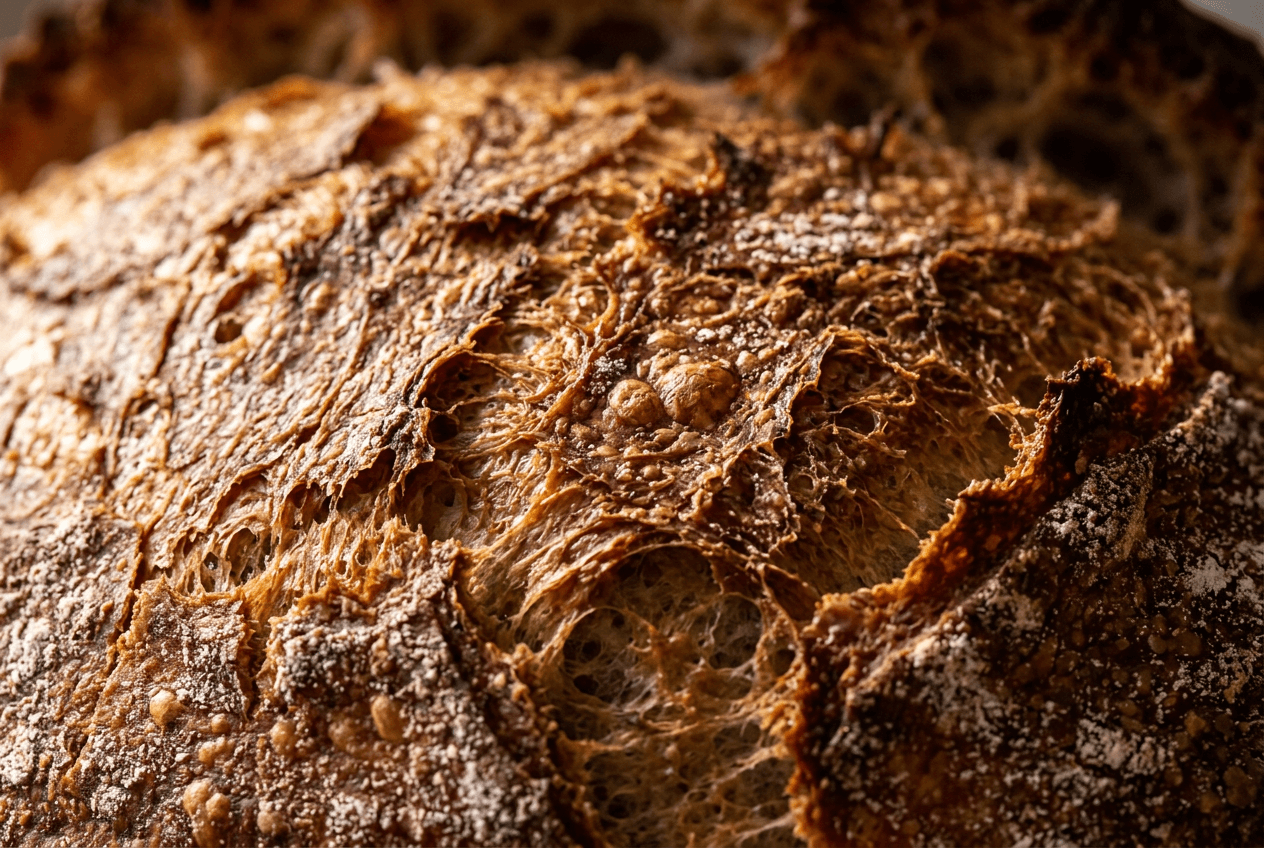 Texture emphasis food photography technique showing extreme close-up of sourdough bread crust details
How to emphasize texture in food photography:
- Get close. Fill the frame with the texture. A tight shot of a cracked crème brûlée surface is more compelling than a wide shot of the whole dessert.
- Use side lighting. Light that rakes across the surface at a low angle reveals every ridge, crack, and bubble. This is the single best lighting technique for showing food texture.
- The oil brush trick. A thin coating of neutral oil makes surfaces glisten and look freshly cooked — roasted vegetables, grilled meat, crusty bread.
- Water spray for freshness. A fine mist on fruits, salad greens, or cold drinks adds dewy freshness and beautiful light-catching droplets.
10. Environmental Storytelling — Context Creates Craving
A beautiful dish in a vacuum is just food. A beautiful dish surrounded by the right context tells a story — and stories sell more food than sterile product shots ever will.
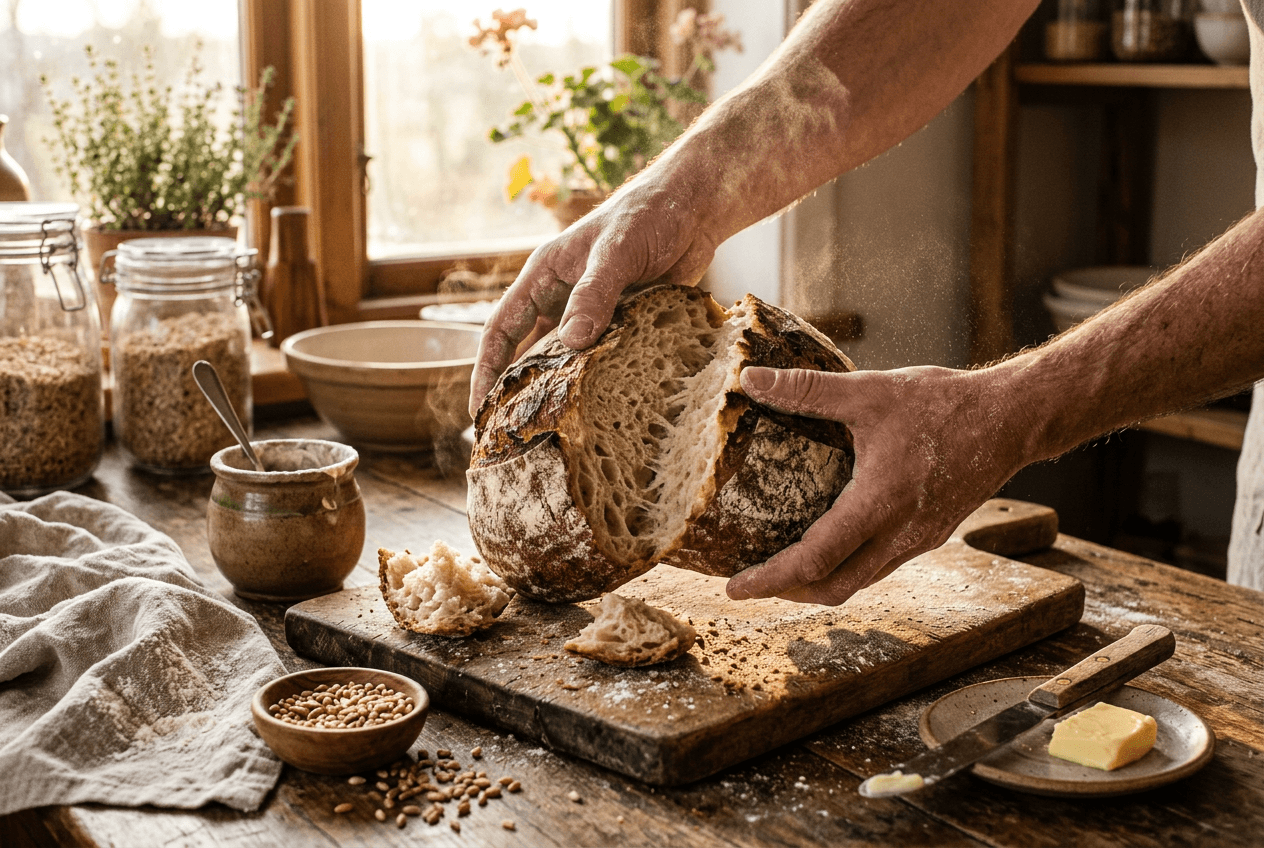 Environmental storytelling food photography technique with hands tearing bread surrounded by ingredients
Environmental storytelling means including elements that suggest who made this food, where it's being served, and what the experience of eating it would feel like.
Storytelling elements for food photography:
- Hands in frame: Someone tearing bread, lifting a forkful, reaching for a glass. Human presence creates immediate emotional connection.
- Ingredients scattered nearby: A few raw tomatoes next to a caprese salad. Whole lemons beside a lemon tart. This says "made fresh, right here."
- Cooking tools: A wooden spoon, a cast-iron pan, a dusted rolling pin. These place the viewer right in the kitchen.
- Environmental surfaces: Rustic wood for comfort food. Clean marble for fine dining. Checked cloth for a picnic vibe.
The rule: every element in the frame must earn its place. If removing a prop wouldn't change the story, remove it. Cluttered frames confuse the eye and dilute the impact of your hero dish. Our food styling guide goes deeper into arranging these storytelling elements effectively.
11. The 'Imperfect Perfect' — Deliberate Messy Styling
Some of the most appetizing food photos aren't technically perfect. They're deliberately, beautifully imperfect — and that's exactly what makes them feel real.
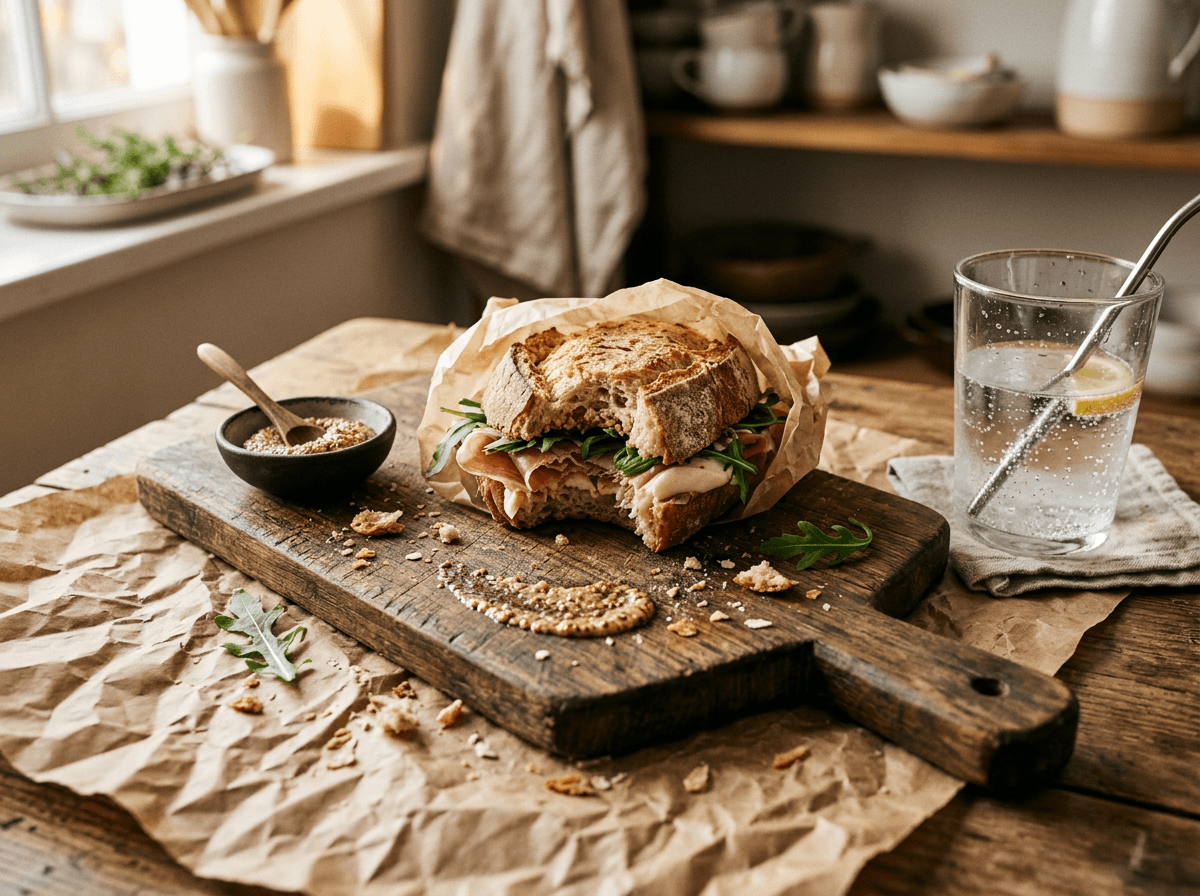 Imperfect perfect food photography styling technique with torn sandwich and scattered crumbs
Crumbs scattered around a torn loaf of bread. A drip of sauce on the rim of a plate. A bite taken from a cookie. A dusting of flour on the countertop. These "imperfections" signal that the food is real, approachable, and meant to be eaten — not just admired behind glass.
Why this food photography technique works: Pristine, perfectly symmetrical plating can feel clinical and sterile — more suited to a textbook than a restaurant menu. A touch of chaos tells the viewer "someone was just here" and makes them want to be the next person to dig in.
How to do it well:
- The mess must look intentional. A strategic sauce drip is charming. An actual accidental spill is just a mess.
- Limit imperfect elements to one or two per shot. Crumbs and a drip and a missing bite and scattered herbs is too much visual noise.
- "Imperfect perfect" styling works best for casual and comfort food. Fine dining photography still benefits from cleaner lines.
This technique is especially effective for food delivery photography and social media content, where authenticity outperforms polished perfection in engagement metrics.
12. AI Enhancement — Let Technology Perfect Your Composition
Here's where it gets interesting. You've learned 11 food photography techniques that require practice, patience, and a trained eye. Technique #12 is about using AI to apply several of these principles automatically — even after the shot is already taken.
FoodShot AI is purpose-built for food photography enhancement. Upload any food photo (even a quick smartphone snap), and the AI handles:
- Camera angle adjustment — Didn't shoot at the ideal 45°? The AI can reframe your composition to a more flattering perspective without reshooting.
- Lighting correction — Applies professional lighting styles that emphasize texture and color, similar to the side-lighting and backlighting discussed in techniques #7 and #9.
- Background replacement — Swap a cluttered kitchen counter for a clean marble surface, a rustic wood table, or even a luxury restaurant setting. This is environmental storytelling (technique #10) without the set design.
- Style presets — Over 30 presets optimized for specific platforms: Delivery, Instagram, Fine Dining, Pinterest, and more. Each preset adjusts composition elements to match what performs best on that channel.
- Element editing — Add, remove, or replace garnishes, sauces, and toppings to nail your color contrast (technique #8) and food styling details.
The entire process takes about 90 seconds and starts with a free plan — no photography degree required.
AI isn't replacing the need to understand these food photography techniques. It's amplifying them. Knowing why a 45° angle works for a pasta dish means you can direct the AI more effectively. And for restaurant owners who need 50 menu photos by next week, it means achieving professional results at a fraction of traditional photography costs.
Ready to try it? Upload a photo to the food photo editor and see these techniques applied automatically.
Putting It All Together
You don't need all 12 food photography techniques in every photo. The best food photographers pick 2–3 per shot and execute them well:
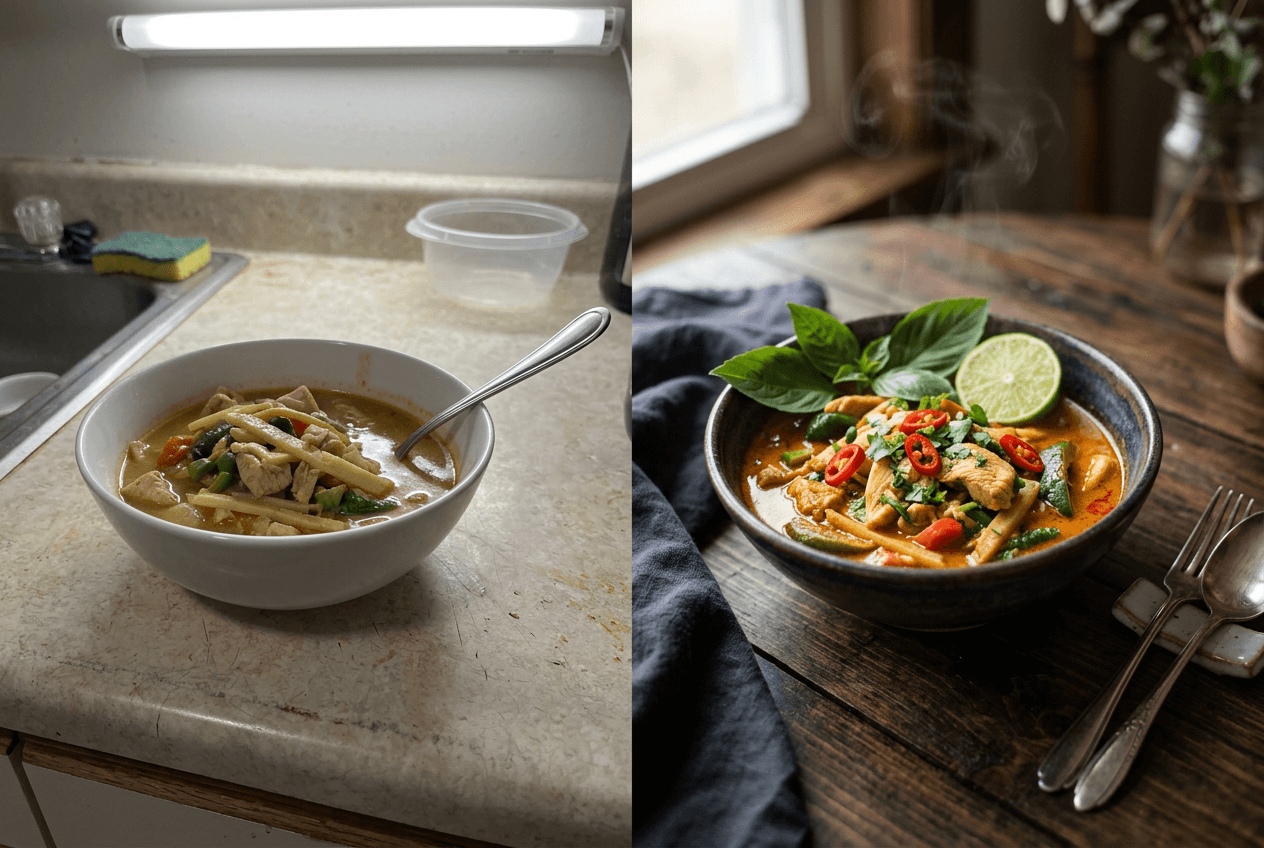 Before and after food photography technique comparison showing amateur snapshot versus styled professional photo
- A single plate with rule of thirds placement + shallow depth of field + one leading-line prop = a strong hero shot
- An overhead flat lay with triangular composition + color contrast + negative space = a scroll-stopping social post
- A pour shot with movement + backlighting + the "imperfect perfect" styling = content that people share
Start with the rule of thirds and one angle choice. Practice those until they're instinctive, then layer in leading lines, depth of field, and color choices. If you want to shortcut the learning curve on lighting and camera angle, FoodShot's AI tools can handle those elements while you focus on food styling and composition.
For more foundational advice, check out our complete list of food photography tips. And if you want to go deeper into specific areas, our guides on lighting, editing, and props cover each topic in detail.
Frequently Asked Questions
What camera angle is best for food photography?
The 45° angle is the most versatile food photography technique for angles — it's how you naturally see food at a table, and it works for the widest range of dishes. Use 90° overhead for flat items like pizza, salads, and charcuterie boards. Use eye-level for tall dishes and drinks that benefit from showing off height and layers.
How do I make food look appetizing in photos?
Focus on three things: good lighting (natural side light from a window is the easiest starting point), composition (rule of thirds placement — don't center everything), and freshness details (oil brush for glisten, water spray for dewiness, fresh herbs for color pops). Our food photography tips guide covers 20 additional methods.
What is the rule of thirds in food photography?
Divide your frame into a 3×3 grid using two horizontal and two vertical lines. Place your main subject at one of the four points where lines intersect, rather than in the center. This creates a more dynamic, visually interesting composition that guides the viewer's eye naturally. Most smartphone cameras have a built-in grid overlay you can enable in your camera settings.
Can I take professional food photos with a smartphone?
Absolutely. Modern smartphones have excellent cameras for food photography — especially in well-lit conditions. The food photography techniques in this article (composition, angles, lighting, styling) matter far more than whether you're shooting on an iPhone or a DSLR. See our guide to taking food photos with your phone and the best iPhone camera settings for food.
How does AI improve food photography?
AI tools like FoodShot can adjust camera angles, correct lighting, replace backgrounds, and enhance food styling automatically. You upload a photo and the AI applies professional food photography techniques in about 90 seconds. It's especially useful for restaurant owners who need high-quality menu images without hiring a professional photographer — at roughly 95% lower cost than traditional food photography.
