Catering Food Photography: Showcase Your Dishes & Win Clients

Your catering proposals are only as strong as the photos inside them. A client choosing between three caterers for their daughter's wedding reception isn't reading your ingredient lists — they're scrolling your photos, imagining those platters on their tables and that dessert station in their venue.
Yet most caterers are still pitching with dim, phone-quality snapshots taken mid-event under fluorescent banquet hall lighting. That gap between what your food actually looks like and what your photos show is costing you bookings.
Quick Summary: Catering food photography requires a different approach than restaurant photography — you're selling scale, variety, and the full event experience. This guide covers the five essential shot types every caterer needs, practical tips for shooting at events, how to build a portfolio that wins proposals, and a cost-effective workflow for photographing 50+ dishes using AI enhancement. The goal: a professional catering portfolio you can update monthly, not annually.
Why Catering Photography Is Different from Restaurant Photography
Restaurant food photography focuses on individual dishes. One beautiful plate, perfectly lit, artfully styled. Catering food photography is a completely different animal.
You're not selling a single entrée — you're selling an experience. A client evaluating your catering services needs to envision their entire event: the buffet line with steam rising from chafing dishes, the cocktail hour with passed hors d'oeuvres, the tablescape with flowers and place settings framing your food. Your photographs need to tell that story at every scale.
Here's what makes catering photography uniquely challenging:
- Scale and variety. A restaurant might photograph 20–30 menu items once a year. A caterer often manages 50–100+ dishes across wedding, corporate, and social menus — and those menus rotate seasonally.
- Unpredictable environments. You're shooting in banquet halls with mixed fluorescent lighting, outdoor tents with harsh midday sun, and dim reception rooms where candles are the primary light source. You rarely control the setting.
- The proposal factor. For restaurants, photos boost online orders. For caterers, photos directly close deals. According to multiple proposal experts, catering proposals with high-quality visual portfolios significantly outperform text-only pitches. One proposal template platform reported their catering clients closed over $16 million in business in 2025 alone — with professional photos cited as a key factor.
- Constant updates. Your corporate lunch menu this quarter looks nothing like last quarter's. Spring wedding menus differ from fall. Every seasonal shift creates a fresh photography need.
The bottom line: caterers need more photos, updated more frequently, across more challenging conditions than almost any other food business. And that's exactly why the traditional "hire a photographer once a year" model doesn't work for catering companies. (For a broader look at food photography in the food business context, see our commercial food photography guide.)
The 5 Shot Types Every Caterer Needs
A strong catering portfolio isn't just a gallery of pretty food — it's a strategic collection of images that prove you can execute at every level. Here are the five shot types that cover your bases.
1. Hero Plating Shots
These are your money shots: individual dishes photographed in isolation against clean, controlled backgrounds. They go on your website, in your menus, and as the anchor images in proposals.
What to shoot: Your signature dishes, highest-margin items, and any dish that photographs particularly well. Focus on items clients specifically request — like a carved prime rib station or a signature dessert.
How to shoot them: A 45-degree angle works for dishes with height (stacked appetizers, layered desserts). Overhead shots work best for flat items like charcuterie boards, sushi platters, and cookie spreads. Side lighting from a window creates the depth and texture that makes food look three-dimensional. For detailed techniques, check out our guide on food photography techniques that make dishes look irresistible.
Pro tip: Photograph the same dish against 2–3 different backgrounds. A rustic wooden surface says "barn wedding." Dark marble says "corporate gala." This gives you options when building event-specific proposals.
2. Buffet and Station Spreads
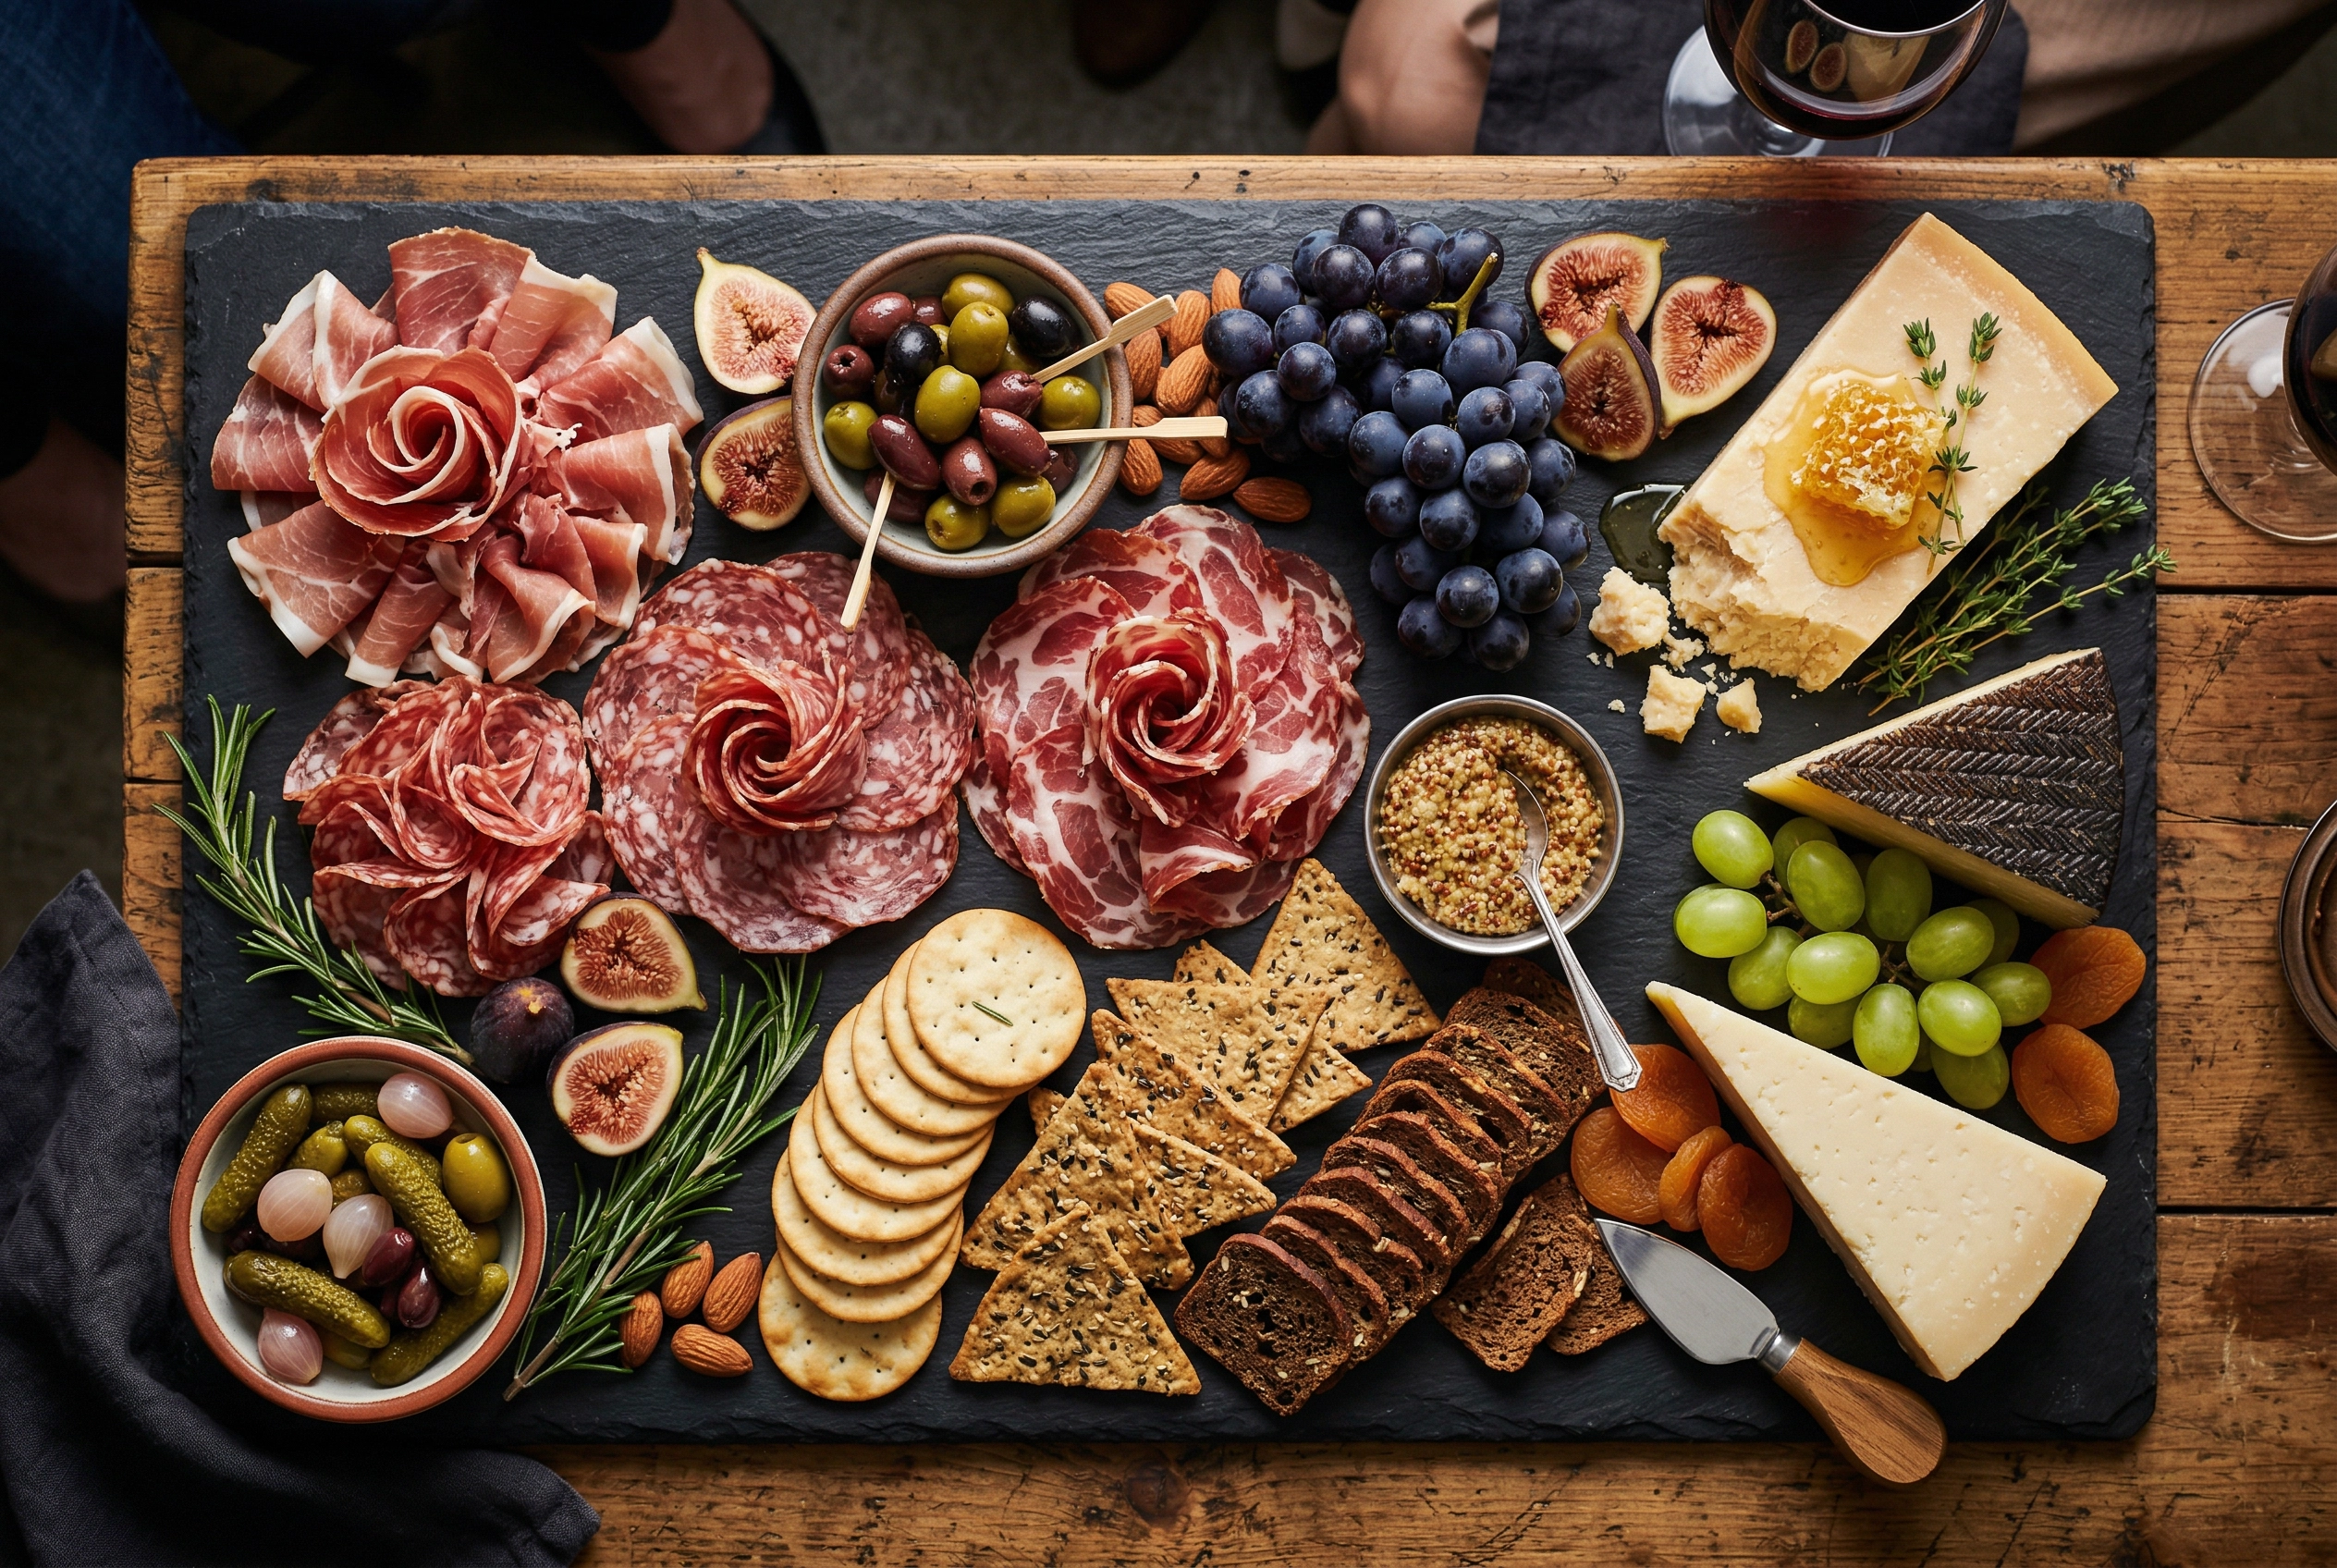 Overhead view of catering charcuterie board with cured meats, cheeses, fruits, and crackers on dark slate surface
This is the shot type most unique to catering. Clients want to see volume, abundance, and the visual flow of a complete food station.
What to shoot: Full buffet lines from end to end, carving stations mid-action, dessert table arrangements, charcuterie walls, and breakfast stations. Include the serving vessels, tent cards, and decorative elements — these details signal professionalism.
How to shoot them: Step back. Buffet shots work best from a slight elevation — stand on a step stool or shoot from a balcony if the venue has one. You want to capture the full spread in context. A slightly diagonal angle (shooting from one end of the table looking down its length) creates depth and drama.
Pro tip: Always shoot the buffet fully stocked, before a single guest touches it. The first 10 minutes after setup is your window.
3. Passed Hors d'Oeuvres and Tray Shots
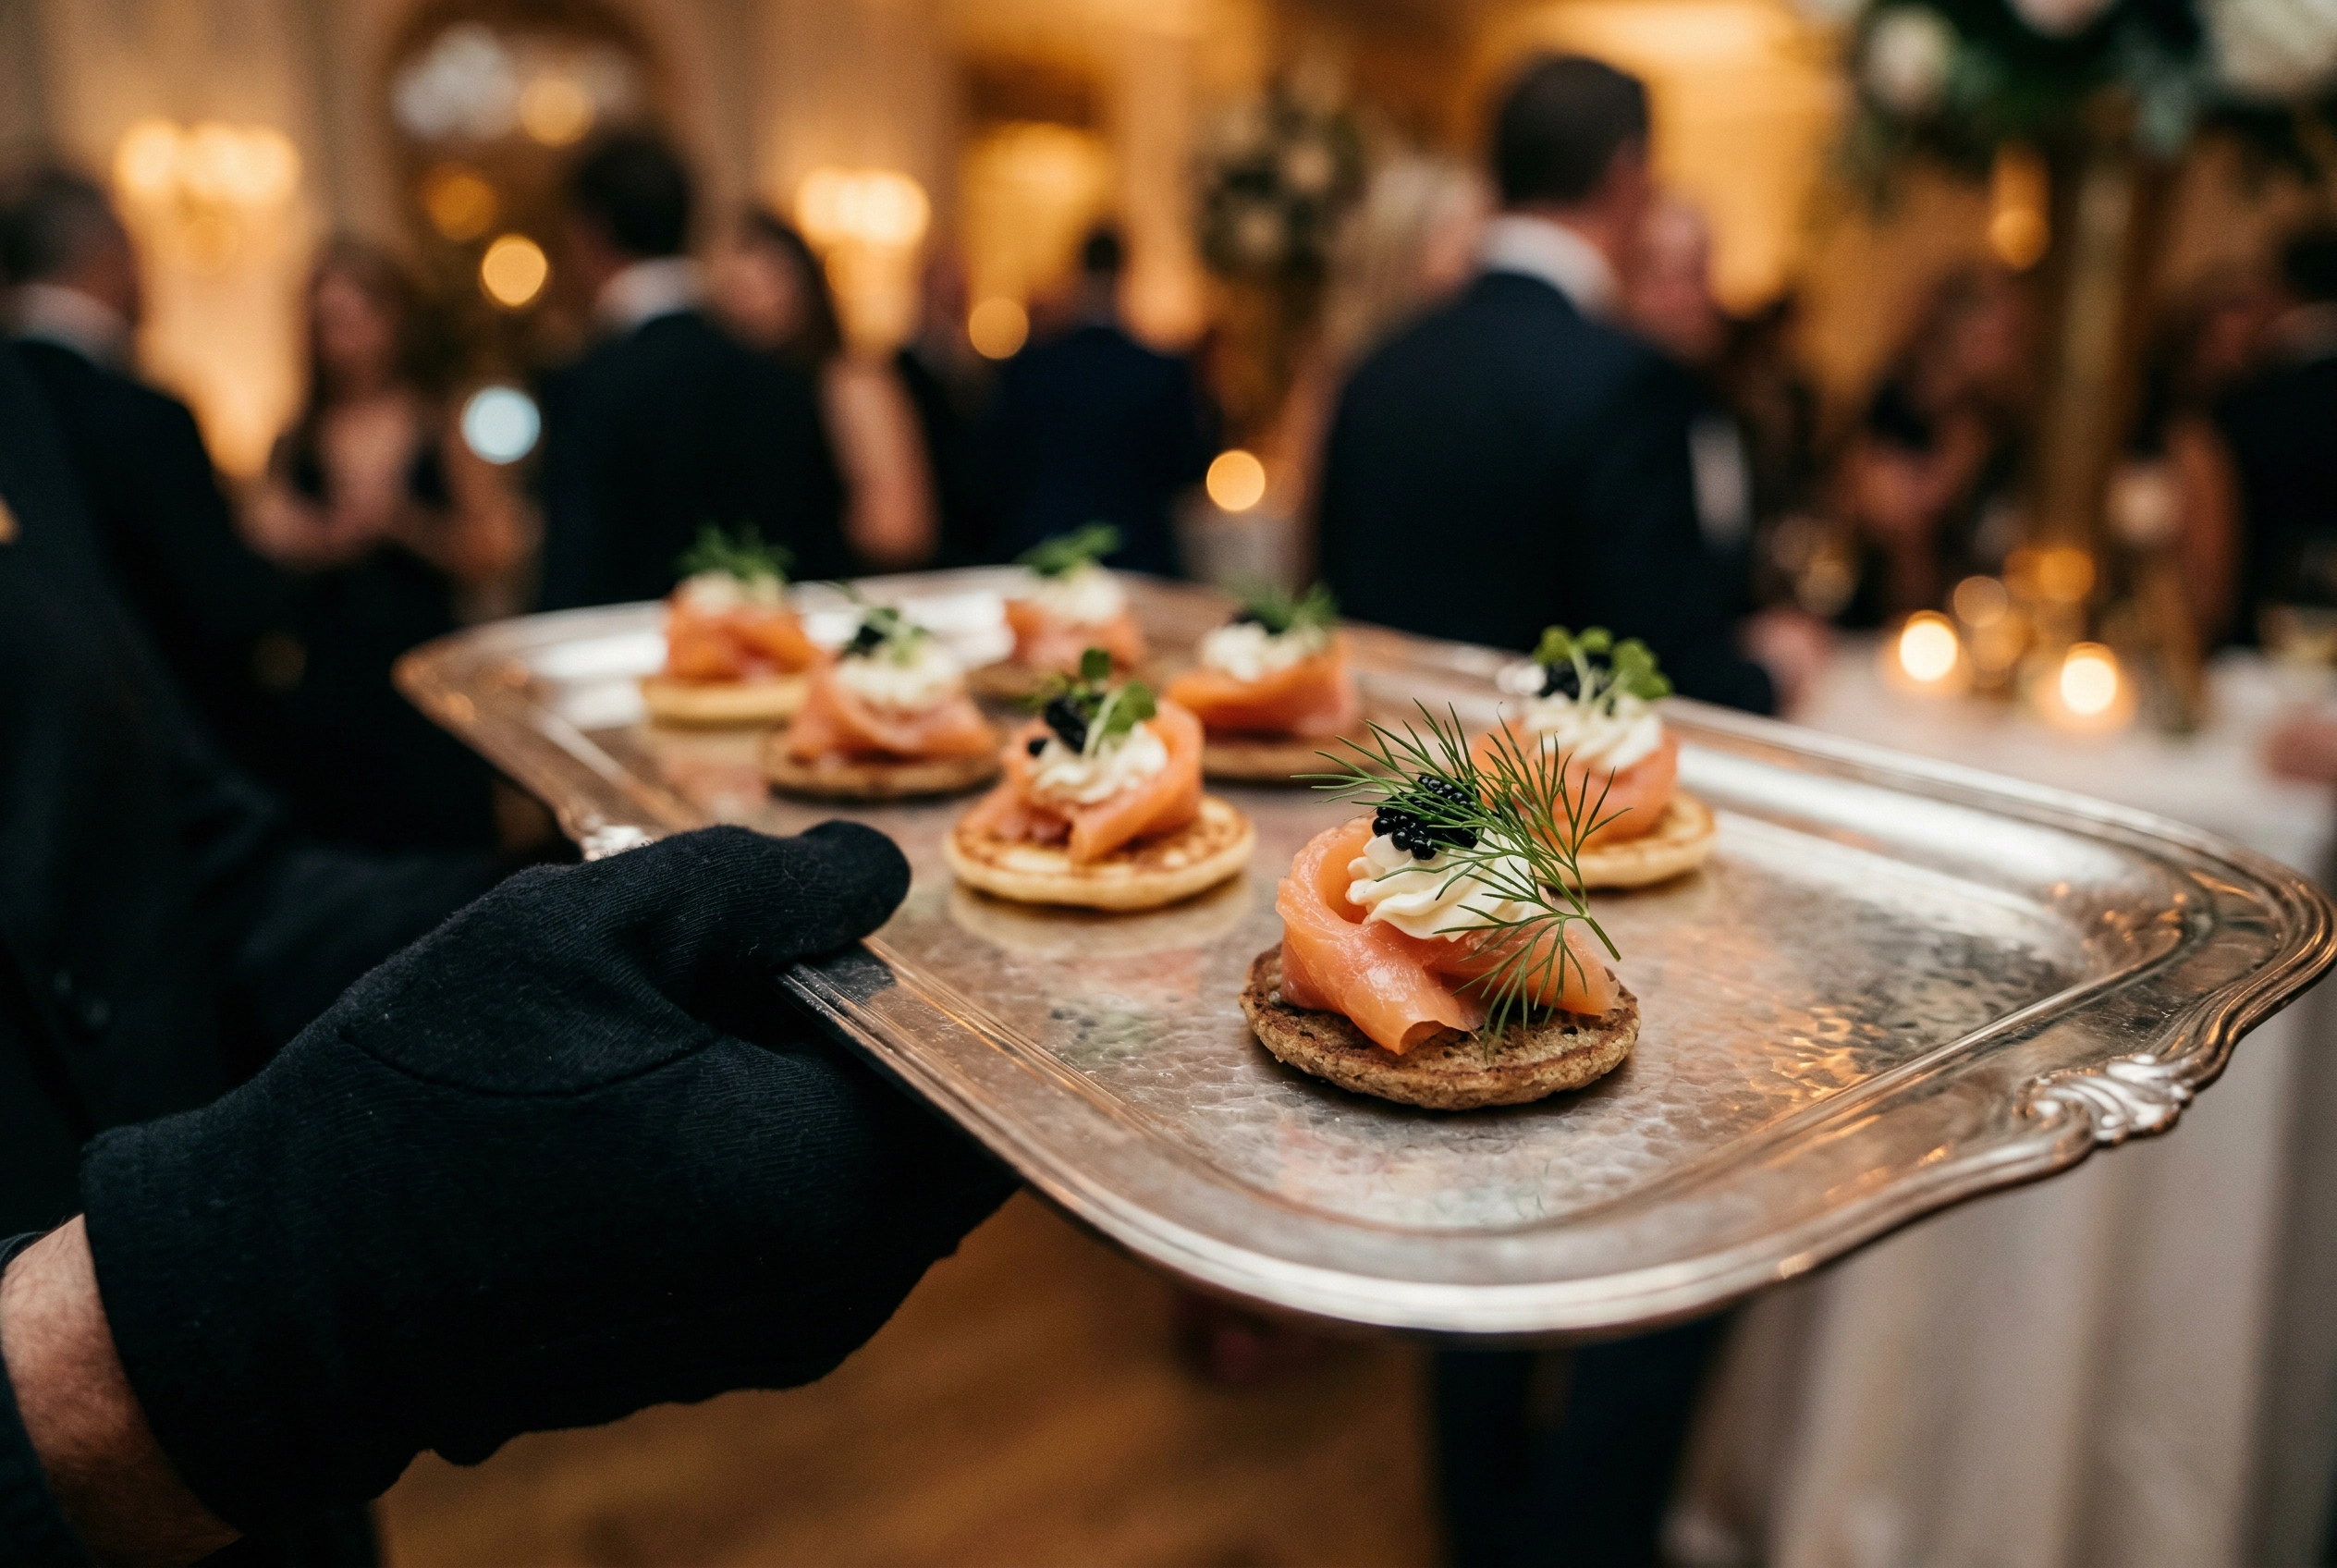 Close-up of passed hors d'oeuvres on silver tray with smoked salmon canapés at a catering cocktail reception
These photos capture the service element of catering — something restaurant photography never needs to convey. A beautifully arranged tray of canapés being offered to a guest tells a story of hospitality that a static plate shot never can.
What to shoot: Trays of appetizers from above (showing the pattern and arrangement), a server's hand extending a tray toward the camera, and close-up detail shots of individual hors d'oeuvres.
How to shoot them: Use your phone's burst mode to capture natural movement without blur. Focus on the food, not the server's face (avoids privacy issues and keeps the attention where it belongs). A shallow depth of field — achievable in portrait mode — makes the nearest items pop while the background softly blurs.
4. Tablescapes and Full Event Setups
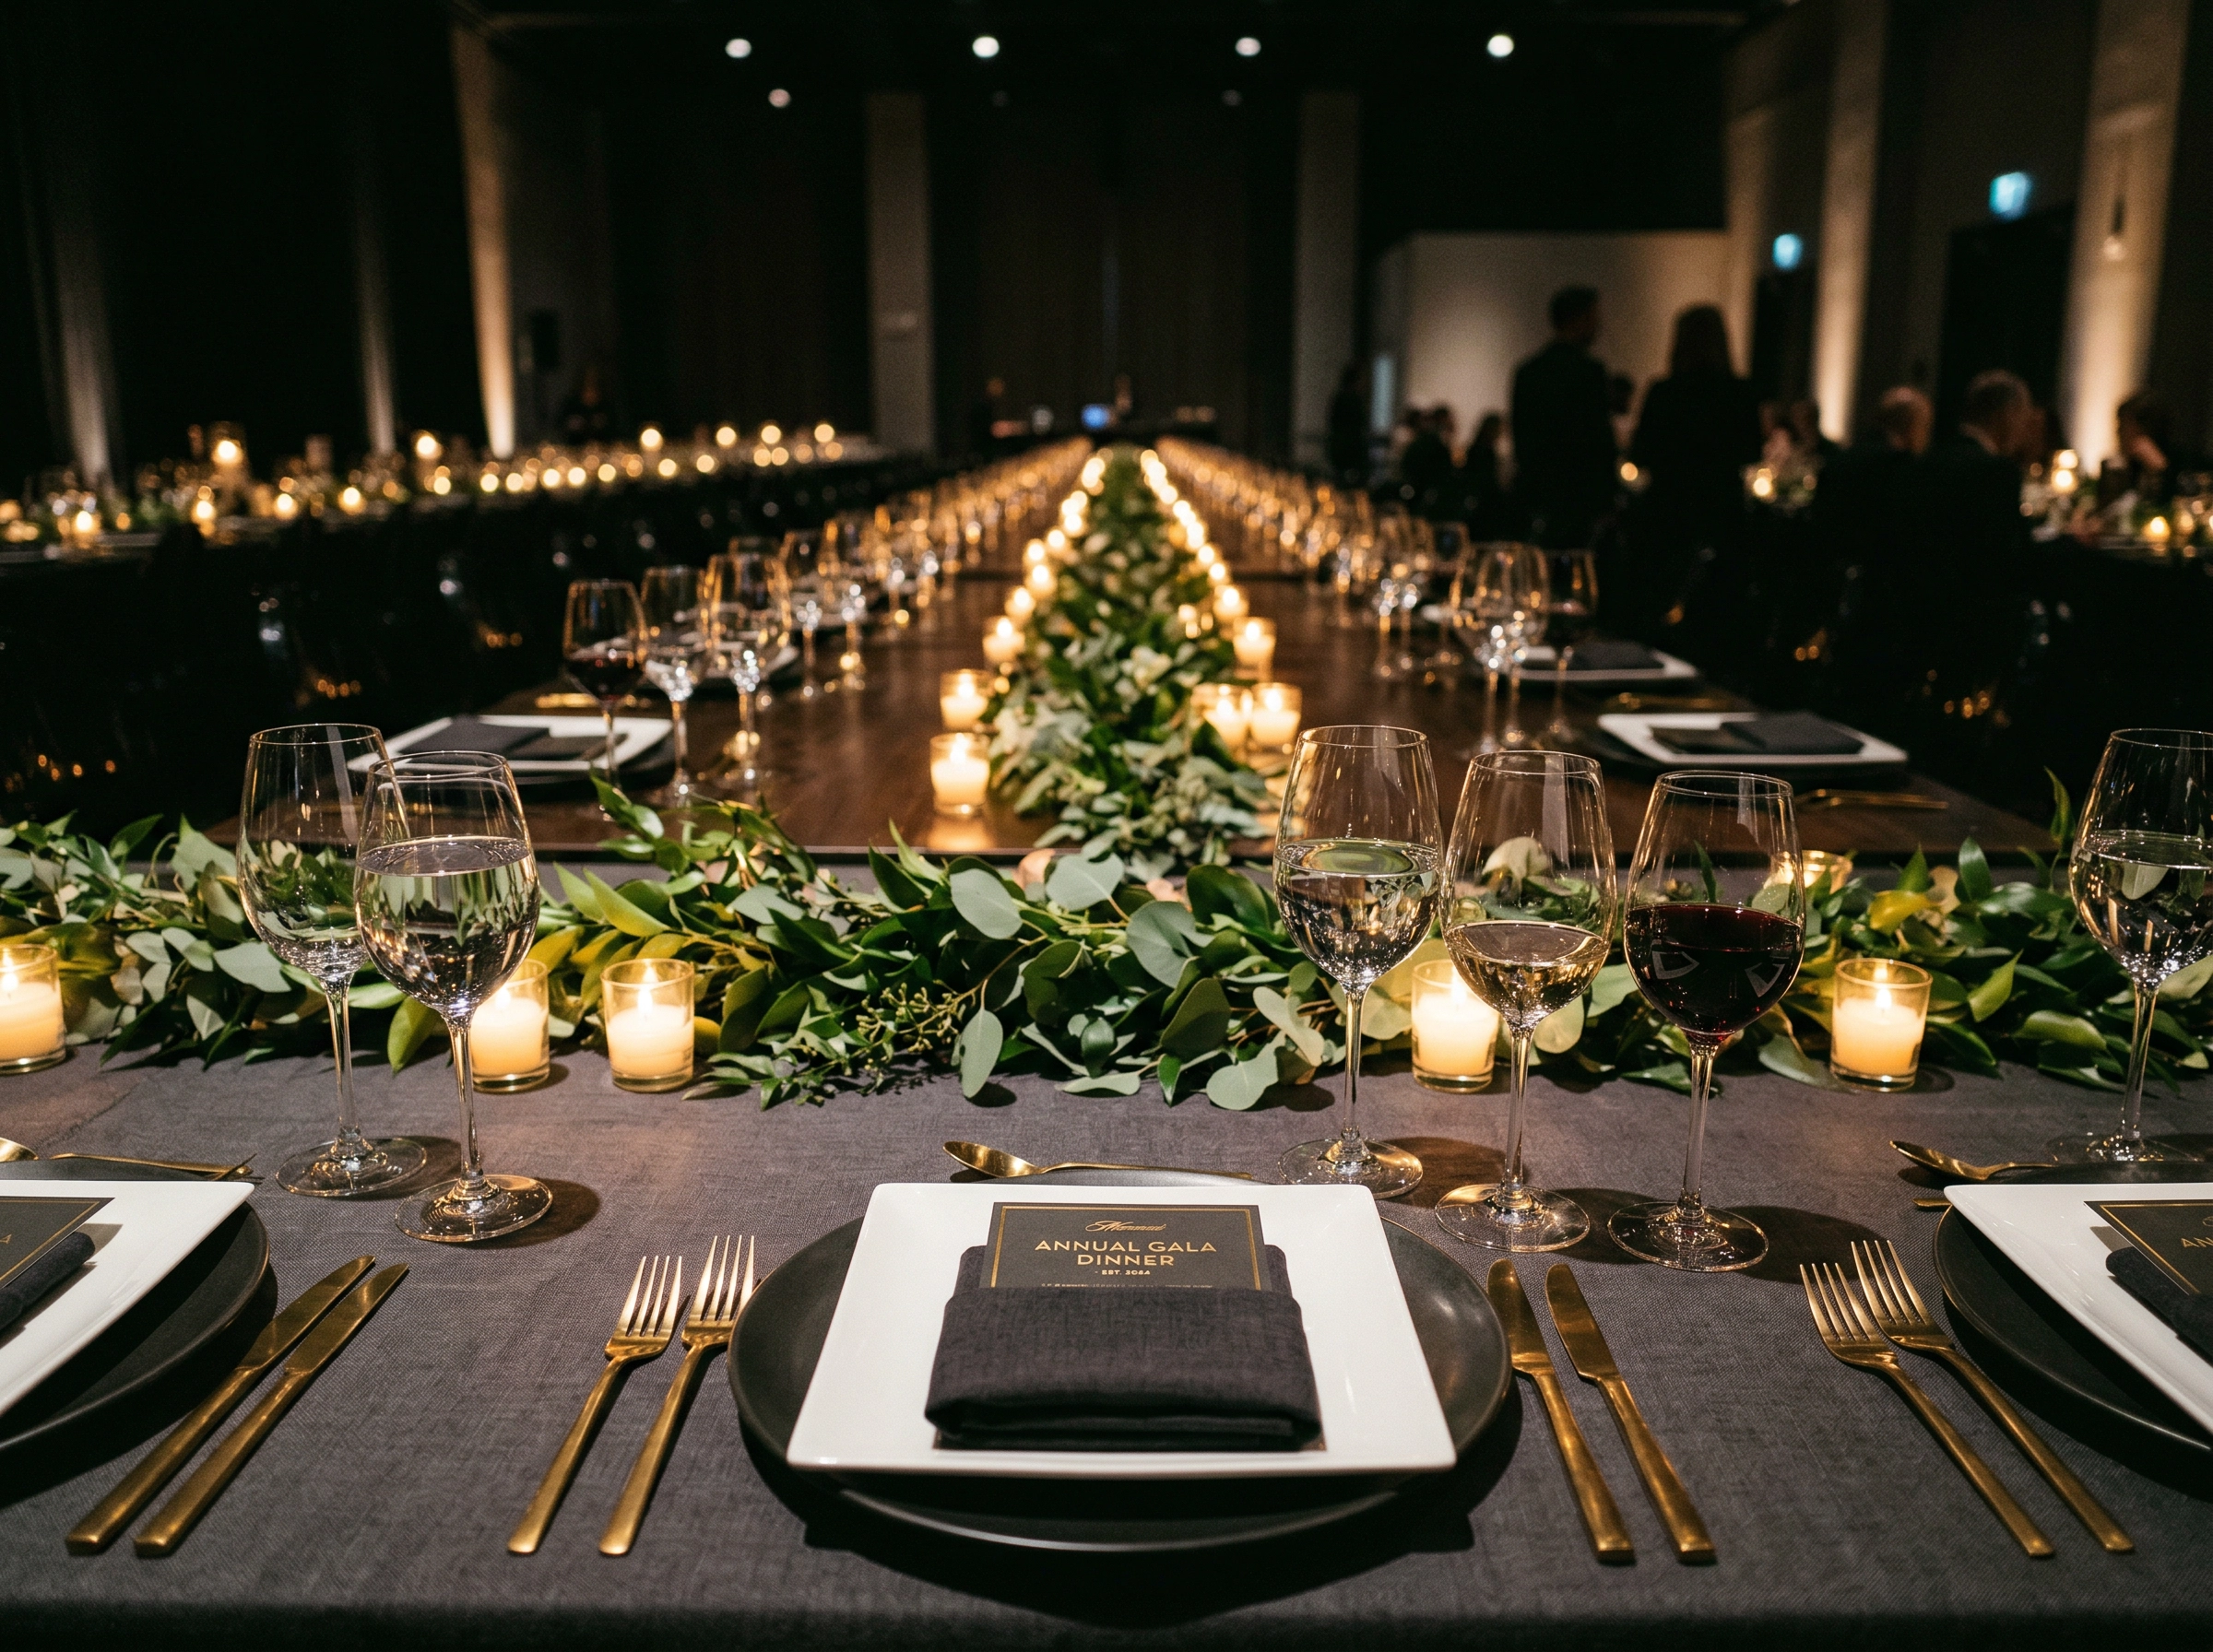 Corporate event tablescape with formal place settings, candles, and greenery for catering portfolio photography
Tablescapes sell the dream. These photographs show clients exactly what their event could look like — the full picture with food, flowers, linens, glassware, and candlelight working together.
What to shoot: Complete table settings at different event types. A romantic wedding reception table with gold chargers and floral centerpieces. A clean, modern corporate dinner with white linens and branded menus. A casual outdoor setup with kraft paper runners and wildflowers.
How to shoot them: Capture both a wide shot (showing 8–10 feet of table) and a medium shot (3–4 place settings). Shoot from seated guest height to give viewers the perspective they'll actually experience. These photos are most powerful when they show the food in context with the décor.
5. Action and Behind-the-Scenes Shots
A chef slicing a roasted tenderloin at a carving station. Your team lining up 200 plated entrées for a gala. A bartender torching a crème brûlée. These photographs build trust and show the human element behind your service.
Why they matter: Behind-the-scenes content consistently outperforms polished imagery on social media because it feels authentic. For proposals, action shots prove you have the team and infrastructure to handle large-scale events.
How to shoot them: Embrace imperfection. Slightly blurred hands in motion are fine — they communicate energy. Shoot in well-lit areas of the kitchen or during outdoor prep. Don't pose your team; capture them working naturally. For more on capturing authentic food moments, see our food styling guide.
Tips for Photographing at Catering Events
 Catering team member photographing a wedding reception tablescape with smartphone at an elegant venue
Event photography is where most caterers struggle — and where the biggest opportunity lies. Every event you work is a chance to build your portfolio, if you're prepared.
Solve the lighting problem first. Venue lighting is your biggest enemy. Banquet halls often have warm-toned downlights mixed with fluorescent overheads, creating uneven color casts. Outdoor events in midday sun produce harsh shadows. Reception rooms rely on ambient candlelight. Here's how to work around it:
- Shoot near windows whenever possible, especially during setup when you have time to position dishes
- Avoid using your phone's flash — it flattens food and creates unnatural highlights
- If the venue is dark, a small $30–50 LED panel (clipped to a shelf or held by a teammate) makes an enormous difference
- Set your phone's white balance to match the venue lighting so colors render accurately
Time your shots strategically. Food looks best in the first few minutes after it's plated or displayed. Your shoot window is during final setup, before guests arrive and before steam subsides or garnishes wilt. Plan for this:
- Arrive 15–20 minutes before the event opens
- Shoot the full buffet/station spread first (it'll never look better than right now)
- Capture tablescapes before guests sit down
- Action shots happen naturally during service — keep your phone accessible
Get permission in advance. Some venues restrict photography in certain areas or during specific times. Confirm with the event coordinator before the day of service. If you're photographing a private event, make sure the host knows and approves of photos being used in your portfolio.
Designate a photographer. Trying to photograph while managing a catering operation is a recipe for mediocre photos and distracted management. If possible, assign one team member as the designated photographer for each event. Brief them on the five shot types above and give them a simple checklist. (Not confident in your phone photography skills yet? Our guide on how to take good food photos covers everything you need to know.)
Building a Catering Portfolio That Wins Proposals
Your portfolio isn't a photo dump — it's a sales tool. Organize it strategically and you'll close more deals.
Organize by event type. Create separate sections (or pages on your website) for weddings, corporate events, social gatherings, and casual catering. When a bride visits your site, she wants to see wedding food immediately — not scroll past corporate lunch boxes to find it.
Curate ruthlessly. 15–20 of your absolute best photos per category beats 100 mediocre ones. Every image should make a potential client think, "I want that at my event." Remove anything with poor lighting, messy backgrounds, or half-eaten food.
Show variety within each category. Include hero plating shots, buffet spreads, tablescapes, and action photos in each section. This demonstrates that you don't just cook great food — you execute a complete experience.
Use before/after transformations. If you're using AI enhancement to elevate your phone snapshots into portfolio-quality images, showing the transformation builds credibility. It tells clients, "This is what your food actually looks like — and this is how we present it." Clients appreciate authenticity paired with polish. See how the transformation works on our catering photography with FoodShot page.
Update seasonally. A portfolio that only shows summer dishes in December signals neglect. Refresh your images at least quarterly to reflect current menus and recent events. This is where AI enhancement becomes essential — the cost of a professional reshoot every season is prohibitive for most caterers.
How to Photograph 50+ Dishes Efficiently
 Batch catering food photography setup with six plated dishes lined up near window light in commercial kitchen
Here's the real-world problem: your catering menu has 60 items across three categories. A professional photoshoot for that volume would cost $1,500–$5,000+ and take a full day. And you'll need to do it again in three months when the seasonal menu changes.
The efficient alternative is a two-step workflow: batch phone photography + AI enhancement.
Step 1: Batch your phone shoots. Group dishes by cuisine or station type (all appetizers together, then entrées, then desserts). Set up near the best natural light in your kitchen — next to the largest window, during midday. Place each dish on a clean surface, snap 2–3 photos from different angles, and move on. An experienced team member can photograph 50 dishes in about 2 hours this way. Our menu photoshoot guide has the complete step-by-step workflow.
Step 2: Enhance with AI. Upload those phone snapshots to FoodShot AI and transform them into studio-quality images. Choose from 100+ curated styles designed specifically for food businesses — from dark marble surfaces for elegant evening events to bright, airy backgrounds for corporate luncheon menus.
The efficiency gains are significant:
- FoodShot's Builder Mode lets you combine a background surface, plating style, and your food photo into a single cohesive image — perfect for building visual proposal decks where every image matches
- My Styles lets you upload a reference photo from your best event setup, then apply that exact look across every dish in your menu. Forty items across three menus, all with consistent lighting, surfaces, and atmosphere
- Processing time: Each image takes roughly 90 seconds. Fifty dishes = approximately 75 minutes of enhancement time
- Output quality: 4K resolution, print-ready for menus, brochures, and large-format proposal displays
The result: a complete catering portfolio photographed and enhanced in under a day, for a fraction of what a single professional shoot would cost. And you can repeat this process every quarter as your menus evolve.
Cost Comparison: Professional Photographer vs. AI Enhancement
Let's talk real numbers. Here's what each approach costs for a typical catering business:
| Professional Photographer | AI Enhancement (FoodShot) | |
|---|---|---|
| Per-session cost | $1,000–$3,000+ | $15–$99/month |
| Food stylist | $500–$1,200/day (additional) | Not needed |
| Per-image cost | $25–$200 | $0.40–$0.60 |
| Time per dish | 15–40 minutes | ~90 seconds |
| 50-dish shoot | $2,500–$7,000+ (one day) | $24–$45 (same month's plan) |
| Annual cost (quarterly updates) | $10,000–$28,000+ | $180–$1,188/year |
| Turnaround | 1–3 weeks for edited images | Same day |
The math is stark. A caterer updating their portfolio quarterly with a professional photographer spends $10,000–$28,000 per year. The same caterer using FoodShot's Business plan at $45/month gets 100 images monthly for $540/year — a 95%+ cost savings.
When professional photography still makes sense: Brand launches, flagship event documentation, and high-end editorial content for press kits or publications. If you're launching a new catering brand or pitching a luxury venue partnership, invest in a professional shoot. For everything else — weekly social media content, seasonal menu updates, proposal visuals, delivery app listings — AI enhancement delivers professional quality at a pace and price that actually matches how caterers work.
The smart hybrid approach: Book one professional photographer session per year for your hero brand images. Use AI enhancement for the other 95% of your photography needs. This gives you the best of both worlds — aspirational brand photography anchored by a consistently updated, affordable portfolio. For the broader context on food photography pricing, read our restaurant food photography guide.
Frequently Asked Questions
What equipment do I need for catering food photography?
A modern smartphone (iPhone 14+ or Samsung Galaxy S23+) is genuinely sufficient. The camera hardware in current phones handles food photography well — lighting and composition matter far more than gear. If you want to level up, add a $25–$50 phone tripod for stable overhead shots and a small LED panel ($30–$50) for venues with poor lighting. That's under $100 total. For professional-level technique with basic equipment, see our guide on food photography techniques.
How many photos should a catering portfolio have?
Aim for 15–20 strong images per event category (weddings, corporate, social). That gives you enough variety to demonstrate range without overwhelming potential clients. A total portfolio of 60–80 curated photos across all categories is the sweet spot for most catering companies.
Can I use phone photos for my catering proposals?
Raw phone photos from events? Only if the lighting was excellent. Phone photos enhanced with AI tools like FoodShot? Absolutely. The key difference is consistency — AI enhancement gives every image a polished, professional look regardless of the original shooting conditions. Clients notice when some photos look great and others look amateur. Consistency builds confidence.
How often should I update my catering portfolio?
Quarterly at minimum. Your portfolio should reflect your current menus, seasonal ingredients, and recent event experience. If you only update annually, clients see last year's spring menu in December — and that signals a business that isn't actively growing. AI enhancement makes quarterly (or even monthly) updates financially practical.
What's the best lighting for photographing buffet setups?
Natural window light from the side is ideal. Position the buffet (or yourself) so the light comes from one direction — this creates depth and natural shadows that make food look dimensional. Avoid overhead fluorescent lighting, which flattens everything. If you're stuck in a windowless venue, a portable LED panel placed at a 45-degree angle to the food simulates natural directional light. Set it to a warm color temperature (around 4500K) for food that looks appetizing rather than clinical.
