
12 Plating Techniques Chefs Use, and Which Survive Delivery
 Ali Tanis17 min read
The plating techniques worth learning now have to pass three tests: the pass, the camera and the delivery box. A swoosh of beet purée that stops the dining room can arrive as a pink smear on the lid. A ring-mold tower that looks dramatic at 45 degrees disappears when it's shot from overhead.
Below are 12 plating techniques chefs use every service, each with the tools, a short step sequence, the camera angle it reads best from, and a straight verdict on delivery. At the end: one salmon dinner plated three ways, and a checklist for plating once for the room and once for the camera. If those plates are headed for a tasting menu or a press kit, our page on fine dining food photos picks up where this guide ends.
Quick Summary: Most plating techniques build on three ideas: a clear focal point, balance, and space around the food. Flat, graphic plating (swooshes, dots, clock-face layouts) reads best from overhead, while height (stacks, fans, quenelles) needs a 45-degree angle. Only the sturdy techniques, such as clock-face compartments, odd numbers and color contrast, survive a delivery bag, so plan a separate box build.
What Plating Techniques Actually Change
Good plating techniques change how food tastes to the diner and what they'll pay for it. In controlled studies, the same ingredients plated neatly or artistically are liked more and valued higher than when plated carelessly, and the effect holds in a working restaurant, not only in a lab.
- Neat beats messy. In a 2011 study in Appetite, the same food was liked more when plated neatly, and people said they'd pay more for it.
- Attractive beats merely neat. A 2014 follow-up with Culinary Institute of America chefs served restaurant diners one chicken dinner in two neat layouts. Diners liked the food more in the more attractive presentation, even the rice pilaf.
- Art sells. In Oxford's 2014 "Kandinsky salad" study, 60 diners rated an art-inspired presentation as tastier than the same salad tossed or neatly arranged. According to The Guardian's report, they would pay twice as much for it.
- Direction matters. A 2015 study in Flavour found people preferred a linear arrangement over a circular one using the same ingredients, and turned the dish so the main line rose to the right.
The camera is part of the dining room now. "A number of chefs now are realising that they are being judged by how their foods photograph," Oxford's Professor Charles Spence told The Guardian. That's why each of the plating techniques below lists a camera angle.
The 12 Plating Techniques at a Glance
The table compares all 12 plating techniques on the tools, the camera angle that flatters each one, and whether it survives a delivery bag. Pick two or three per dish, never all twelve; a good presentation uses few components and one clear focal point. If overhead versus 45 degrees is new to you, our guide to food photography techniques explains both.
| Technique | Key tools | Best camera angle | Survives delivery? |
|---|---|---|---|
| Clock-face placement | Rimmed plate, tongs | 45° from 6 o'clock | Yes, as compartments |
| Height stacking | Ring mold, offset spatula | 45° or eye level | No |
| Swoosh | Kunz spoon, thick purée | Overhead | No |
| Dots and drops | Squeeze bottles, sieve | Overhead | No |
| Negative space | Oversized coupe | Overhead | Not applicable |
| Odd numbers | Even portions, tweezers | Both | Yes |
| Color contrast | One bright garnish | Both | Yes, with sturdy garnish |
| Sauce pool and bathing | Wide-rim bowl, jug | 45° | Partly, broth on the side |
| Landscape line | Long platter, tweezers | Overhead | Partly |
| Fanning | Slicing knife, mandoline | 45° | Partly |
| Quenelles | Two spoons, hot water | 45° | No |
| Tweezer garnish | Tweezers, microplane | Close 45° | Pack separately |
1. Clock-face placement (classic plating)
Clock-face placement reads the plate as a clock from the diner's seat: 12 is the far edge, 6 the near edge. Each of the components gets a fixed hour, so every cover matches. Of all food plating techniques, this classic method is usually the first one culinary schools teach.
Tools: a 10- to 11-inch rimmed plate, tongs, an offset spatula and a damp cloth.
Steps:
- Set the protein in the front half, between 3 and 9 o'clock.
- Place the starch at 10 and the vegetables at 2.
- Sauce under or beside the protein, never over a crisp skin.
- Wipe the rim.
That's the version Le Cordon Bleu Malaysia teaches. Other kitchens shift the hours, so pick one map and hold every cook to it.
Camera: 45 degrees from the 6 o'clock side. Overhead flattens the protein.
Delivery: Yes. The clock becomes the three sections of a compartment container.
2. Height stacking with a ring mold
Stacking builds the dish upward: starch first, protein on top, garnish leaning against it, with a ring mold keeping the tower straight. Use it to create one modest peak, not a skyscraper the diner has to knock down.
Tools: a 3-inch (7.5 cm) ring mold, an offset spatula and a spoon.
Steps:
- Set the ring in place and fill the base layer using a spoon.
- Press it firm with the back of the spoon.
- Add the next layer, then lift the ring straight up.
- Lean the top garnish against the stack.
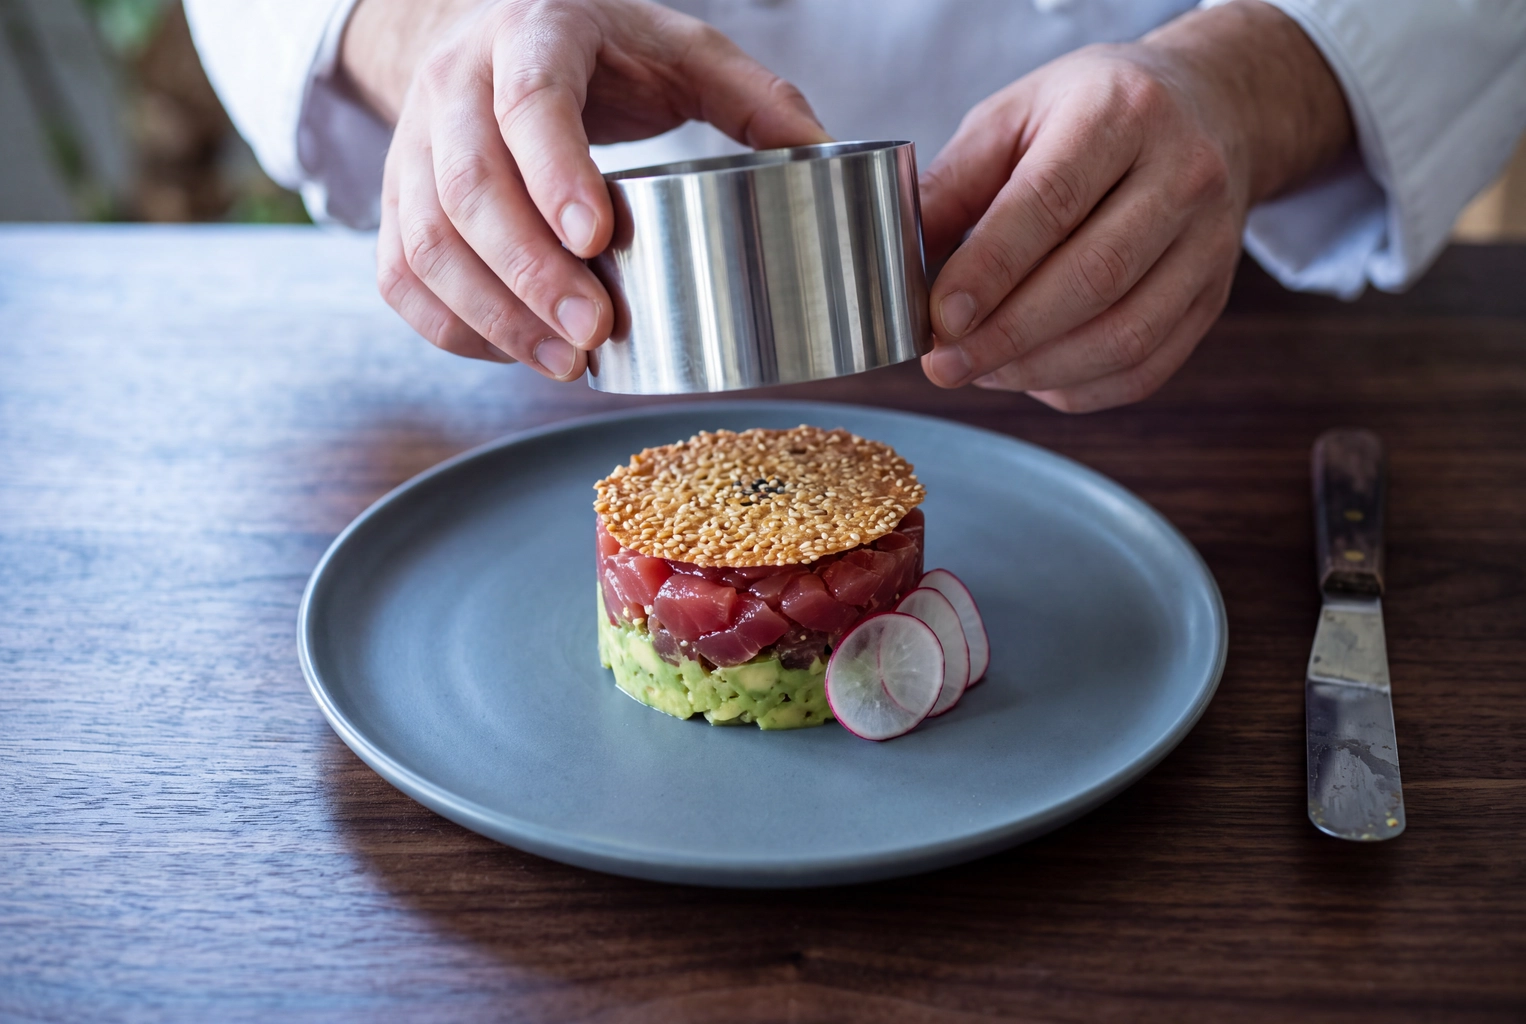 Hands lifting a ring mold off a tuna tartare and avocado tower, the height stacking plating technique seen at 45 degrees
Camera: 45 degrees or eye level. From overhead, a tower reads as a small disc. Our burger stacking guide deals with the same problem for buns.
Delivery: No. Towers topple on the first corner, so pack the layers side by side.
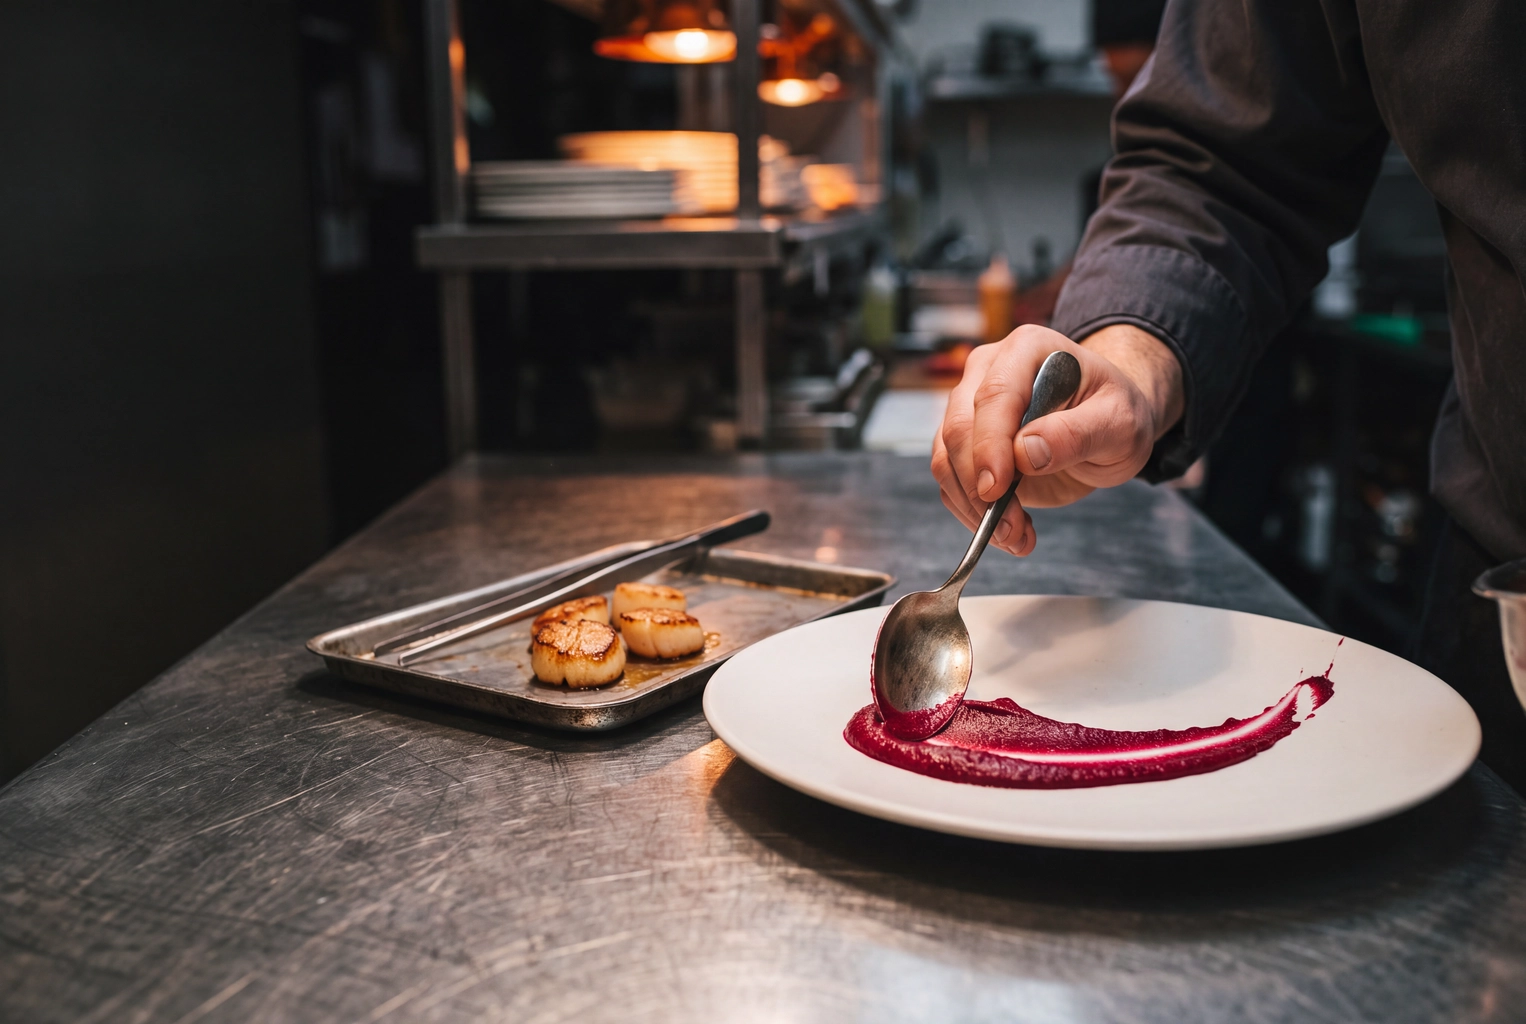
3. The swoosh
A swoosh is one confident pull of thick purée, heavy where the spoon lands and tapering to a tail, with the protein on the heavy end. It's a staple of modern plating techniques, used because it adds movement and tells the eye where to start.
Tools: a Kunz spoon or tablespoon, and a purée about as thick as Greek yogurt.
Steps:
- Drop a spoonful of purée at one end of the well.
- Press the back of the spoon into its center.
- Pull in one smooth arc without going back over it.
- Set the protein on the heavy end.
Camera: Overhead. Angle the swoosh so it rises to the right, the direction people preferred in the 2015 study.
Delivery: No. A swoosh smears against the lid, so spoon the purée under the protein instead.
4. Dots and drops
Dots are small beads of sauce, gel or oil piped with a squeeze bottle in graduated sizes along a line or curve. They create rhythm and color, and let the diner season each bite. Keep them deliberate: one line or one arc, not a scatter.
Tools: 8- or 12-ounce squeeze bottles, a fine sieve and a toothpick.
Steps:
- Strain the sauce so the tip doesn't clog.
- Practice the pressure on a cutting board.
- Pipe from the largest bead to the smallest.
- Drag a toothpick through one for a teardrop.
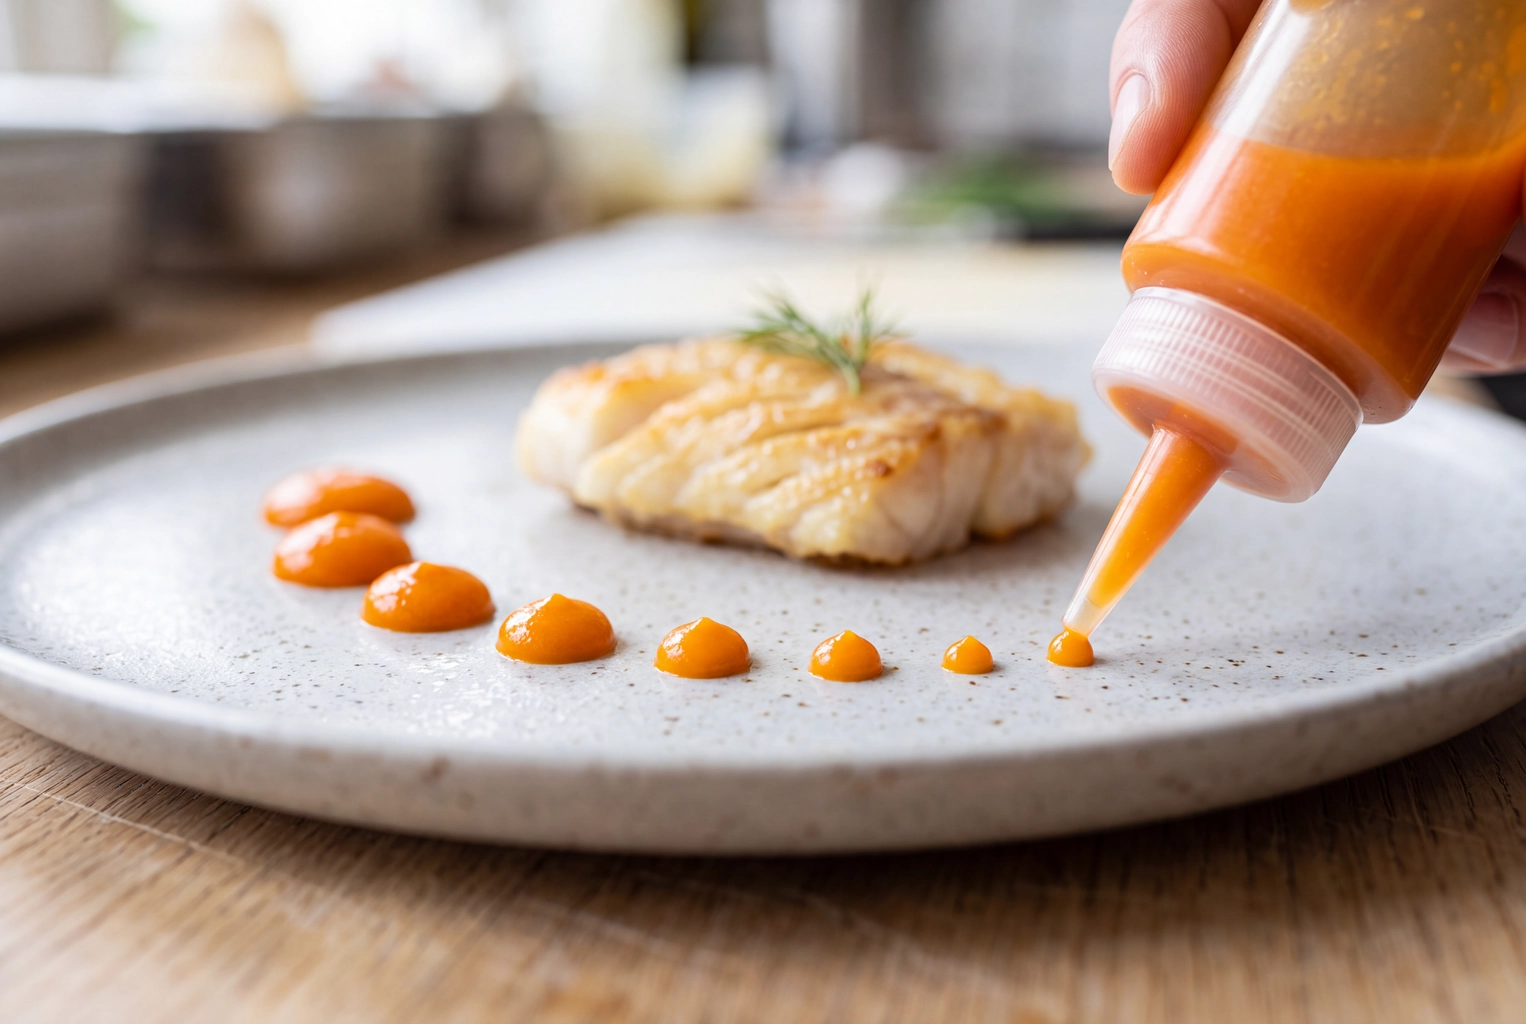 Squeeze bottle piping graduated orange carrot gel dots in an arc beside roasted cod, the dots and drops plating technique
Camera: Overhead. At 45 degrees, round dots become ellipses and can read as drips.
Delivery: No. They slide and merge in transit, so send the sauce in a cup.
5. Negative space
Negative space is the part of the plate you leave empty on purpose. It frames the food and makes the focal point obvious. A common rule of thumb leaves about a third of the well bare, but the right amount depends on the dish.
Tools: an oversized round or coupe plate and a clean rim cloth.
Steps:
- Choose a plate one size larger than the portion.
- Build the food off-center, inside one or two thirds of the well.
- Keep sauce and crumbs out of the empty zone.
Camera: Overhead. Watch delivery-app crops, though: Uber Eats asks for items framed in the center, and a small portion in a vast white field looks stingy as a thumbnail.
Delivery: Not applicable. A box has no empty space to design with, so fill it neatly.
6. Odd numbers
Odd numbers means serving three or five pieces rather than two, four or six. An odd group has a natural center and looks composed, while even groups pair off. It's a painter's composition rule used in kitchens everywhere, though we found no plating study that tests it directly.
Tools: consistent portioning and tweezers for small items.
Steps:
- Portion three, five or seven pieces of the same size.
- Set them in a triangle, an arc or a staggered line.
- Keep the gaps even.
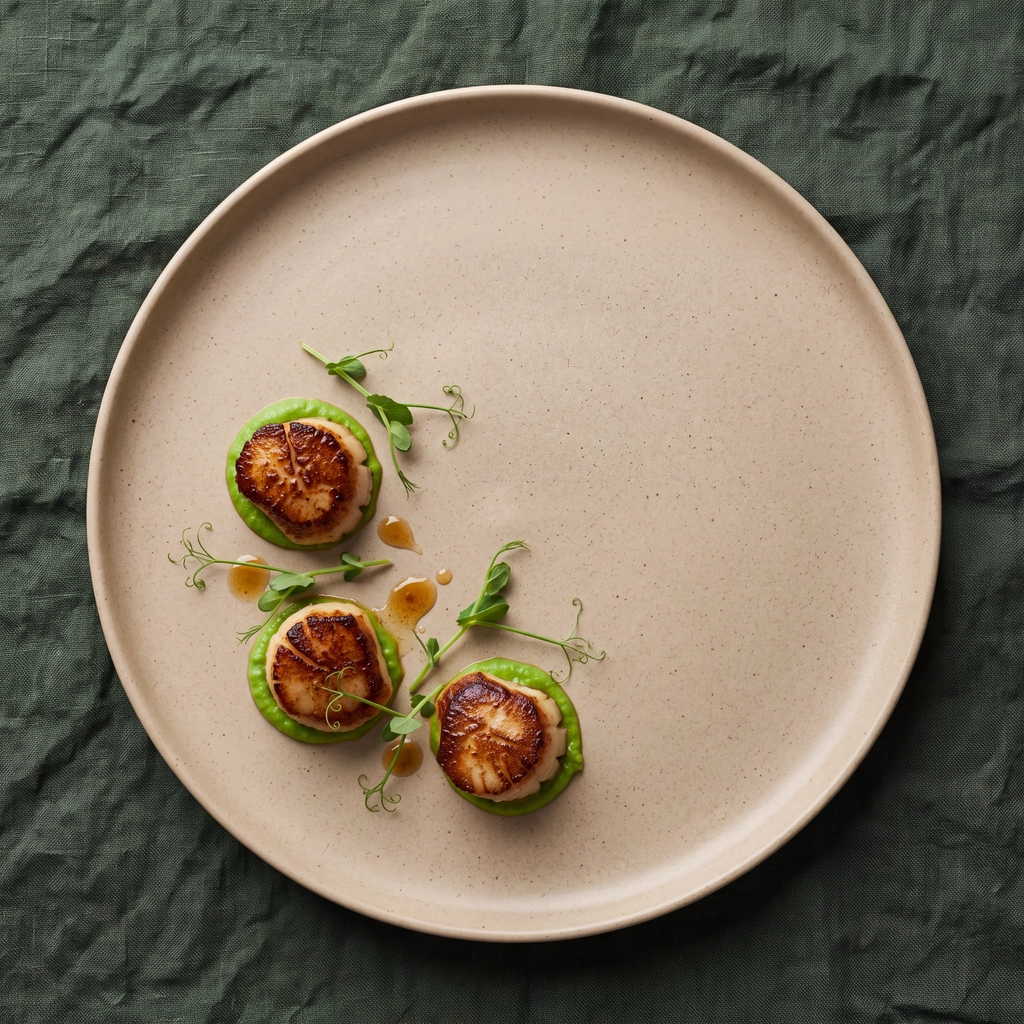 Overhead of three seared scallops off-center on a large sand-colored coupe plate, negative space and odd numbers in plating
Camera: Both. Three scallops read well overhead; five dumplings read well at 45 degrees.
Delivery: Yes. The count survives even when the arrangement shifts.
7. Color contrast
Color contrast puts a bright element against a dull one, such as green herb oil on a brown braise or pickled red onion on beige hummus. It gives the eye a focal point, and brown dishes need it most. The plate color counts too.
In a 2012 study, a strawberry mousse served on a white plate was rated 15% more intense, 10% sweeter and 10% better liked than the same mousse on a black one. Color isn't an automatic win, though: in a 2010 study, changing color and balance shifted how attractive a presentation looked but not how much people liked the taste. Color sells the look; the cooking sells the bite.
Tools: one contrasting garnish per dish, and white china as the default, which is what the 2014 restaurant study used.
Steps:
- Name the dominant color of the dish.
- Add one element from the opposite side of the color wheel.
- Make it edible and on-flavor.
Camera: Both. Contrast is what survives a small thumbnail. Our food color grading guide covers the edit afterwards.
Delivery: Yes, with sturdy garnish. Steam wilts soft herbs, so use pickled shallots, chili threads or toasted seeds.
8. Sauce pool and bathing
Pooling sets sauce under the food; bathing sets the food in a shallow pool of broth in a wide bowl. The liquid becomes the canvas, and pouring it at the table turns the plating into a small show.
Tools: a wide-rim shallow bowl, a pouring jug and a ladle.
Steps:
- Build the solid elements first, slightly off-center.
- Pour the broth to one side so crisp elements stay dry.
- Keep it shallow: the food should sit in it, not sink.
- Float one accent, such as herb oil.
Camera: 45 degrees shows the pool and the food rising out of it. If the broth is poured at the table, shoot the pour.
Delivery: Partly. Pack the broth in another sealed container so the diner pours it at home.
9. Landscape and linear plating
Landscape plating arranges food low and long in one band, like a strip of garden. In the 2015 Flavour study, people rated a linear arrangement higher than the same ingredients set in a circle. This plating style suits tasting portions and anything cut into pieces.
Tools: a long rectangular or oval platter, and tweezers.
Steps:
- Lay a base line of purée or sauce.
- Set the components along it at even intervals.
- Rotate the dish so the line rises from left to right.
Camera: Overhead. At 45 degrees, shoot along the line rather than across it.
Delivery: Partly. The line holds in a long, snug container, but loose elements drift.
10. Fanning and shingling
Fanning lays overlapping slices in an arc: duck breast, steak, tomato, apple. It shows off the cut face and makes one portion look generous. A Libbey Foodservice trend piece calls the precise version "scaling", after fish scales.
Tools: a sharp slicing knife, a mandoline for vegetables and an offset spatula.
Steps:
- Rest the meat, then slice evenly against the grain.
- Slide the knife under the slices and move them as one unit.
- Press gently with your palm to fan them out.
- Sauce beside the fan so the slices keep their edges.
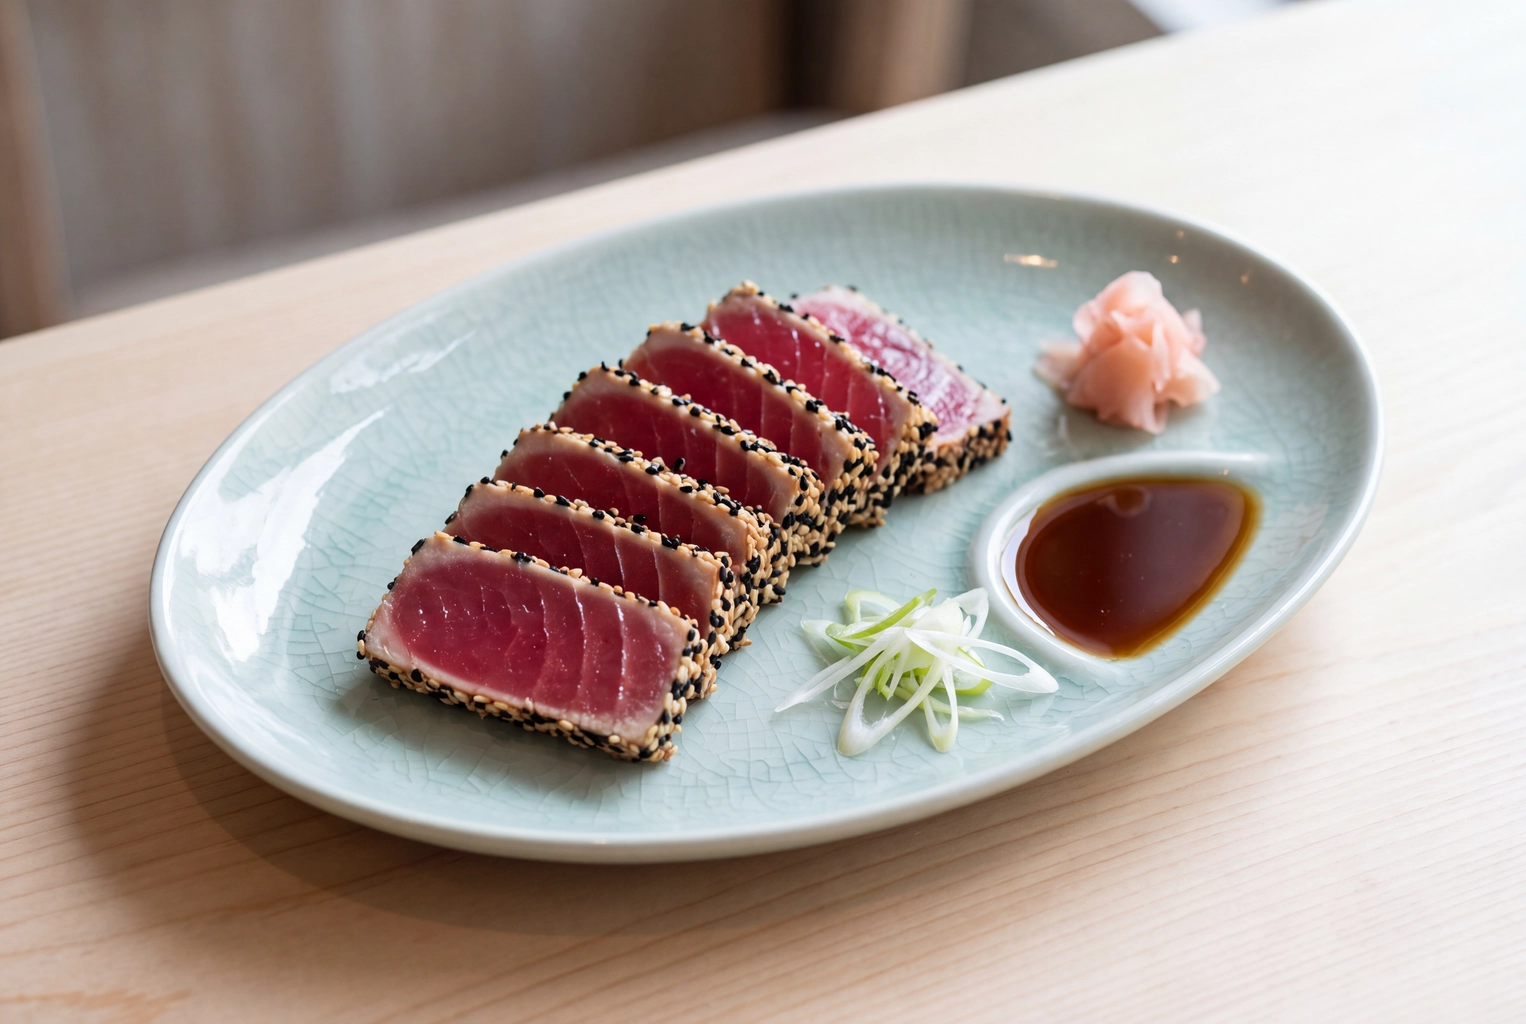 Sesame-crusted seared tuna sliced and shingled in an overlapping row on a celadon plate, the fanning plating technique
Camera: 45 degrees, so the pink center and the crust both show. Our steak photography guide covers the cut face.
Delivery: Partly. Slices lose heat and juice fast, so pack them tight, with sauce on the side.
11. Quenelles
A quenelle is a smooth three-sided oval shaped using two spoons, from ice cream, mousse, crème fraîche or tartare. It's the pastry station's signature move and a polished way to add a cold element to a warm dish. The one-spoon version, used by many pastry chefs, is called a rocher.
Tools: two tablespoons (or a quenelle spoon) and a jug of hot water.
Steps:
- Dip the spoon in hot water and wipe it dry.
- Drag it across the chilled mixture toward you.
- Pass it between two spoons to smooth all three sides.
- Set it on a crumb or sauce base so it doesn't slide.
Camera: 45 degrees shows the ridges. Shoot within a minute, before it softens; our dessert photography guide covers the timing.
Delivery: No. A quenelle melts or flattens, so use a dome or a lidded pot.
12. Garnish placed with tweezers
Garnish is the final layer: herbs, flowers, crumbs, flaky salt or a few drops of oil, placed last and precisely. Every garnish must be edible and belong to the dish. A sprig that doesn't taste like the rest of the food is decoration, and diners notice.
Tools: 8-inch plating tweezers, a microplane and pinch bowls.
Steps:
- Prep all garnish before service.
- Add texture using a crumb or nut soil beside the main element.
- Place herbs with tweezers, leaning them toward the light.
- Finish with flaky salt, then wipe the rim.
Camera: A close 45-degree angle with side light shows texture best.
Delivery: Pack separately. Crumbs go soggy and herbs wilt under a lid, so send them in a small cup.
One Salmon Dinner Plated 3 Ways
The same dish needs different plating techniques for the dining room, the camera and the delivery box. Here's one salmon dinner (pan-roasted fillet, pea purée, charred baby carrots, crushed potatoes, herb oil) built three ways.
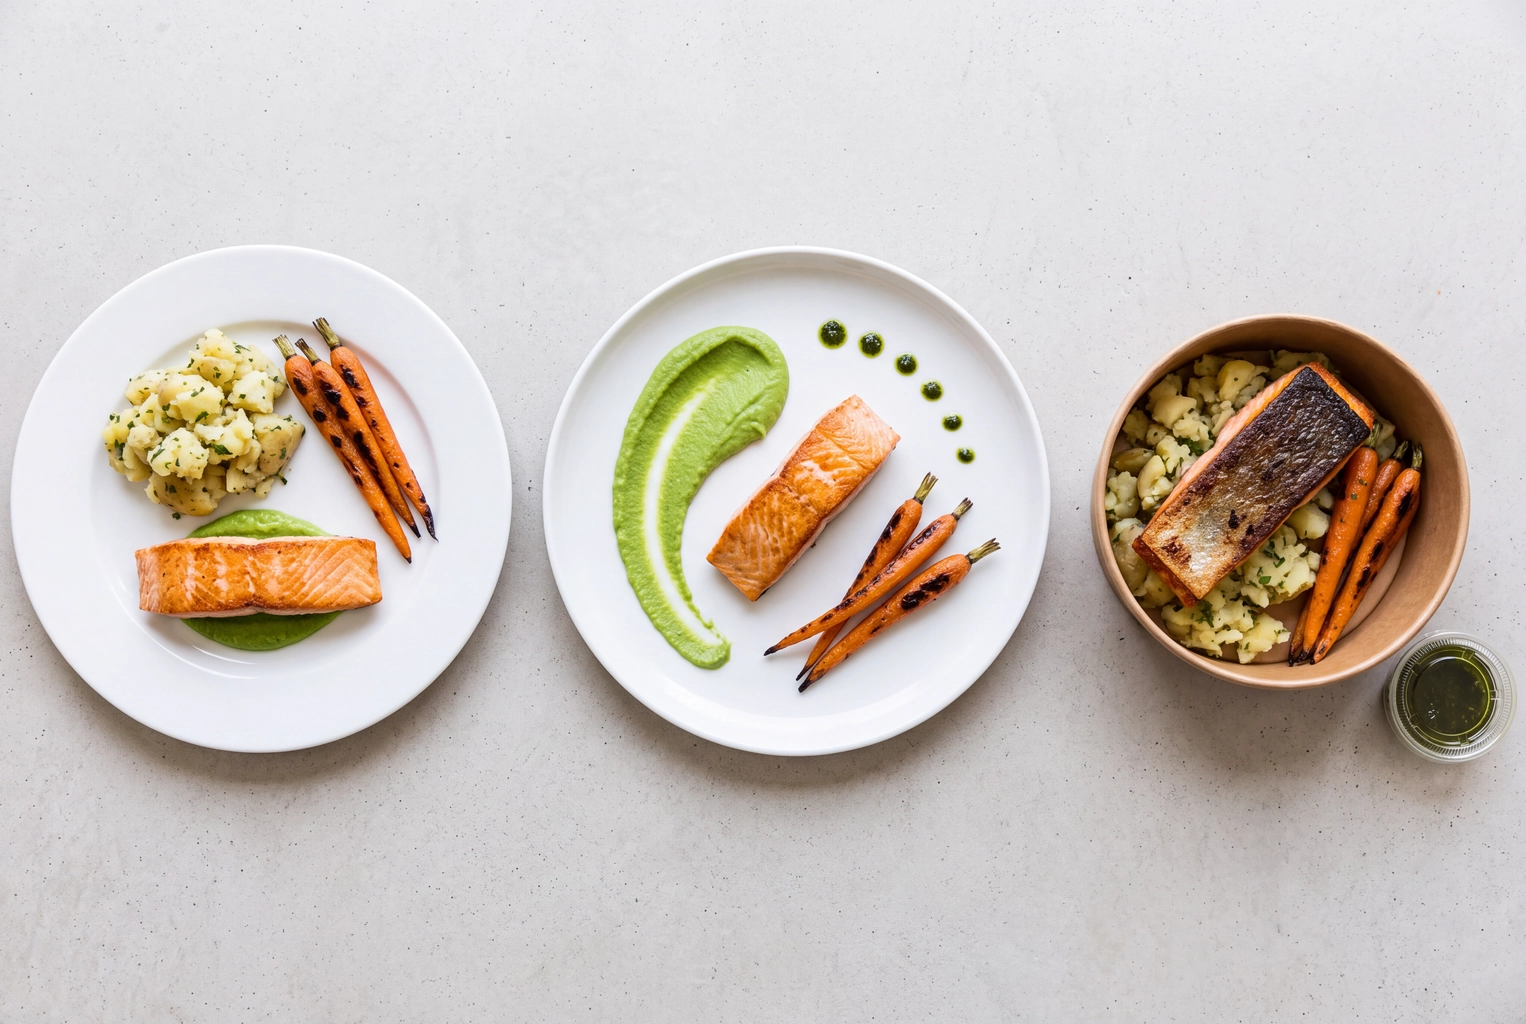 One salmon dinner plated 3 ways: classic clock layout, free-form pea swoosh and a delivery bowl with herb oil on the side
Way 1: classic, for the room. Potatoes at 10, carrots at 2, the salmon at 6 on a spoonful of purée, herb oil beside it. It's fast on a busy line, and every bite is easy to reach.
Way 2: free-form, for the camera. A curved pea swoosh, the salmon set against it, three carrots at an angle and an arc of herb-oil dots. It's built for an overhead shot, and too slow to plate for every cover on a full Saturday.
Way 3: built for the box. Crushed potatoes as a bed, the salmon on top skin-side up so it stays crisp, the carrots alongside, the herb oil in a lidded cup. Nothing can slide, smear or wilt.
The example images in this guide are generated illustrations, created so the plating styles can be compared side by side using the same components. For props and surfaces, see our guide to staging food for photography.
Plate It Once for the Room, Once for the Camera
Most plating techniques were designed for the room, and a lens needs different choices. The diner sees the dish from arm's length and then eats it; the camera sees one frame, often cropped to a square, in far more detail. Run this checklist before you plate the photo version.
| Check | For the room | For the camera |
|---|---|---|
| Angle | Diner's view, protein at 6 | Choose overhead or 45° first |
| Spacing | Room to cut and eat | Components a little closer |
| Height | Low enough to eat | Only if you'll shoot at 45° |
| Sauce | Warm and generous | Thicker, added last |
| Direction | Protein facing the diner | Main line rising to the right |
| Gloss | Natural | A light brush of oil |
| Rim | Wiped once | Wiped twice |
| Timing | Serve now | Shoot in the first minute or two |
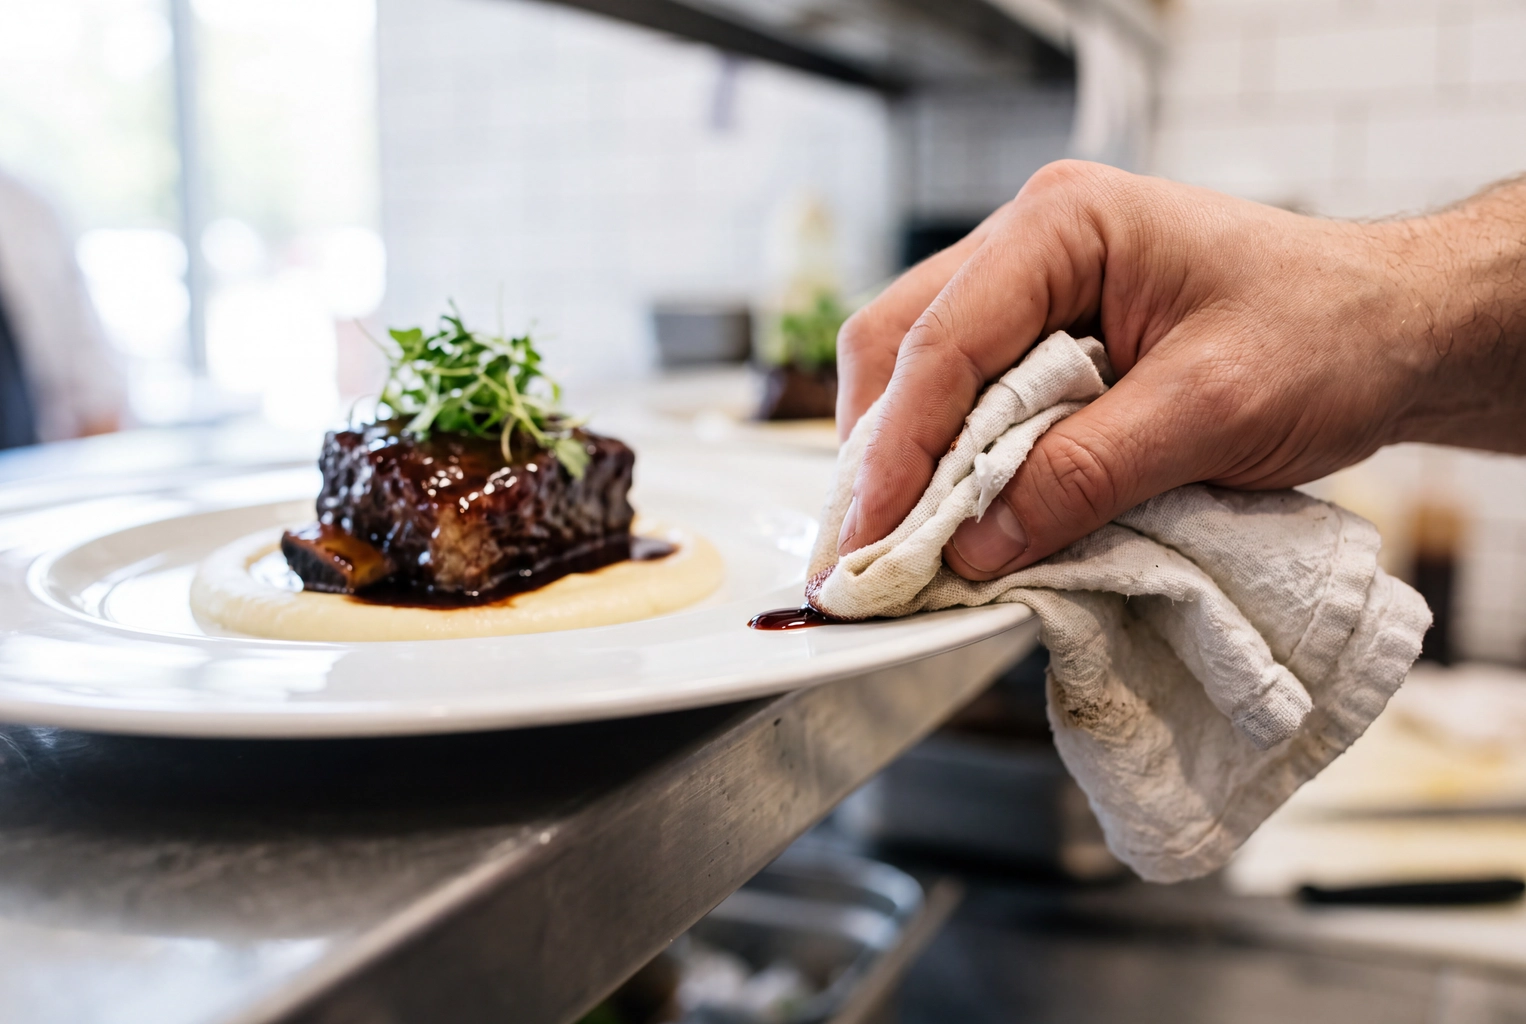 Cook wiping a drip of red wine jus off a plate rim with a folded cloth before photographing braised short rib
If the photo is headed for a delivery app, check the Uber Eats photo requirements first. Uber Eats' own merchant photo guidelines say top-down angles suit plates and bowls, while 45 degrees suits burgers, sandwiches and taller items.
Once the food is plated, the photo is the last step, and that's where FoodShot fits. FoodShot turns a phone photo of your finished dish into a studio-style shot in about a minute, and prompt edits can swap the plate or the background without re-plating. Your plating stays the subject. Browse the food photo styles first; plans start at 25 photos for $15 a month, each with a commercial license. Comparing tools? Our roundup of food photography apps covers the field, and the food styling guide covers what goes around the food.
Frequently Asked Questions
What are the basic plating techniques?
There's no official list of basic plating techniques, but the five most taught are clock-face placement, height stacking, the swoosh, dots and negative space. Odd numbers and color contrast sit on top as composition rules, and plating styles such as classic, free-form and landscape come from combining them. Learn the clock method first, because it teaches portion, balance and consistency at once.
Which plating techniques work for delivery?
The plating techniques built on placement rather than sauce: clock-face compartments, odd numbers, color contrast with sturdy garnish and tight fanning. Swooshes, dots, towers and quenelles don't survive a delivery bag. Pack sauce, crumbs and herbs separately, and see our delivery app photography guide for shooting the box version.
What tools do you need to start plating?
Start with five: squeeze bottles, an offset spatula, plating tweezers, a 3-inch ring mold and a large spoon such as a Kunz spoon. Add an 11-inch white plate and a damp cloth, and you can practice all 12 techniques. The first attempts won't be perfect, so plate one dish five times and compare the photos, or post one to r/CulinaryPlating for critique.
Should you plate on white or black plates?
White is the safer default. In the 2012 plate-color study, the same mousse tasted sweeter and was liked more on white than on black. Dark stoneware can make pale dishes such as white fish, rice or panna cotta stand out on camera, so use it on purpose. More ideas for plates and props are in our food photography props guide.